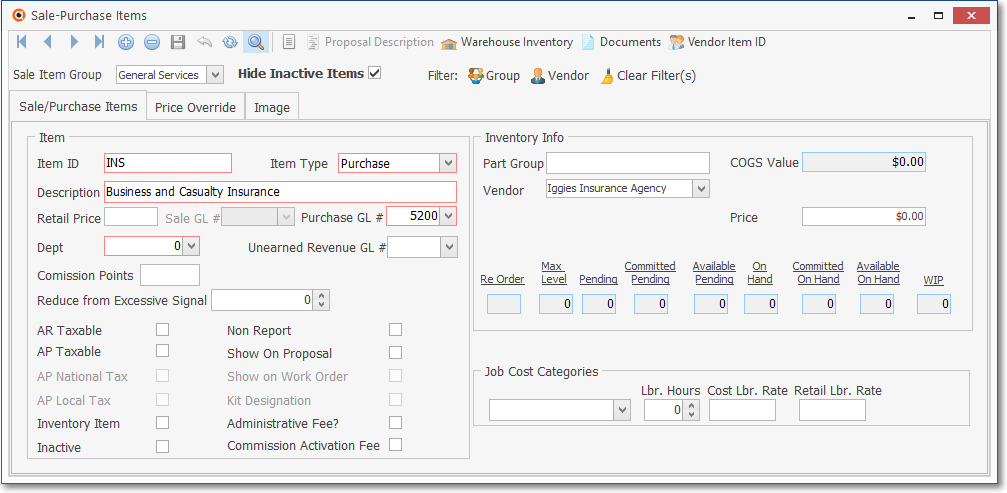
❑Before you can use the Accounts Payable System, you must define the Types of Purchases your Company will be making.
•Purchase Categories are the codes and descriptions (and usually prices) for purchases such as Parts, Recurring Purchases, General Expenses, Shipping Charges, Finance Charges, etc., that must be categorized, bought, and later included in expense related reports.
•Whether you are creating a Purchase Order, or recording a Bill from a Vendor, each of these transactions (specifically, the Line Item Detail of each) are assigned a Sale-Purchase Item codes (which we will refer to as Purchase Categories from now on).
•These Purchase Categories (Sale-Purchase Item codes) may be assigned automatically while creating Bills for your Company's Recurring Purchases), or selected manually by a person as a (Purchase) Bill is recorded.
•You may also print a list of these Purchase Categories.
❖See the Sale-Purchase Items, the Defining Inventory & Job Costing Items , and the Defining Special Bank Transaction Register Codes chapters for more information about identifying Codes for Sales, Purchases, and Inventory Items)
❑Your Company must have accurate reports of the Company's Purchases, and other Expenses to know where the Company's hard earned Revenue is being spent.
•Proper reporting requires proper filing (categorization) of these Purchase, and other Expense transactions.
✓Your Purchase Categories may be as broad as O/S (for Office Supplies) or D&S (for Dues and Subscriptions).
✓They may also be as specific as an exact Part Number from a parts Vendor.
•You do not have to enter every part and item you purchase at this time - you can always add more as needed.
✓However, you should enter the more general Purchase Categories that your Company is currently using (keeping in mind that NOW is the best time to Refine them).
❑Within the Accounts Payable System, there are three general types of Purchase Categories that will need to be defined so your Company's Expense Transactions can be properly recorded and categorized.
1.Recurring Purchases - similar in concept to billing Recurring Revenue to Subscribers, except that it represents the fixed fee Bills your Company gets regularly (e.g., Rent, Mortgage, Truck and other fixed rate Installment Payments).
2.Inventory items (usually Parts - and so these are often used as both Sale and Purchase categories).
3.General Expenses such as Bank Fees, Office Supplies, Phone Bills, Gasoline, Repairs and Maintenance, Sales Tax Remittance, etc.
❑General Ledger module Users:
➢Note: If you are not currently using the General Ledger module and do not plan on doing so in the near future, you may skip the discussion of GL # fields.
1.When the Sale-Purchase Item is assigned an Item Type of Purchase, use the Drop-Down Selection List provided to Choose the appropriate Purchase GL # which:
a.Must be an Active GL Account.
b.Cannot be any of the following (see the Use of, and Purpose for Mandatory Accounts chapter for a discussion of these General Ledger Accounts):
i.Current Earnings
ii.Retained Earnings
iii.Earnings Posting Account
iv.Accounts Receivable
v.Accounts Payable
vi.Undeposited Funds
vii.Inventory
viii.Inventory Adjustment
ix.WIP Inventory
x.Inventory Purchases
xi.Deposit Liability
2.If the Sale-Purchase Item is assigned the Item Type of Both (because it is used as a Sale and a Purchase item), the Sale GL # and the Purchase GL # must be chosen - as noted in 1. above) using the Drop-Down Selection List provided.
•When you do start the General Ledger, return here to complete this information after creating your Company's General Ledger Accounts.
✓If Sale-Purchase Item is assigned an Item Type of Sale, assign only a Sale GL # using the Drop-Down Selection List provided.
✓If Sale-Purchase Item is assigned an Item Type of Purchase, assign only a Purchase GL # using the Drop-Down Selection List provided.
✓If Sale-Purchase Item is assigned an Item Type of Both (because it is used as a Sale and a Purchase item), the Sale GL # and the Purchase GL # must be entered using the Drop-Down Selection List provided.
❑Entering your Company's usual Purchase Categories (in the Sale-Purchase Items Form) - These may include Codes (and Descriptions, Prices, and other special fields) for purchase types such as the following: Installations, Late Fees, Shipping Charges, and Services, Labor, Inventory items, Expenses, etc.
•To open the Sale-Purchase Item Form:
a)From the Backstage Menu System Select Maintenance and Choose Sales-Purchase Items, or
b)From the Quick Access Menu, Select Maintenance and Choose Sales-Purchase Items.
•As with all Data Entry Forms within MKMS, a field boxed in Red indicates that it is a mandatory field which must be completed before the record can be saved.
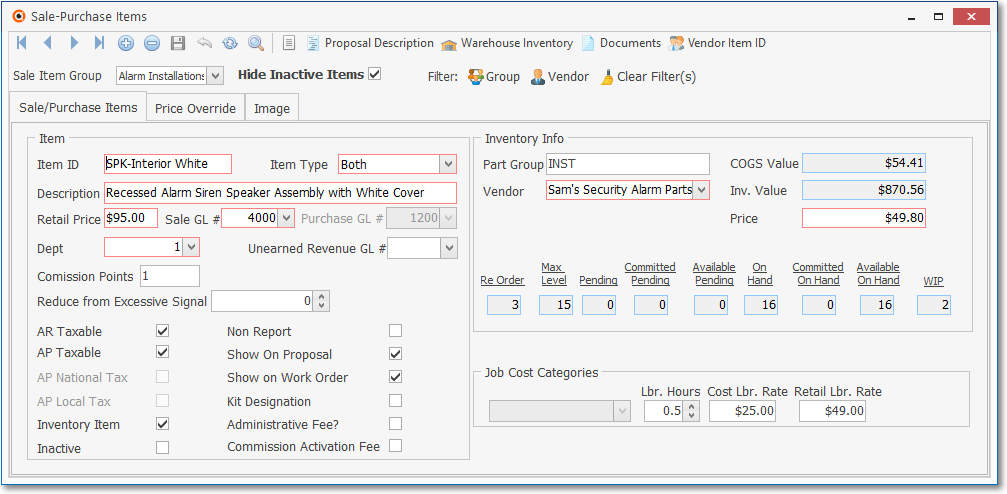
Sale/Purchase Item Form - Note that the Average Inventory Cost is the Inventory Valuation Method in effect
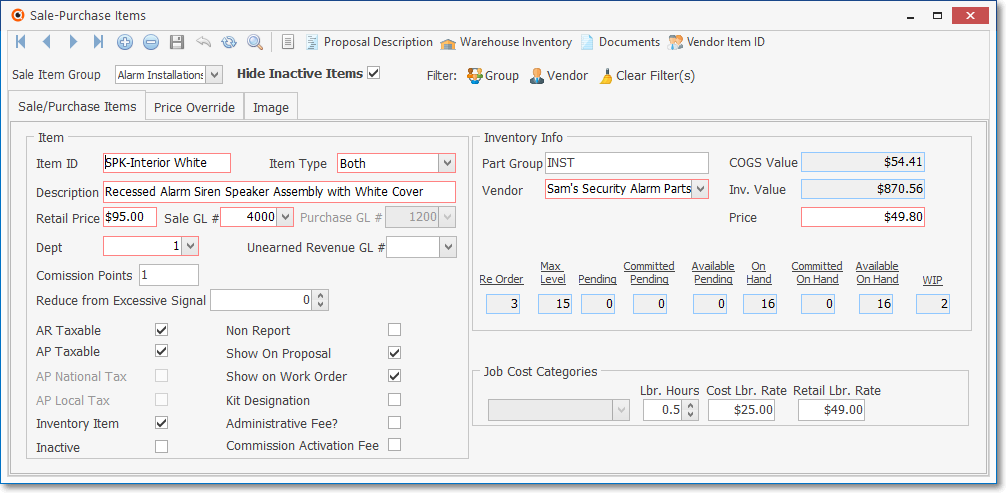
Sale/Purchase Item Form - Note that the LIFO Inventory Valuation Method is in effect
❑You have probably entered many Sale-Purchase Items while preparing to use the Accounts Receivable and/or Service Tracking modules and so have learned much about the Sale-Purchase Items Form shown below.
Sale-Purchase Items Form with a (non Inventory) Purchase Item example
✓This Sale-Purchase Items Form may be Re-sized by Dragging the Top and/or Bottom up or down, and/or the Right side in or out.
❑Ribbon Menu - These Icons are located at the top of the Sale-Purchase Items Form.

Sale-Purchase Items Form - Ribbon Menu
•The Navigation section on the Ribbon Menu provides the normal "Navigation" Icons (i.e., Insert, Delete, Save, Cancel, Refresh, Search)
![]()
![]() Click the Insert Icon to clear the fields in the Record Editing section in preparation for adding information to a new record.
Click the Insert Icon to clear the fields in the Record Editing section in preparation for adding information to a new record.
![]() Click the Delete Icon to remove the current Sale-Purchase Item record (or identify it as a Deleted record if it has already been used in the system)
Click the Delete Icon to remove the current Sale-Purchase Item record (or identify it as a Deleted record if it has already been used in the system)
![]() Click the Save Icon to record any new or modified Sale-Purchase Item currently displayed in the Record Editing View.
Click the Save Icon to record any new or modified Sale-Purchase Item currently displayed in the Record Editing View.
![]() Click the Cancel Icon to abandon (cancel) any new or modified Sale-Purchase Item that is displayed in the Record Editing section but has not yet been saved.
Click the Cancel Icon to abandon (cancel) any new or modified Sale-Purchase Item that is displayed in the Record Editing section but has not yet been saved.
![]() Click the Refresh Icon to "reload" the information displayed for the current Sale-Purchase Item record to ensure the latest "version" is on screen.
Click the Refresh Icon to "reload" the information displayed for the current Sale-Purchase Item record to ensure the latest "version" is on screen.
![]() Search - Click the Search Icon to open the Search dialog to Locate and Select a previously defined Sale-Purchase Items.
Search - Click the Search Icon to open the Search dialog to Locate and Select a previously defined Sale-Purchase Items.
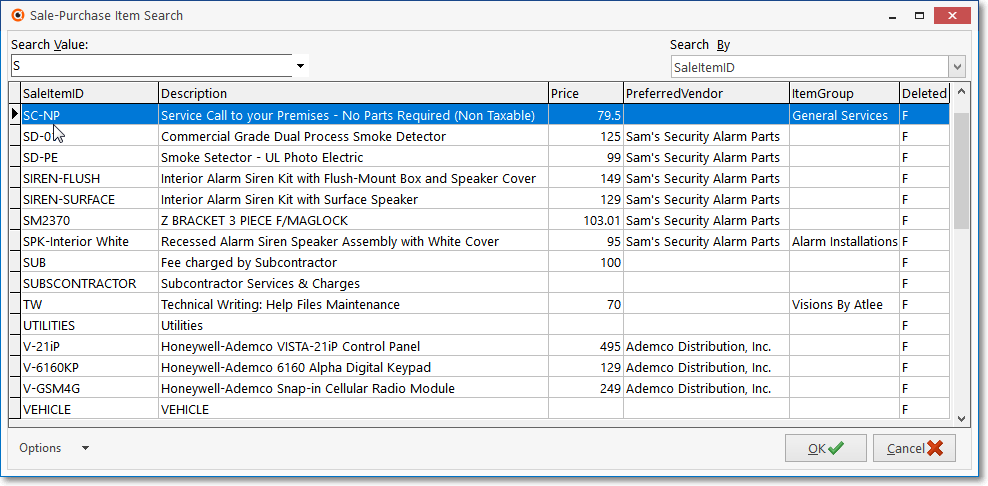
Sale-Purchase Item Search dialog
✓See the Locating a Sale-Purchase Item chapter for detailed information relating to this Sale-Purchase Item Search dialog.
❖See the "Using the Special Search dialog" section in the Advanced Search Dialog chapter for more information about Search dialogs.
❑Actions Icons on the Sale-Purchase Items Form - The Actions section on the Ribbon Menu provides Icons for accessing the List View; plus access to the Proposal Description, Warehouse Inventory, Documents, and when appropriate a Vendor Item ID functions.
![]()
•List - A tabular (spreadsheet style) view of the currently defined Purchase Categories is easily accessible.
![]()
Ribbon Menu
Actions - List Icon
✓Click the List Icon to display the associated Grid Data.
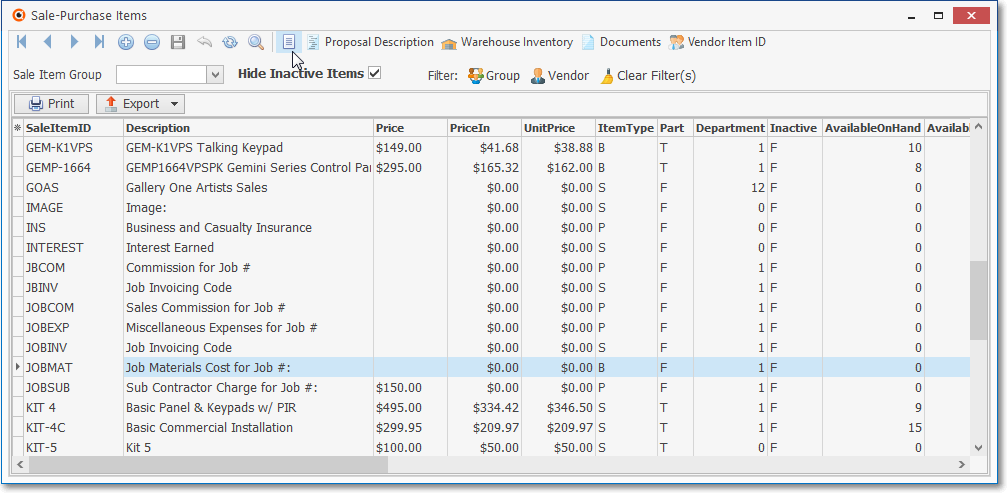
Sale-Purchase Items Form - List View
* The list of available columns that may be displayed can be Chosen (checked) by Clicking the Asterisk on the left of the Header.
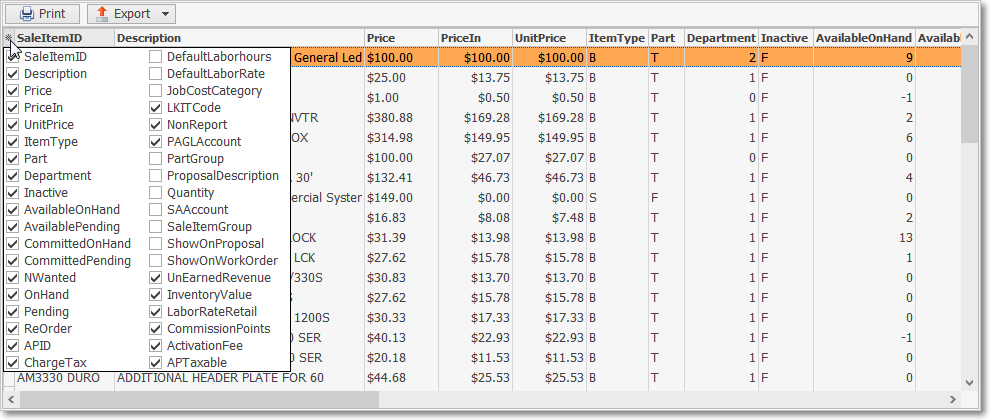
✓Print - Opens the Print Preview dialog - the data included is determined by the arrangement and (if applied) filter currently in effect in the List View.
✓Export - The data in the List Grid may be exported into different File Types:
▪Use the Drop-Down Selection List to Choose the type of File Format that should be used for this Data Export
▪Use the Windows® Save As dialog that will be presented to define the File Name and Folder location for this Data Export
✓Use the Slide Bar at the bottom of the Sale-Purchase Items list to see the data listed in all of the columns.
![]()
✓Click the List Icon again to Close the List View and return to the Record Editing View.
❖See the Grids - Print Preview - Export Data chapter for complete information on using the List View, including its Export & Print options.
❖Also see the Sales Categories List chapter for related information.
•Proposal Description - Click the Proposal Description Icon on the Actions Menu to open the Proposal Description editor to create a longer and more detailed description of this Sale-Purchase Item.

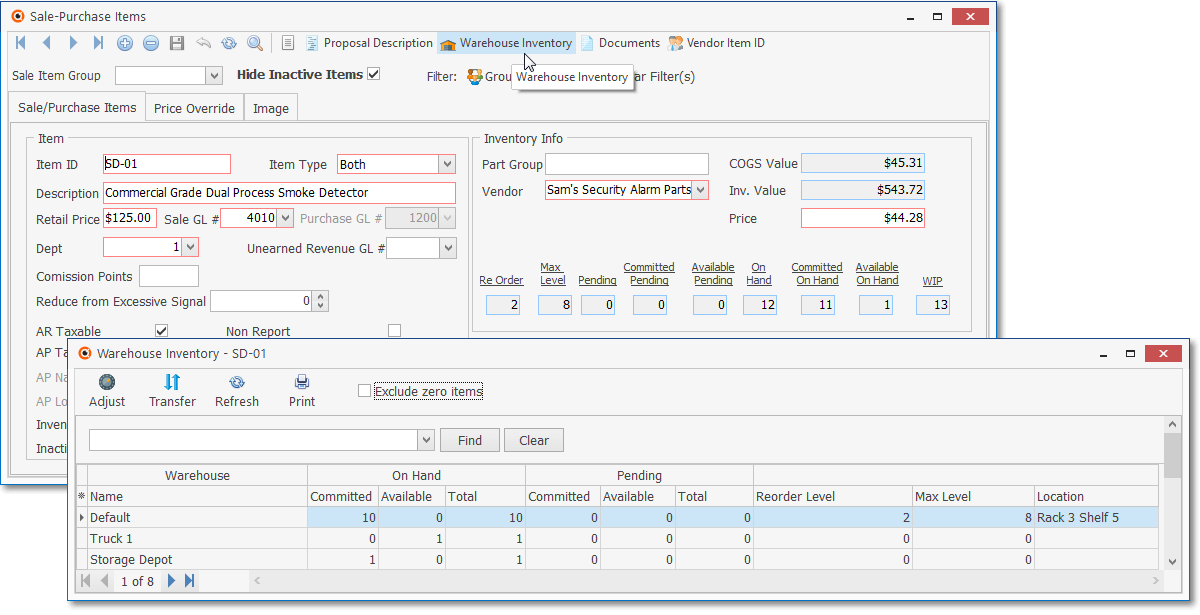
•Warehouse Inventory - Click the Warehouse Inventory Icon to open the Warehouse Inventory Form (also see the "Warehousing your Inventory" section in the Defining Inventory Items chapter for more information).
Sale-Purchase Item Form - Warehouse Icon - Warehouse Inventory Form
•Documents - Click the Documents Icon to open the Documents for dialog from where files (and file links) related to this Sale-Purchase Item may be identified.
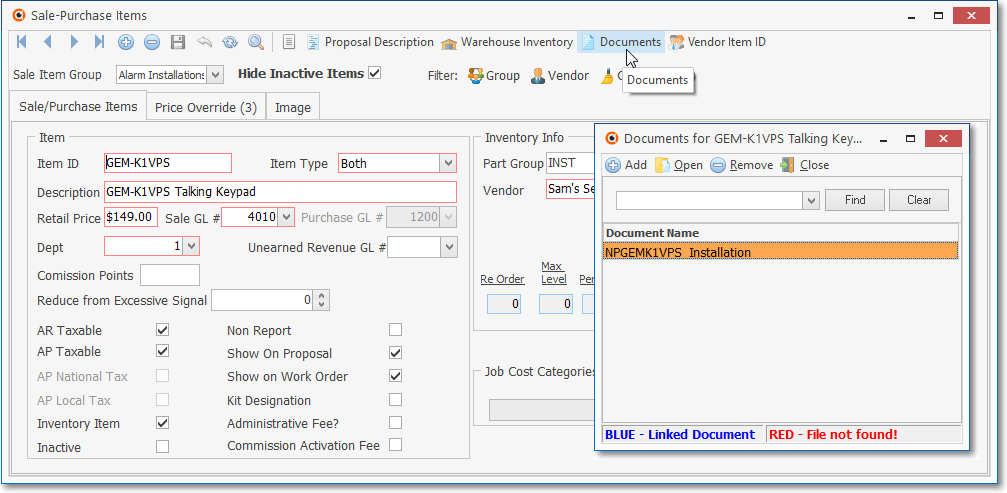
Sale-Purchase Item Form - Documents Icon - Documents for... dialog
✓See the Documents chapter within the Accounts Receivable module for a detailed explanation of this powerful feature.
•Vendor Item ID - Click the Vendor Item ID Icon to open the Vendor ID Form in which the specific Part Numbers used by various Vendors may be defined.
➢Note - See Understanding the Restrict Vendor PO setting discussion below for important information about the Vendor field and this Vendor Item ID Grid

✓If Purchase or Both is the Item Type, and you are using the Accounts Payable System,
▪Click the Vendor Item ID Icon on the Navigation Menu.
▪Add the actual Part Number (Vendor ID) used by each of the Vendors from whom you make this purchase.
✓This Vendor Item ID option will not appear if Sale was assigned as the Item Type.
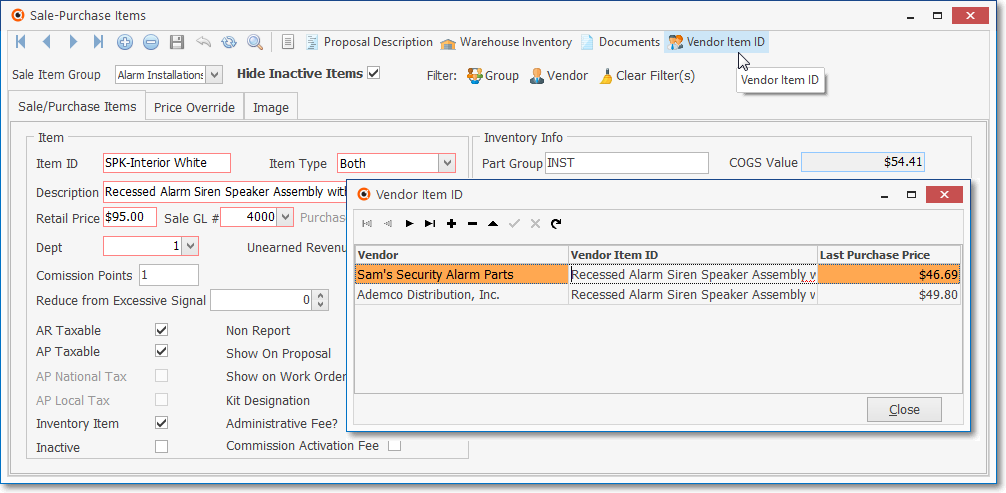
Sale-Purchase Item Form - Vendor Item ID Icon - Vendor Items ID entries
❑Record Editing View - The details of the currently selected record are displayed within the Sale/Purchase Items tab below the Navigation Menu at the center (Main Body) of the Sale-Purchase Items Form.
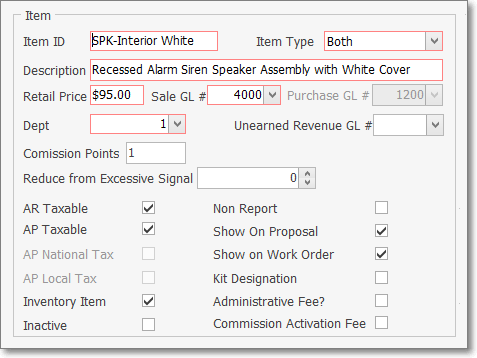
Sale-Purchase Items Form - Record Editing View
•To define a Purchase Category, Click the ![]() Icon on the Navigation Menu.
Icon on the Navigation Menu.
✓Sale Item Group - Optionally, a Sale Item Group may be assigned using the Drop-Down Selection List provided (located just above the Sale/Purchase Items tab).
![]()
▪If you have a large quantity of Sale-Purchase Items, this Sale Item Grouping feature allows you to Select the desired Sale-Purchase Item from a filtered list (based on the Sale Item Group assigned to it).
▪The Advanced Sale Item Look-up function (accessed with Alt+F2 from within the Sale-Purchase Item Drop-Down Selection List on Sales, Proposal, Purchase Order and Purchases forms) lets you Select from a list of items limited to a specific group - thereby presenting a much shorter list from which to choose.
✓Item ID - Enter a unique code of up to 40 alpha-numeric characters with most punctuation marks permitted.
▪The letters may be entered as Upper or lower case, as appropriate.
✓Item Type - This Purchase Category item may be either a Purchase or Both which indicates this item (Part or Service) could be bought and sold and so would be used for Both cases.
✓Description - Enter a clear, concise description of this Sale-Purchase Item.
▪You may enter up to 70 alpha-numeric characters, upper and lower case letters are allowed, most punctuation marks, with spaces permitted, also.
▪For Sale-Purchase Items defined with an Item Type of Both, you may enter a more detailed Description using the Proposal Description Icon at the top of the Form (also see Proposal Description above).
✓Retail Price - Enter the usual Retail Price for this item (suggested, but not mandatory unless this is an item that will be an Inventory Item and you're using the Inventory Tracking & Job Costing System, in which case the Retail Price is mandatory.
❖If you are using the General Ledger System, these fields will be boxed in Red indicating a mandatory entry.
oSale GL # - Using the Drop-Down Selection List provided, Choose the General Ledger Account Number for this type of Sale.
oPurchase GL # - If this Sale-Purchase Item is assigned an Item Type of Purchase, or represents Both a Sale and a Purchase item, both the Sale GL # and the Purchase GL # must be entered using the Drop-Down Selection List provided.
oDept - If using the multiple Departments feature,use the Drop-Down Selection List provided to Choose the appropriate Department.
❖If you have implemented multi-departmental accounting, this field becomes Mandatory.
oUnearned Revenue GL# - for Recurring Revenue definitions only, not used in Accounts Payable.
✓Commission Points - not used in Accounts Payable.
✓Reduce from Excessive Signal - for certain special Recurring Revenue definitions only, not used in Accounts Payable.
•Check boxes - There are several Check Boxes that may, or may not be needed based on the specific Purpose of this Sale-Purchase Item:
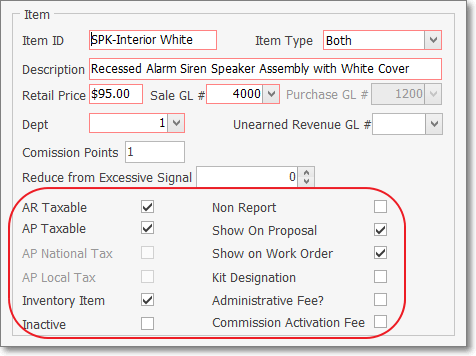
✓AR Taxable? - Check this box if this Sale-Purchase Item is normally Taxable when making a Sale.

AR Taxable field
▪When entering a Sales Invoice:
oIf Taxable? is Checked, whenever this Sale-Purchase Item is entered on a Sales Invoice, the appropriate Tax Code & Tax Percentage Rate will be inserted automatically, based on the Sales Tax information entered in the Receivables section within the Edit View for that Subscriber.
oIf Not Checked, whenever this Sale-Purchase Item is entered on a Sales Invoice, the Tax Code will be entered as N (Non) and the Tax Percentage Rate set at 0%, regardless of the Sales Tax information entered in the Receivables section within the Edit View for that Subscriber.
✓AP Taxable - Check this box if your Company is normally charged Sales Tax when purchasing this Sale-Purchase Item.

▪When entering a Bill (Vendor's Invoice):
a)If AP Taxable is Checked, whenever this Sale-Purchase Item is entered on a Bill (Vendor's Invoice), the appropriate Tax Code & Tax Percentage Rate will be inserted automatically, based on the Sales Tax information entered in the Tax Information section within the Edit View for that Vendor.
b)If Not Checked, whenever this Sale-Purchase Item is entered on a on a Bill, the Tax Code will be entered as N (Non) and the Tax Percentage Rate set at 0%, regardless of the Sales Tax information entered in the Tax Information section within the Edit View for that Vendor.
➢Important Note: See the "Canada Sales Tax information" discussion below and the Sale-Purchase Item - Sales Tax Fields chapter for more details about Sales Tax Charging Options.
✓Inventory Item - Check the Inventory Item box if this Sale-Purchase Item represents an item that is purchased and/or sold as an Inventory Item.
❖See the Defining Inventory & Job Costing Items chapter for a better understanding of Inventory related issues.
✓Inactive - Located within the Inventory section of the Sale-Purchase Item Form, this Check box identifies an item as Inactive and therefore no longer in use.
▪The Inactive Check box is provided because, once entered and used, a Sale-Purchase Item cannot be deleted because it has become part of the Transaction "History" of the system.
▪Checking this box will remove this item from all Drop-Down Selection Lists normally used to Choose a specific Sale-Purchase Item for a Sale or Purchase.
▪If an attempt to make an Inventory Item inactive when that Inventory Item has been used on a Proposal which is still active and has not yet been converted, a Conformation message will be displayed:

oAnswer Yes to accept this condition, or No to cancel the deactivation process.
✓Non Report - Check Non Report if this item should not be included in certain Sales Analysis Reports.
✓Show on Proposal - Check the Show on Proposal box if this could be a Sale item also which may be used on a Proposal.
✓Show on Work Order - Check the Show on Work Order box if this Sale-Purchase Item has been assigned an Item Type of Sale or Both and might be needed when recording the use of Inventory and/or Materials on a Service Request.
▪The Drop-Down Selection List used to Choose the appropriate Inventory Item used on a Work Order, accessed within the Web Tech Service, will list only those Sale-Purchase Items which have a Check in the Show on Work Order box.
▪The Drop-Down Selection List used to Choose the appropriate Inventory and/or Materials usage in the Inventory/Materials tab of the Service Request Form will list only those Sale-Purchase Items which have a Check in the Show on Work Order box.
▪By Not Checking this box, this Sale-Purchase Item will not be included in the Drop-Down Selection Lists that are provided to a Technician working in the field using the Web Tech Service and/or to any User recording information within the Inventory and/or Materials tab on a Service Request Form.
▪Therefore any Sale-Purchase Items that are defined to identify Purchases or Sales which are unrelated to providing Service to Subscribers will be eliminated from the list - making that Selection process easier and faster, thus reducing the length of the Drop-Down Selection List to a manageable size, and more importantly, with a definable content.
✓Kit Designation - If this Sale-Purchase Item represents a Kit, Check the Kit Designation box to indicate that this is the Master Record for a User Defined Kit.
▪The Kit Components tab will then become available
▪This Kit Components tab is used to identify the Inventory Items and the Quantities required for each component of this Kit.
❖See the Designing Your Own Parts Packages chapter for more information about User Defined Kits.
✓Administrative Fee? - not used in Accounts Payable.
✓Commission Activation Fee - not used in Accounts Payable.
•Canada Sales Tax information (see the Canada Sales Tax chapter for complete information):
✓Canadian Taxation - Special Check box rules for those Companies who must charge Canada Sales Tax on Bills:
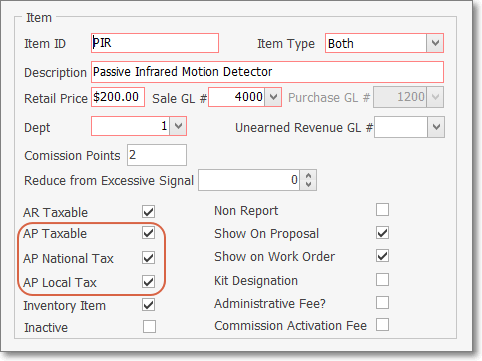
Sale-Purchase Item Form - Canada Sales Tax - Check boxes
a)AP Taxable, - If this item is ever Taxable when Purchased, Check this box.
b)AP National Tax - Regardless of whether it is a GST or an HST Tax that will be charged on this Purchase, Check this box.
c)AP Local Tax - Only Check this box when the National Tax is GST and the Province also assesses a PST Sales Tax (not required if your Company's Purchases are only assessed an HST).
❑Inventory Info section:
•This section is to be completed as shown below only when this is an Inventory Item and/or the Kit Designation box has been Checked, and the Average Inventory Cost method is not implemented:
✓Part Group - Enter a Part Group Code.
▪This Part Group Code may be up to four (4) characters in length (i.e., numbers, letters, punctuation, spaces) - if letters are entered, they will be capitalized automatically.
▪This is a user definable code that has no predefined data set (e.g., no Maintenance Form).
▪It may be used as a selectable filter on the Kit List with Components Report and may be used in a filter expression in the Report Builder module.
✓Vendor - Enter the (preferred) Vendor from whom this Inventory Item is generally Purchased using the Drop-Down Selection List provided.
➢Note - See Understanding the Restrict Vendor PO setting discussion below for important information about this Vendor field and the Vendor Item ID Grid
•Based on the selected Inventory Valuation Method, the following fields will be presented as described below:
✓Original Price (Cost) - If the Original Price Inventory Valuation Method is in effect, the Price field will be displayed as a normal mandatory field on the Sale-Purchase Item Form if this is an Inventory Item.
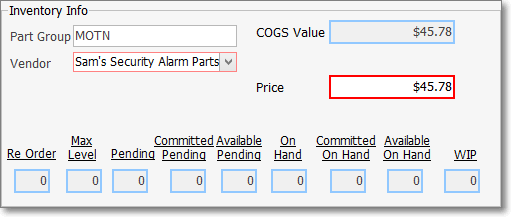
Inventory Info box - Original Price Inventory Valuation Method selected
▪COGS Value - This field is filled in by the system once the Price is entered (see illustration above).
oWhen the Original Price Inventory Valuation Method is in effect, the contents of the Price and COGS Value fields will remain unchanged.
▪Price - Enter the Price that should be used for calculating the Cost of Goods Sold Value of this Inventory Item.
▪Vendor - Enter the (preferred) Vendor from whom this Inventory Item is generally Purchased using the Drop-Down Selection List provided.
✓LIFO - If the LIFO Inventory Valuation Method is in effect, the contents of this COGS Value field will be updated each time another Inventory Item of this type is Purchased with the Cost re-set to the most current Price that charged on a Bill.
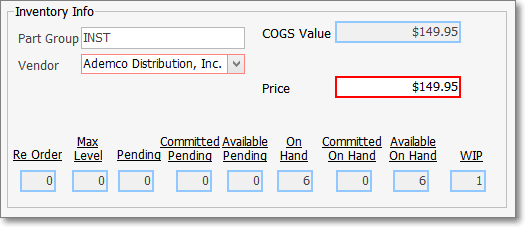
Inventory Info box - LIFO Inventory Valuation Method selected
▪COGS Value - This field is filled in by the system once the Price is entered (see illustration above).
oWhen the LIFO Inventory Valuation Method is in effect, the contents of the COGS Value field will change to the current Price Paid each time there is an additional Purchase of this Inventory Item.
▪Price - Enter the Price that should be used initially for calculating the Cost of Goods Sold Value of this Inventory Item.
▪Vendor - Enter the (preferred) Vendor from whom this Inventory Item is generally Purchased using the Drop-Down Selection List provided.
✓Average Inventory Cost - If the Average Inventory Cost Inventory Valuation Method is in effect, the contents of the COGS Value and Inv. Value fields will be updated each time another Inventory Item of this type is Purchased
❖For those Companies using (or intend to use) the STARK 35 version of the General Ledger System, the required Inventory Valuation method is Average Cost of Inventory.
a)the Value of the COGS Value field is re-set to the Average Inventory Cost based on what is charged on the current Bill averaged with what was previously charged for these Inventory Items currently 'in-stock' (i.e. Quantity On Hand plus WIP - Work In Progress - Quantity).; and
b)the Value of the Inv. Value field is recalculated based on the COGS Value multiplied by the Quantity of the Inventory Items that are currently still 'in-stock' (i.e. the sum of the Quantity On Hand plus WIP - Work In Progress - Quantity multiplied by the current COGS Value).
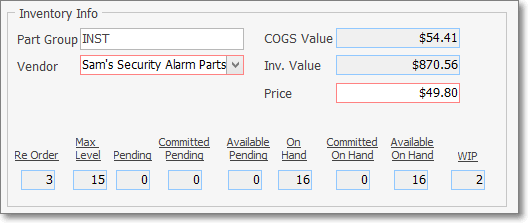
Inventory Info box - Average Inventory Cost Inventory Valuation Method is selected
▪COGS Value - This system maintained field is updated based on what is charged on the most current Bill, averaged with what was previously charged (including Sales Tax) for these Inventory Items currently still 'in-stock'. (see illustration above).
▪Inv. Value (total value of what is actually 'in-stock' (i.e. Quantity On Hand plus WIP - Work In Progress - Quantity) for this Inventory Item) - This will be a system maintained field which is also updated, as needed, using the Calculate Average Inventory process.
▪Price - The Price that was entered initially for calculating the Cost of Goods Sold Value of this Inventory Item.
▪Vendor - Enter the (preferred) Vendor from whom this Inventory Item is generally Purchased using the Drop-Down Selection List provided.
➢Note - See Understanding the Restrict Vendor PO setting discussion below for important information about this Vendor field and the Vendor Item ID Grid
❖See the Defining Inventory & Job Costing Items and related Inventory Valuation Methods and the Average Inventory Costing chapters for more detailed inventory and job costing related information.
•The Inventory Quantities and Status information at the bottom of the Inventory Info section cannot be changed here.
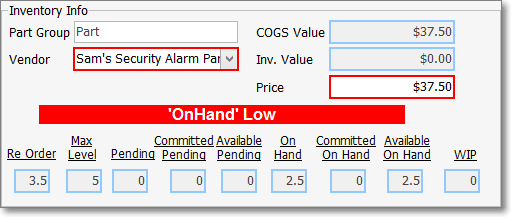
Sale-Purchase Item Form - Inventory Info section - Quantities fields
✓If the actual On Hand level is less than the established Re-Order level for this Inventory Item, an 'On Hand' Low message will be flashed.
✓Note: See the "Understanding how the Inventory Quantities and Status information is calculated" discussion in the Defining Inventory Items chapter.
•Job Cost Categories section: The Job Cost Category Drop-Down Selection List is unavailable (it's Gray) because this is an Inventory Item Expense.
➢Note: If using the Commission Tracking System and charging an Activation Fee (defined as part of a Proposal Package), the individual Inventory Items - which will be included in a Proposal Package - should have Commission Points assigned but should not have Labor related information defined (because Labor is included in the Activation Fee).

Job Cost Categories section for Inventory Items
✓Labor Hours - ("Lbr. Hours") - Define the number of Hours this Inventory (Sale-Purchase) Item takes to install.
✓Cost Labor Rate - ("Cost Lbr. Rate") - Define the internal Cost for each hour this Inventory (Sale-Purchase) Item takes to install.
✓Retail Labor Rate - ("Retail Lbr. Rate") - Define the average Retail Charge for each Labor Hour required.
✓If this Inventory (Sale-Purchase) Item is included in a Proposal and subsequently converted to a Job, the Retail Labor Rate information is included in the Job Estimate tab.
❖See the Defining Inventory & Job Costing Items chapter for more detailed Inventory Tracking and Job Costing related information.
• Click the ![]() Icon to record this Purchase Category record.
Icon to record this Purchase Category record.
✓Repeat as needed.
➢Important Note: Also see the following chapters which explain the purpose and entry of these special use Sale-Purchase Items.
✓Defining Inventory & Job Costing Sale-Purchase Items
✓Assigning & Using Job Cost Categories for Sale-Purchase Items
❑Job Costing module users see the Inventory Items chapter and also see Inventory Tracking information in the Job Costing chapter.
•Job Cost Categories: For Purchase Items that are not Inventory Items, but would still be used for Job Costing Expenses, complete this information.

Sale-Purchase Item Form - Job Cost Categories section
✓Expense Category - Use the Drop-Down Selection List to Choose the appropriate Job Cost Category.

✓Labor Hours - ("Lbr. Hours") allows you to define - when this is an Inventory Item - the number of hours this Part takes to be installed.
✓Cost Labor Rate - ("Cost Lbr. Rate") allows you to define - when this is an Inventory Item - the cost for each hour this Part takes to be installed.
✓Retail Labor Rate - ("Retail Lbr. Rate") allows you to define - when this is an Inventory Item - the retail price for each hour this Part takes to be installed.
❑Inventory Tracking module users see the Inventory Items chapter.
•Inventory - Complete the Inventory related fields.
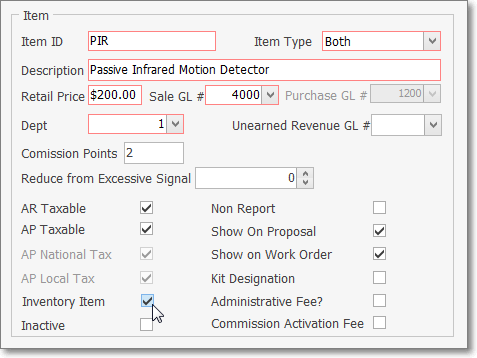
Sale-Purchase Item Form - Inventory section
❑Sale-Purchase Items Form tabs:
•There are three (or four) tabs on the Sale-Purchase Items Form (determined by the type of the selected Sale-Purchase Item that has been defined):
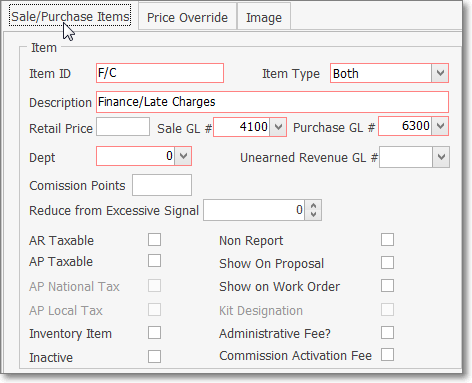
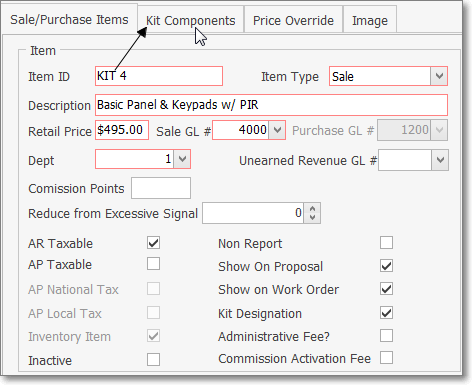
Sale Purchase Items Forms Tabs - No Kit / With Kit designation
1.Sale/Purchase Items - As shown in the illustration below, the Sale/Purchase Items tab is used for the actual data entry of the Purchase Categories.

Sale Purchase Items Form with the Sale/Purchase Items data entry tab displayed
2.Kit Components - If this Sale-Purchase Item represents a Kit, the Kit Designation box will be Checked to indicate that this is the Master Record for a User Defined Kit.and the Kit Components tab will then become available
▪This Kit Components tab is used to identify the Inventory Items and the Quantities required for each component of this Kit.
❖See the Designing Your Own Parts Packages chapter for more information about User Defined Kits.
3.Price Override - As shown in the illustration below, the Price Override tab is used to enter a different set of Pricing Mark Up/Down Percentages for previously defined Pricing Mark Up Groups, as appropriate.
▪These Price Overrides are implemented on Proposals and Sales Invoices when the Prospect or Subscriber has a Pricing Mark Up Group assigned, and this specific Sale-Purchase Item is added to the Proposal or Sales Invoice.
▪The Price Overrides tab will display the number of entries within the tab.
▪Once these Price Overrides are defined, as a Sale-Purchase Item is added to a Proposal or Sales Invoice, if that Prospect or Subscriber has been assigned to a Pricing Mark Up Group, the User will be asked if they want to use the Price Override value.
oIf the User answers Yes, the Price Override value will be applied.
oIf the User answers No, the Pricing Mark Up Group will be applied.
▪To define a Price Override:

Sale Purchase Items Form with the Price Overrides tab displayed
a.Click the ![]() Icon
Icon
b.Group - Using the Drop-Down Selection List provided, Choose one of the previously defined Pricing Mark Up Groups.
c.Percentage - Enter the Override Mark Up/Down Percentage Rate - as a positive or negative value - indicating that the regular Retail Price entered for this Sale-Purchase Item should be increased or decreased respectively, as described in the Pricing Mark Up Groups chapter.
d.Save - Click the Save ![]() Icon to record this Price Override.
Icon to record this Price Override.
4.Image - As shown in the illustration below, the Image tab is used to enter a picture of the Sale-Purchase Item, when appropriate.
▪By using this Image tab to identify an Inventory Item or Kit, it provides the User access to an actual picture of that Part.
▪Images attached to a Sale-Purchase Item record my also be included on a printed Proposal based on the options selected when Printing a Proposal.
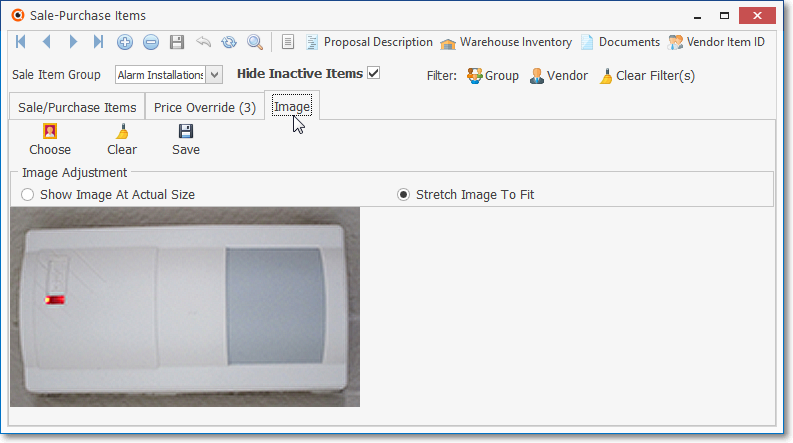
Sale Purchase Items Form - Image tab
▪To insert an Image:
a.Choose - Click the Choose button and, using the standard Windows® dialogue box provided, locate the desired file.
oThis should be a BMP or JPG file approximately 5 x 5 inches at 72 ppi.
b.Image Adjustment - Once the Sale-Purchase Item's BMP or JPG file is selected, Choose the Image Adjustment method that best displays your Sale Purchase Item in the display box by alternately Clicking Show Image At Actual Size and Stretch Image To Fit.
c.Save - Click the Save button once you are satisfied with the Image Adjustment setting.
oOnce an Image has been saved for a Sale-Purchase Item, the Image tab will have a Camera Icon next to it (see the mouse pointer in the illustration above).
d.If you want to re-do this process, Click the Clear button and repeat the steps above.
❑Filter options on the Sale-Purchase Items Form - There are two Filter buttons [and a Clear Filter(s) choice] on the Sale-Purchase Items Form.
•Sale Item Group - Optionally, a Sale Item Group may be entered using the Drop-Down Selection List provided (located just above the Sale/Purchase Items tab).
![]()
✓If you have a large quantity of Sale-Purchase Items, this Sale Item Grouping feature allows you to Select the desired Sale-Purchase Item from a filtered list (based on the Sale Item Group assigned to it).
✓The Advanced Sale Item Look-up function (accessed with Alt+F2 from within the Sale-Purchase Item Drop-Down Selection List on Sales, Proposal, Purchase Order and Purchases forms) lets you Select from a list of items limited to a specific group - thereby presenting a much shorter list from which to choose.
•Hide Inactive Items? - Check this box to exclude from the Form, those Sale-Purchase Items which have been Identified as Inactive.
•Filter: There are two Filter buttons on the Sale-Purchase Items Form.
✓These Filter buttons may be used individually, or together, to limit which Sale-Purchase Items are available for review.
![]()
Group and Vendor Filter buttons on the Sale Purchase Items Form
1.Group - Click the Group button to limit the Sale-Purchase Items listed on the Table View tab, and therefore available to be seen on the Edit View tab, to only those that are assigned to the selected Sale Item Group(s).
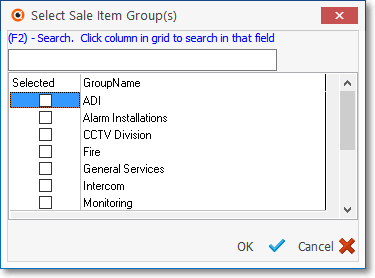
Select Sale Item Group(s) dialog
✓Using the Select Sale Item Group(s) dialog, Check one or more Group Names, that the Sale-Purchase items you want to view, are assigned.
✓Click the GroupName header bar to re-order the list, alphabetically (first Click displays last to first, second Click returns it to first to last - alphabetically).
✓(F2) - Search - If the complete list of names cannot be seen on this screen:
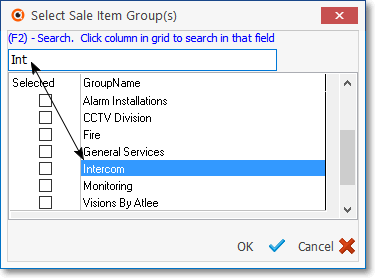
(F2) Search function on Select Sale Item Group(s) dialog
▪Click on any name within the GroupName list.
▪Press F2
▪Type the first few letters of that desired Group Name.
▪Based on your entry, the record will be highlighted so that you may easily Check it.
✓Advanced Search - You may also use the Advanced Search dialog to Select a specific Group Name.
✓Click the OK ü button to save your Group filter selection(s).
2.Vendor - Click the Vendor button to limit the Sale-Purchase Items that are available for viewing to those whose preferred Vendor matches (one of) the Selected Vendor(s).
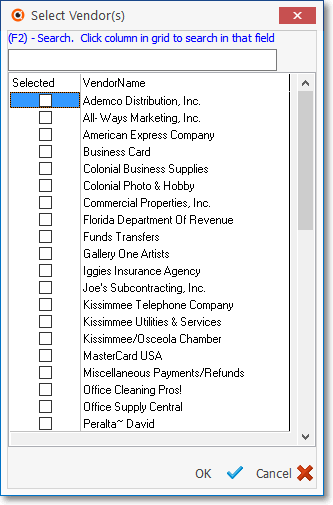
Select Vendor(s) dialog
✓Using the Select Vendor(s) dialog, Check one or more Vendor Names, that the Sale-Purchase items you want to view, are assigned as their preferred Vendor.
✓Click the VendorName header bar to re-order the list, alphabetically (first Click displays last to first, second Click returns it to first to last - alphabetically).
✓(F2) - Search - If the complete list of names cannot be seen on this screen:
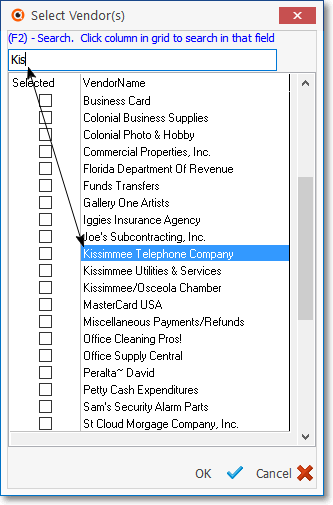
(F2) Search function on Select Vendor(s) dialog
▪Click on any name within the VendorName list.
▪Press F2
▪Type the first few letters of that desired Vendor.
▪Based on your entry, the record will be highlighted so that you may easily Check it.
✓Advanced Search - You may also use the Advanced Search dialog to Select a specific Vendor.
✓Click the OK ü button to save your Vendor filter selection(s).
•Clear Filter(s) - Once a filter has been set the Clear Filter(s) Icon is activated (see mouse pointer in illustration below).
![]()
Clear Filter(s) Icon on the Sale Purchase Items Form
✓Click the Clear Filter(s) Icon is turn off (cancel) any/all previously set Filters.
❑Understanding the Restrict Vendor PO setting and its association with the Vendor field and the Vendor Item ID Grid
The Restrict Vendor PO in the Company Settings Form A.By default, the RestrictVendorPO option is set to False ("F") in the Company Settings Form and the previous "normal" behavior will be in effect ▪A Sales-Purchase Item (e.g., Purchase Category) may be associated with (e.g., belong to) a Sales-Purchase Item when any of these actions occur: 1)A Vendor is selected in the Sales-Purchase Item Form's Vendor field a)When chosen for the Vendor field, it populates the internal APID field in the SaleItem table 2)A Vendor is added to the Sales-Purchase Item Form's Vendor Item ID Grid a)When inserted into the Vendor Item ID Grid, it also creates a record in table Vendor Codes.
B.If the RestrictVendorPO option is set to True ("T") the above actions are still in effect, plus: 1)When creating a Purchase Order for a Vendor, the User will only be able to pick from a list of the Sales-Purchase Items which have been associated with (e.g., belong to) that Vendor 2)From the Work Order Form, when creating a Purchase Order by Clicking the Order Icon,
Work Order Ribbon Menu Order Icon
a)The User is required to select a Vendor, then b)The Purchase Order Form will be limited to selecting Sales-Purchase Items that "belong" to that selected Vendor. 3)When the Order Inventory option is selected within the Part List tab on a Work Order Form, in the Order Inventory dialog, the User must Choose a Vendor and a Warehouse, after which the User will only be able to Order from a list of the Sales-Purchase Items which have been associated with (e.g., belong to) that Vendor 4)From the Item List sub-tab within the Inventory tab on the Job Costing Form, when the Order Inventory option is chosen an Order Inventory dialog is displayed in which the User must Choose a Vendor and a Warehouse, after which the User will only be able to Order from a list of the Sales-Purchase Items which have been associated with (e.g., belong to) that Vendor 5)From Work Order Invoicing/Review - When viewing the Parts List tab of a specific Work Order Form, if the Order Inventory option is selected within the Part List tab on that Work Order, in the Order Inventory dialog, the User must Choose a Vendor and a Warehouse, after which the User will only be able to Order from a list of the Sales-Purchase Items which have been associated with (e.g., belong to) that Vendor |
Restrict Vendor PO information
