❑Understanding the purpose and capabilities of the Work Order Invoicing/Review Form:
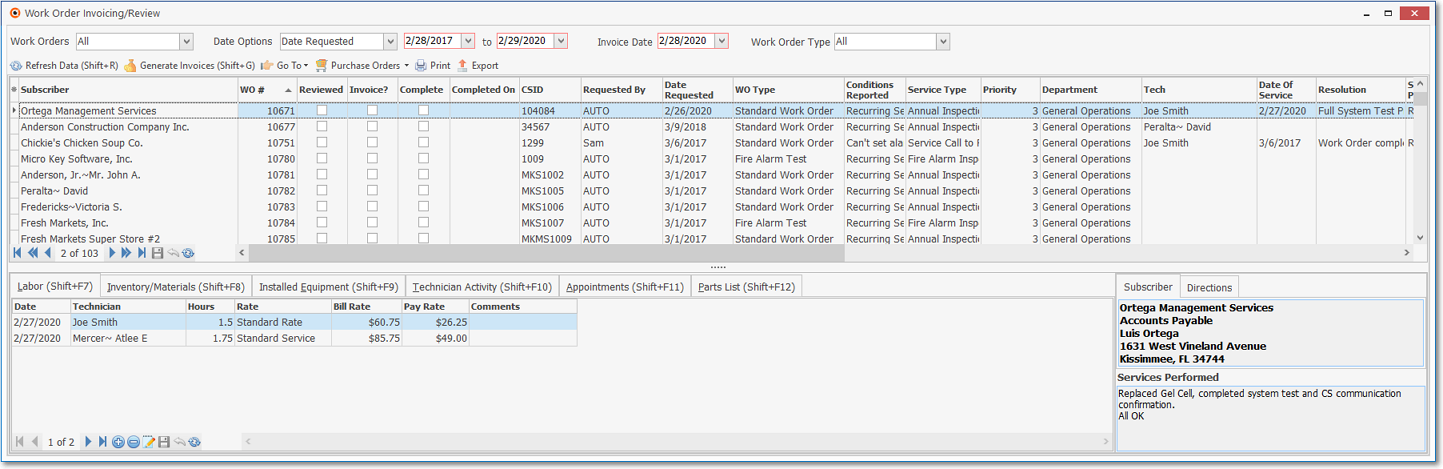
Work Order Invoicing/Review Form - shown with many Data Columns activated
•Initially, this Form will be displayed in its full width, with all available data columns included in its Grid, so the first step is to Choose which of those data columns you currently need (want) to view.
✓There are more than 3 dozen columns available to review, print, and/or export, and may be selected based on what you need at the time you are viewing this dialog.
✓The data columns generally required in this Grid, are those fields which will be updated when Reviewing and Completing a Work Order in preparation for Invoicing those Completed Work Orders.
✓To make your selections:
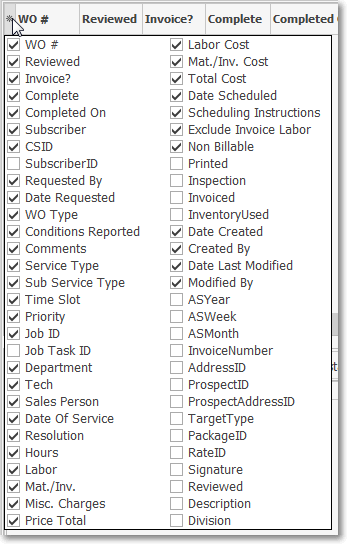
Work Order Invoicing/Review Form - Checked Data Columns
a)Click the Asterisk at the left of the Grid Header
b)Check each Header Name to be displayed (all are initially Checked),
c)Remove the Check from any that are not absolutely necessary for Reviewing and Completing.
d)Column Names (and therefore Header Names) way be relocated using either of these two methods:
Column Name relocation procedure
i.Click and Hold the mouse pointer on the Column Name to be relocated, then Drag and Drop that Column Name to the desired location (it will be relocated to where the Green Arrows are pointing).
ii.Click and Hold the mouse pointer over the Header Name to be relocated, then Drag and Drop that Header Name to the desired location.
•Later, as you actually Review a Work Order record for Completion and Invoicing: Click on the Work Order record you want to edit.
e)Enter data in the fields required to properly Complete this Work; then, accessing the Tabs on the bottom of the Work Order Invoicing/Review Form:
iii.On the Labor (Shift+F7) tab, identify the Technician(s), labor hours required, and their associated labor rates
iv.On the Inventory/Materials (Shift+F8) tab, enter the parts and materials that were used to complete this Work Order
v.On the Installed Equipment (Shift+F9) tab, identify what parts should be added to the Subscriber's Installed Equipment table
f)Alternately, or in addition, you may Select the Go To option at the top of the Work Order Invoicing/Review Form and Choose Work Order to access that specific Work Order Form
vi.Complete this Work Order record on that Work Order Form itself by filling in the Completion section on that Work Order Form as appropriate
vii.Save and Close that Work Order Form
viii.You will be returned automatically to the associated Work Order item in the Work Order Invoicing/Review Form
•Generally speaking, this multipurpose Work Order Invoicing/Review Form allows you to "finish-up" all the loose ends (i.e., enter the missing data) related to the Work Orders which were completed by the Technicians throughout the day (and week) within your Company's Service Department - but have not yet been Invoiced and/or properly Completed.

Work Order Invoicing/Review Form - Edit Inventory/Materials dialog
•Specifically, this Work Order Invoicing/Review Form allows a Supervisor or Service Manager to:
1.Set the Work Order Completion/Review Options that determine which Work Orders will be displayed for review, completion and invoicing.
2.Re-Size the Form, as required (the size that is set will be "remembered" on a User by User basis).
3.Review All of the Work Orders or only those that have been marked as Completed, still Open, or were Not previously identified as Reviewed.
4.Review the Work Orders based their Type (i.e., All, Standard, Fire Alarm Test, Fire Extinguisher Inspection, Installation Order, Job Task) of his/her choosing.
5.Review the Work Orders based on a specified Date Range.
6.Review the Work Orders based on any combination of 3, 4, and 5.
7.Record the Technician's Labor on these Work Orders.
8.Enter Inventory and Material, and other expenses that were required to complete these Work Orders.
9.Open a Work Order from this Work Order Invoicing/Review Form and directly enter the data required in the Completion section - as well as the Labor and Inventory/Materials Drop-Down Info Boxes within the Work Order Form.
10.Complete any missing but required information, as needed, to finalize these Work Orders.
11.Generate Invoices for those Work Orders that are Completed and ready for Billing.
➢Note: Any Work Orders identified as Nob-Billable (i.e., any costs associated with this Work Order should not be billed to the Subscriber) and are finished, will also be listed - as long as they were not marked as Completed within the Work Order Form.
a)The User will then have the ability to add (or confirm) the Inventory/Material (Shift+F8) items that were used.
b)Once that has been done, those Inventory items will appear in the Installed Equipment (Shift+F9) tab
c)Checking the corresponding Install box in the Installed Equipment (Shift+F9) will notify the system that those should be inserted into the associated Subscriber's Installed Equipment Form.
d)Complete the Work Order as normal, and once any of the other Work Orders have been billed, this Work Order will be removed form this list and the Inventory item will be added to the Subscriber's Installed Form automatically.
•There are four ways to access the Work Order Invoicing/Review Form:
a)From the Backstage Menu System Select File and Choose Service and Select the Work Order Invoicing/Review option, or
b)From the Backstage Menu System Select File and Choose Receivable and Select the Work Order Invoicing/Review option, or
c)From the Quick Access Menu, Select File and Choose Service and Select the Work Order Invoicing/Review option, or
d)From the Quick Access Menu, Select File and Choose Receivable and Select the Work Order Invoicing/Review option
•To take full advantage of this Work Order Invoicing/Review Form:
✓The Technicians should have finished their assigned Work Orders for the Date Range being reviewed.
✓The Appointment times for those Work Orders should have passed.
✓There is a Supervisor or Service Manager whose access rights allow them to:
1.View this Work Order Invoicing/Review Form
oRequires User Access Rights or Employee Group Rights for the Form that include Create, Read, Update, and Delete Rights.
2.Manage Time Sheets
oThe Manage Time Sheets box is Checked for this Supervisor or Service Manager on the Security tab in the Employee Form.
3.Enter New Sales
oRequires User Access Rights or Employee Group Rights that include Create, Read, Update, and Delete Rights for the Invoice Form).
✓The Supervisor or Service Manager using this Work Order Invoicing/Review Form is required to, and so should be capable of performing the following tasks:
a)Review all completed Work Orders.
b)Assign Tech Hours for the Labor that was required to complete the Work Orders.
c)Account for any Inventory and Material expenses that are chargeable to those Work Orders.
d)Identify them as Complete, whether or not they are Billable, and whether the predefined Labor charges associated with Inventory Items should be billed.
e)Understand how to Generate Invoices for the completed Work Orders.
❑Establishing Viewing Parameters for the Work Orders that have not been Invoiced:
•This Work Order Invoicing/Review Form allows a Supervisor or Service Manager to specify which Work Orders will be displayed in the Work Order List:

Work Order Invoicing/Review - Viewing Parameters
•Setting the Work Order Status, Date Range Dates, and Work Order Type Parameters
✓Work Orders - Identify which Work Orders will be displayed based on the following parameter:
a)All - Any Work Order that has have not been Invoiced will be included.
b)Completed - Only those Work Orders which have been marked Completed will be included.
c)Open - Only those Work Orders that have not been marked as Completed will be included.
d)Not Reviewed - Only those Work Orders that have not been marked as Reviewed will be included.
✓Date Options - Enter the appropriate Date Range based on one of the four Date Option listed below - the result of which will identify the Work Orders that will be listed:
▪By default, the Date Range offered will be Today as the starting date, and the last day of the month as the ending date.
a)Date Requested - Use the Drop-Down Selection List to Choose the Date Requested option and enter the Date Range (beginning and ending dates) using the Drop-Down Calendar/Date Entry fields provided for the date(s) that the Work Orders were Requested by the Subscriber (i.e., Requested On Date entered on the Work Order is within this specified Date Range).
b)Date Scheduled - Use the Drop-Down Selection List to Choose the Date Scheduled option and enter the Date Range (beginning and ending dates) using the Drop-Down Calendar/Date Entry fields provided for the date(s) when the Work Orders were Scheduled by the Service Department (i.e., Start Date entered on the Appointment Form for the Work Order through the Technician Scheduling Form is within this specified Date Range).
c)Date Completed - Use the Drop-Down Selection List to Choose the Date Completed option and enter a Date Range (beginning and ending dates) using the Drop-Down Calendar/Date Entry fields provided for the date(s) when the Work Orders were identified as having been Completed (i.e., Completed On Date entered on the Work Order is within this specified Date Range).
d)Date Serviced - Use the Drop-Down Selection List to Choose the Date Serviced option and enter a Date Range (beginning and ending dates) using the Drop-Down Calendar/Date Entry fields provided for the date(s) when the Work Orders were actually Serviced by the Technician (i.e., Serviced On Date entered on the Work Order is within this specified Date Range).
✓Invoice Date - By default, the Sale Date that will be assigned to any Invoices that are generated within this Work Order Invoicing/Review Form will be Today.
▪A different Sale Date may be designated using the Drop-Down Calendar/Date Entry field provided.
✓Work Order Type - Using the Drop-Down Selection List provided, Choose the Type of Work Order format which are to be reviewed.

Work Order Invoicing/Review Form - Work Order Types list
•Click the Refresh Data (or Press Shift+R) button once all of the desired Viewing Parameters have been identified.

Work Order Invoicing/Review Form - Refresh Data option
❑Using the Work Order Listing (which is a Grid) to Locate a specific Work Order based on its Work Order Number, the Subscriber's Name, their CSID. and/or Service Type:
•The Work Order Listing - Grid section has its own Ribbon Menu.
![]()
•The service call related information previously entered for the selected Work Order will be shown within the Work Order Listing - Grid section and may be modified, as appropriate.

Work Order Invoicing/Review Form - Work Order List
•Work Order Listing - Below the Viewing Parameters section of this Work Order Invoicing/Review Form is the list of the selected Subscriber(s) and their associated Work Orders - with the members of the list determined by the selected Date Option, Date Range and Work Order Type (you may want to review the "Establishing the Viewing Parameters for Work Orders which have not been Invoiced" discussion above).
✓By default, the Work Order data is listed in alphabetical order based on the the Subscriber's Name (A to Z), but another listing order may be chosen (it's WO# in the illustration above).
▪Click any Column Header Name to resort the data listed based on that Header Name, in descending order (A to Z or 1 to 9, etc.).
▪Click that Column Header Name again to change from descending to ascending order.
▪Click another Column Header Name to resort the data listed based on that newly selected Header Name, in ascending order.
▪Click that Column Header Name again to change from ascending to descending order.
➢Note: Not all Column Header Names can be used to change the sorted order. Those that cannot have their order re-set are:
a)Conditions Reported
b)Serviced Performed
c)Scheduling Instructions
✓The Work Order data's Sorted Order is indicated by the Sort Order Icon next to the Header Name determining that order.
•To View an associated Subscriber or Service Request Form from within the Work Order Listing:

Work Order Invoicing/Review Form - Go To options
a)Select the appropriate Work Order
b)Click on the Go To button at the top of the Work Order Invoicing/Review Form
c)Choose the appropriate Go To Option.
d)The associated Form will be displayed for the selected Subscriber, Service Request (Work Order), or Job Costing record.
•Go To Options - Right-Click on any line item within the Work Order Invoicing/Review Grid to open the Radial Right-Click Menu to access one of the options listed below:
a)Job option to open the associated Invoice Form (when available)
b)Work Order option to open the Work Order Form
c)Subscriber to open the associated Subscriber Form

Work Order Invoicing/Review - data-grid - Radial Right-Click menu
❑Tabs - There are six (6) tabs below the Work Order Listing - Grid section
•Specific Details of a Selected Work Order will be available, and may be added or modified in the Labor, Inventory/Materials, Installed Equipment, Technician Activity, Appointments and Parts List tabs
![]()
Work Order Invoicing/Review Form
Labor, Inventory / Materials, Installed Equipment, Technician Activity, Appointments, and Parts List tabs
•See the various "Understanding the Work Order Invoicing/Review Tabs" discussions in the Recording Work Order Charges chapter for those instructions.
❑Reviewing, Invoicing and Completing a selected Work Order:
•The basic steps to finalizing a Work Order record are:
a)Select the Work Order record to be completed;
b)Enter the appropriate Labor Hours and Rate, Inventory/Materials expenses, Installed Equipment, and Technician Activity information, as required;
c)Review and add/update the remaining Completion information:
i.Edit the Work Order Invoicing/Review record in the Grid, as appropriate, or
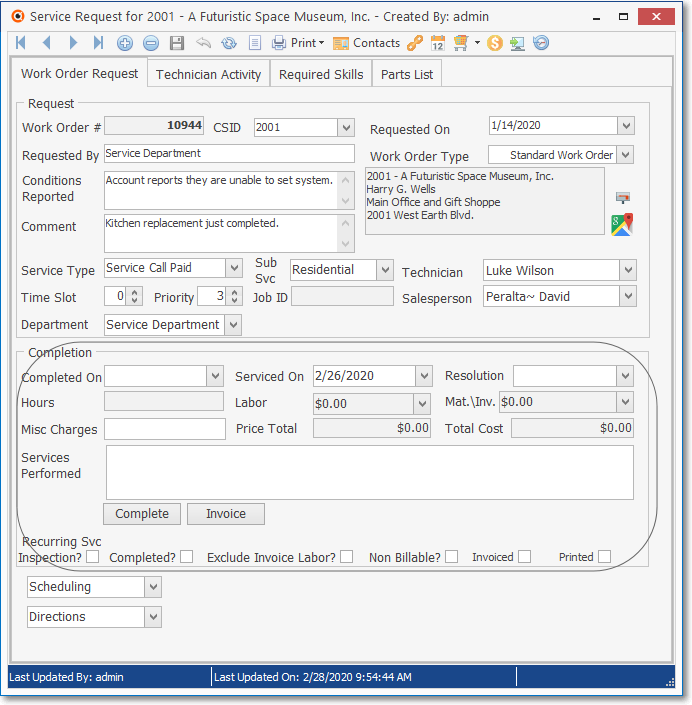
ii.Update that Work Order record itself by Selecting the Go To > Go to Work Order option (see the illustration below).

Work Order Invoicing/Review Form
Use the Go To Work Order option to edit the selected Work Order's Completion section
•The Completion section on the selected Work Order Form is displayed - as shown immediately above - may be used for executing the required Review, Invoicing, and Completion process.
✓Enter whatever data is required (see the Completing a Work Order chapter for that information) to identify who and what was required to complete this Work Order.
a)If you want to actually mark this Work Order as Complete and Invoice it from within the Work Order Form:
▪Enter a Serviced On and a Completed On Date.
▪Follow the "Automatic Invoice Generation" instructions in the Completing a Work Order chapter.
b)Otherwise, enter all of the necessary information (except the Completed On Date) and simply Click the Close ![]() box to Close the Work Order Form.
box to Close the Work Order Form.
▪The information entered in the Work Order Form will be added to the Work Order Invoicing/Review record (once you Click the Refresh Icon)
▪By doing this, all of the Work Orders that have undergone the Work Order Invoicing/Review process may then be Invoiced in one batch.
•You may also use the Labor, Inventory/Materials, Installed Equipment, Technician Activity, Appointments, and Parts List tabs (which are located immediately below the Work Order Listing) to view, review and/or update that information, as well.
✓The information within each of these tabs is for the selected Work Order record.
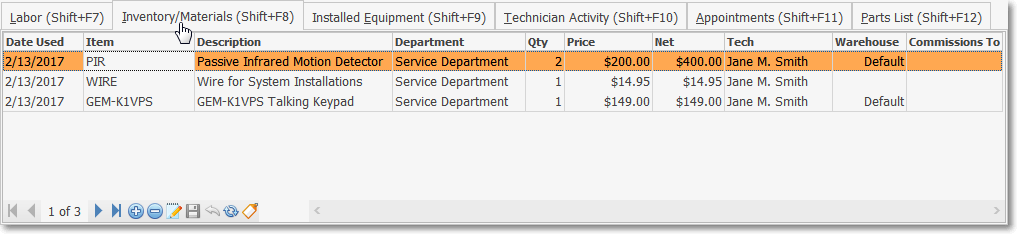
Work Order Invoicing/Review - Labor, Inventory/Materials (selected), Installed Equipment, Technician Activity, Appointments & Parts List tabs
❖See the Recording Work Order Charges chapter for more detailed information.
•All of the Completed and Reviewed Work Orders may be Invoiced in one batch process.

Work Order Completion/Review Form - Generate Invoices (Shift+G) button
❖See the Generate Invoices chapter to understand how to created an Invoice for all Completed and Reviewed Service Requests (Work Orders):