❑Accounts Receivable Information - This Receivables section within the Edit View on the Subscribers Form contains the fields required for the Accounts Receivable System and shows the Account's current status as it relates to Receipts and Sales.
•To access the Accounts Receivable Information Data Entry Section:
✓Select the Receivables tab on the MKMS Desktop and Click the Subscribers (F3) Icon.
✓On the Subscribers Form, Locate the appropriate Subscriber record using the Subscriber Search function.
✓Click the Edit View Icon and Choose the Subscriber Tab
✓Click the Receivables Icon (see the illustration immediately below) to view the Accounts Receivable section.
❑This Receivables section provides two key functions:
1.Configuration of this Subscriber record for Accounts Receivable purposes as it relates to Sales Taxs, Late Fees, Division Code, and a Credit Limit
2.Viewing the Account Status which includes the Last Pay, Last Sale and the associated Dates, the Yearly RMR (Annualized Billing Amount of the Subscriber's currently defined Recurring Revenue), and the Subscriber's net Current Balance - none of which may be changed here.
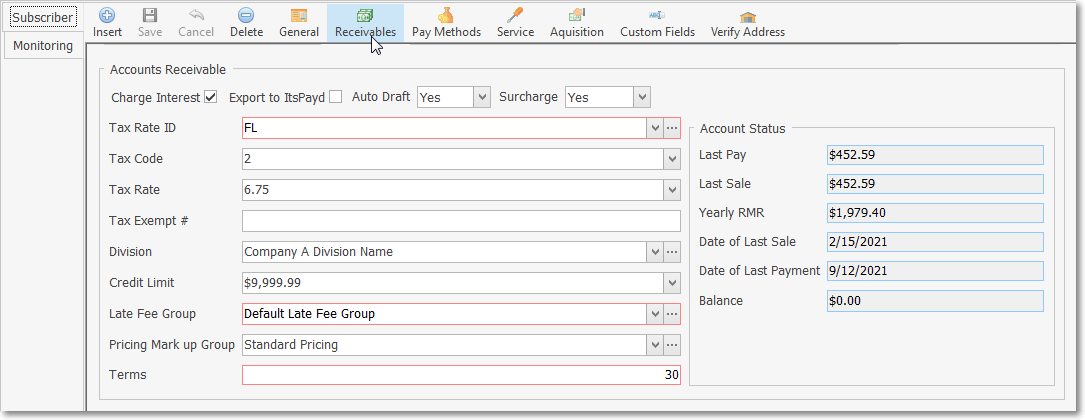
Subscribers Form - Edit View - Accounts Receivable section
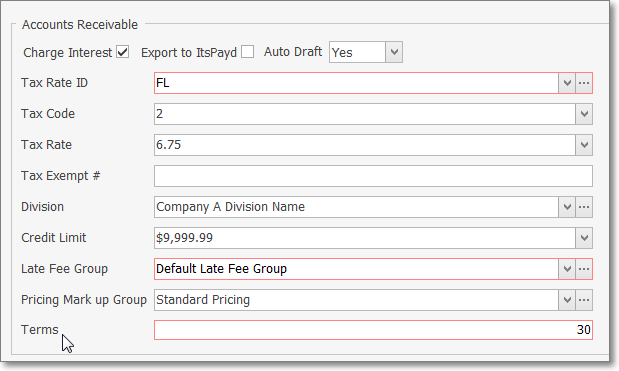
❑Accounts Receivable Configuration items associated with Sales Taxes, and charging Late Fees:
•Charge Interest - If you are assessing Late Fees for Past Due Invoices and you want this Subscriber to be subject to Late Fees if they have Past Due Invoices, Check the Charge Interest box.
•Export to ItsPayd - If your Company has Purchased and Registered the ItsPayd feature/service, and this Account will be submitted to them, Check this box.
•Auto Draft - By default, if the Version 5.1.35.8253 Upgrade has been installed, the Auto Draft field will be pre-populated as follows:
a)If Auto Draft information was previously entered including Bank Draft or Credit Card information using Version 8252 or earlier, this field will be set to "Yes"
b)Otherwise (no Bank Draft or Credit Card information was previously entered), this Auto Draft field will be set to "No"
c)If this is a new Version 5.1.35.8253 installation, and this Subscriber has authorized the use of a Credit Card or Bank Draft to process Recurring Revenue Invoice Payments automatically (via a Payment Gateway) during the Fully Automated Recurring Billing or Post Auto Drafts procedure. this Auto Draft field will be set accordingly (to Yes).
▪See the Subscriber Payment Methods chapter for instructions on how to identify that Credit Card and/or Bank Draft information.
▪Also see the "Assigning Division Level Payment Gateway Defaults" discussion in the Divisions chapter for additional information.
✓When the Auto Draft box is set to Yes, it indicates that this Subscriber will be using the Auto Draft feature as a method of making Payments for on-going, automatically drafted payments for Recurring Revenue Invoices for the services being provided by your Company.

▪Once Checked, the Auto Draft field within the Accounting tab on the Subscriber Form will also be Checked automatically.
•Surcharge - If your Company has elected to assess a Surcharge on Credit Card Payments, and has completed the Credit Card Surcharge Setup process, then decide whether this specific Subscriber is to be assessed that Surcharge.
✓Using the Drop-Down Selection List provided choose either Yes or No.
✓Understanding the Credit Card Surcharge:
▪The Credit Card Surcharge Setup process puts in place your Company's decision to assess a Credit Card Surcharge.
▪Thereafter, a Credit Card Surcharge may be assessed on designated Subscriber Payments that are made using their Credit Card,
▪Those Surcharges are assessed as a percentage of the Amount being charged on the Credit Card
▪That Surcharge Amount charged to the Subscriber's Credit Card will be in addition to the Amount needed to pay the Balance Due on that Invoice
•Verify Address - This option (on the Ribbon Menu above) allows the User to verify (and update as needed) that a Subscriber's United States address is a valid USPS address.
•Tax Rate ID - Using the Drop-Down Selection List provided, Double-Click the appropriate Sales Tax ID for this Subscriber.
✓Optionally, Click the Ellipse Icon to open the Sales Tax Rates Maintenance Form. where new Sales Tax Rates may be created, or existing ones revised (if the appropriate User Access Rights have been granted for the Sales Tax Rates Form)
✓This Sales Tax Rates Maintenance Form is where Sales Tax Rates may be created or revised (if the appropriate User Access Rights have been granted for the Sales Tax Rates Form)
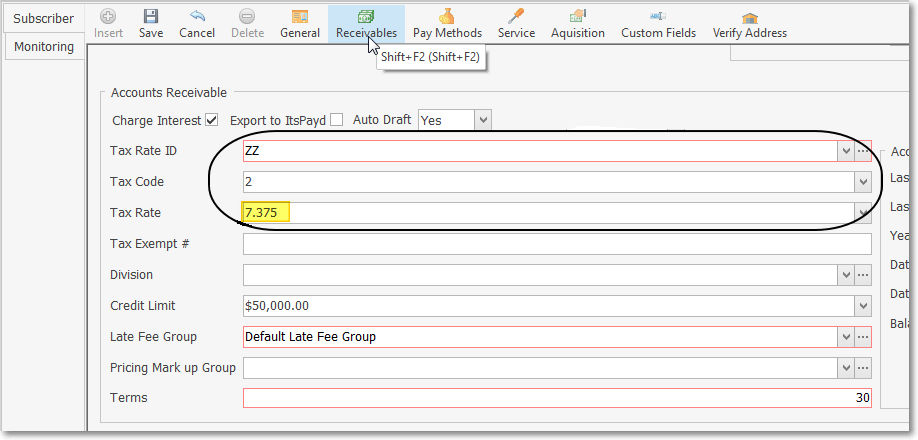
▪When Sales Taxing Authorities have implemented Sales Tax Percentage Rates with up to three (3) Decimal Places, two Company Settings must be re-set to support Charging and Collecting this type of Sales Tax.
1)Show Tax And Total Per Line Item Report - By default, the ShowTaxAndTotalPerLineItemReport option is set to False ("F"). However, when Sales Taxing Authorities have implemented Sales Tax Percentage Rates to three (3) Decimal Places (e.g., nn.nnn%), this is one of the two Company Settings that must be re-set ( see "Show Tax And Total Per Line Item Screen" immediately below) to support Charging and Collecting this type of Sales Tax. Setting this ShowTaxAndTotalPerLineItemReport option to True ("T" will activate this Three Decimal Places Sales Tax feature and include this information on reports.
2)Show Tax And Total Per Line Item Screen - By default, the ShowTaxAndTotalPerLineItemScreen option is set to False ("F"). However, when Sales Taxing Authorities have implemented Sales Tax Percentage Rates to three (3) Decimal Places (e.g., nn.nnn%), this is one of the two Company Settings that must be re-set ( see "Show Tax And Total Per Line Item Report" immediately above) to support Charging and Collecting this type of Sales Tax. Setting this ShowTaxAndTotalPerLineItemScreen option to True ("T" will activate this Three Decimal Places Sales Tax feature on the appropriate data entry screens (as shown below).
•Tax Code - Using the Drop-Down Selection List provided, Select the appropriate Tax Code (from those defined for the assigned Tax Rate ID):
✓Y - Yes they are Taxable and the assigned Tax Rate ID was defined as not having Multiple Tax Rates
✓1 - Yes they are Taxable and the assigned Tax Rate ID was defined as a Multiple Tax Rates class and this Tax Code number represents the Tax Rate to be assessed.
✓2 - Same as 1 above.
✓3 - Same as 1 above.
✓N - No the Subscriber is Not Taxable.
✓E - This Subscriber is always Sales Tax Exempt.
•Tax Rate - This field will be populated automatically based on the Rate information for the Tax Code selected above, based on the information entered in the Tax Rates record of that selected Tax Code.
➢Note: Once this Tax Rate ID and Tax Rate information is saved, if Auto Bill records have been defined, and if this information is subsequently modified, a Rate Change Detected message will be displayed with the option to Update those affected Auto Bill records with the correct Tax Code and Tax Rate information.

Rate Change Detected - Update Tax Percentage on Recurring Revenue records?
•Division - If you have implemented the Division Codes functionality, using the Drop-Down Selection List provided, Double-Click the appropriate Division code if this Subscriber should be associated with one of those Divisions..
✓Optionally, Click the Ellipse Icon to open the Divisions Maintenance Form. where Division may be created new or revised (if the appropriate User Access Rights have been granted for the Divisions Form)
✓The Divisions Form allow a Company to identify a Default Warehouse for any Division - a Level 1 Warehouse may be identified.
▪Thereafter, when Invoices are created for a Subscriber who was assigned to a Division; or for Work Order when Inventory/Materials which were used are identified, are created for a Subscriber who was assigned to a Division (a Division assignment to a Subscriber is optional), by default, any Inventory related Transaction posted to one of those documents will automatically be assigned to and associated with that Warehouse but that Warehouse designation may be changed when needed.
•Credit Limit - If you want this Subscriber to have a Credit Limit, enter that maximum Credit Limit amount.
✓This is only designed to be a visual check for the User and not to prevent or discourage additional Sales entries.
✓It does not provide an automated Credit Limit alert message.
•Late Fee Group - If you did Chose to Charge Interest, the Late Fee Group with the rules to be applied to the Late Fees that may be assessed to this Subscriber must be selected.
✓Using the Drop-Down Selection List provided, Double-Click the appropriate Late Fee Group.
✓Optionally, Click the Ellipse Icon to open the Late Fee Group Maintenance Form. where a Late Fee Group may be created new or revised (if the appropriate User Access Rights have been granted for the Late Fee Groups Form)
✓Note: If you have elected to Charge Interest and will be billing Recurring Revenue using the Recurring Billing Cycles feature (where different groups of Subscribers may be billed for their Recurring Revenue Fees at different times throughout the month), you should create Late Fee Groups for each of these Billing Cycles to ensure that their Past Due status better equates to when each Subscriber was actually billed.
•Pricing Mark Up Group - Using the Drop-Down Selection List provided, Double-Click an optional Pricing Mark Up Group, if appropriate.
✓Click the Ellipse Icon to open the Pricing Mark Up Group Maintenance Form. where a Pricing Mark Up Group may be created new or revised (if the appropriate User Access Rights have been granted for the Pricing Mark Up Group Form)
•Terms - This field is not normally visible because the Company's Terms are set in the Company Options - General sub-tab on the Company Options tab of the User Options Form.
✓However, your Company may establish individualized Payment Terms for each (any/all) of your Subscribers.
✓This feature is enabled in Company Settings
▪If the UseSubscriberTerms option is set to True ("T") in Company Settings, this Terms field will become available.
▪To Update all of the Terms in the Receivables section of all Subscribers with the current Terms set in the Company Options - General sub-tab, use dbisql.exe, to run the following script:
update dba.AccountsReceivable
set Terms = (Select Terms from dba.Useroptions)
where SubscriberID IN
(Select SubscriberID from dba.Subscriber where SubscriberID = BillPayer)
Commit
▪Thereafter, this Terms field in the Receivables section will be enabled and populated with the default Company Terms set in the Company Options - General sub-tab,.
▪In the future, you may re-set any individual Subscriber's Terms as needed, on a Subscriber by Subscriber basis.
✓Once this script shown above has been run, the Terms field will contain the Terms i.e., Number of Days after the Sale Date when the Payment for an Invoice is Due) established in the General sub-tab in the Company Options tab on the User Options Form,
✓Those Terms may be modified, as and when needed, on a Subscriber by Subscriber basis.

•Click the Save Icon on the Edit View Menu to record the entries.
❑Account Status items, as indicated by the Teal colored box around these fields, are maintained by the system and so are displayed for information only.
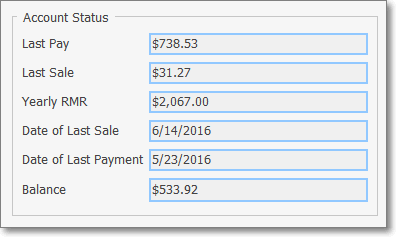
•Last Pay - the Amount of the last Receipt entered for this Subscriber
•Last Sale - the Total Amount of the last Sales Invoice entered for this Subscriber
•Yearly RMR - Annualized Billing Amount of the currently defined Recurring Revenue.
•Date of Last Sale - the Date of the last Sales Invoice entered for this Subscriber
•Date of Last Payment - the Date of the last Receipt entered for this Subscriber
•Balance - the Net Balance Due from this Subscriber is shown (includes All Receipts - regardless of whether or not they have been properly Allocated).
❑Service Account Only - When the currently selected Subscriber record represents a Service Address which is not the Bill Payer for this Account (i.e., this particular Service Address is not the Billing Address for this premises as established in the Bill Payer dialog), the Accounts Receivable section will not have an Account Status section, .
•However, it will have all of the other Accounts Receivable Configuration items - except Terms (which will be determined by the associated Billing Payer Account).
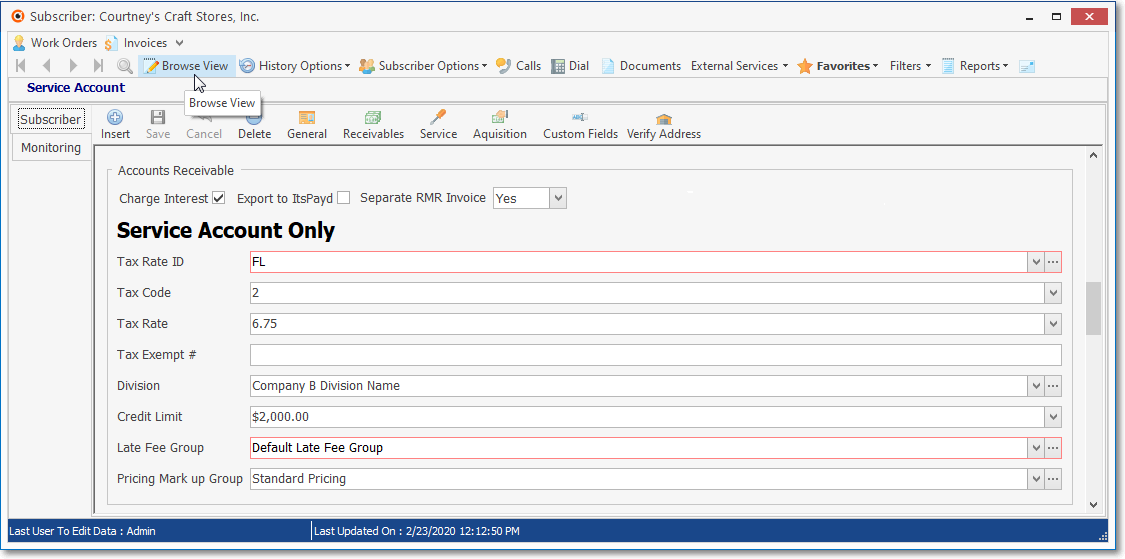
•Separate RMR Invoice - Additionally, (only when the currently selected Subscriber record represents a Service Address which is not the Bill Payer for that Account) there is a new "Separate RMR Invoice" field which offers a Drop-Down Selection List containing Yes or No options.
a)No - Select No (the default) when the Recurring Revenue charges for this Service Address are to be Invoiced on the Bill Payer's Recurring Revenue Invoices.
b)Yes - Select Yes when the Recurring Revenue charges for this Service Address are to be Invoiced separately.
•Select Browse View (which replaces the Edit View option when selected) when finished editing this record.