❑Please refer to the Proposals chapter in the Prospect Tracking System for detailed information on how to enter a Proposal - whether for an existing Subscriber or for a new Prospect.
•General feature highlights and a specific additional feature which is only available in the Subscriber's Proposal Form are described below.
❖Again, please review the full instructions in the Proposals chapter and related sub-chapters chapters for a complete understanding of the features that are available for creating Proposals.
❑Accessing and Viewing the Proposals Form:
•Open a Subscribers Form.
✓Press F-2 Search on the Navigation section of the Subscribers Form to locate the appropriate Subscriber record,
✓Open the Subscriber Options Menu on the Navigation section of the Subscribers Form, Select the Receivables sub-menu, then Choose the Proposals option.
✓The Proposal Form will be displayed.
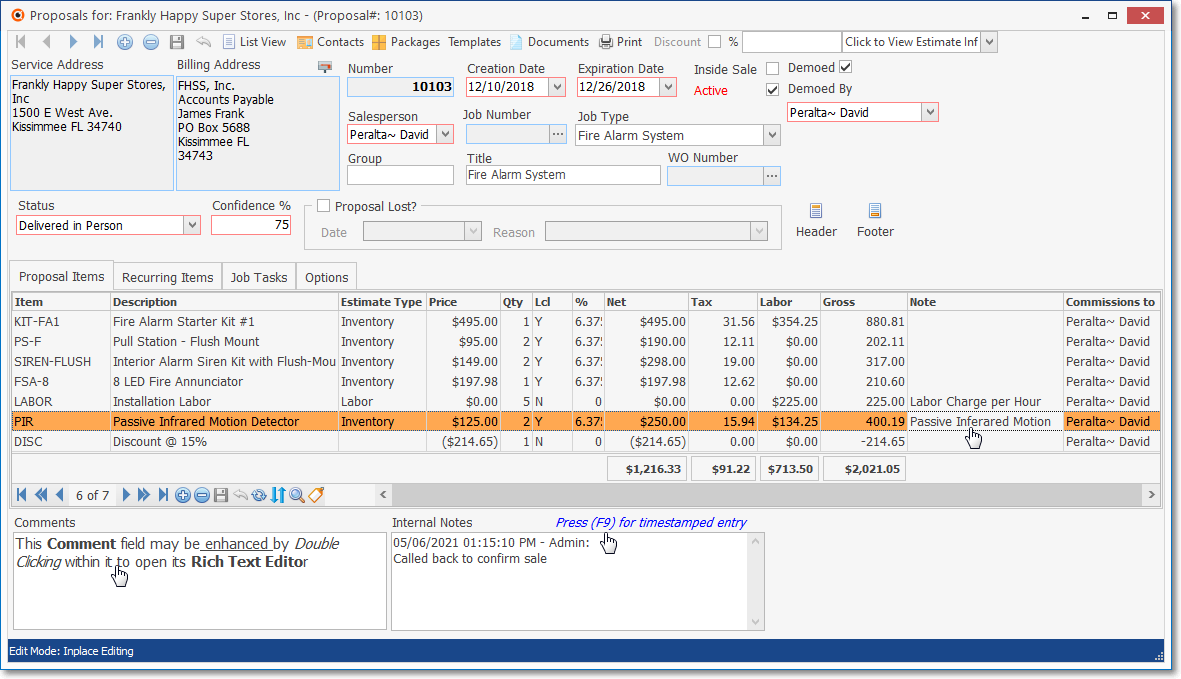
Subscriber's Proposal Form - normal Two (2) Digit Sales Tax format - Detail Line Item Totals included
✓Most Users will only be charging a Sales Tax with up to Two Decimal Places (as illustrated above).
✓However, for those Prospects and Subscribers who have Sales Taxing Authorities which have implemented Sales Tax Percentage Rates with up to three (3) Decimal Places, three Company Settings may be re-set to support Charging and Collecting this type of Sales Tax which may exclude individual line item totals (on Proposals and Invoices), but include a Summary Totals box displayed at the bottom of the Proposal (as illustrated below).

Subscriber's Proposal Form - special Three (3) Digit Sales Tax format - with no Detail Line Item Totals - there will be a Summary Totals box added at the bottom of the Proposal
❖See the Sample Results of these Sales Tax related Company Settings Options discussion in the Company Settings for Accounts Receivable chapter for Invoice Detail Line Item illustrations (which also applies to Proposals).
•Navigation, Actions and Miscellaneous options - which provide additional options for creating and printing this Proposal - will be available (see the Proposals chapter in the Prospect Tracking System section for detailed information about these options):
![]()
Proposal Form - Navigation and Actions Icons - View Estimate & View Package Info options
•The Proposal Form may (based on the Proposal's content) display the following options:
✓Navigation options:
▪Insert - Click to start a new Proposal.
▪Delete - Click to remove the currently displayed Proposal.
▪Save - Click to save any new or modified information on the currently displayed Proposal.
▪Cancel - Click to abandon any new or modified information (cancel all changes) on the currently displayed Proposal.
▪List - Click to display a tabular listing of all previously created Proposals (for the current Subscriber).
✓Actions options:
▪Contacts - Click this Contacts option to open the Contacts Form to identify anyone who should be associated with this Proposal.
▪Packages - Add a predefined Proposal Package to this Proposal.
▪Template - Using another Proposal as a sample to create this Proposal.
▪Documents - Add and/or Remove Documents as attachments to this Proposal.
▪Convert - Convert this Proposal to an Invoice, Convert to Installation Order, or to a Job Costing record.
▪Print - Create a printed copy of this Proposal.
✓Discount - This option is used to Discount the Net Total Amount of this Proposal from its total originally calculated price (whether for a Sales Promotion or some other compensation situation)
![]()
✓Other options:
▪Estimate option - To view the Proposal Estimate information for the selected Proposal, Click the Estimate field's Down-Arrow
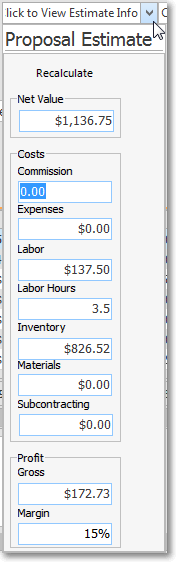
▪Package Info option - For Proposals defined with a Proposal Package, the Commission Tracking System Points associated with that selected Proposal Package may be viewed by Clicking the Package Info field's Down-Arrow
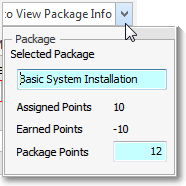
oSelected Package, Assigned Points and Earned Points, and the earned Package Points fields will be populated, as appropriate.
•Once a Detail Line Item has been added to the Proposal, all four special purpose Proposal Form sub-tabs will be displayed.
1.Proposal Items - Any number of Proposal Items may be added to the Proposal.
2.Recurring Items - Used enter the proposed Recurring Revenue Items based Services (e.g., Monitoring, Service Contract, Open/Close Reporting).
3.Job Tasks - Used to define the Job Costing Tasks that would be required to complete this installation.
4.Options - Used to define additional Optional Service Items that the Subscriber may want to accept in addition to the basic Proposal.
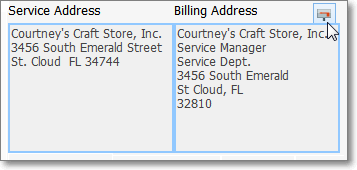
•Alternate Address - The Billing Address information for this Proposal may be changed to one of the Addresses that were previously defined to provide alternate mailing addresses for specific type(s) of Forms. (The Prospect's Proposal Form also offers this feature.)
Proposals Form - Addresses Icon
✓To insert one of these alternate addresses, Click the Addresses button above the Billing Address information (see the mouse pointer in the illustration above).
✓The Search Billing Addresses dialog will be displayed.
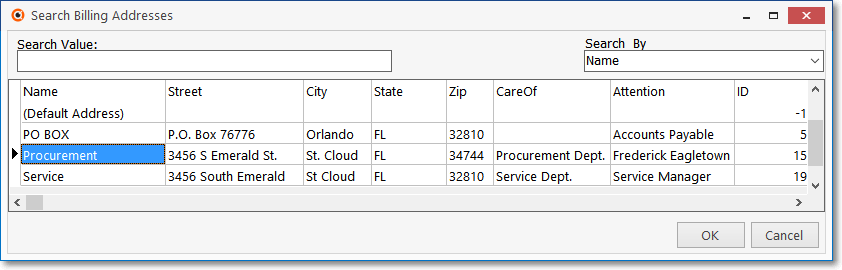
Search Billing Addresses dialog
✓Select the appropriate address, then Click the OK button.
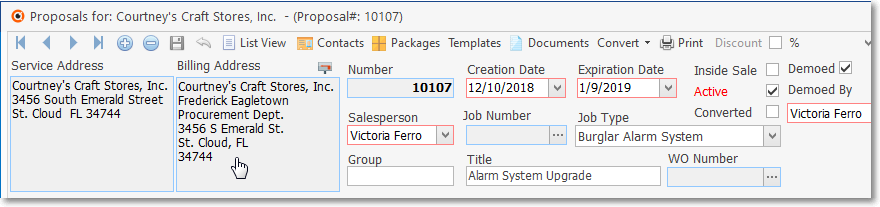
Alternate Billing Address has been selected
✓The selected Address will replace what was shown as the the Subscriber's Billing Address information.
•List Icon - Click this Icon to display the spreadsheet style List View of all the Proposals that were previously created for this Subscriber.
✓If Proposal(s) exist for this Subscriber, those Proposals will be listed numerically by the Proposal Number.

✓Double-Click a Proposal Number ("Proposal #") to have that Proposal displayed in the Proposal Options Tab.
▪The Proposals are initially listed in Proposal Number order (from the oldest to the newest).
✓Sorting the Previous Proposals List - Click a column's Header Name to change the sorted order to that column, with the sorted order automatically set from lowest to highest (a-z or 1 - 9).
▪To change this newly selected column's sorted order from highest to lowest, Click that column's Header Name again.
▪An Arrow next to the Header Name indicates the column that is determining the sorted order of the Grid Data.
o~ indicates lowest to highest (a-z or 1 - 9)
o€ indicates highest to lowest (z-a or 9-1).

Previous Proposals Data Grid with Custom Filter applied
✓Custom Grid Filters - The information listed within this Data Grid may be filtered - as needed - to refine which Proposals are displayed within the Data Grid.
❑Starting a New Proposal Entry:
•Click the ![]() Icon to start a new Proposal
Icon to start a new Proposal
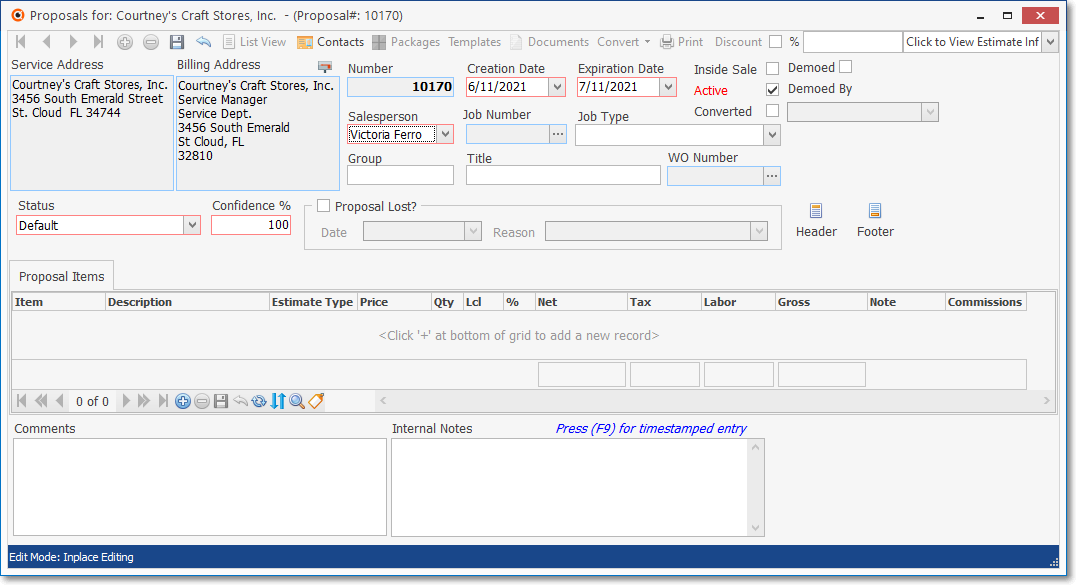
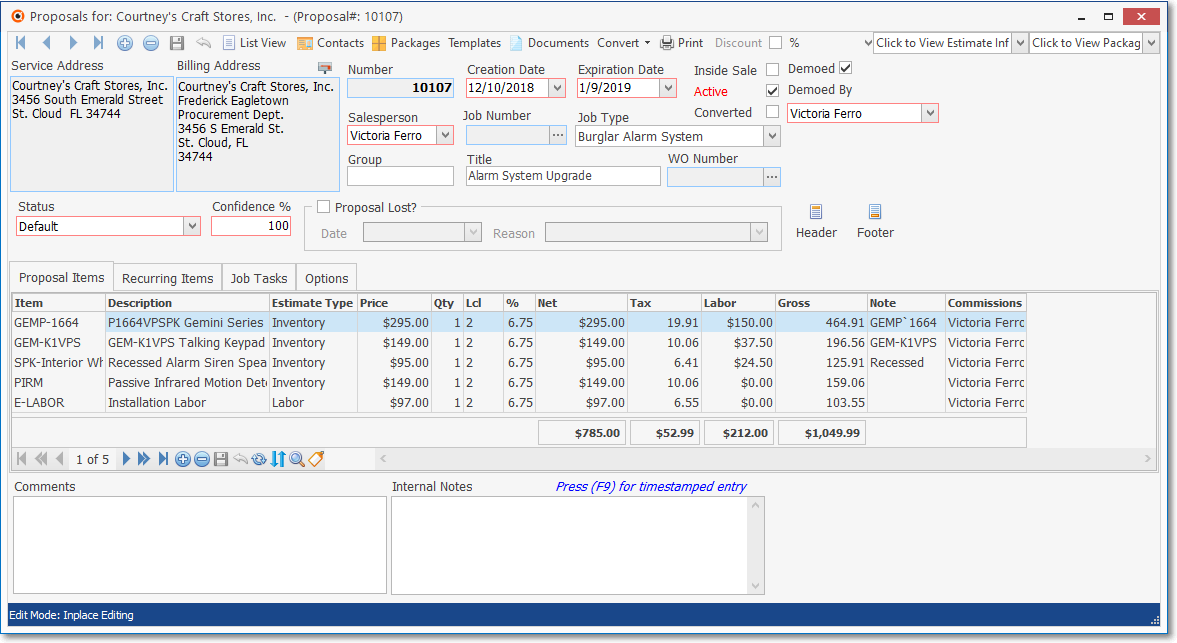
New Proposal Form with default entries and no Detail Line Items
•Service Address - The name and address of this Subscriber entered automatically by the system.
•Billing Address - The name and address of this Subscriber entered automatically by the system, or the (selected) Billing Address for this Prospect.
•Number - Inserted automatically by the system.
•Creation Date - Confirm the Creation Date (by default Today).
a)Click on the Date field and type the desired Date using a MM/DD/YYYY format; or
b)Use the Drop-Down Calendar/Date Entry field provided to Choose the desired Date
✓If you do not want Today as the Creation Date, reset this date using the Drop-Down Calendar/Date Entry field provided.
•Expiration Date - By default, it will be 30 Days from Today.
✓If you do not want that Expiration Date, you may reset this date using the Drop-Down Calendar/Date Entry field provided.
•Inside Sale - The purpose of this field is to determine if a Proposal was created for an existing Subscriber (the Sales Person would Check this Inside Sale box when creating the Proposal) or a Prospect (the field will be left unchecked).
✓The Converted Proposals and Proposals (Grid) reports will include the "Inside Sale" field and allow the User to filter that Inside Sale field in those reports' Grids by "True" or "False"
•Demoed - This box, by default, will be not Checked.
✓ Check this box when this Proposal has been presented and/or demonstrated to the Subscriber.
•Active? - This box, by default, will be Checked to indicate that this is an Active Proposal;
✓You may Un-check this box if the Proposal becomes Inactive.
•Demoed By - This box, by default, will be empty.
✓Use the Drop-Down Selection List provided to identify who made the Demo, when it occurs.
•Converted - This box will not be Checked until the Proposal is accepted by the Subscriber and Converted to an Invoice, Convert to Installation Order, or to a Job Costing record.
•Salesperson - Inserted automatically by the system based on the Salesman entered on the Prospects (or Subscribers) Form.
✓An alternate Salesman may be entered by using the Drop-Down Selection List provided.
✓When assigning a Salesperson to a Proposal: only those Employees whose Employee Type is identified as either Sales or All will be available (in the Drop-Down Selection List list) for populating the Salesman (or Commission To) fields.
•Job Number - If this Proposal is associated with a specific Job, that Job's Number will be inserted here by the system.
•Job Type - Optionally, particularly if you using the Service Tracking System or the Inventory Tracking & Job Costing System, use the Drop-Down Selection List to Choose a Job Type for this Proposal.
•Group - You may enter a Group Code for this Proposal.
✓Group Codes are optional, free-form, user created codes which any User may assign to any Proposal.
✓This Group Code may also be used to "filter" the Proposals included in the Proposals Printing dialog so only those that were assigned a specified Group Code will be included.
✓Group Codes are internally converted to UPPERCASE Letters so "Apples33", and "applES33", and "AppLeS33" all represent "APPLES33" to the system.
▪Letters, Numbers, Spaces and normal punctuation marks may be used.
▪The length may not exceed 15 characters and/or spaces.
✓There is no "Maintenance" Form to predefine these Group Codes and no restrictions as to how many may be used.
•Title - Enter a Title for this Proposal
✓This Title will appear in the List of Proposals (see the "List option" description, above) to help you identify a specific one, and
✓It will be shown on the Ribbon Menu of a Job Costing record, if this Proposal is converted to a Job.
•WO Number - If this Proposal is associated with a specific Work Order, that Work Order's Number will be inserted here by the system.
•Status - Initially the Default Proposal Status will be inserted but you may use the Drop-Down Selection List to Choose a different Proposal Status for this Proposal.
•Confidence % - Initially 100% will be inserted but you may enter any value from 0 to 100, as appropriate (see the "Understanding and Using the Confidence % field" discussion in the Prospect Tracking System's Proposal chapter)
•Proposal Lost? - If the Prospect (or Subscriber) has notified you or your Company that they will no longer consider this Proposal, Check this box and enter that Date and Reason this determination was made.
✓Date - The Date, by default will be Today
▪If you do not want Today as the Proposal Lost Date, reset this date using the Drop-Down Calendar/Date Entry field provided.
✓Reason - Enter the Proposal Lost Reason using the Drop-Down Selection List provided.
❖These Date and/or Reason entries may be removed if the Prospect (or Subscriber) changes their mind (again) and is reconsidering this purchase. To do so:
▪Select each field one at a time, swipe across the entry, then Press the Delete key.
▪Then, remove the Check Mark from the Proposal Lost box.
•Header and Footer Options - Create a custom Header and/or Footer foe this Proposal or use a predefined Header and/or Footer, if appropriate.
Header & Footer Buttons on Proposal Form
✓To assign predefined Header and/or Footer to a Proposal, Click either the Header and/or Footer button, as needed (see illustration above).
✓Header - A Header Page for this Proposal may be added using a Predefined Proposal Paragraph, or created specifically for this Proposal using the Proposal Header's Rich Text Editor (see the instructions below).
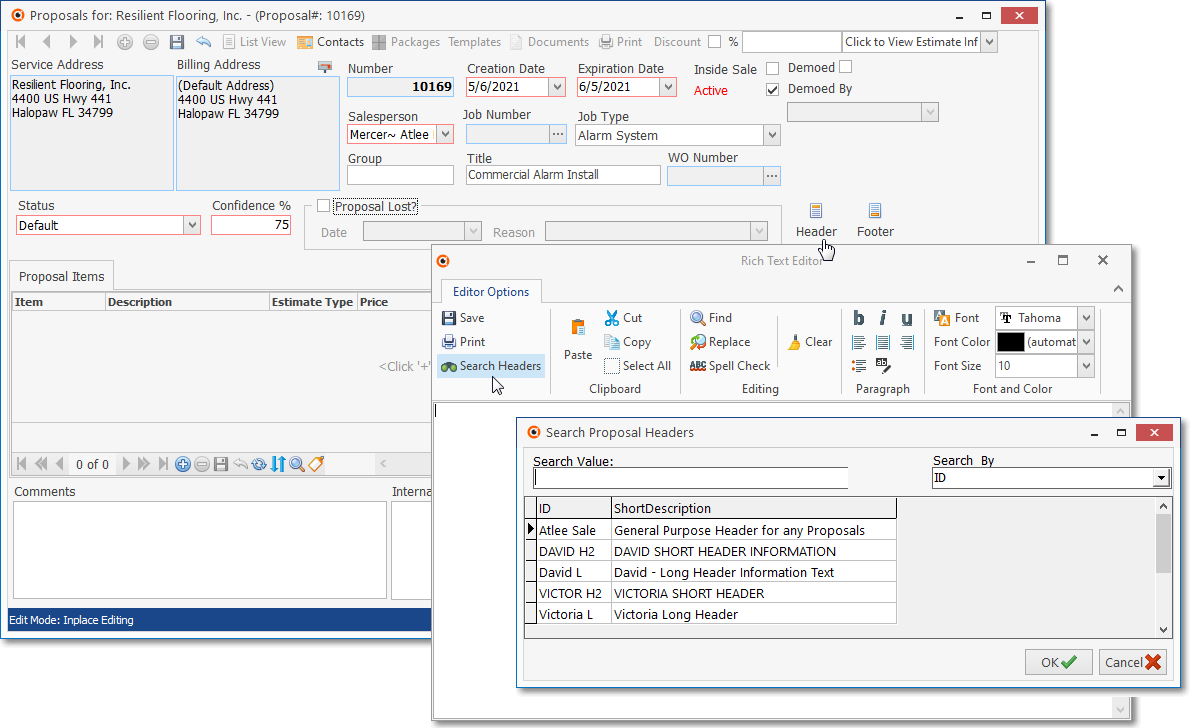
Proposal Header Form Rich Text Editor Search Header Icon Search Proposal Headers dialog
▪A Header Proposal Paragraph is actually a Cover Page for a Proposal - and may include any number of paragraphs, special formatting. multiple fonts, and text and background colors.
▪It stands alone and is used generally as an introductory dialog preceding the Proposal itself.
▪It only appears on the first page of the Proposal and no sales items are on that page with it.
✓Footer - A Footer Page for this Proposal may be added using a Predefined Proposal Paragraph, or created specifically for this Proposal using the Proposal Footer's Rich Text Editor (see the instructions above).
▪A Footer Proposal Paragraph is generally inserted as a "wrap-up" commentary.
▪It appears only on the last page of the Proposal.
▪It also may include any number of paragraphs, special formatting. multiple fonts, and text and background colors.
✓You may create a custom document for this specific Proposal by simply entering what you want, or Click the Search Icon (see illustration above) to locate the appropriate Proposal Paragraphs.
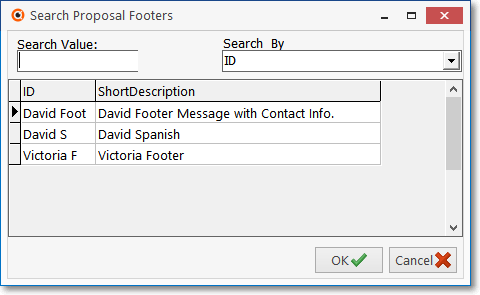
Search Proposal Footers dialog
▪Search By - Use the Drop-Down Selection List to Choose either the ID or Short Description to Search By.
▪Search Value - Enter the appropriate numbers, characters, or value to locate the desired document.
▪Select - Click on the desired document.
▪Click OK to save this selections and return to the Proposal Header (or Footer) Form.
✓When you have finished your entry, or have selected the appropriate Proposal Paragraph, Click File and Select Save and Exit (or Press Ctrl + S) to record the entry and close the Form.
▪Although no other indication is presented to show the saved Header or Footer, when you View or Print the Proposal you will see what you've selected.
▪If you want to change or edit the selected Header or Footer, just Click the appropriate button to re-open the Proposal Header/Footer Rich Text Editor.
➢Note: If the ConfirmHeaderFooter option is set to True ("T") in the Company Settings dialog accessible within the Company tab of the User Options Form, when a Header (and/or a Footer) has not been created for a Proposal, upon exiting the Proposal, you will be asked if you want to do so before exiting the Proposal Form.

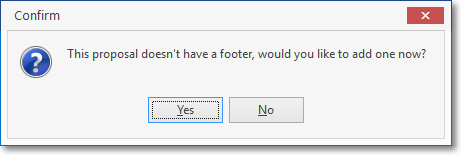
▪Answer Yes and the appropriate Rich Text Editor dialog will be displayed.
❑Proposal Items Tab - Entering the Detail Line Items for a Proposal
•Click the Insert ![]() Icon on the Ribbon Menu located on the bottom of the Proposal Items tab to start the entry of the Detail Line Items for the Proposal and:
Icon on the Ribbon Menu located on the bottom of the Proposal Items tab to start the entry of the Detail Line Items for the Proposal and:
✓If the Inplace Editing Edit Mode is in effect, a new, blank Detail Line Item will be inserted and the Drop-Down Selection List of Sale-Purchase Items will be displayed.
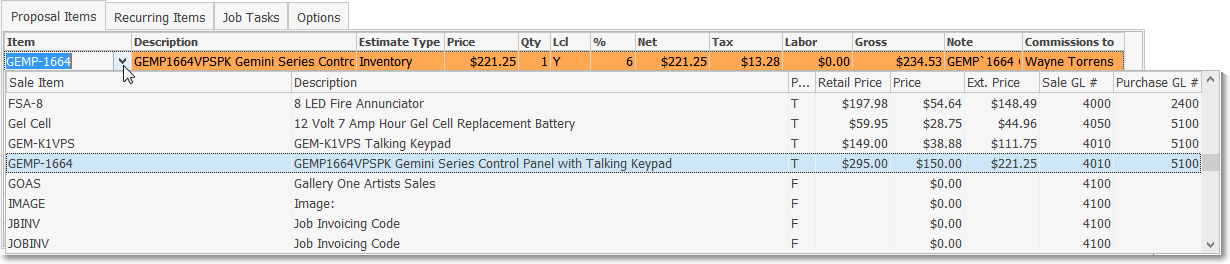
•Even if you used a Template (see Copy from Template above) or Proposal Package (see Proposal Package below), you may need to modify some of the line items or add additional Proposal Items.
•See Proposal Items Tab chapter for complete information on entering Detail Line Items within the Proposal Items tab.

Proposals Form - 5 Detail Line Items added
✓If you have too many Sale-Purchase Items defined to easily make your selection, Press Alternate and F2 at the same time (Alt+F2) to activate the Advanced Sale Item Lookup.
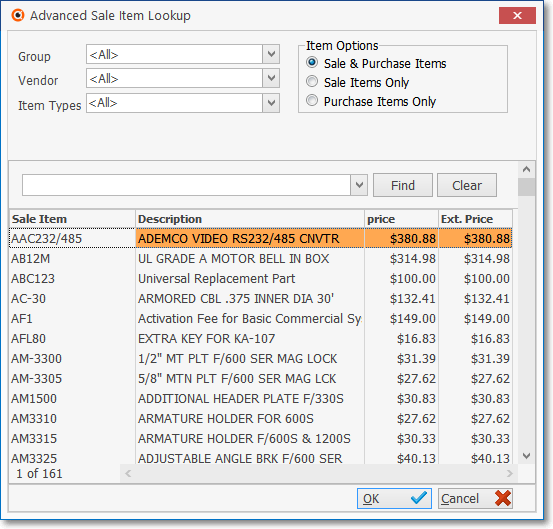
Advanced Sale Item Look-up dialog
❖See the Advanced Sale Item Look-up chapter for more information about this feature.
❑Proposal Creation Shortcuts: Using the Packages and Templates Icons to speed the Proposal's Creation.
•Proposal Package - If this is a Proposal that conforms to a predefined Proposal Package,
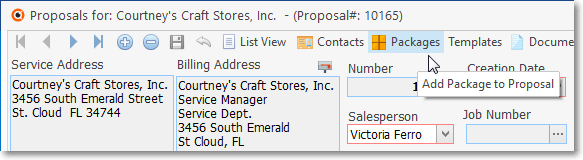
✓Select this Packages option at the top of the Proposal Form (see mouse pointer in the illustration above).
✓Using the Search Proposal Package dialog (shown below), Choose the appropriate Proposal Package.
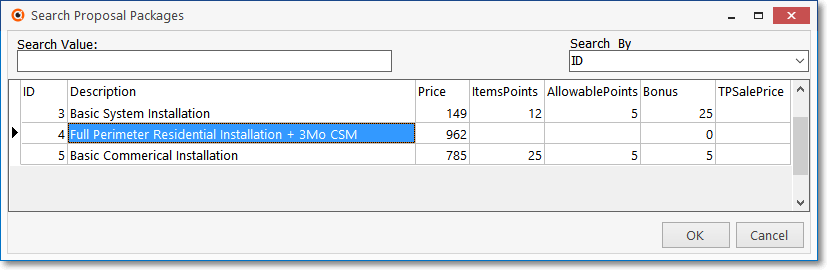
Search Proposal Package dialog
▪Search By - Use the Drop-Down Selection List to Choose either the Package ID, its Description or a Price to Search By.
▪Search Value - Enter the appropriate numbers, characters, or value to locate the desired Proposal Package.
▪Select - Click on the desired package..
▪Click OK when you have located the correct package.
✓The Detail Line Items for the selected Proposal Package will be automatically inserted into the Proposal Form's Proposal Items tab (see immediately below).
•Copy From Template - If this is a Proposal which substantially matches a previously created Proposal, for any Prospect or Subscriber, you can use that previously created Proposal as a Template for this one.

✓Select this Templates option at the top of the Proposal Form (see mouse pointer in the illustration above).
✓Using the Proposal Search dialog (shown below), Choose the appropriate Proposal.
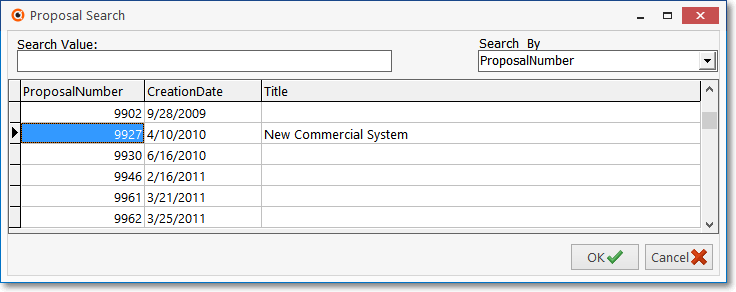
Proposal Search dialog
▪Search By - Use the Drop-Down Selection List to Choose either the Proposal Number or Creation Date to Search By.
▪Search Value - Enter the appropriate numbers, or date to locate the desired Proposal Template.
▪Select - Click on the desired template.
▪Click the OK button when you have located the correct template.
✓The Detail Lines for the selected Proposal Template will be automatically inserted into this Proposal.
•Documents - Select this option to open the Documents dialog from which a Document may be attached to the currently selected Proposal.
•Print - Select this option to open the Print Proposals dialog which will be defaulted to print the currently selected Proposal.
❑Other Notes and Comments fields:
View of a new Proposal Form record - with Detail Line Item Note entry, Comments field, & Internal Notes field with F-9 Time Stamp feature
1.Detail Line Item: To enter any additional information that will help the Prospect/Subscriber better understand the sale items on this Proposal,
a.Use the Note fields in the Detail Line Items will be printed on the actual Proposal. and are Rich Text Editor capable
b.As noted above, use the Proposal Headers and/or Footers (see the Proposal Paragraphs and Proposal chapters for additional information).
2.Comments - This field should only be used to record "Internal" notes and/or comments and will not be printed on the actual Proposal. but it is Rich Text Editor capable.
3.Internal Notes Press (F9) for timestamped entry - This field is also used to record "Internal" notes and/or comments, has a Time Stamp (F9) feature, and will not be printed on the actual Proposal.
✓It is not Rich Text Editor capable.
❑Recurring Items tab - Entering the proposed Recurring Items to (optionally) be included on the Proposal when it is printed.
•Click the Recurring Items tab on the Proposals Form.
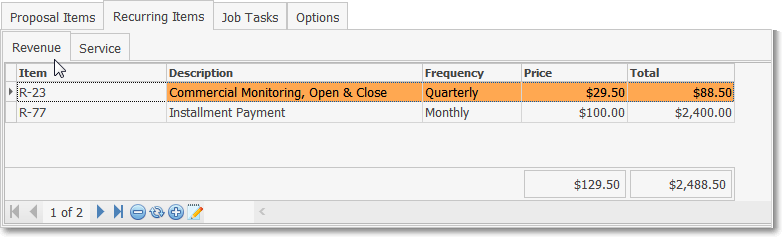
Recurring Items tab - Revenue sub-tab
✓This tab provides a means to define the Recurring Revenue Items - both for Recurring Revenue charges and for Recurring Service obligations - that may be included with this Proposal.
✓See the Recurring Items tab chapter for complete information on entering Recurring Revenue Items.
•When you Print Proposals, you will be offered the option to include this Recurring Information on the Proposal.
❑Job Tasks tab - Entering the Job Tasks to (optionally) be included in a Job Costing record and/or to create a Work Order for the installation.
•If this Proposal is converted to a Job in the Job Costing System, these tasks will be inserted in the Job Tasks tab on the Job Costing Form.
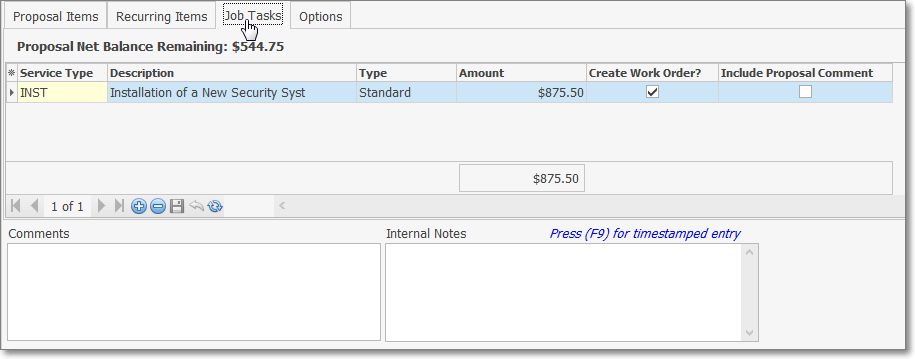
Job Tasks tab on the Proposal Form
•If the Proposal is converted to an Invoice, this Job Task information is not used - it will simply be here for reference.
✓See the Job Tasks tab chapter for complete information about this feature.
❑Options tab - Entering the proposed Proposal Options to be included on the Proposal when it is printed.
•Click the Options tab on the Proposals Form.
✓This tab provides a means to define any optional features the Subscriber may select to include in their system.
•When printing the Proposal, you will be offered the option to include an Additional Option Sheet with the Proposal.
✓See the Options tab chapter for complete information abut this feature.
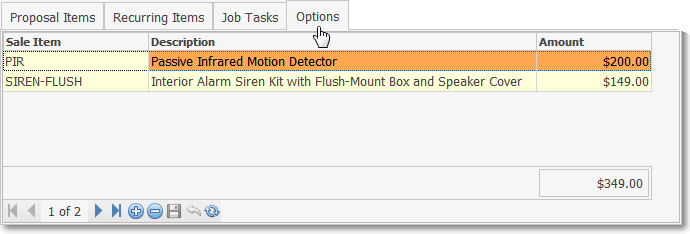
Options tab on the Proposal Form
❑Printing the Proposal - Once the Proposal has been entered, you will need to print it for the Prospect.
•Open a Prospect or Subscribers Form and locate (F2 Search) the desired record.
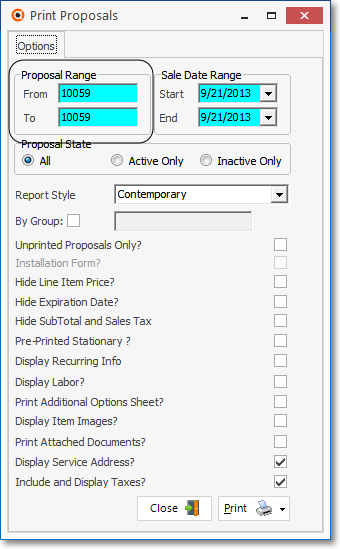
Print Proposals dialog opened from the Proposal Form
✓On the Prospect Form's Receivable menu, or the Subscribers Form's Receivable menu, Select Proposals.
✓Using the List Icon on the Proposals Form, locate and Double-Click on the Proposal number you want to Print.
✓That Proposal record will be displayed on the Proposals Form
✓Click the Print Icon on the Proposals Form to make a printed copy of the Proposal.
▪If an Alternate Address was selected for a Subscriber's Proposal, that will be the address printed on the Proposal.
▪Also see Custom Report Formats for information about how to change the default Proposal format.
✓Click the Email Icon when Previewing a Proposal to send the Proposal as an attachment via the Web (see E-mail the Proposal).
❑Converting a Subscriber's Proposal: The Proposal may be converted to an Installation Order, an Invoice or a Job.
•Convert - The Convert button is located at the top of the Proposal Form in the Actions section
✓Clicking the down arrow ‚ on the right of Convert button displays the list of conversion options:

Proposal Form - Convert options
➢Note: Also, see the Proposals chapter in the Prospect Tracking System, and the four associated sub-chapters (listed below) for a detailed discussion of how to create, estimate, print and ultimately to Convert a Proposal to an Invoice or a Job.
a.Proposal Items - Any number of Proposal Items may be added to the Proposal.
b.Recurring Items - Used enter the proposed Recurring Revenue Items based Services (e.g., Monitoring, Service Contract, Open/Close Reporting).
c.Job Tasks - Used to define the Job Costing Tasks that would be required to complete this installation.
d.Options - Used to define additional Optional Service Items that the Subscriber may want to accept in addition to the basic Proposal.