❑Warehouse Inventory Form provides a list of all previously defined Inventory Items
❖When first implementing the Inventory Tracking & Job Costing module:
a) Define the Inventory Items that are to be tracked and/or execute the ADI Inventory Import procedure.
b) Print the Inventory Worksheet report to get an Inventory List which may then be used to make an Inventory Count easier.
c) Count the "in-stock" Inventory Items to quantify what's On Hand
d) Use the Warehouse Inventory Form (which lists the Inventory Items currently stored at the selected Warehouse Location) to Adjust those Quantities to match that On Hand Inventory Count
•There are a two ways to access the Warehouse Inventory Form and the contents of the two versions of the Warehouse Inventory Forms are substantially different:
1. Open Warehouse Form from the Warehouse Maintenance Menu:
a)From the Backstage Menu System Select Maintenance then Select the General sub-menu and Choose General Maintenance, or
b)From the Quick Access Menu, Select the Maintenance sub-menu and Choose General Maintenance
c)On the (General Maintenance's) Miscellaneous Menu
i.Select the Inventory sub-menu and
ii.Choose Warehouse with the special purpose View Inventory Icon.

Warehouse Form - Inventory button
d)Click the View Warehouse Icon (see the mouse pointer in the illustration above) at the top of the Warehouse Form to open the Warehouse Inventory Form.
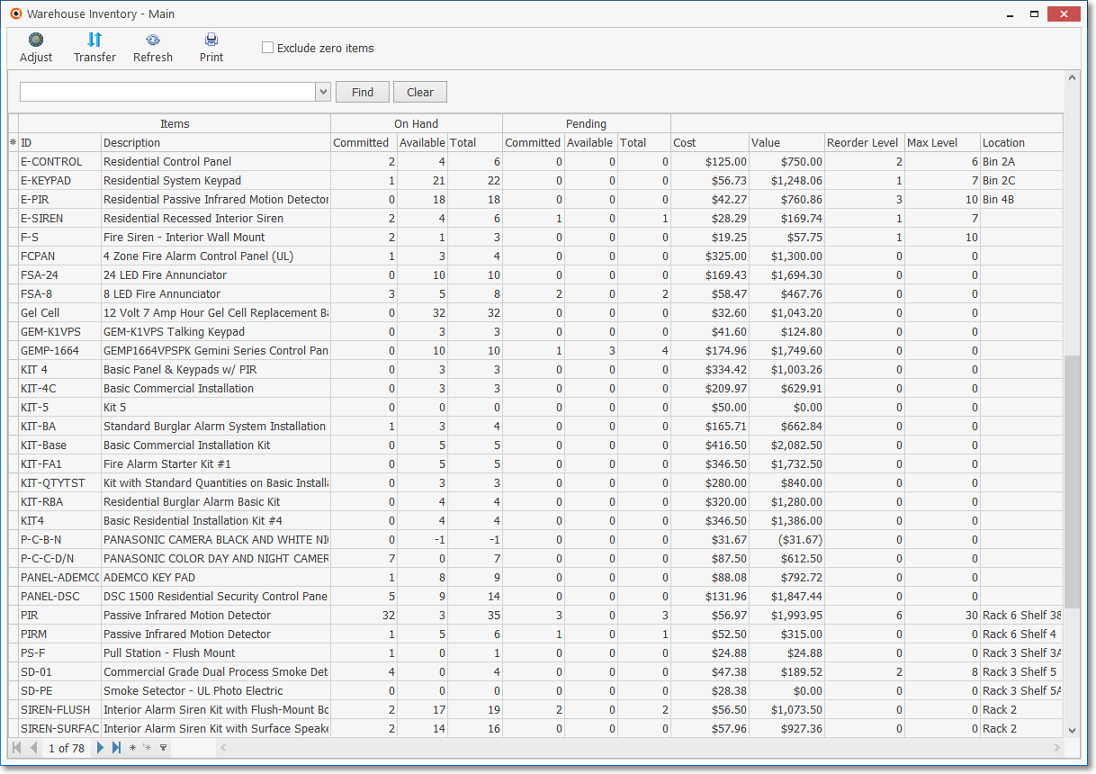
e)The Warehouse Inventory Form (as illustrated below) will be displayed and this Warehouse Inventory Form version includes:
oA list of all Inventory Items identified as such which have been defined in the Sale-Purchase Item Form
oThe current On Hand and Pending Quantities ("counts") of those Inventory Items for the selected Warehouse Location (by not the Quantities for any other Warehouse Location)
oA Print option which will produce (subject on any Grid filters or rearrangement of the columns on the Warehouse Inventory Form) a printed List or Exported file of all the Inventory Items
Warehouse Inventory Form - Opened from the Warehouse Form
▪Choose the Columns to be Viewed:
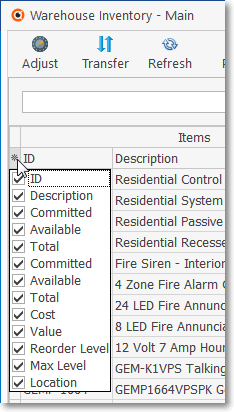
Available Columns
oCheck any Header Name to be included in the List View (by default, All Header Names will be Checked)
oRemove the Check for any Header Name (see illustration below) that is to be removed from the List View.
▪Search the Grid:

oFind - Enter text to search for a specific record, then Click the Find option.
oClick on the desire record to view and/or make the changes as needed (see the "Special Purpose Buttons on the Warehouse Inventory Form" section below).

Find a Sale-Purchase Item in the Inventory List
oClear - To remove the text to search for entry and redisplay the entire list, Click the Clear option
2. Open the Sale-Purchase Item Form:
a)From the Backstage Menu System Select Maintenance and Choose Sales-Purchase Items, or
b)From the Quick Access Menu, Select Maintenance and Choose Sales-Purchase Items.
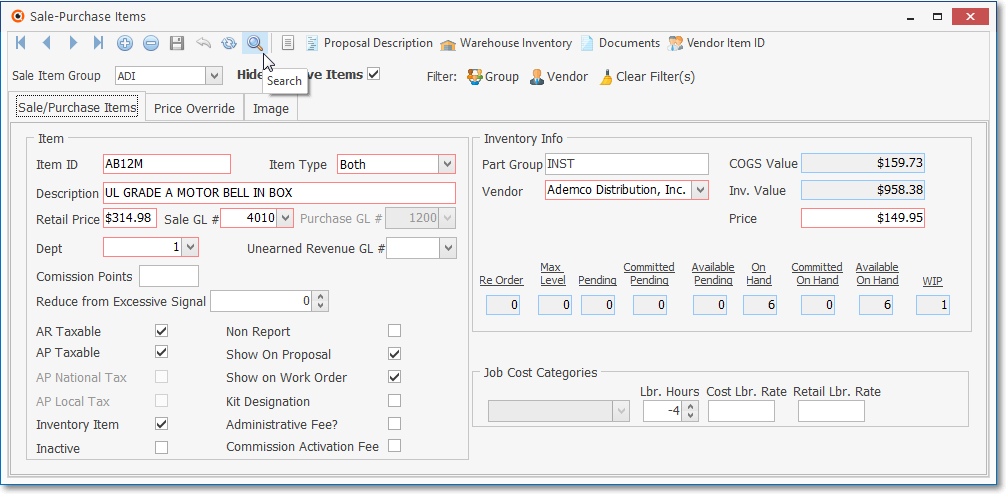
Sale-Purchase Item Form - Search Icon
c)Select the Search Icon and locate the desired Inventory Item.
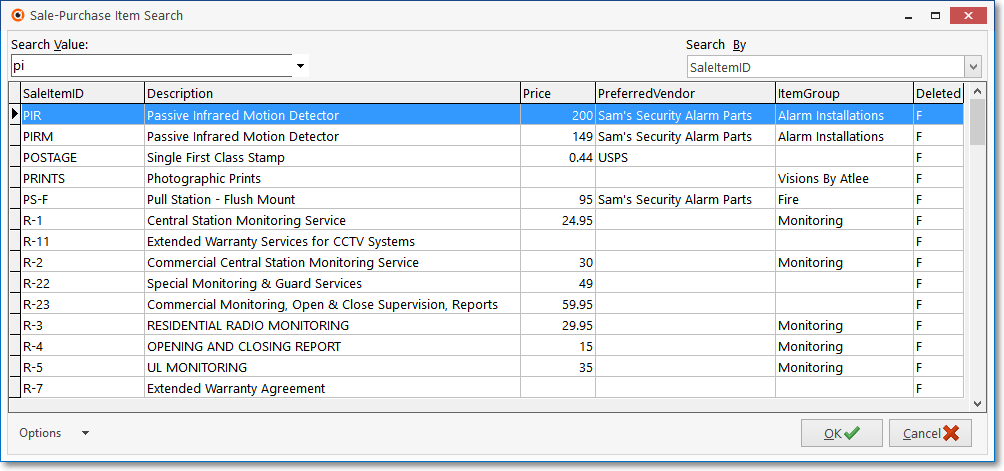
Sale-Purchase Item Search dialog
d)When the desired Inventory Item is displayed on the Sale-Purchase Item Form, Click the Warehouse Inventory Icon (see the Arrow Pointer in the Sale-Purchase Item Form illustration below).
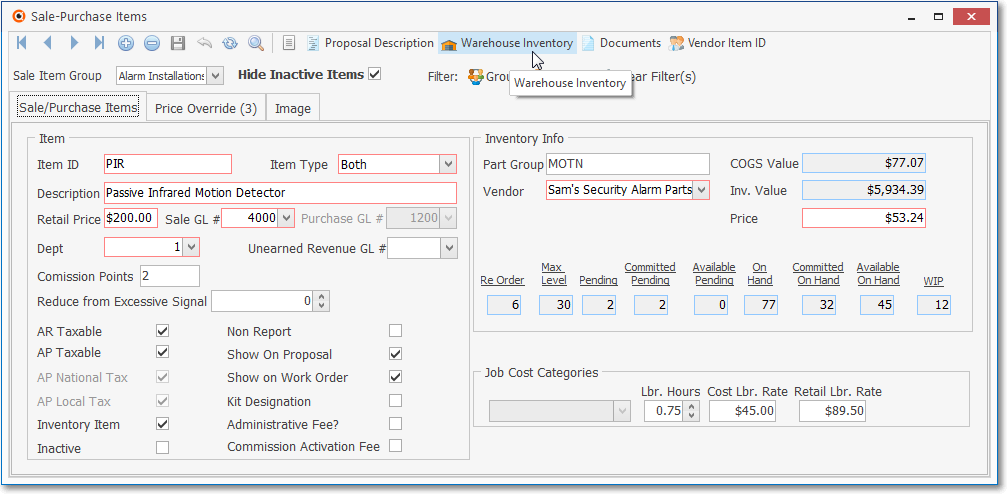
Sale-Purchase Item Form - Warehouse Inventory Icon
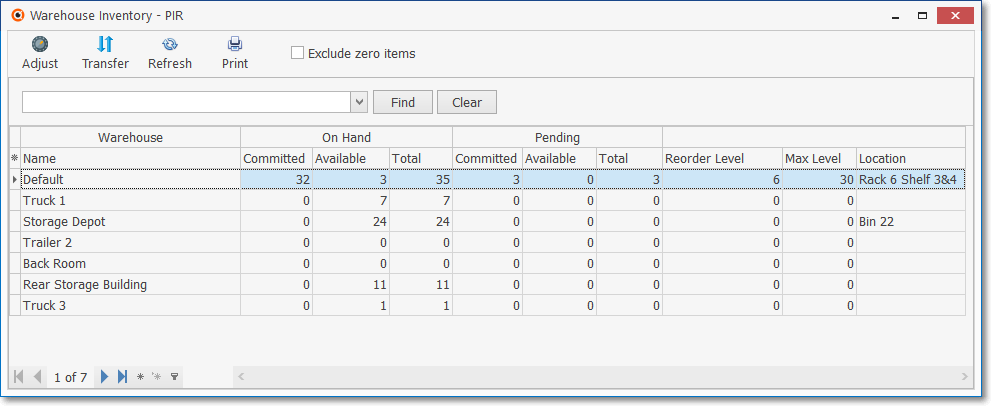
e)The Warehouse Inventory Form will be displayed showing all of the Warehouses and the Quantity of On Hand (i.e. Committed, Available, Total), and Pending (i.e., Committed, Available, Total) for the selected Inventory Item stored in each Warehouse facility.
Warehouse Inventory Form - accessed from the Sale-Purchase Items Form
❑Understanding and Using the Warehouse Inventory Form:
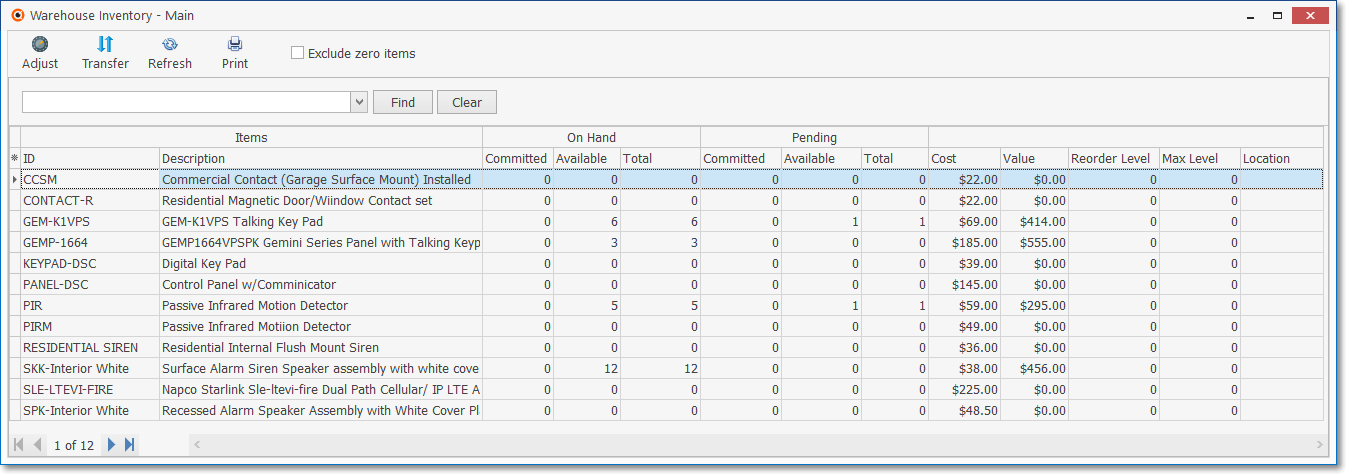
1.When the Warehouse Inventory Form is opened from the Warehouse (maintenance) Form, each defined Inventory Item is listed (see "Exclude zero items" below for the only exception) along with its associated Quantity and Location information.
✓Exclude zero items - Check this box to eliminate from this list any Inventory Items with a Quantity of zero ("0") in all On Hand (i.e. Committed, Available, Total),and Pending (i.e., Committed, Available, Total) fields.
Warehouse Inventory Form - accessed from the Warehouse (maintenance) Form
2.When the Warehouse Inventory Form is opened from the Sale-Purchase Item Form, each defined Warehouse is listed along with the Quantity and Location information for the selected Inventory Item.
✓Exclude zero items - Check this box to eliminate any Warehouse from this list when none of the selected Inventory Item is being stored there.
Warehouse Inventory Form - accessed from the Sale-Purchase Items Form
•Print - This option is available in both Warehouse Inventory Forms (i.e., listing the Warehouses, listing the Inventory Items) and will display a Print Preview dialog of the currently formatted Grid Data.
Warehouse Inventory Form - when accessed through the Warehouse Form
•Column Headings - Regardless of which method was used to open the Warehouse Inventory Form, these are the fields that are displayed on the Form:
✓When displayed from the Warehouse Form, the first columns will be:

▪Items - This Heading has two sub-headings:
oID - The Sale-Purchase Item Code for the Inventory Item.
oDescription - The description of the Sale-Purchase Item.
✓When displayed from the Sale-Purchase Item Form, the first columns will be:

▪Warehouse - Lists the Name of the Warehouses which may, or may not have these Inventory Items (see "Exclude zero items" below for the only exception).
✓On Hand
▪Committed - The quantity that is physically in the Warehouse but is committed to a specific Job.
▪Available - The quantity that is physically in the Warehouse and not committed to a specific Job.
▪Total - The quantity that is physically in the Warehouse.
✓Pending
▪Committed - Those quantity of items that have been Ordered and Reserved specifically for a Job.
▪Available - The quantity that has been Ordered for "stock" but not yet Received.
▪Total - The quantity that has been Ordered, but not yet Received.
✓Other Data - (Note that the Cost and Value fields are not shown when the Warehouse Inventory Form is accessed from the Sale-Purchase Items Form.)
▪Cost - This is the current COGS Value (determined by the chosen Inventory Valuation Method) of the selected Inventory Item
▪Value - This is the Value of all of these Inventory Items which are currently in stock.
▪Reorder Level - If the Available On Hand level is at or below this value, this Inventory Item will be included on the Inventory Re-Order Report.
▪Max Level - When a Re-Order is required, the difference between the sum of the Available On Hand plus the Available Pending and the Max Level will be the recommended Re-Order quantity on the Inventory Re-Order Report.
▪Location - Enter the specific Location where this Inventory Item is stored within the selected Warehouse.

✓Click the Location field of the Inventory Item for which you want to add or update specific location information.

▪Click the Ellipse button (it will appear to the right of the Location field when that field is Clicked).
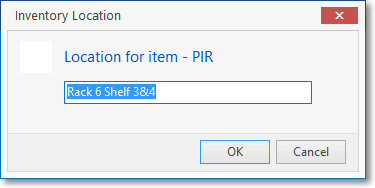
▪Enter a specific Location where this item may be found.
▪Click OK to write this information into the Location field of the Warehouse Inventory Form.
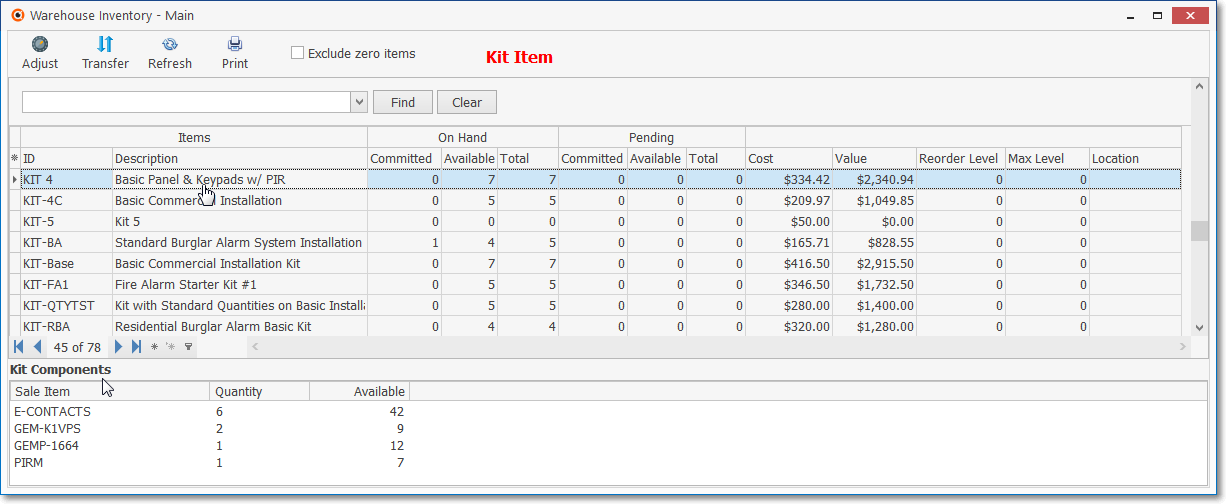
•Kit Components - When an Inventory Item is displayed on the Warehouse Inventory Form that is a User Defined Kit, the Kit Components section will be displayed at the bottom of the Warehouse Inventory Form.
Kit record on the Warehouse Inventory Form accessed through the Warehouse Form
✓The Inventory Items that make up this Kit, the required Quantity, and number Available are displayed automatically when a Kit Item is selected..

Kit Components list of the Inventory Items that make up the selected Kit
❑Special Purpose Adjust, Transfer, and Transfer Buttons on the Warehouse Inventory Form:

Warehouse Inventory Form - Icons & Options
•Adjust - Click the Adjust Icon to change the Inventory Count(s) displayed on the Warehouse Inventory Form.
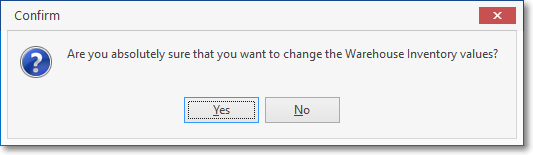
Confirm that you want to Adjust Inventory Values
✓You must Confirm that this is what you want to do.
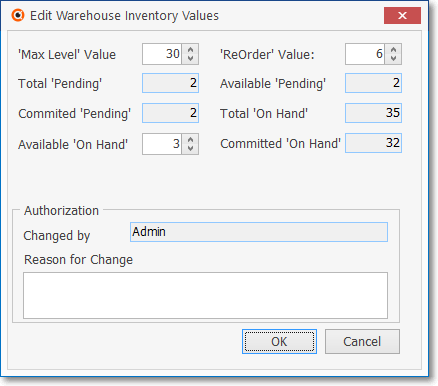
✓The Edit Warehouse Inventory Values dialog to re-set the counts as needed, will be displayed.
Edit Warehouse Inventory Values
✓Select and Update the specific Inventory Count field(s) that need to be revised:
▪'Max Level' Value: - The maximum Quantity of this Inventory Item that should be in-stock (Available 'On Hand') at any time.
▪'ReOrder' Value: - The Quantity of this Inventory Item which is in-stock (Available 'On Hand') that triggers a Re-Order Request (which is documented in the Inventory Reorder Report).
▪Available 'On Hand': - The Quantity of this Inventory Item that is in-stock at any time.
![]()
oRight-Click this Available 'On Hand' field to (re-)set the Increment in which the Up/Down Arrows will change the current Quantity and display the resultant Quantity.
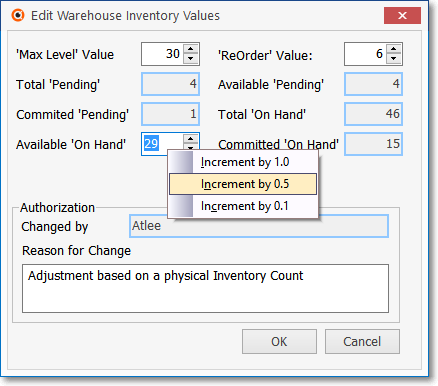
oThe choices are 1.0, 0.5, and 0.1
oOnce the field is (re-)set, this Increment setting will become the default.
✓Authorization - Identify who permitted this change.
▪Changed By - The current User's Name is inserted automatically.
▪Reason for Change - Enter the Reason for this Change
▪Click OK to save the change or Cancel to abort the revisions.
✓See the Defining Inventory and Job Costing Items chapter for more information about the fields on this Edit Warehouse Inventory Values Form.
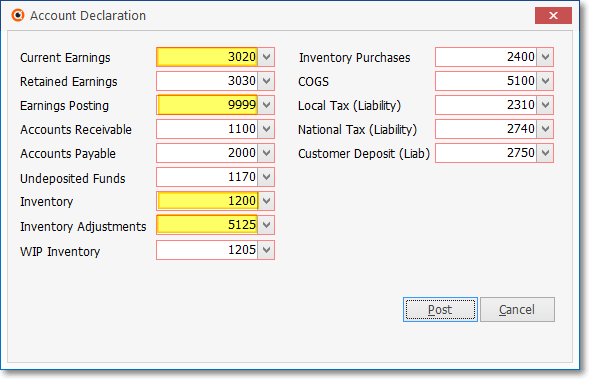
•For General Ledger System Users: When an Inventory Adjustment is recorded, four Mandatory Accounts are updated as follows:
Inventory related Mandatory Accounts
1.Inventory Adjustments - An Expense Account which is Credited (added to) if the Quantity of Available on Hand was increased; or Debited (reduced) if decreased.
2.Earnings Posting - A Net Income Debit Account which is Debited (added to) if the Quantity of Available on Hand was increased; or Credited (reduced) if decreased.
3.Current Earnings - An Equity Account which is Credited (added to) if the Quantity of Available on Hand was increased; or Debited (reduced) if decreased.
4.Inventory - An Asset Account which is Debited (added to) if the Quantity of Available on Hand was increased; or Credited (reduced) if decreased.
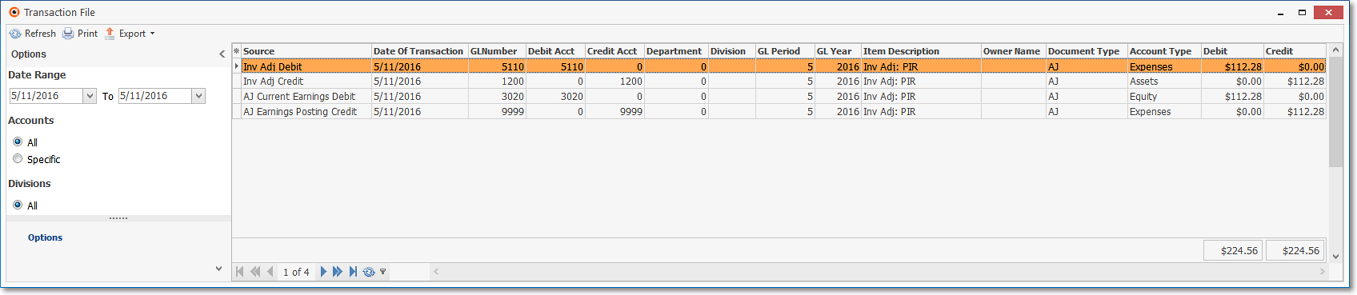
Transaction File dialog - Inventory Adjustment entries
•Transfer - Click the Transfer button to Move Inventory Item(s) from one Warehouse to another.
➢Note: Also, see the Transfer discussion in the Warehouses chapter for another way to Transfer Inventory.

Warehouse Inventory Transfer dialog
✓Sale Item - The Inventory Item that is to be relocate.
✓From - Click the Warehouse Search Icon to locate the appropriate Warehouse Location FROM which a specified Quantity of this Inventory Item will be removed.
▪Search By - Use the Drop-Down Selection List to Choose the search method which may be by Name or by Warehouse ID number.
▪Search Value - Enter the characters with which to perform the search.
▪Click on the desired Warehouse.
▪Click the OK button to close the Warehouse Search dialog which will also insert the selected record into the From field.
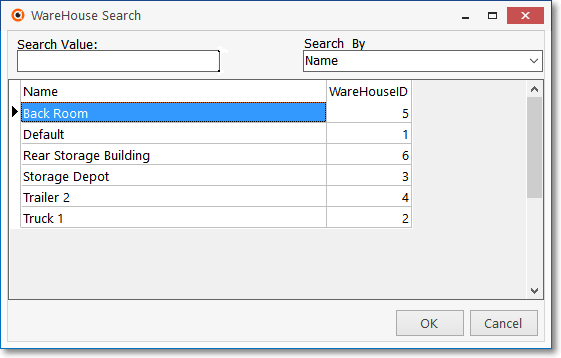
Warehouse Search dialog
▪Once the FROM Warehouse is selected, the On Hand and Available On Hand Quantities that are currently stored in that Warehouse will be displayed.
✓To - Click the Warehouse Search Icon to locate the appropriate Warehouse Location TO which a specified Quantity of this Inventory Item is to be moved.
▪Search By - Use the Drop-Down Selection List to Choose the search method which may be by Name or by Warehouse ID number.
▪Search Value - Enter the characters with which to perform the search.
▪Click on the desired Warehouse.
▪Click the OK button to close the Warehouse Search dialog which will also insert the selected record into the TO field.
▪Once the TO Warehouse is selected, the On Hand and Available On Hand Quantities that are currently stored in that Warehouse will be displayed.
✓Quantity - Enter the Quantity to be Transferred. The default value will be 1.
▪This Quantity may not be greater than the Available On Hand Quantity currently stored in that Warehouse.
▪The Quantity entered may not be a negative value.
✓Transfer - Click the Transfer button to execute the move.
✓Close - Click the Close ![]() box on the top of the Form to exit the Warehouse Inventory Transfer dialog.
box on the top of the Form to exit the Warehouse Inventory Transfer dialog.
•Refresh - For those Users who are operating MKMS on a network with multiple workstations that may also be accessing this data,
✓Click the Refresh Icon to pull the most current data set from the SQL Database.
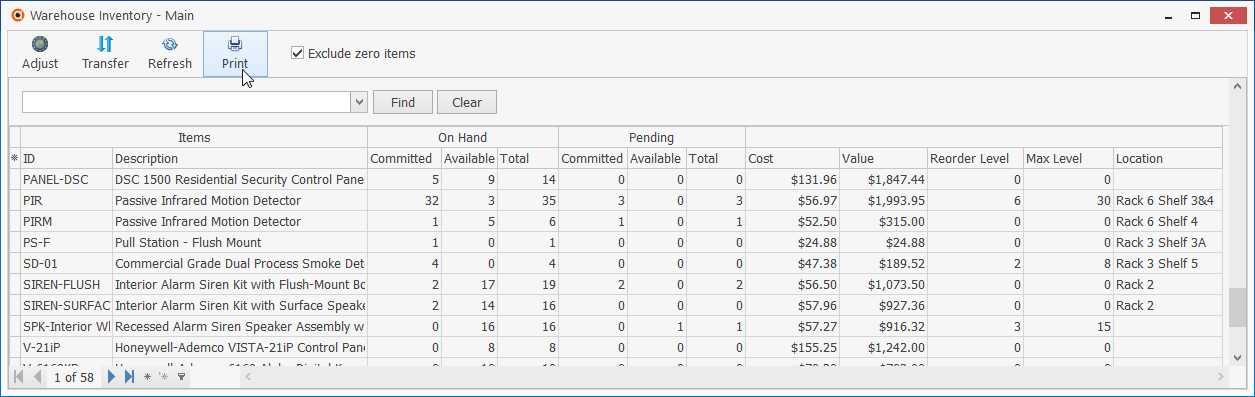
•Print - This Icon is only available when the Warehouse Inventory Form is opened from the Warehouse Maintenance Form:
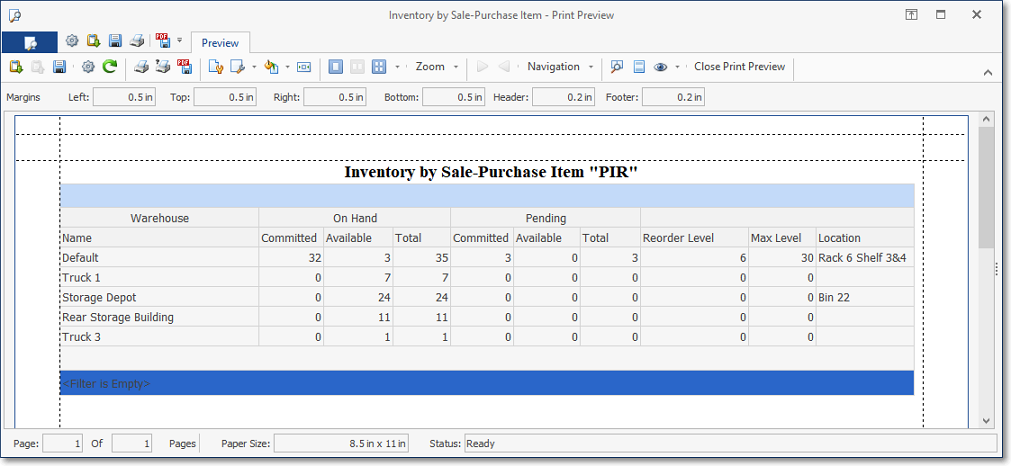
✓Click the Print Icon to display the Print Preview dialog.
✓Because this Warehouse Inventory Form's List of Inventory Items is displayed in a Grid, it offers a Print Preview options.
❖See the Grid & Lists - Print Preview - Export Data chapter for complete information on using the Grid, including its Filter, Column Re-configuration, Export and Print Preview options.
•Exclude zero items - See above.
•Close - Click the Close ![]() box on the top of the Form to exit the Warehouse Inventory Form.
box on the top of the Form to exit the Warehouse Inventory Form.