❑For Inventory Tracking and Job Costing System Users:
•Sale-Purchase Item entries representing Inventory Items may be used Both for a Sale item and as a Purchase item, when using the Accounts Payable System as well as the Inventory Tracking System and/or Job Costing System.
✓As with all Data Entry Forms within MKMS, any field boxed in Red is a mandatory field that must be completed for the record to be saved.
•To open the Sale-Purchase Item Form:
a)From the Backstage Menu System Select Maintenance and Choose Sales-Purchase Items, or
b)From the Quick Access Menu, Select Maintenance and Choose Sales-Purchase Items.
❑Understanding the Inventory related Special options on the Sale-Purchase Items Form:

•Vendor Item ID - Because your Company is also using the Accounts Payable System and its Purchase Order capability, you will want to identify the specific Part Number used by each Vendor from whom a Sale-Purchase Items (Inventory Item) will be ordered.
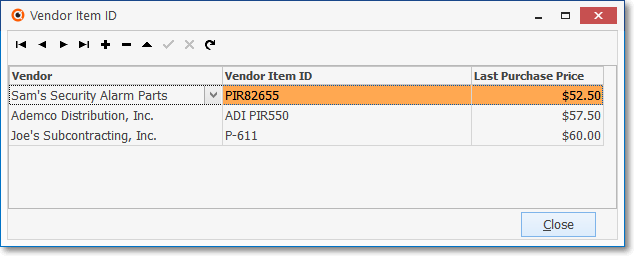
Sale-Purchase Items Form - Vendor Item ID dialog
✓Vendor Item ID - Click the Vendor Item ID button to open the Vendor Item ID dialog.
▪Click Add ("+").
▪Vendor - Use the Drop-Down Selection List to Choose the Vendor whose Part Number you are entering.
▪Vendor Item ID - Enter the Part Number used by this Vendor to identify the selected Sale-Purchase Item.
▪Last Purchase Price - This is a system maintained field.
▪Click Save ("ü") to record the entry.
▪Repeat this process until you've identified the Part Number used by each of the Vendors from whom this item is purchased.
▪To return to the Sale-Purchase Items Form, Click the Close button or Close ![]() box on this Vendor Item ID Form.
box on this Vendor Item ID Form.
•Proposal Description - Click the Proposal Description Icon to create a longer and more detailed description of this Inventory Item.
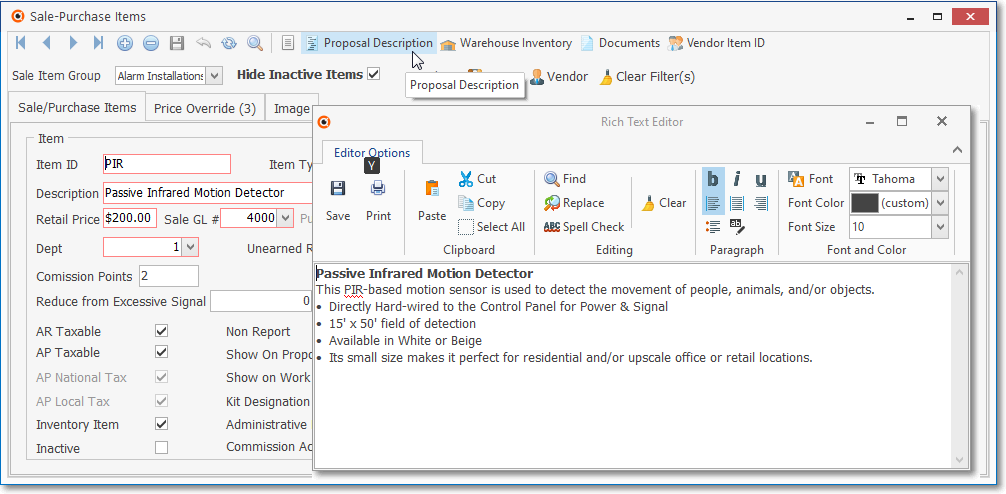
✓The expanded description entered here using the Rich Text Editor will be printed in addition to the Description field information (described above), on all Proposals containing this Inventory Item.
•Understanding the Image tab
✓Image - As shown in the illustration below, the Image tab is used to attach a picture of the Sale-Purchase Item, when appropriate.
▪By using this Image tab to identify an Inventory Item or Kit, it provides the User access to an actual picture of that Part's.Image which also be included on a printed Proposal (based on the options selected when Printing a Proposal).
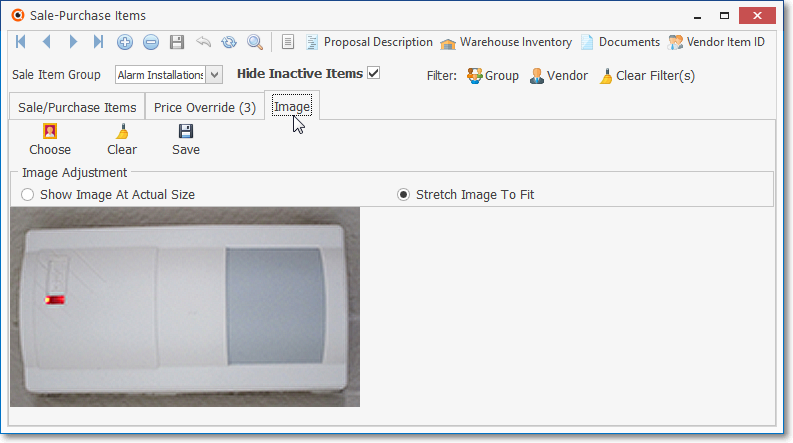
Sale Purchase Items - Image tab
▪To insert an Image:
a.Choose - Click the Choose button and, using the standard Windows® dialogue box provided, locate the desired file.
b.Image Adjustment - Once the Sale-Purchase Item's BMP or JPG file is selected, Choose the Image Adjustment method that best displays your Sale-Purchase Item in the display box by alternately Clicking Show Image At Actual Size and Stretch Image To Fit.
c.Save - Click the Save button once you are satisfied with the Image Adjustment setting.
d.Clear - If you want to re-do this process, Click the Clear button and repeat the steps above.
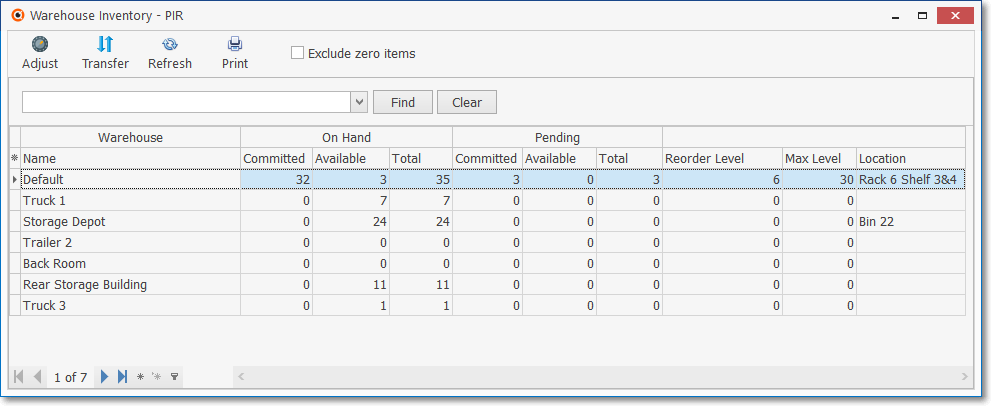
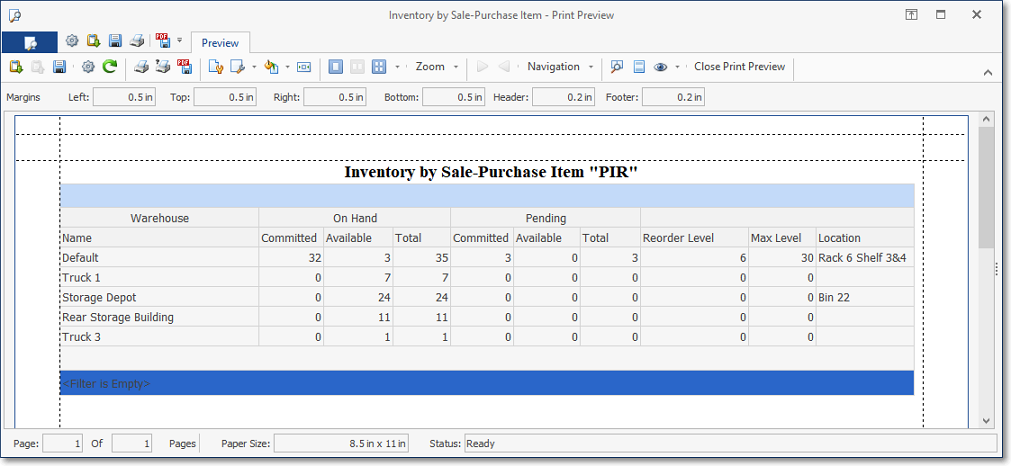
•Warehouse Inventory - Accessing the Warehouse Inventory Form (See the Warehouse Inventory chapter for complete information about using the Warehouse Inventory Form)

✓To see the current Quantities by Warehouse of the currently displayed Inventory Item, Click the Warehouse Inventory Icon on the Navigation Menu of the Sale-Purchase Items Form to display the Warehouse Inventory Form shown below.
▪Exclude zero items - Check this box to eliminate any Warehouse from this list if it has none of the selected Inventory Item being stored there.
Warehouse Inventory Form
✓Warehouse - column showing the places defined as Warehouses.
✓Location - To enter the specific Location within this Warehouse
▪Click within the Location column of the record to be updated with Location information
▪Click the Ellipse button ![]() (which will appear on the right of that Location field).
(which will appear on the right of that Location field).
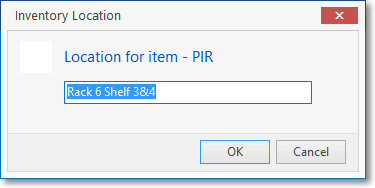
▪Enter a specific Location where this Inventory item is stored within the selected Warehouse.
▪Click OK to record this entry.
✓Status Line - row (next to the Warehouse column) displays a series of columns with the current Committed, Available, and Total counts for this Inventory Item.
❑Special Icons on the Warehouse Inventory Form: Click the Warehouse Icon on the Sale-Purchase Item Form to view the Warehouse Inventory Form.
•These buttons provide special Inventory Related functions for the Inventory Tracking & Job Costing System.
•Exclude zero items - Check this box to eliminate any Warehouse from this list if it has none of the selected Inventory Item being stored there.

•Adjust - Edit Warehouse Inventory Values - Allows you to (Re-)Set the rules for Reordering Inventory items, and to adjust actual counts based on the results of a physical Inventory Counting process.
✓See the Editing Warehouse Levels chapter for complete information about making Inventory Count Adjustments.
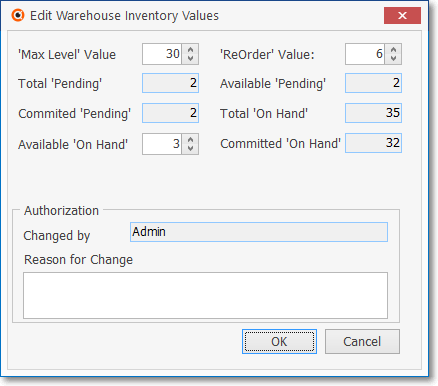
Edit Warehouse Inventory Values
✓Click on the Inventory Count field(s) to be revised.
▪'Max Level' Value: - The maximum number of this Inventory Item that should be in-stock (Available 'On Hand') at any time.
▪'ReOrder' Value: - The number of this of this Inventory Item which is in-stock (Available 'On Hand') that triggers a Re-Order Request (documented in the Inventory Reorder Report).
▪Available 'On Hand': - The number of this Inventory Item that is in-stock at any time.
▪Adjust these numbers, as required.
✓Authorization
▪Changed by - Completed automatically based on the Login Name of the current User.
▪Reason for Change - Enter the Reason for this Change (which will be included the Inventory Adjustments Report).
✓Click OK to save the change or Cancel to abort the revisions.
•Transfer Inventory - See the Transfer Inventory chapter for complete information on how to move Inventory from one Warehouse to another

Warehouse Transfer Form
•Moving Inventory Item(s) from one Warehouse to another.
✓Sale Item - The Inventory Item you want to relocate.
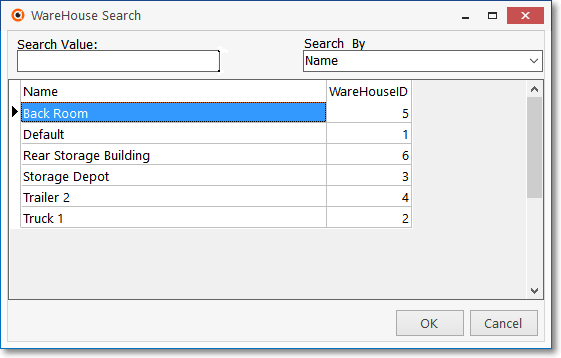
✓From - Click the Warehouse Search Icon to locate the appropriate Warehouse Location FROM which to move this item from.
▪Search By - Use the Drop-Down Selection List to Choose the search method which may be by Name or by Warehouse ID number.
▪Search Value - Enter the characters with which to perform the search.
▪Click on the desired Warehouse.
▪Click the OK button to close the Warehouse Search dialog which will also insert the selected record into the From field.
Warehouse Search dialog
✓To - Click the Warehouse Search Icon to locate the appropriate Warehouse Location TO which to move this item.
▪Search By - Use the Drop-Down Selection List to Choose the search method which may be by Name or by Warehouse ID number.
▪Search Value - Enter the characters with which to perform the search.
▪Click on the desired Warehouse.
▪Click the OK button to close the Warehouse Search dialog which will also insert the selected record into the TO field.
✓Quantity - Enter the Quantity to be Transferred. The default value will be 1.
✓Transfer - Click the Transfer button to execute the move.
✓Close - Click the Close ![]() box to Exit the Warehouse Inventory Transfer Form.
box to Exit the Warehouse Inventory Transfer Form.
•Refresh - For those Users who are operating MKMS on a network with multiple workstations that may also be accessing this data,
✓Click the Refresh Icon to pull the most current data set from the SQL Database.
•Print - This Icon is only available when the Warehouse Inventory Form is opened from the Warehouse Maintenance Form:
✓Click the Print Icon to display the Print Preview dialog.
✓Because this Warehouse Inventory Form's List of Inventory Items is displayed in a Grid, it offers a Print Preview options.
❖See the Grid & Lists - Print Preview - Export Data chapter for complete information on using the Grid, including its Filter, Column Re-configuration, Export and Print Preview options.
•Close - Click the Close ![]() box to close the Warehouse Inventory Form.
box to close the Warehouse Inventory Form.