❑Sale Item Groups are provided to categorize Sale-Purchase Items - particularly Inventory Items - that may number in the hundreds for some Companies.
•When entering an Invoice, Bill, Purchase Order or a Proposal, locating the correct Sale-Purchase Item isng a normal Drop-Down Selection List may be very difficult because of the length of that list (the large number of Sale-Purchase Items which are on file).
•To speed this selection process, use the Advanced Sale Item Look-up.
✓This Advanced Sale Item Look-up process requires that most - if not all - Sale Purchase Items will have been assigned to a Sale Item Group.
✓Once this has been done, when selecting a Sale-Purchase Item, just indicate that the list should only contain items in a specific Sale Item Group by using the Advanced Sale Item Look-up feature.
❑Sale Item Group Assignments
•It is likely that initially assigning every Sale-Purchase Item to a Sale Items Group was not a priority, because there were not that many items to look through.
✓Later, as the list of Sale-Purchase Items grows (and it will), this may be a necessity.
•To facilitate the assignment of a Sale Items Group to Sale-Purchase Items, use this Sale Item Group Assignment Form.
a)From the Backstage Menu System Select Maintenance and Choose the Receivables sub-menu then Select Sale Item Group Assignment, or
b)From the Quick Access Menu, Select Maintenance and Choose the Receivables sub-menu then Select Sale Item Group Assignment.
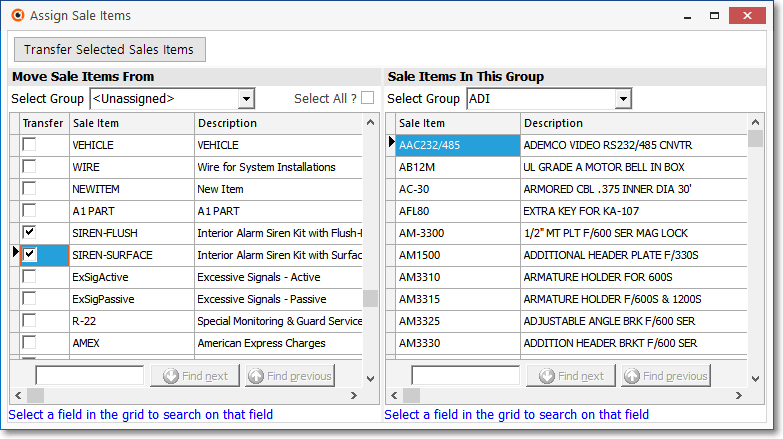
Sale Item Group Assignment Form
•There are two main sections on this Form:
1.Move Sale Items From - Choose the Sale Item Group using the Drop-Down Selection List provided to identify the Sale Item Group whose members (Sale-Purchase Items) will be subject to Transfer to the Sale Item Group identified on the right side of the Sale Item Group Assignment Form
▪Select Group - Use the left side Select Group Drop-Down Selection List to Choose the Sale Item Group (or more likely, the items with no Sale Item Group assigned - the <Unassigned> items) that are to be transferred to the Sale Item Group (which will be Chosen using the Select Group Drop-Down Selection List on the right side).
oThe concept is to find the <Unassigned> (the initial default selection) Sale-Purchase Items on the left side and move (Transfer) them to a Sale Item Group of similar Sale-Purchase Items on the right side.
▪Check the boxes of as many items as needed in the Transfer column on the left side which will identify them as the Selected ones that are to be transferred to the right side.
2.Sale Items In This Group - Identify which sign is to
▪Select Group - Use the right side Select Group Drop-Down Selection List to Choose the Sale Item Group to which the Selected left side Sale-Purchase Items are to be transferred.
▪Click the Transfer Selected Sales Items button to actually move them to the right side of the Form.
![]()
▪The Selected Sale-Purchase Items on the left will be instantly moved to the right side and automatically assigned the right side's selected Sale Item Group.
•To transfer all members (Sale-Purchase Items) of a Sale Item Group to a different Sale Item Group.
✓Select Group - Select the Sale Item Group within which all Sale-Purchase Items are to be re-assigned using left side Select Group Drop-Down Selection List.
▪All items assigned to that Sale Item Group will be listed.
▪Check the Select All? box.
✓Select Group - Use the right side Select Group Drop-Down Selection List to Choose the Sale Item Group to which all of the listed Sale-Purchase Items on the left side are to be transferred.
▪Click the Transfer Selected Sales Items button.
•Other features on the Sale Item Group Assignment Form:
✓Search Function - When selecting the items on the left side to be transferred to a selected Sale Item Group on the right side, if your naming or code assignment method has been consistent, you may use the Search function at the bottom of the Form to quickly locate items of a similar type.

▪As an example - If you named Inventory Items starting with the manufacturer's name:
▪Enter a portion of that name in the search box - The entry is not case sensitive.
oClick the column (either Sale Item or Description - in this case Description) where the comparison should be made.
oClick Find next (or Find previous) to locate the next item that matches the search entry.
▪If it is correct, Click the Transfer box to insert a Check mark.
▪It is now selected for transfer.
oClick the Description that matched the search and Click Find next (or previous) again to locate the next item.
oContinue this process until you have found all the members of the group you want to transfer to the right side.
▪Click the Transfer Icon to move them to the right side.
•Click the Close ![]() box on the top right of the Sale Item Group Assignments Form when all required processing is completed.
box on the top right of the Sale Item Group Assignments Form when all required processing is completed.