❑Creating an Invoice (for a New Sale to a Subscriber):
•Open the Subscribers Form and use the F2 Subscriber Search function to Locate the appropriate Subscriber record.
•Click the Invoices option on the Subscriber Options Menu on the Subscribers Form.
•Then, Select Invoices option on that Invoices option's sub-menu.
Invoice Form - New Invoice Entry defaults
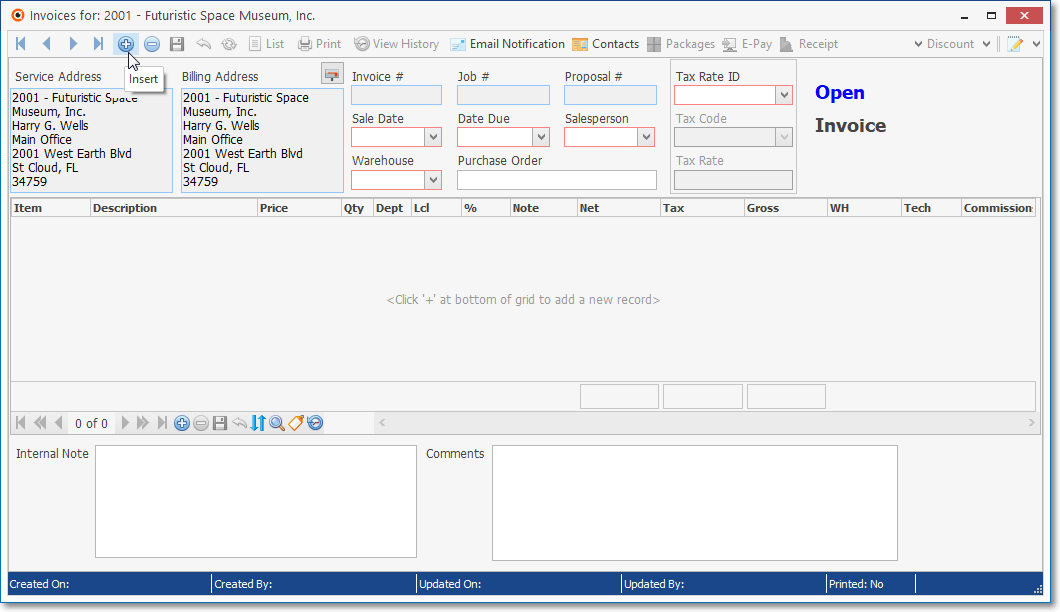
•Click the ![]() Icon on the Ribbon Menu at the top of the Invoice Form to create a new Invoice.
Icon on the Ribbon Menu at the top of the Invoice Form to create a new Invoice.
✓The Invoice Header fields will be populated as follows:
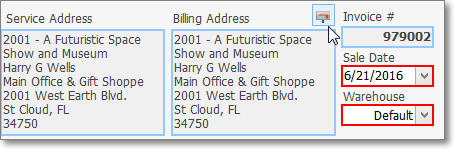
▪The Service Address and Billing Address information
▪The system maintained Invoice #
✓Predefined defaults will be inserted based on the system defaults (see detailed explanations below)
▪The mandatory information (boxed in Red) which must be entered to complete the Invoice Header is automatically filled in, but may be modified, as needed.
▪The defaults for the Sale Date ("Today"), the Due Date (see "Setting the Due Date" below), the Salesman (this will be the Salesperson of record for this Subscriber), and the Default Warehouse (identified in the Inventory Options tab in the User Options Form) will be inserted automatically, but may be changed.
➢Note #1:The Divisions Form allows your Company to identify a Default Warehouse for each Division
Thereafter, when Invoices, Purchase Orders, Bills and/or Work Orders are created for a Subscriber who was assigned to a Division (a Division assignment to a Subscriber is optional), by default, any Inventory related Transaction posted to one of those Invoice, Purchase Order, Bill and/or Work Order documents will automatically be assigned to that Warehouse but that Default Division Warehouse assignment may be changed as needed.
➢Note #2: The system maintained Job # and Proposal # fields are only populated when the Invoice was created by converting a Proposal, or from a Job Costing record.

System provided and Default Invoice Header information
✓Completing the Mandatory (boxed in Red) and Optional fields on the Invoice Header:
▪Sale Date - Assigned automatically as the current Date (Today).
oThis Sale Date may be reset using the Drop-Down Calendar/Date Entry field provided.
a)Click on the Date field and type the desired Date using a MM/DD/YYYY format; or
b)Use the Drop-Down Calendar/Date Entry field provided to Choose the desired Date
✓Setting the Due Date - The Due Date will be calculated and inserted automatically based on one of these two cases:
1)In Company Settings, the UseSubscriberTerms option is set to False ("F"): so the Due Date will be Sale Date + Value (i.e., Number of Days from the Sale Date which the Due Date should be set) based on the Terms defined in the Company Options - General sub-tab on the Company Options tab of the User Options Form; or
2)In Company Settings, the UseSubscriberTerms option is set to True ("T"): so the Due Date will be the Sale Date + Value (i.e., Number of Days from the Sale Date which the Due Date should be set) based on the Terms defined in the Receivables Section of the Edit View of the Subscribers Form.
▪Due Date - Assigned automatically:
i.If the (current) Sale Date is modified, then the Due Date is re-set to match the 1) Company's, or 2) Subscriber's Terms (as noted above in "Setting the Due Date").
ii.However, the Due Date may be manually reset using its Drop-Down Calendar/Date Entry field and that change will not affect the Sale Date.
a)Click on the Date field and type the desired Date using a MM/DD/YYYY format; or
b)Use the Drop-Down Calendar/Date Entry field provided to Choose the desired Date
▪Salesman - By default, the Salesman will be the one assigned on the Subscribers Form. It may be changed, if required.
✓When assigning a Salesperson to an Invoice: only those Employees whose Employee Type is identified as either Sales or All will be available (in the Drop-Down Selection List) for populating the Salesman (or Commission To) fields.
▪Warehouse - The default Warehouse defined in the Inventory Options Tab on the User Options Form is inserted automatically.
oAlternate default Warehouse option:
a)The Divisions Form allows a Company to identify a Default Warehouse for any Division and each Subscriber (and/or Vendor) may be assigned to a Division.
b)Thereafter, when Invoices, Purchase Orders, Bills and/or Work Order documents are created for a Subscriber or Vendor who is assigned to a Division (a Division assignment to a Subscriber or Vendor is optional), any Inventory related Transaction (e.g., Sale, Purchase, Purchase Order, Inventory Used on a Work Order) posted to one of those documents will automatically be assigned to that (Subscriber's or Vendor's) default Warehouse
c)However, that Warehouse assignment may also be changed, when appropriate.
oUse the Drop-Down Selection List provides to Choose the appropriate Warehouse, if Inventory Items will be included in this Sale..
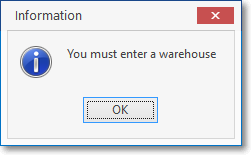
You must enter a warehouse
oWhen entering the Sale of an Inventory Item and no Warehouse (from which it will be taken) is identified, an informational reminder message will be displayed.
▪Purchase Order - If this Invoice is being created in response to a previously submitted Purchase Order from that Subscriber, enter that Purchase Order Number.
oThis is an alpha-numeric field.
oEnter up to 40 upper and/or lower case letters, numbers, standard punctuation marks, and/or spaces.
oThis Purchase Order Number will be printed on the Invoice.
oIf the Purchase Order Number entry contains more than 13 characters, only the last 13 characters will be printed on an Invoice.
•Adding the Invoice's Detail Line Items (to identify what is being sold):
✓Click the ![]() Icon on the Ribbon Menu located on the bottom of the Detail Line Item's Data Grid and fill in the Detail Line Item using an Inplace Editor (i.e., enter the appropriate data into a horizontal - from left to right - data entry grid
Icon on the Ribbon Menu located on the bottom of the Detail Line Item's Data Grid and fill in the Detail Line Item using an Inplace Editor (i.e., enter the appropriate data into a horizontal - from left to right - data entry grid
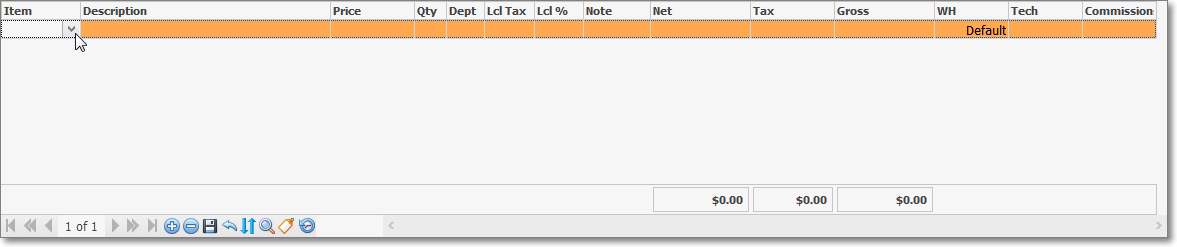
•Entering the Detail Line Item information:
✓Item - In the Inplace Editor (as shown above), use the Drop-Down Selection List to Choose the Sale-Purchase Item for this Detail Line Item
▪If you have too many Sale-Purchase Items defined to easily make your selection: activate the Advanced Sale Item Look-up,
a)Click the Advanced Item Search ![]() Icon on the Ribbon Menu at the bottom of the Data Grid, or
Icon on the Ribbon Menu at the bottom of the Data Grid, or
b)Press Alternate and F2 at the same time (Alt+F2) .
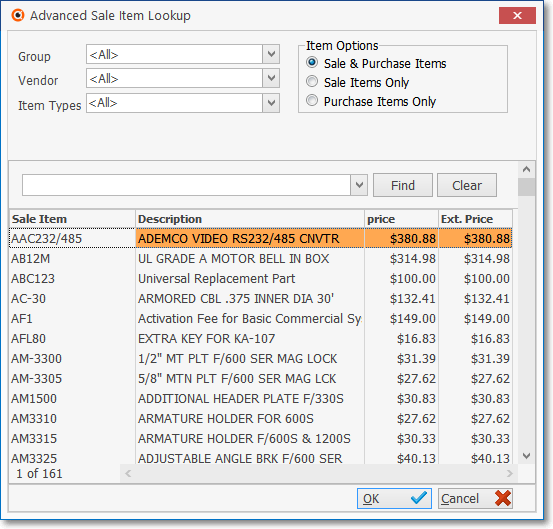
Advanced Sale Item Look-up dialog
❖For Inventory Tracking System Users - If using the Inventory Tracking System and are entering a Detail Line Item which is an Inventory Item (see the "Entering the Invoice's Detail Line Items" section below), a Warehouse must be identified for each Inventory Item included on the Invoice (Default is inserted automatically but should be changed when appropriate).
i.When the Inventory Tracking System is started, the actual Warehouse name(s) are entered in that Form, and the Default Warehouse is identified in the Inventory Options section of the User Options Form.
ii.That predefined Default Warehouse is automatically assigned when an Inventory Item is entered on an Invoice, but may be changed, if appropriate.
iii.If this Inventory entry creates a Negative On Hand Quantity for the selected Inventory Item, a Negative Inventory Warning message will be displayed.
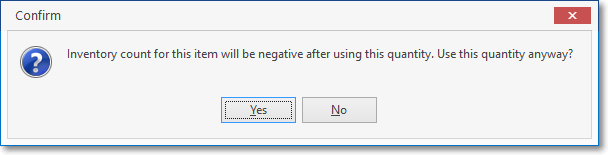
Warning - Negative Inventory
oClick the Yes or No button, as appropriate.
oThe Pop-Up Negative Inventory Warning will be displayed when an Inventory item is added to an Invoice and the addition of that Inventory item results in a Negative On Hand Quantity value for that Inventory item, only if the ConfirmNegativeInventory option in the Company Settings Form is set to True ("T").
✓Description - By default, the Description entered when this Sale-Purchase item was defined will be inserted.
▪You may revise it or simply add a Note (see below) to clarify this line item.
✓Price - By default, the Retail Price, entered when this Sale-Purchase item was defined, will be inserted.
▪This Price may also be calculated based on a Mark Up/ Mark Down Percentage as defined in Pricing Mark Up Groups if a Pricing Mark Up Group has been assigned to this Subscriber or to the Selected Sale-Purchase item.

Override Mark Up?
▪Answer Yes to apply the Mark Up/ Mark Down Percentage adjustment, if defined; or enter No to not adjust the Price.
▪In either case, the default Price may be manually adjusted, if required.
✓Qty (Quantity) - By default, the Quantity entered will be 1.
▪Enter whatever quantity is being charged (decimal values are allowed).
✓Dept - A Department number only needs to be assigned if the General Ledger System is in use and multi-departmental accounting has been selected.
▪If using the General Ledger module and the default Department is not appropriate for this entry, Click the Department field's Drop-Down Selection List to Choose the correct Department for this transaction.
✓Local Tax Code (Lcl Tax) - If this Subscriber is Taxable and must be charged a Local Sales Tax, and that information has been properly entered in the Accounting Receivable Section within the Edit View of the Subscribers Form, and the Taxable? box is Checked in the selected Sale-Purchase Item record, the proper Local Tax Code will be inserted automatically.
✓Local Tax Rate (Lcl %)- If this Subscriber is Taxable and must be charged a Local Sales Tax, and that information has been properly entered in the Accounting Receivable Section within the Edit View of the Subscribers Form, and the Taxable? box is Checked in the selected Sale-Purchase Item record, the proper Local Tax Rate will be inserted automatically.
▪These Sales Tax Default Codes and Rates may be modified, if required.
▪If the 3DigitTax option is set to True ("T") in Company Settings, the Local Tax Rate field may accept a Tax Percentage Rate with up to three (3) Decimal Places, otherwise only two (2) Decimal Places will be accepted.
✓National Tax Code: If a National Sales Tax must be charged and the Tax tab has been properly completed in the User Options Form, the National Tax Code will appear and be properly populated, otherwise, this field will not be displayed.
▪When a National Sales Tax is in effect and multiple National Sales Tax Rates have been defined, instead of Y (yes) or N (no) being inserted, the National Tax Code's Sales Tax Code #1 will be inserted.
▪If a National Tax Rate other than Sales Tax Code #1 should be assessed, use the Drop-Down Selection List to Choose the correct Tax Rate Code.
✓National Tax Rate - If there is a National Sales Tax in effect, and there are multiple Sales Tax Rates defined, the correct Subscriber's Sales Tax Rate will be inserted when you select the correct Sales Tax Code.
✓Note - If a more detailed explanation for this charge is needed, use the Note field to enter this information which will then be printed on the Invoice immediately below the associated Detail Line Item.
▪Double-Click the Note field which will open a Rich Text Editor dialog.
▪Enter the appropriate information and then Click the Save Icon on the Rich Text Editor dialog to record the entry.
✓WH (Warehouse) - If the Sale-Purchase Item is an actual Part (Inventory Item) and the Inventory Tracking System is being used to track this Part, but the default Warehouse is not from where this Part was taken, Click the Warehouse field and use the Drop-Down Selection List to Choose the correct Warehouse location.
▪The default Warehouse defined in the Inventory Options Tab on the User Options Form is inserted automatically.
▪Alternate default Warehouse option:
a)The Divisions Form allows a Company to identify a Default Warehouse for any Division and each Subscriber (and/or Vendor) may be assigned to a Division.
b)Thereafter, when Invoices, Purchase Orders, Bills and/or Work Order documents are created for a Subscriber or Vendor who is assigned to a Division (a Division assignment to a Subscriber or Vendor is optional), any Inventory related Transaction (e.g., Sale, Purchase, Purchase Order, Inventory Used on a Work Order) posted to one of those documents will automatically be assigned to that (Subscriber's or Vendor's) default Warehouse
c)However, that Warehouse assignment may be changed, when appropriate.
▪Use the Drop-Down Selection List provides to Choose the appropriate Warehouse, if Inventory Items will be included in this Sale..
You must enter a warehouse
oWhen entering the Sale of an Inventory Item and no Warehouse (from which it will be taken) is identified, an informational reminder message will be displayed.
✓Tech - To enter the Technician who performed this work, Press the <Space Bar> when the mouse pointer is within the Technician field and use the Drop-Down Selection List to identify the appropriate Technician.
▪Before accessing the More Info dialog, if a Technician needs to be identified an informational message will be displayed.

✓Commission To - By default, the Commission (if eligible) will go to the Salesperson of record for this Subscriber.
▪To change the Salesperson information, use the Drop-Down Selection List provided.
▪When assigning a Salesperson to an Invoice: only those Employees whose Employee Type is identified as either Sales or All will be available (in the Drop-Down Selection List) for populating the Commission To field.
▪If using the Commission Tracking System and any items on the Invoice are Commission Eligible, the Commissions Ribbon Menu Icons will also be displayed on the Invoice Form.
![]() Click the Save Icon at the bottom of the Detail Line Items to record this Detail Line Item.
Click the Save Icon at the bottom of the Detail Line Items to record this Detail Line Item.
![]() Click the View Item History Icon at the bottom of the Detail Line Items to display the General Ledger Financial Transactions for this Detail Line Item.
Click the View Item History Icon at the bottom of the Detail Line Items to display the General Ledger Financial Transactions for this Detail Line Item.
✓System Maintained Totals fields (When the ShowTaxAndTotalPerLineItemScreen option is set to True ("T") in Company Settings, each column will have their individual Totals listed, otherwise [i.e., the ShowTaxAndTotalPerLineItemScreen option is set to False ("F")] these Totals will be displayed at the bottom of the Invoice:
▪Net = Price * Quantity
▪Tax = (Price x Quantity x Local Tax Rate) + if applicable, (Price x Quantity x National Tax Rate)
▪Gross = Net + Tax
•The Invoice Footer (see "System Maintained Totals fields" immediately above)
Invoice Form Footer information - with Totals for each Column
✓Totals - Displays the Net Sales, Sales Taxes and Gross Totals for this Invoice.
Invoice Form Footer information - with Totals at bottom of Invoice
✓Comments - Enter any additional Comment that will help the Subscriber better understand the charges on this Invoice.
▪By default - specifically and only for the Invoices generated automatically for Late Charges, this Comments field will contain the following (the actual percentage rate is based on what was defined as the Late Fee rules):
Late Charges are computed at an Annual Rate of
18.00% and subject to a minimum charge of $5.00
✓Internal Note - This field is used to enter a comment (which is not printed on the Invoice) that will only appear on this Invoice Form
✓Click the ![]() Icon to record this Invoice.
Icon to record this Invoice.
•Discounts - Discounting the Gross Amount of this Invoice from its total original price (whether for a Sales Promotion or some other customer compensation situation):
✓The Discount function - which may require the appropriate Authorization - allows you to apply either a specific "percentage off" Value, or a specific "dollar off" Amount, both of which will be calculated by the Invoice Form and inserted as a separate Detail Line item.

Invoice Form - Discount Section - Check Box
✓To provide a Discount based on a specific Dollar Value, after the Invoice has already been completed and saved:
▪Enter that Dollar Value in the Discount field
▪Do Not Check the % box.
▪Press the Tab F key
![]()
Dollar Value Discount entry
▪Click the Discount option.
▪Click the ![]() Icon to record this Discount entry.
Icon to record this Discount entry.

Invoice Form - Detail Line Item showing Dollar Value Discount
▪This action will automatically adjust all of the Invoice Net, Tax, and Gross Totals.
✓To provide a Discount based on a specific Dollar Value, after the Invoice has already been completed and saved:
▪Check the Discount Box:
▪Enter the desired Discount Percentage of Discount.
▪Press the Tab F key
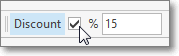
▪Click the Discount option.
▪Click the ![]() Icon to record this Discount entry.
Icon to record this Discount entry.
▪This action will automatically adjust all of the Invoice Net and Gross Totals.
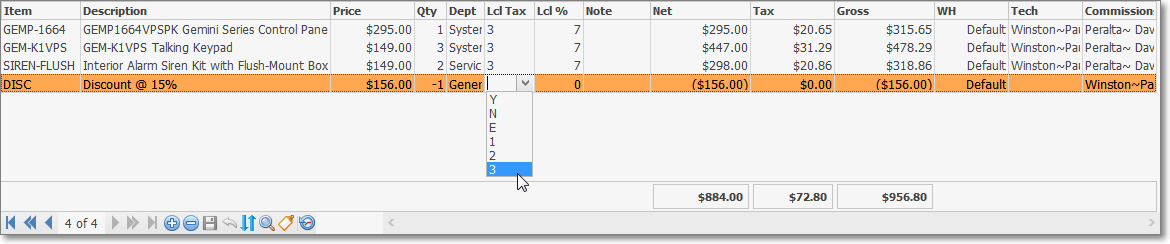
❖About Sales Tax and Department entries - Updates to the Discount Detail Line Item may be required:
▪Sales Tax - In some States and/or Countries, Sales Tax may not be credited as part of the Discount, but in others it is allowed.
Invoice Form - Discount Detail Line Item - Lcl Tax field
a)If the Sales Tax cannot be credited as part of the Discount, and Sales Tax has been charged on other items, Click the Local Tax - Code column and, using the Drop-Down Selection List provided, Select "N" (No).
b)If the Sales Tax may be credited as part of the Discount, and Sales Tax has been charged on other items, Click the Local Tax - Code column and, using the Drop-Down Selection List provided, Select the appropriate Sales Tax code and rate.
❖Also, when Sales Taxing Authorities have implemented Sales Tax Percentage Rates with up to three (3) Decimal Places, three Company Settings may be re-set to support Charging and Collecting this type of Sales Tax.
1)3 Digits Tax - By default, the 3DigitsTax option is set to False ("F").
a)When Sales Taxing Authorities have implemented Sales Tax Percentage Rates to three (3) Decimal Places (e.g., nn.nnn%), this is one of the three Company Settings that, in this case, must be re-set to True to support Charging and Collecting this type of Sales Tax.
b)Setting this 3DigitsTax option to True ("T") will activate this Three Decimal Places Sales Tax feature in the Tax Rates Form.
2)Show Tax And Total Per Line Item Report - By default, the ShowTaxAndTotalPerLineItemReport option is set to False ("F").
a)When Sales Taxing Authorities have implemented Sales Tax Percentage Rates to three (3) Decimal Places (e.g., nn.nnn%), this is one of the three Company Settings that should be re-set to add support on Reports for Charging and Collecting this type of Sales Tax (also see "Show Tax And Total Per Line Item Screen" immediately below).
b)Setting this ShowTaxAndTotalPerLineItemReport option to True ("T") will include this Three Decimal Places Sales Tax feature's three (3) Decimal Places Sales Tax formatting on reports.
3)Show Tax And Total Per Line Item Screen - By default, the ShowTaxAndTotalPerLineItemScreen option is set to False ("F") which - regardless of the 3DigitsTax setting, excludes Detail Line Item calculations for Sales Tax Amounts (the Tax Rate is still shown); but instead provides a Totals information box with Net, Tax, and Gross Amounts at the bottom of the Invoice and/or Proposal).
a)When Sales Taxing Authorities have implemented Sales Tax Percentage Rates to three (3) Decimal Places (e.g., nn.nnn%), this is one of the three Company Settings that may be re-set to add support for Charging and Collecting this type of Sales Tax on Invoices. (see "Show Tax And Total Per Line Item Report" immediately above)
b)Setting this ShowTaxAndTotalPerLineItemScreen option to True ("T") will activate this Three Decimal Places Sales Tax feature on Invoices thus showing three (3) Decimal Places on all Detail Line Item entries plus column totals.
c)However, consider leaving the ShowTaxAndTotalPerLineItemScreen option setting to its default of False ("F") when the this 3DigitsTax option to True ("T").
i.This False setting will show the Tax Rate on an Invoice's Detail Line Item in three (3) Decimal Places but will not show the extended pricing in three (3) Decimal Places to avoid confusion.
ii.In this case a Totals information box with Net, Tax, and Gross Amounts is included at the bottom of the Invoice and/or Proposal.
➢Note: See the Sample Results of these Sales Tax related Company Settings Options discussion in the Company Settings for Accounts Receivable chapter for Invoice Detail Line Item illustrations.
▪Department - If a Department was assigned to the original Detail Line Items (prior to providing a Discount), be sure to assign the appropriate Department to the Discounted Detail Line Item.
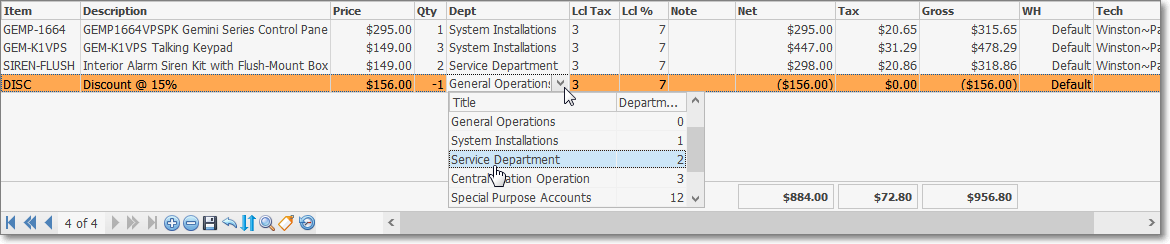
Invoice Form - Discount Detail Line Item - Department field
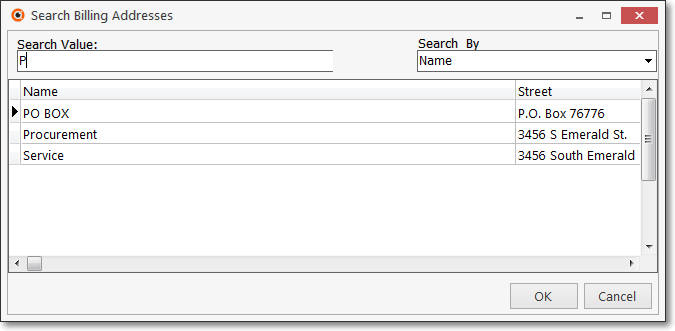
•Select Billing Address - Before Printing the Invoice, if this Subscriber wants this Invoice mailed to a different Address than the normal Billing Address,
Select Billing Address Icon on the Invoice Form
✓Click the Select Billing Address Icon to display the Search Billing Address dialog.
Search Billing Addresses dialog
▪Search Billing Addresses - The Search Billing Addresses dialog allows the User to Select one of the previously defined optional Addresses as the Billing Address for this specific Invoice.
❑Using the special Reorder and Search Icons on the Navigation Menu located on the bottom of the Detail Line Items section
![]()
•Reorder - If the sequence of the items on the Invoice might cause confusion and you would like to rearrange the (listed) order in which they will be printed:
✓Click the Reorder Icon on the Navigation Menu located on the bottom of the Detail Line Items Data Grid on the Invoice Form to rearrange the sequence of the Detail Line Items.
![]()
▪The Reorder Items dialog box will be displayed.
▪Click on the item to be moved
▪Click the Up h or Down i button as needed to relocate the item.
▪Click the Save button and Confirm that you do want to Reorder the item.
▪Repeat the selection and move process as needed.
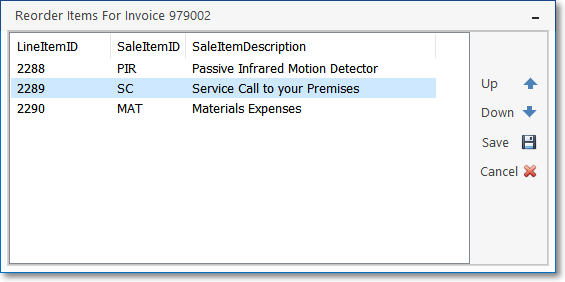
Reorder Items dialog
✓Click the Save ![]() Icon on the Navigation Menu located on the bottom of the Detail Line Items section to record these changes to this Invoice.
Icon on the Navigation Menu located on the bottom of the Detail Line Items section to record these changes to this Invoice.
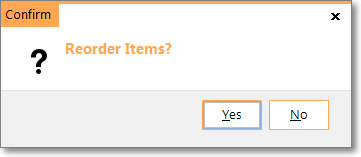
Reorder Items?
▪Confirm the Reorder setting.
•Search - When there are a great number of Detail Line Items on the Invoice, and you need to locate a specific one:
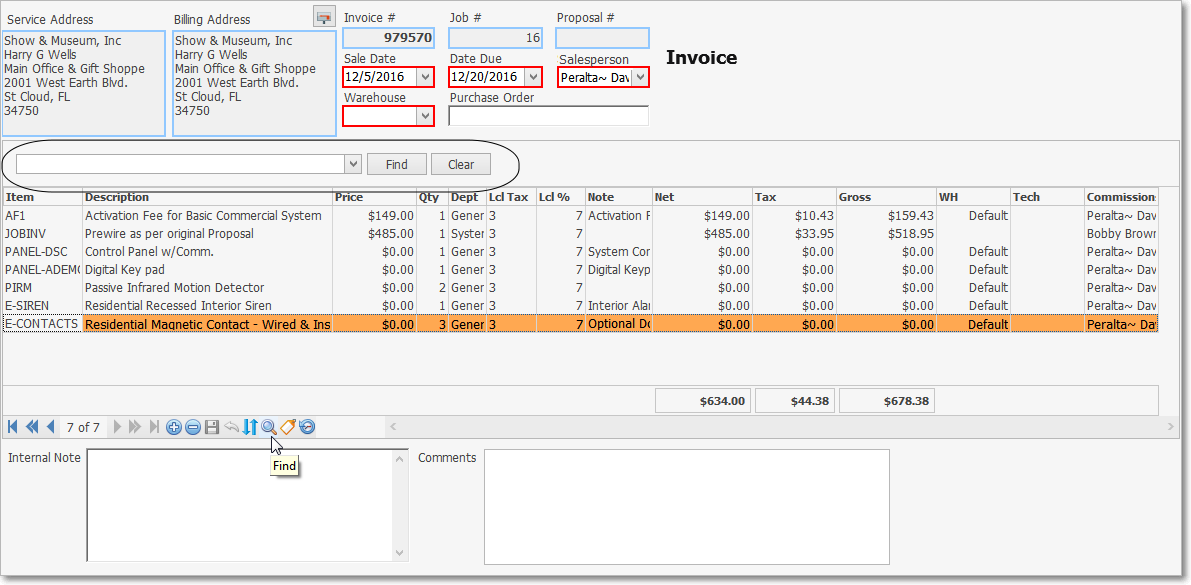
Invoice Form - Detail Line Items section - Search field
✓Click the Find Icon on the Navigation Menu located on the bottom of the Detail Line Items section on the Invoice Form.
✓The Search text entry field will be displayed along with the Find and Clear buttons.
✓To Locate the desired record:

▪Find - Click the Find option.
▪Enter text to search... Enter appropriate characters to start this search for a specific record.
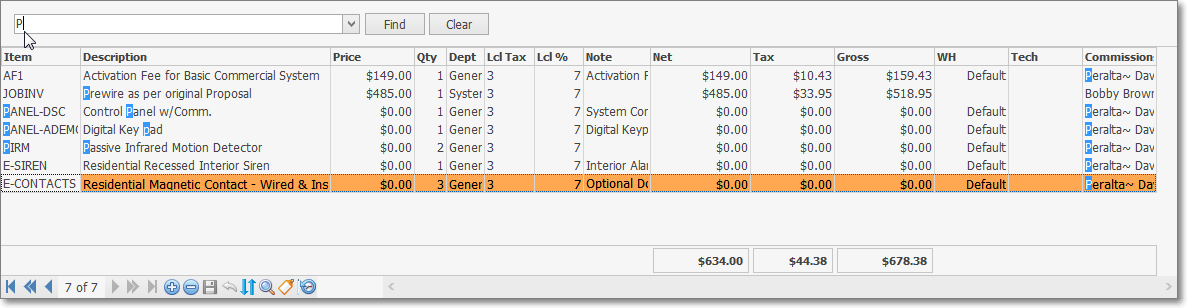
oAs you type, an incremental search - based on your entry - will be performed on all fields in the List.
oAll data matches will be highlighted in blue.
oSelect the desired record.
▪Clear - To remove the search characters (perhaps to start a different search), Click the Clear option
oThen, Click the Search Icon again to hide this Search function.
oYour selected record will still be in view.
❑For General Ledger System Users:
•Examining the General Ledger Financial Transactions that were posted to the Account Register for a specific Detail Line Item:
✓Select the Detail Line Item to be examined.

✓Double-Click anywhere on the Detail Line Item to be examined.
✓The resulting Pop-Up Form will list the General Ledger Accounts to which this Detail Line Item entry's Financial Transactions were posted in the General Ledger System.
❖See the Use of, and Purpose for Mandatory Accounts and the Tracking Inventory as Assets, Liabilities, Sales and Expenses chapters for a more detailed explanation of how Financial Transactions are posted into the General Ledger System.