Inventory Items, Job Costing Considerations, and Warehouse Locations
❑Inventory Tracking and Job Costing System Users:
•While using the Accounts Receivable System and the Accounts Payable System with the Inventory Tracking System and Job Costing System, the Inventory & Job Costing entries may be used Both for a Sale item and as a Purchase item.
•To access the Sale-Purchase Items Form to define an Inventory Item:
a)From the Backstage Menu System Select Maintenance and Choose Sales-Purchase Items or,
b)From the Quick Access Menu, Select Maintenance and Choose Sales-Purchase Items.
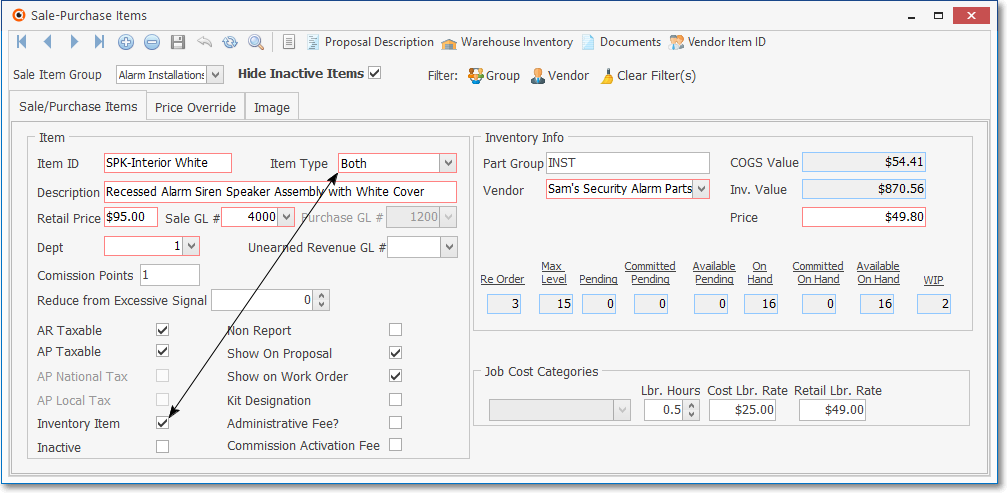
Sale-Purchase Items Form - Inventory entry
✓This Sale-Purchase Items Form may be Re-sized by Dragging the Top and/or Bottom up or down, and/or the Right side in or out.
•Ribbon Menu - These Icons are located at the top of the Sale-Purchase Items Form.

Sale-Purchase Items Form - Ribbon Menu
❖See the Navigation section in the Sale-Purchase Items chapter.
❑Defining Inventory:
•Completing the Basic Inventory Item information
✓Click the ![]() Icon on the Navigation Menu to start the Inventory (Sale-Purchase) Item entry.
Icon on the Navigation Menu to start the Inventory (Sale-Purchase) Item entry.
![]()
•Sale Item Group - Optionally, you may also enter a Sale Item Group using the Drop-Down Selection List provided.
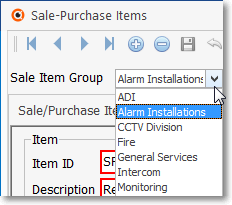
Sale Item Group field
✓For those with a large quantity of Sale-Purchase Items, this Sale Item Grouping feature allows you to Select the desired Sale-Purchase Item from a filtered list (based on the Sale Item Group assigned to it).
✓The Advanced Sale Item Look-up function (accessed with Alt+F2 from within the Sale-Purchase Item Drop-Down Selection List on Sales, Proposal, Purchase Order and Purchases forms) lets you Select from a list of items limited to a specific group - thereby presenting a much shorter list from which to choose.
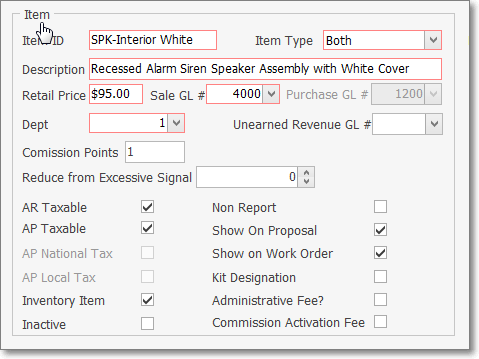
Sale Purchase Item Form - Item section
✓Item ID - Enter a unique code of up to 40 alpha-numeric characters (most punctuation marks are also permitted) for this Inventory Item.
▪The letters may be entered as Upper case or lower case, as appropriate..
▪Once an Inventory record is saved, if a User changes the Item Type field of an Inventory related Sale-Purchase Item to Sale rather than Both, the record cannot be saved without Un-Checking the Inventory Item box on the Sale-Purchase Item Form,
✓Item Type - Enter the Item Type as Both (you must Purchase the Inventory Item before you Sell the Inventory Item).
➢Note: Create a generic Sale-Purchase Item named Parts assigning the Item ID of Parts.
This Default Inventory Code should then be assigned within the Inventory Options tab of the User Options Form.
✓Description - Enter a clear, concise description of this Inventory (Sale-Purchase) Item entry.
▪Up to 70 alpha-numeric characters may be entered, upper and lower case letters are allowed, most punctuation marks, with spaces also permitted.
▪For Sale-Purchase Items defined with an Item Type of either Both or Sale, a more detailed Description using the Proposal Description Icon on the Navigation Menu at the top of the Form may be defined.
✓Retail Price - Enter the usual Retail Price for this Inventory Item (if this is an Inventory Item that will be part of the Company's Inventory and the Inventory Tracking & Job Costing System is being used, the Retail Price is Mandatory.
✓Commission Points - Enter a Point Value (representing its approximate cost) if this Sale-Purchase Item earns Commissions Points for the Salesperson when it is sold.
▪The Commission Points assigned to a Sale-Purchase Item should represent an approximate Cost for the acquisition and installation of the component.
▪Commission Points are assigned a Point Value - on an Employee by Employee basis - in the Personal tab of the Employee Form.
•For General Ledger System Users Only:
✓If you are using the Inventory Tracking System and the General Ledger System:

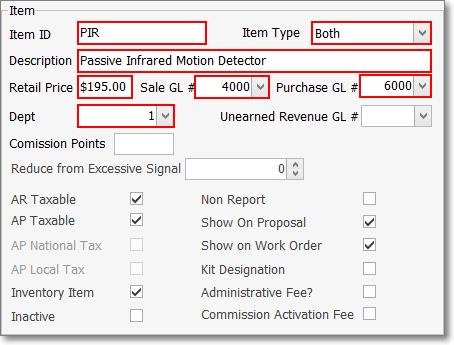
Sale-Purchase Items Form - Inventory Item - with Active General Ledger
▪Sale GL # - Using the Drop-Down Selection List provided, Choose the General Ledger Account Number when this Item is recorded as a Sale.
oIf a General Ledger Account Number is selected that is not for a Sale (i.e., the Primary Account Division associated with the selected General Ledger Account is not "Sale"), an error message with be displayed.
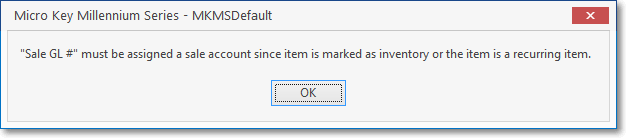
"Sale GL #" must be assigned a sale account since item is marked as inventory or the item is recurring item
oClick OK and Choose the correct of General Ledger Account Number.
▪Purchase GL # - Using the Drop-Down Selection List provided, you may Choose the "Inventory" General Ledger Account Number previously identified in Mandatory Accounts
oHowever, because this Purchase Category has been identified as an Inventory Item, no entry is required.
oThe system will internally insert the correct "Inventory" General Ledger Account Number previously identified in Mandatory Accounts
oOnce this record is saved, the Purchase GL # will be locked and shown in a pale Gray.
oChanging it later would cause an incorrect Inventory Valuation in the General Ledger.
oAlso, see the Inventory Valuation Method chapter
▪Dept - If you are a General Ledger System User and have initiated the use of multiple Departments, enter the appropriate Department number using the Drop-Down Selection List provided.
•Click the ![]() Icon to record this Sale-Purchase Item record.
Icon to record this Sale-Purchase Item record.
❑General Ledger Inventory Item record Overview:
A.If you are not currently using the General Ledger module and do not plan on doing so in the future, you may skip all of the the GL # fields.
B.When you do start the General Ledger, you must return here to complete this information after you have defined your Company's General Ledger Accounts.
C.When you have registered and are starting to use the General Ledger System, these GL # fields will be boxed in Red (see below) indicating when they are Mandatory entries.
1.If you are now using the Accounts Payable System and the General Ledger System, but not the Inventory Tracking System:
Inventory Item on the Sale-Purchase Items Form with no Inventory Tracking
a.Sale GL # - Using the Drop-Down Selection List provided, Choose the General Ledger Account Number for this type of Sale.
b.Purchase GL # - When this Sale-Purchase Item is identified as an Inventory Item: an Item Type of Both should be selected and the appropriate Purchase GL # should be entered using the Drop-Down Selection List provided.
c.Dept - If using the multiple Departments feature,use the Drop-Down Selection List provided to Choose the appropriate Department Number
oIf your Company has implemented multi-departmental accounting, this field is Mandatory.
2.If you will now be using the Accounts Payable System and the Inventory Tracking System and the General Ledger System, enter the General Ledger Account Numbers as appropriate.
Inventory Item on the Sale-Purchase Items Form with Active Inventory Tracking
a.Sale GL # - Using the Drop-Down Selection List provided, Choose the General Ledger Account Number for this type of Sale.
b.Purchase GL # - When this Sale-Purchase Item is identified as an Inventory Item: an Item Type of Both should be selected and no Purchase GL # needs to be entered as it will be provided by the system (see above) based on the Mandatory Account information entered when the General Ledger was started (any entry will be ignored if the field is filled in).
c.Dept - If using the multiple Departments feature,use the Drop-Down Selection List provided to Choose the appropriate Department Number
oIf your Company has implemented multi-departmental accounting, this field is Mandatory.
•Check boxes - There are several other Check Boxes that may, or may not be needed based on the specific Purpose of this Inventory Item:
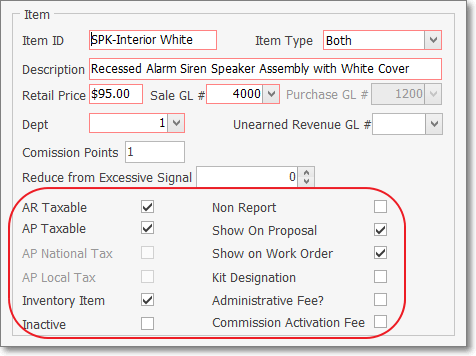
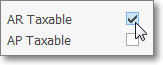
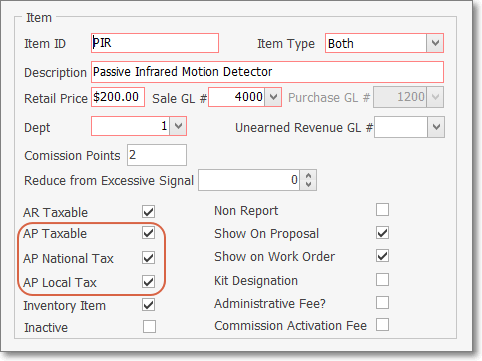
✓AR Taxable - Check this box if this Inventory Item is normally Taxable.
▪When entering a Sales Invoice:
a)If AR Taxable is Checked, whenever this Inventory Item is entered on a Sales Invoice, the appropriate Tax Code & Tax Percentage Rate will be inserted automatically, based on the Sales Tax information entered in the Receivables section within the Edit View for that Subscriber.
b)If Not Checked, whenever this Inventory Item is entered on a Sales Invoice, the Tax Code will be entered as N (Non) and the Tax Percentage Rate set set at 0%, regardless of the Sales Tax information entered in the Receivables section within the Edit View for that Subscriber.
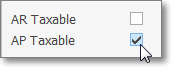
✓AP Taxable - Check this box if your Company is normally charged Sales Tax when purchasing this Inventory Item.
▪When entering a Bill (Vendor's Invoice):
a)If AP Taxable is Checked, whenever this Inventory Item is entered on a Bill (Vendor's Invoice), the appropriate Tax Code & Tax Percentage Rate will be inserted automatically, based on the Sales Tax information entered in the Tax Information section within the Edit View for that Vendor.
b)If Not Checked, whenever this Inventory Item is entered on a on a Bill, the Tax Code will be entered as N (Non) and the Tax Percentage Rate set set at 0%, regardless of the Sales Tax information entered in the Tax Information section within the Edit View for that Vendor.
➢Important Note: See the Sale-Purchase Item - Sales Tax Fields chapter for more details about Sales Tax Charging Options.
✓Canadian Taxation - Special Check box rules for those Companies who must charge Canada Sales Tax on Bills:
Sale-Purchase Item Form - Canada Tax - Check boxes
a)AP Taxable, - If this item is ever Taxable when Purchased, Check this box.
b)AP National Tax - Regardless of whether it is a GST or an HST Tax that will be charged on this Purchase, Check this box.
c)AP Local Tax - Only Check this box when the National Tax is GST and the Province also assesses a PST Sales Tax (not required if your Company's Purchases are only assessed an HST).
✓Inventory Item - Check the Inventory Item box.
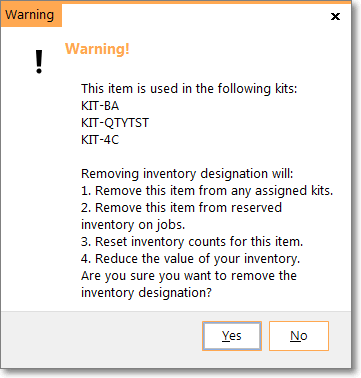
▪When a Sale-Purchase Item record has a Check in the Inventory Item field it may not be removed until any Detail Line Item on any Purchase Order containing that Inventory related Sale-Purchase Item has been Received, Completed, and/or Billed.
▪When you Check Inventory Item, the Form will require additional information needed to properly track Parts as actual Inventory.
▪If an Inventory Item is entered, and saved, and subsequently a User attempts to Remove this Check mark, a Warning will be displayed.
▪Never Check the Inactive box unless this part will no longer be used.
▪Do not Delete an Inventory Item record once it has been used in an Invoice or a Bill (i.e., Sales or Purchases).
▪If you will no longer order or sell the part, just mark it as Inactive.
✓Inactive - Located within the Inventory section of the Sale-Purchase Item Form, this Check box identifies an item as Inactive and therefore no longer in use.
▪The Inactive Check box is provided because, once entered and used, a Sale-Purchase Item cannot be deleted because it has become part of the Transaction "History" maintained by the system.
▪Checking this box will remove this item from the Drop-Down Selection Lists normally used to Choose a specific Sale-Purchase Item for a Sale or Purchase.
✓Commission Activation Fee - Check this Box if this Sale-Purchase Item is to be considered an Activation Fee when it is included as part of a Proposal Package
✓Non Report - Check this box if this Inventory Item should not be included in certain Sales Analysis Reports.
✓Show on Proposal - Check the Show on Proposal box if this is a Recurring Revenue Sale item which may, or may not be chosen on a Proposal (also see Proposal Description below).
✓Show on Work Order - Check the Show on Work Order box if this Sale-Purchase Item has been assigned an Item Type of Sale or Both and might be needed when recording the use of Inventory and/or Materials on a Service Request.
▪The Drop-Down Selection List used to Choose the appropriate Inventory Item used on a Work Order, accessed within the Web Tech Service, will list only those Sale-Purchase Items which have a Check in the Show on Work Order box.
▪The Drop-Down Selection List used to Choose the appropriate Inventory and/or Materials usage in the Inventory/Materials tab of the Service Request Form will list only those Sale-Purchase Items which have a Check in the Show on Work Order box.
▪By Not Checking this box, this Sale-Purchase Item will not be included in the Drop-Down Selection Lists that are provided to a Technician working in the field using the Web Tech Service and/or to any User recording information within the Inventory and/or Materials tab on a Service Request Form.
▪Therefore any Sale-Purchase Items that are defined to identify Purchases or Sales which are unrelated to providing Service to Subscribers will be eliminated from the list - making that Selection process easier and faster, thus reducing the length of the Drop-Down Selection List to a manageable size, and more importantly, with a definable content.
✓Kit Designation - If this Sale-Purchase Item represents a Kit, Check the Kit Designation box to indicate that this is the Master Record for a User Defined Kit.
❖The Kit Components tab will then become available
❖This Kit Components tab is used to identify the Inventory Items and the Quantities required for each component of this Kit.
❖See the Defining the Inventory Items that make up a Kit:discussion in the Kits - Defining your own Parts Packages chapter for more information.
✓Administrative Fee? - If listed, Do not Check this box when defining an Inventory Item.
✓Inactive - Located within the Item section of the Sale-Purchase Item Form, this Check box identifies an item as Inactive and therefore no longer in use.
▪The Inactive Check box is provided because, once entered and used, a Sale-Purchase Item cannot be deleted because it has become part of the Transaction "History" of the system.
▪Checking this box will remove this item from all Drop-Down Selection Lists normally used to Choose a specific Sale-Purchase Item for a Sale or Purchase.
▪If an attempt to make an Inventory Item inactive when that Inventory Item has been used on a Proposal which is still active and has not yet been converted, a Conformation message will be displayed:

oAnswer Yes to accept this condition, or No to cancel the deactivation process.
❑Inventory Info section:
•This section is to be completed as shown below only when this is an Inventory Item and/or the Kit Designation box has been Checked, and the Average Inventory Cost method is not implemented:
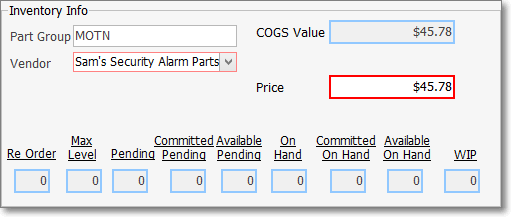
✓Part Group - Enter a Part Group Code.
▪This Part Group Code may be up to four (4) characters in length (i.e., numbers, letters, punctuation, spaces) - if letters are entered, they will be capitalized automatically.
▪This is a user definable code that has no predefined data set (e.g., no Maintenance Form).
▪It may be used as a selectable filter on the Kit List with Components Report and may be used in a filter expression in the Report Builder module.
✓Vendor - Enter the (preferred) Vendor from whom this Inventory Item is generally Purchased using the Drop-Down Selection List provided.
•Based on the selected Inventory Valuation Method, the following fields will be presented as described below:
✓Original Price (Cost) - If the Original Price Inventory Valuation Method is in effect, the Price field will be displayed as a normal mandatory field on the Sale-Purchase Item Form if this is an Inventory Item.
Inventory Info box - Original Price Inventory Valuation Method selected
▪COGS Value - This field is filled in by the system once the Price is entered (see illustration above).
oWhen the Original Price Inventory Valuation Method is in effect, the contents of the Price and COGS Value fields will remain unchanged.
▪Price - Enter the Price that should be used for calculating the Cost of Goods Sold Value of this Inventory Item.
▪Vendor - Enter the (preferred) Vendor from whom this Inventory Item is generally Purchased using the Drop-Down Selection List provided.
✓LIFO - If the LIFO Inventory Valuation Method is in effect, the contents of this COGS Value field will be updated each time another Inventory Item of this type is Purchased with the Cost re-set to the most current Price that charged on a Bill.

Inventory Info box - LIFO Inventory Valuation Method selected
▪COGS Value - This field is filled in by the system once the Price is entered (see illustration above).
oWhen the LIFO Inventory Valuation Method is in effect, the contents of the COGS Value field will change to the current Price Paid each time there is an additional Purchase of this Inventory Item.
▪Price - Enter the Price that should be used initially for calculating the Cost of Goods Sold Value of this Inventory Item.
▪Vendor - Enter the (preferred) Vendor from whom this Inventory Item is generally Purchased using the Drop-Down Selection List provided.
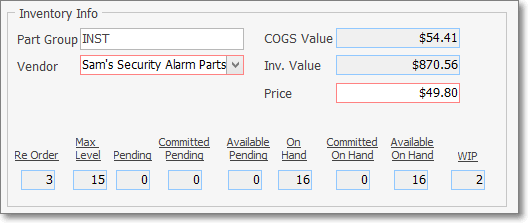
✓Average Inventory Cost - If the Average Inventory Cost Inventory Valuation Method is in effect, the contents of the COGS Value and Inv. Value fields will be updated each time another Inventory Item of this type is Purchased
❖For those Companies using (or intend to use) the STARK 35 version of the General Ledger System, the required Inventory Valuation method is Average Cost Inventory.
a)the Value of the COGS Value field is re-set to the Average Inventory Cost based on what is charged on the current Bill averaged with what was previously charged for these Inventory Items currently 'in-stock' (i.e. Quantity On Hand plus WIP - Work In Progress - Quantity).; and
b)the Value of the Inv. Value field is recalculated based on the COGS Value multiplied by the Quantity of the Inventory Items that are currently still 'in-stock' (i.e. the sum of the Quantity On Hand plus WIP - Work In Progress - Quantity multiplied by the current COGS Value).
c)the Value of the Price (Cost) is initially entered manually when the record is created, then only reset to the most recent Purchase Price when the Calculate Inventory Item Average procedure is executed.
Inventory Info box - Average Cost Inventory Valuation Method selected
▪COGS Value - This system maintained field is updated based on what is charged on the most current Bill, averaged with what was previously charged (including Sales Tax) for these Inventory Items currently still 'in-stock'. (see illustration above).
▪Inv. Value (total value of what is actually 'in-stock' (i.e. the sum of the Quantity On Hand plus WIP - Work In Progress - Quantity multiplied by the current COGS Value for this Inventory Item) - This will be a system maintained field which is also updated, as needed, using the Calculate Average Inventory process.
▪Price - The Price (Cost) that was entered initially for calculating the Cost of Goods Sold Value of this Inventory Item.
oIf the Calculate Inventory Item Average procedure is executed, this Price field will be updated to reflect the Price charged (Current Cost on that Calculate Inventory Item Average Form) for the most recent Purchase of this Inventory Item.
▪Vendor - Enter the (preferred) Vendor from whom this Inventory Item is generally Purchased using the Drop-Down Selection List provided.
❖See the Defining Inventory & Job Costing Items and related Inventory Valuation Methods and the Average Inventory Costing chapters for more detailed inventory and job costing related information.
•The Inventory Quantities and Status information at the bottom of the Inventory Info section cannot be changed here.
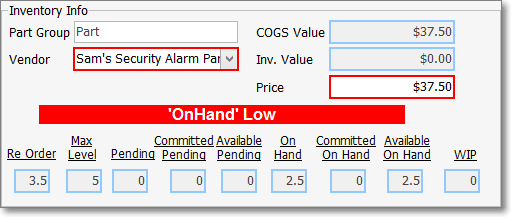
Sale-Purchase Item Form - Inventory Info section - Quantities fields
✓If the actual On Hand level is less than the established Re-Order level for this Inventory Item, an 'On Hand' Low message will be flashed.
✓Note: See the "Understanding how the Inventory Quantities and Status information is maintained" discussion below.
•Job Cost Categories section: The Job Cost Category Drop-Down Selection List is unavailable (it's Gray) because this is an Inventory Item Expense.
➢Note: If using the Commission Tracking System and charging an Activation Fee (defined as part of a Proposal Package), the individual Inventory Items - which will be included in a Proposal Package - should have Commission Points assigned but should not have Labor related information defined (because Labor is included in the Activation Fee).

Job Cost Categories section for Inventory Items
✓Labor Hours - ("Lbr. Hours") - Define the number of Hours this Inventory (Sale-Purchase) Item takes to install.
✓Cost Labor Rate - ("Cost Lbr. Rate") - Define the internal Cost for each hour this Inventory (Sale-Purchase) Item takes to install.
✓Retail Labor Rate - ("Retail Lbr. Rate") - Define the average Retail Charge for each Labor Hour required.
✓If this Inventory (Sale-Purchase) Item is included in a Proposal and subsequently converted to a Job, the Retail Labor Rate information is included in the Job Estimate tab.
❑Understanding how the Inventory Quantities and Status information is maintained:
•For Inventory Tracking & Job Costing module Users: The Inventory related Counts are altered as follows
➢Note: The Inventory Quantities and Status information at the bottom of the Inventory Info section cannot be changed here.
Sale-Purchase Item Form - Inventory Info section - Quantity fields - 'On Hand' Low message
✓When the actual On Hand level is less than the established Re-Order level for this Inventory Item, an 'On Hand' Low message will be flashed.
•Inventory is Ordered - Using the Purchase Orders and Job Costing Forms to track Orders for Inventory:
✓When Inventory Items are ordered using the Purchase Order Form:
▪Both the Inventory Item's " Pending " and " Available Pending " Count on the Sale-Purchase Item Form will be increased by the Quantity that was Ordered.
✓When Inventory Items are ordered through the Job Costing Form:
▪A Purchase Order is created.
▪The Inventory Item's " Committed Pending " Count on the Sale-Purchase Item Form will be increased by the Quantity that was Ordered.
•Inventory is Received - When Inventory Items, ordered using a Purchase Order, are actually Received, they are Checked In.
✓By doing so:
▪The Inventory Item's " Pending " and " Available Pending " Count on the Sale-Purchase Item Form will be reduced by the Quantity that was Checked In
▪The Inventory Item's " On Hand " and " Available On Hand " Count on the Sale-Purchase Item Form will be increased by the Quantity that was Checked In
•Inventory Purchases are Billed - Using the Bill It button on the Purchase Order Form:
✓When a Bill - for Inventory Items which are Received from the Vendor - is created for those Inventory Items that were Received and Checked In, the associated Inventory Counts are updated in the Inventory Tracking System as follows:
▪The Received column on the Purchase Order will be updated by the system to reflect the Quantity that had been previously Checked In and has now been Billed.
▪The Average Inventory Cost (which includes any Sales Tax that was charged) recorded on the Sale-Purchase Item Form will be updated to reflect this new Inventory Purchase's Price.
▪No Inventory Counts are changed on the Sale-Purchase Item Form.
•Inventory is directly Purchased - If a Bill from a Vendor is entered that includes Inventory Items (that did not originate using the Purchase Order process outlined above):
✓In the Inventory Tracking System
▪The Inventory Item's " On Hand " Count on the Sale-Purchase Item Form will be increased by the Quantity that was entered as a Detail Line Item on the Bill
▪The Inventory Item's " Available On Hand " Count on the Sale-Purchase Item Form will be increased by the Quantity that was entered as a Detail Line Item on the Bill
•When an Inventory Item is Reserved on the Job Costing Form:
✓The Committed on Hand Count will be increased, and the Available on Hand will be decreased, by the Quantity that was recorded Reserved.
•When an Inventory Item is Used on the Job Costing Form which was previously Reserved on that Job Costing Form:
✓The Committed on Hand Count will be decreased, and the WIP (Work in Progress) will be increased by the Quantity that was recorded as Used.
•When an Inventory Item is Used on the Job Costing Form which was not previously Reserved on that Job Costing Form:
✓The Available on Hand Count will be decreased, and the WIP (Work in Progress) will be increased by the Quantity that was recorded as Used.
•When Inventory Usage is recorded on a Service Request Form:
1.If the Service Request was created through the Job Costing Form, and those required Inventory Item(s) were previously identified on that Job Costing Form as Reserved
▪The On Hand Count will be decreased by the Quantity that was recorded as Inventory Items Used on the Inventory\Material tab of the Service Request Form.
▪The Available On Hand will be decreased by the Quantity that was recorded as Inventory Items Used on the Inventory\Material tab of the Service Request Form.
▪The WIP (Work in Progress) will be increased by the Quantity that was recorded as Inventory Items Used on the Inventory\Material tab of the Service Request Form.
2.If the Service Request record was created directly on the Inventory\Material tab (not created from a Job),
▪The On Hand Count will be decreased by the Quantity that was recorded as Inventory Items Used on the Inventory\Material tab of the Service Request Form.
▪The Available On Hand will be decreased by the Quantity that was recorded as Inventory Items Used on the Inventory\Material tab of the Service Request Form.
▪The WIP (Work in Progress) will be increased by the Quantity that was recorded as Inventory Items Used on the Inventory\Material tab of the Service Request Form.
•When a Service Request - which had Inventory Usage recorded on the Inventory\Material tab of a Service Request Form (see above) - is Invoiced:
✓In the Inventory Tracking System:
▪As part of the Completing the Service Request, when an Invoice is created for the services performed and there were Inventory and Materials recorded as required for the completion of that Service Request, the WIP (Work in Progress) Count will be decreased by the Quantity that was recorded on the Inventory\Material tab of the Service Request Form
•When an Inventory Item is directly Sold - When a Subscriber is Invoiced directly for an Inventory Item as part of a "stand-alone" Sale (and any Inventory Items included in the Sale were not Invoiced or accounted for as Inventory Used elsewhere in a Service Request and/or as part of a Job Costing entry):
✓Each Inventory Item's " On Hand " and " Available On Hand " Count on the Sale-Purchase Item Form will be decreased by the Quantity that was Invoiced.
✓No WIP (Work in Progress) Count is changed
•Summary of the General Ledger Inventory related Transaction Posting Process works as follows
1.Inventory Items are Ordered using the Purchase Order Form, no General Ledger transactions are required.
2.When the Inventory Items are Received and Checked In the General Ledger creates a Debit (addition) to the Inventory Asset Account and a Credit (addition) to the Inventory Purchases Liability Account
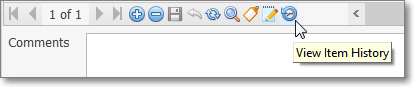
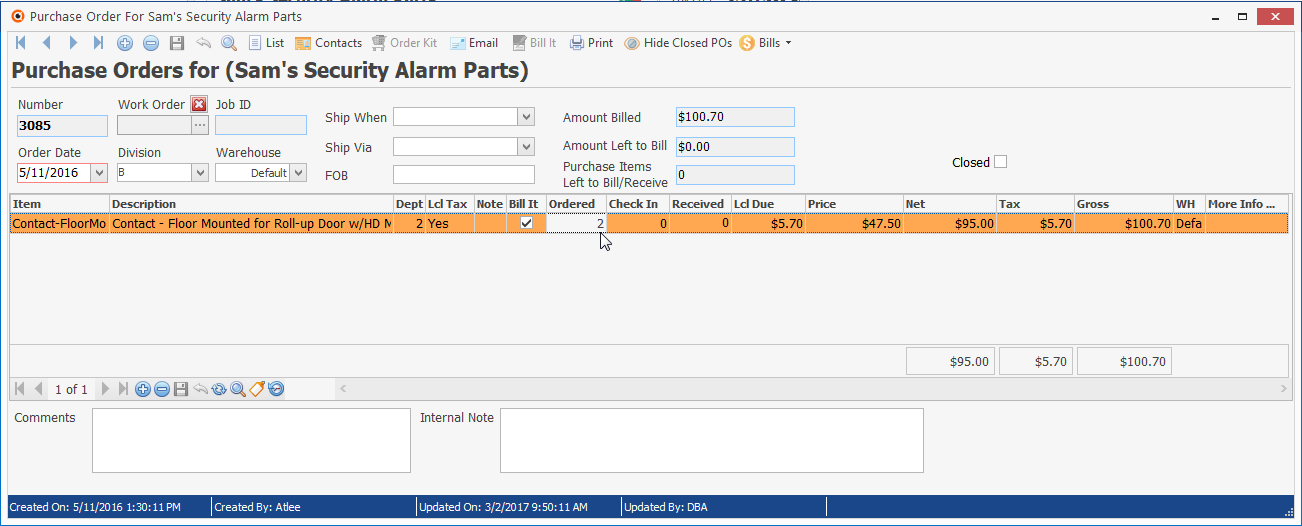
▪Click the View Item History Icon on the Ribbon Menu at the bottom of the Line Item Detail grid to view these General Ledger Transactions.
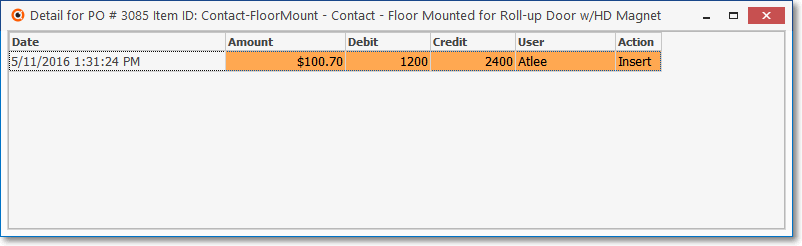
3.When the Purchase Order is actually Billed (after the Ordered Inventory Items have been Received and then Checked In) and Closed, a Bill is created.
4.In that Bill, the Value of the Inventory Items that were Purchased is Debited (subtracted from) the Inventory Purchases Account (i.e., 2400) and the Value of the Inventory Items that were Purchased is Credited to the Accounts Payable Account (i.e., 2000).
▪Click the View Item History Icon on the Ribbon Menu at the bottom of the Line Item Detail grid to view these General Ledger Transactions.

✓This completes the InventoryTransaction Posting Process
❑How Inventory Adjustments are managed:
•When a Credit Memo from a Vendor is Received - From time to time you will need to return unused or inoperative Inventory Items and so will receive a Credit for the Cost of these items from that Vendor for those returned items.
✓The Inventory Item's " On Hand " Count on the Sale-Purchase Item Form will be decreased by the Quantity that was Credited.
✓The Inventory Item's " Available On Hand " Count on the Sale-Purchase Item Form will be decreased by the Quantity that was Credited.
•When a Credit Memo to a Subscriber is Issued - From time to time you may accept the return of unused or inoperative Inventory Item(s) from a Subscriber and will therefore issue them a Credit Note:
✓The Inventory Item's " On Hand " Count on the Sale-Purchase Item Form will be increased by the Quantity that was returned.
✓The Inventory Item's " Available On Hand " Count on the Sale-Purchase Item Form will be increased by the Quantity that was returned.
✓The Inventory Item's " Available Pending " Count (as shown on the Sale Purchase Item Form) will not be changed.
✓The Inventory Item's " Total Pending " Count (as shown on the Sale Purchase Item Form) will not be changed.
•Inventory Transfers - From time to time you may relocate (i.e., Transfer) Inventory Item(s) from one Warehouse location to another.
✓These Transfers do no affect the overall Quantity of any Count shown on the Sale Purchase Item Form.
•Inventory Adjustments - From time to time you may perform a physical Inventory Count.
✓As a result of this Inventory Counting Procedure, and to subsequent Inventory Count Adjustments (using the Adjust option on the Warehouse Inventory Form (see the "Special Purpose Buttons on the Warehouse Inventory Form" discussion toward the end of this chapter):
▪The " On Hand " and " Available On Hand " Counts of certain Inventory Items will be changed.
▪These Inventory Adjustments are accomplished by simply making that change to the Quantity of certain " On Hand " and " Available On Hand " Counts using the Adjust option on the Warehouse Inventory Form (the results of which are shown on the Sale Purchase Item Form).
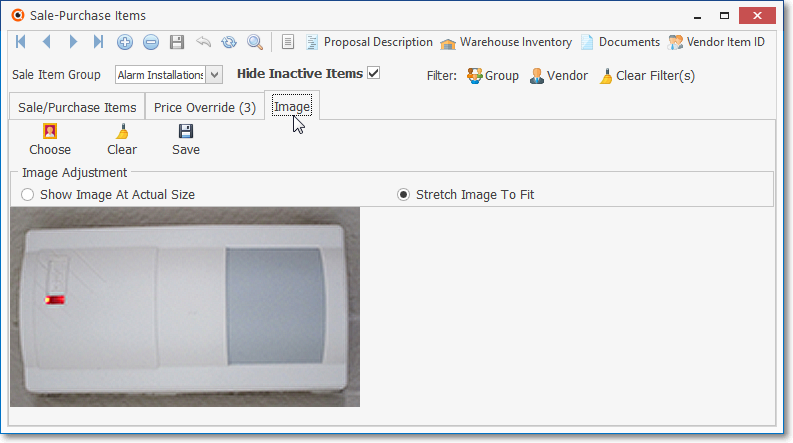
❑Using the Image tab:
•Image - As shown in the illustration below, the Image tab is used to enter a picture of the Sale-Purchase Item, when appropriate.
✓By using this Image tab to identify an Inventory Item or Kit, it provides the User access to an actual picture of that Part.
✓Images attached to a Sale-Purchase Item record my also be included on a printed Proposal based on the options selected when Printing a Proposal.
Sale Purchase Items - Image tab
▪To insert an Image:
a.Choose - Click the Choose button and, using the standard Windows® dialogue box provided, locate the desired file.
b.Image Adjustment - Once the Sale-Purchase Item's BMP or JPG file is selected, Choose the Image Adjustment method that best displays your Sale-Purchase Item in the display box by alternately Clicking Show Image At Actual Size and Stretch Image To Fit.
c.Save - Click the Save button once you are satisfied with the Image Adjustment setting.
d.If you want to re-do this process, Click the Clear button and repeat the steps above.
Sizing Images for a Sales-Purchase Item
❑Formatting images for the Image tab - making them are the proper size without introducing distortion - can be a bit tricky.
•These instructions were created using Irfan View as the editor (see the http://www.irfanview.com/ website)
•Use an aspect ratio of 4:3 (640x480) to make the image fit well and look good.
❑To re-size and format with Irfan View, do the following:
a)Open the original image with Irfan View
b)Crop the image to what portion that you want and press CTRL-Y to crop.
c)Resize with these steps using CTRL-R: o Select Set new size:
d)Select Units: pixels
e)Select Preserve aspect ratio (proportional)
f)Select Apply sharpen after Re-sample
i.Unselect Adjust DPI based on new sizes (asp. Ratio)
ii.Set DPI: 72
iii.Enter Width: of 640 and if Height: is less than 480, click OK. If not, enter Height: of 480 and the Width: would be less than 640 and then click OK.
g)Adjust the Canvas size using SHIFT-V:
i.Select Method 2: Set total canvas size dimensions in pixels:
ii.Enter Width: of 640 and Height: of 480
iii.Select Anchor of Center
iv.Select Canvas Color: of White so that it matches the white Proposal background
v.Click OK.
•Finally, import this image into the Sales-Purchase item record following the "Using the Image tab" instructions above.
•We hope you will be pleased with the result.
❑Other Special Fields and Functions:
•Sale Item Group - Optionally, you may also enter a Sale Item Group using the Drop-Down Selection List provided.
Sale Item Group field
✓If you have a large quantity of Sale-Purchase Items, Sale Item Grouping allows you to use the Advanced Sale-Purchase Item Lookup feature to select the desired Purchase Category from a pre-limited list (based on the Sale Item Group assigned to it).
✓The Advanced Sale-Purchase Item Lookup function (accessed with Alt+F2 from with the Purchase Item Drop-Down Selection List on the Bills Form) lets you pick from items only in a specific group - thereby presenting a much shorter list.
✓Click the ![]() Icon to record this Sale Item Group assignment for the Purchase Category entry.
Icon to record this Sale Item Group assignment for the Purchase Category entry.
•Vendor Item ID - For those using the Accounts Payable System, and the Inventory Tracki8ng System
✓The Vendor Item ID button at the top of the Form allows you to enter the Part Numbers used by the Vendors from whom you generally order this Purchase Category.

✓Click the Vendor Item ID Icon on the Navigation Menu to open the Vendor Item ID Form.
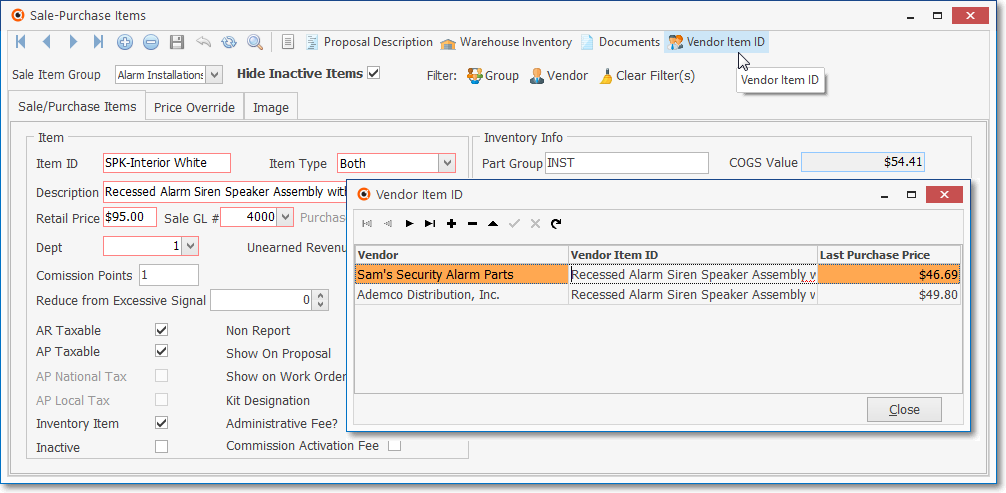
Vendor Item ID entries
▪This Vendor Item ID Form is used to identify the Part Numbers (Vendor Item IDs) that various Vendors, from whom this Inventory Item is Purchased, use internally to identify this Inventory Item (i.e., their Part Number).
▪Click Add ("+") to start a new entry.
oVendor - Use the Drop-Down Selection List to Choose the appropriate Vendor.
oVendor Item ID - Enter the actual Part Number used by the selected Vendor.
oLast Purchase Price - System maintained field.
▪Save - Click the Save ("ü") Icon to save this Vendor Item ID record.
▪Repeat as needed.
▪Close - Click the Close button to return to the Sale-Purchase Item Form.
✓Click the ![]() Icon to record this Vendor Item ID assignment for the Purchase Category entry.
Icon to record this Vendor Item ID assignment for the Purchase Category entry.
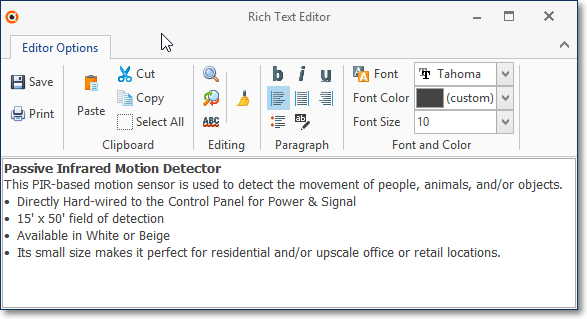
•Proposal Description - Click the Proposal Description Icon on the Actions Menu to open the Proposal Description editor to create a longer and more detailed description of this Inventory Item.

✓This expanded Proposal Description will be included on Proposals containing this Sale-Purchase Item.
Proposal Description editor
▪Type whatever is appropriate.
▪Click ü OK to save the entry.
•Documents - Documents may be attached, and/or linked, to this this Sale-Purchase-Item record:
![]()
✓Click the Documents Icon to open the Documents for dialog from where files (and file links) related to this Sale-Purchase Item may be identified.
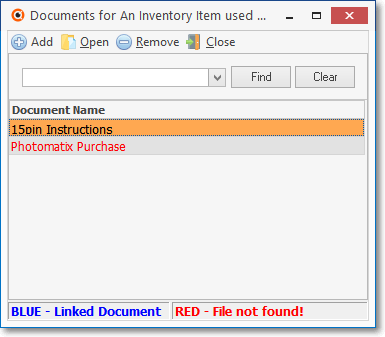
Documents for... Form
✓See the Documents chapter within the Accounts Receivable module for a detailed explanation of this powerful feature.
❑Important Job Costing and Service Department related Information:
•Once you've Set up a Job in the Inventory Tracking & Job Costing module, you will often incur Non-Inventory Expenses for the Job.
✓These type of Non-Inventory Expenses are identified with a Job Cost Category
•As you define your Sale-Purchase Items, if your Job Costing System is active, you will - as needed - enter the Job Cost Category for the item by using the Drop-Down Selection List provided.
✓The Job Cost Category field is not available when you are defining an actual Inventory Item or Kit.
✓The field is Gray - as in the example Inventory Item in the illustration below - because Inventory usage is tracked separately and automatically.
Job Cost Categories section for Purchase Categories which are Inventory Items
•The Non-Inventoried Job Cost Categories are:
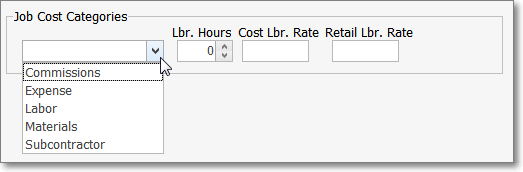
Job Cost Category List
✓Job Cost Category options and their purpose are:
a)Commissions - Identifies this Purchase Category as a Sales related Commission charged against a Job This Commissions Job Cost Category will usually not have Labor component defined.
b)Expense - Identifies this Purchase Category as a miscellaneous Expense charged against a Job
oThis Expenses Job Cost Category will usually not - but may - have a Labor component defined.
c)Labor - Identifies this Purchase Category as a miscellaneous Labor (Technician's Labor costs) charged against a Job.
oThis Labor Job Cost Category will almost always have a Labor component defined
d)Materials - Identifies this Purchase Category as charges for various Material used for a Job (such as wire, batteries, other electrical supplies, conduit, clamps, etc.).
oThis Materials Job Cost Category will usually not - but may - have a Labor component defined
e)Subcontractor - Identifies charges of Subcontractor bills that will be charged against a Job (such as telephone line installations, pre-wiring, CCTV, independent alarm installer, etc.).
oThis Subcontractor Job Cost Category will usually not - but may - have a Labor component defined.
✓Where appropriate, enter Labor information:
✓If this Purchase Category is an Inventory Item:
oLabor Hours - ("Lbr. Hours") - This field is used to define - when this is an Inventory Item - the average number of Labor hours that are required to install this Part.
oCost Labor Rate - ("Cost Lbr. Rate") - This field is used to define - when this is an Inventory Item - the average internal Cost for each hour required to install this Part.
oRetail Labor Rate - ("Retail Lbr. Rate") - This field is used to define - when this is an Inventory Item - the average Retail Charge for each hour required to install this Part.
➢Note: When this Inventory (Sale-Purchase) Item is included in a Proposal and subsequently converted to a Job, the Retail Labor Rate information is included in the Job Estimate tab.
✓If this Purchase Category is not an Inventory Item:
oJob Cost Category - Identify the Job Costing Category using the provided Drop-Down Selection List.
oLabor Hours - ("Lbr. Hours") - This field is used to define the average number of Labor hours that are required for completing the designated Job Cost.
oCost Labor Rate - ("Cost Lbr. Rate") - This field is used to define the average internal Cost for each hour required for the designated Job Cost.
oRetail Labor Rate - ("Retail Lbr. Rate") - This field is used to define the average Retail Charge for each hour required for the designated Job Cost.
❑Inventory Item Warehouse information:
•Warehouse Inventory Icon:

✓To see the current status of an Inventory Item by Warehouse, Click the Warehouse Inventory Icon on the Navigation Menu of the Sale-Purchase Items Form.
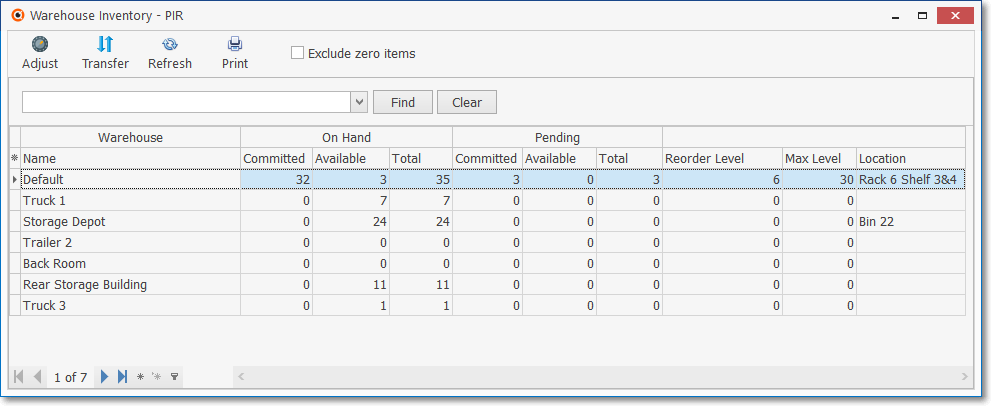
Warehouse Inventory Form
✓Warehouse - The far left column lists the places defined as Warehouses.
✓Location - The far right column is used to enter the specific Location within this Warehouse
▪Click the Location field, then:
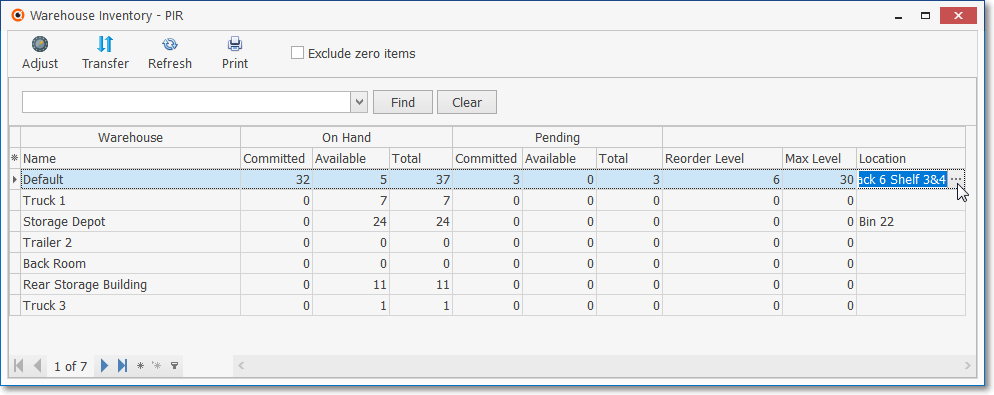
▪Click the Ellipse button (which will now be displayed on the right of the Location field).
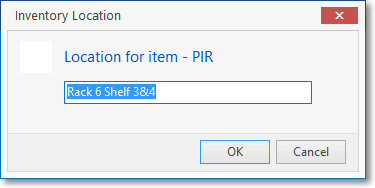
▪Enter a specific Location where this Inventory item is stored within the selected Warehouse.
▪Click OK to record this entry.
✓Status Line - row (between the Warehouse and the Location columns) displays a series of columns with the current status (counts) of this Inventory Item.
❑Special Purpose Buttons on the Warehouse Inventory Form - These features are only used with the Inventory Tracking & Job Costing System:

•Exclude zero items - Check this box to remove any Warehouses from the list which have none of the selected Inventory Item at that location.
•Adjust - Edit Warehouse Inventory Values - Allows you to (Re-)Set the rules for Reordering Inventory items, and to adjust actual Inventory Item counts based on the results of a physical Inventory Counting process.
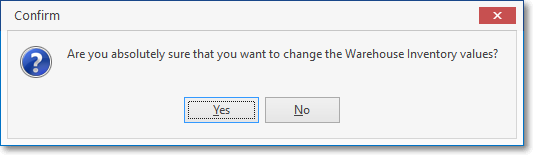
✓Click Yes to Confirm that you do want to change the existing Warehouse Quantities.
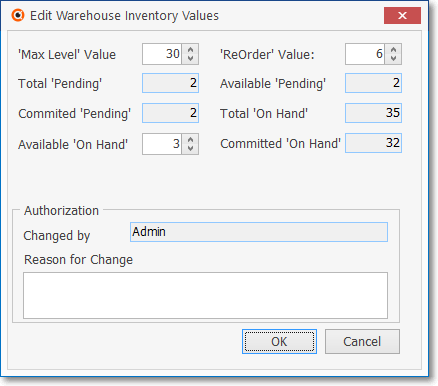
Edit Warehouse Inventory Values
✓Select and Update the specific Inventory Count field(s) that need to be revised:
▪'Max Level' Value: - The maximum Quantity of this Inventory Item that should be in-stock (Available 'On Hand') at any time.
▪'ReOrder' Value: - The Quantity of this Inventory Item which is in-stock (Available 'On Hand') that triggers a Re-Order Request (which is documented in the Inventory Reorder Report).
▪Total Pending - This Quantity is controlled by the system when using the Purchase Orders Form to order Inventory Items.
▪Available Pending - This Quantity is controlled by the system when using the Purchase Orders Form to order Inventory Items.
▪Available 'On Hand': - The Quantity of this Inventory Item that is in-stock at any time.
![]()
oRight-Click this Available 'On Hand' field to (re-)set the Increment in which the Up/Down Arrows will change the current Quantity and display the resultant Quantity.
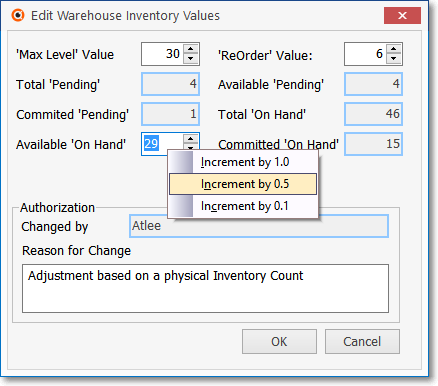
oThe choices are 1.0, 0.5, and 0.1
oOnce the field is (re-)set, this Increment setting will become the default.
✓Authorization -Identify the Reason for Change
✓Click OK to save the change or Cancel to abort the revisions.
✓For General Ledger System Users: When an Inventory Adjustment is recorded, four Mandatory Accounts are updated as follows:
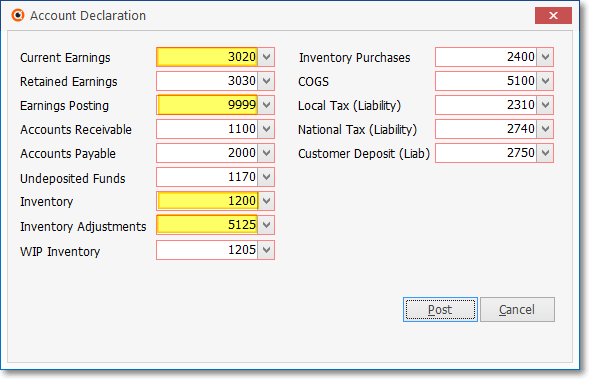
Inventory related Mandatory Accounts
1.Inventory Adjustments - An Expense Account which is Credited (added to) if the Quantity of Available on Hand was increased and Debited (reduced) if decreased.
2.Earnings Posting - A special Expense Account which is Debited (added to) if the Quantity of Available on Hand was increased and Credited (reduced) if decreased.
3.Current Earnings - An Equity Account which is Credited (added to) if the Quantity of Available on Hand was increased and Debited (reduced) if decreased.
4.Inventory - An Asset Account which is Debited (added to) if the Quantity of Available on Hand was increased and Credited (reduced) if decreased.
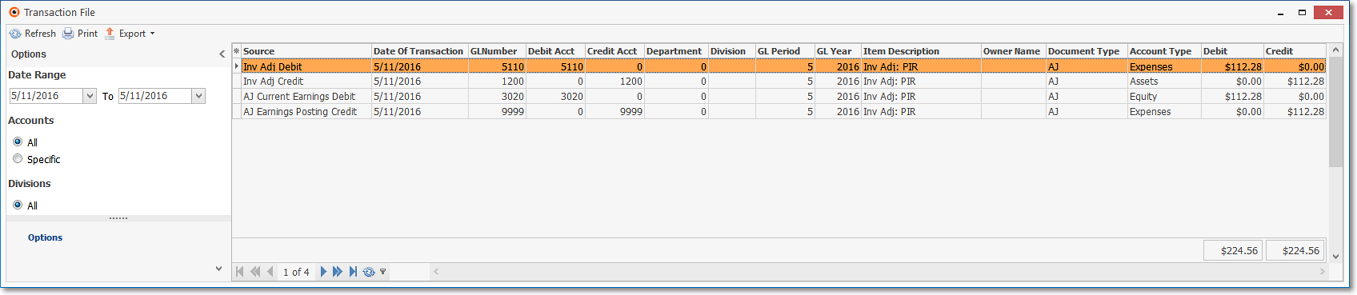
Transaction File dialog - Inventory Adjustment entries

•Transfer - Click the Transfer button to Move a designated Quantity of Inventory Item(s) from one Warehouse to another.

Warehouse Inventory Transfer dialog
✓Sale Item - The Inventory Item that is to be relocate.
✓From - Click the Warehouse Search Icon to locate the appropriate Warehouse Location FROM which a specified Quantity of this Inventory Item will be removed.
▪Search By - Use the Drop-Down Selection List to Choose the search method which may be by Name or by Warehouse ID number.
▪Search Value - Enter the characters with which to perform the search.
▪Click on the desired Warehouse.
▪Click the OK button to close the Warehouse Search dialog which will also insert the selected record into the From field.
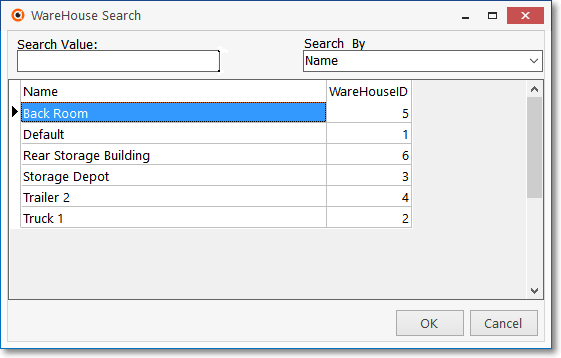
Warehouse Search dialog
▪When the FROM Warehouse is selected, the On Hand and Available On Hand Quantities that are currently stored in that Warehouse will be displayed.
✓To - Click the Warehouse Search Icon to locate the appropriate Warehouse Location TO which a specified Quantity of this Inventory Item is to be moved.
▪Search By - Use the Drop-Down Selection List to Choose the search method which may be by Name or by Warehouse ID number.
▪Search Value - Enter the characters with which to perform the search.
▪Click on the desired Warehouse.
▪Click the OK button to close the Warehouse Search dialog which will also insert the selected record into the TO field.
▪When the TO Warehouse is selected, the On Hand and Available On Hand Quantities that are currently stored in that Warehouse will be displayed.
✓Quantity - Enter the Quantity to be Transferred. The default value will be 1.
▪This Quantity may not be greater than the Available On Hand Quantity currently stored in that Warehouse.
▪The Quantity entered may not be a negative value.
✓Transfer - Click the Transfer button to execute the move.
✓Close - Click the Close ![]() box on the top of the Form to exit the Warehouse Inventory Transfer dialog.
box on the top of the Form to exit the Warehouse Inventory Transfer dialog.

•Refresh - Updates the Form with the most current information in case another User made a change since the Form was opened.

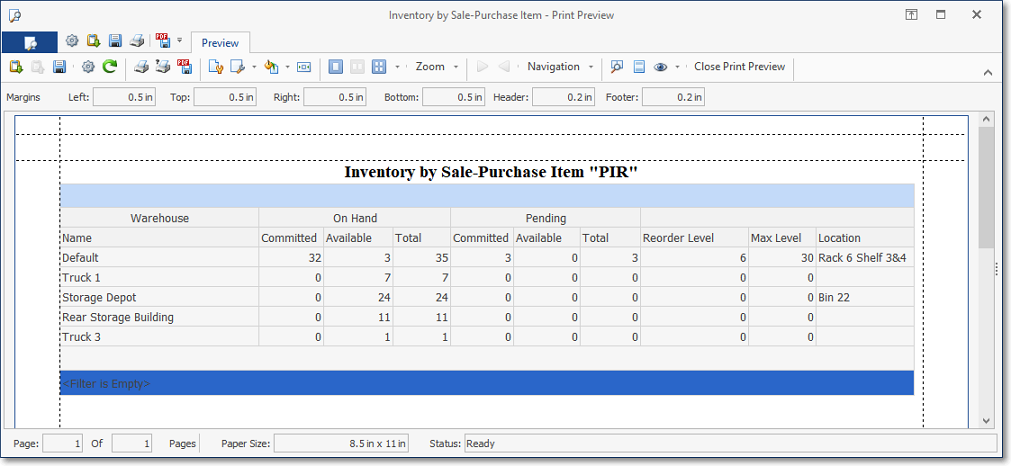
•Print - Click the Print button to open the Inventory by Sale-Purchase Item Print Preview.
•Close - Click the Close ![]() box to Exit the Warehouse Inventory Form
box to Exit the Warehouse Inventory Form