❑The Ribbon Menu Icons on the Work Order Requests Tab at the top of the Work Order Form are shown below
•An overview of the purpose for each of these Icons follows.
![]()
Work Order Form - Ribbon Menu
•Navigation Menu Icons:
![]()
1.Record Movement (First, Prior, Next, Last)
2.Insert new Work Order
3.Delete a Work Order
4.Save the Work Order
5.Cancel the editing changes made to a Work Order
6.Refresh the currently displayed Work Order data.
7.List - Displays a list of the previous Work Orders in a Data Grid (as shown immediately below).
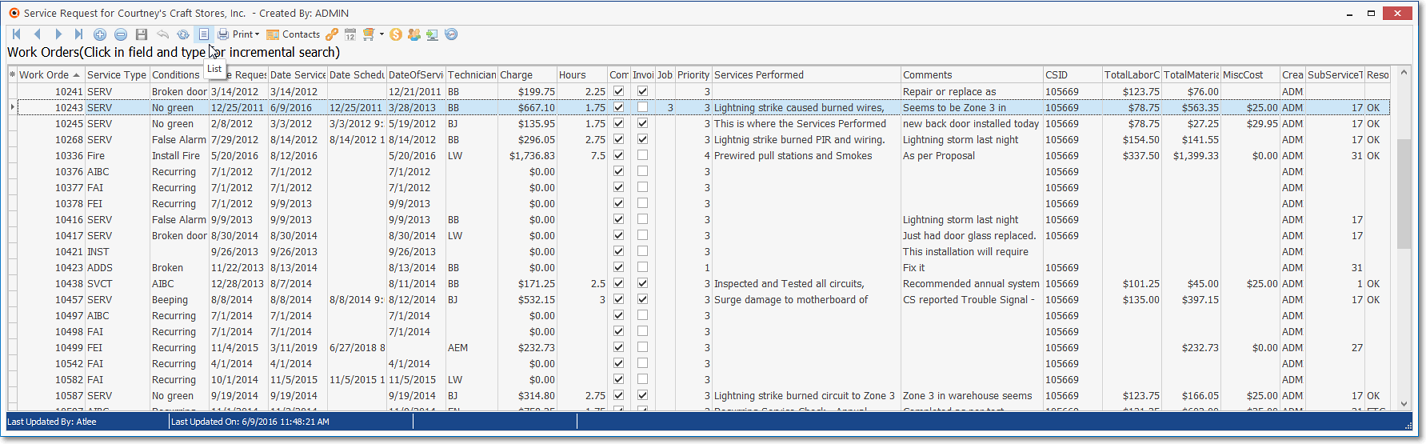
Work Order Requests Form - List View
▪List View - Column Assignments: The User may Select which Columns of data will be included in the List View Grid. To do so:
oClick the Asterisk (*) at the top left of the Grid's Header to display a list of all available Columns (Header Names).
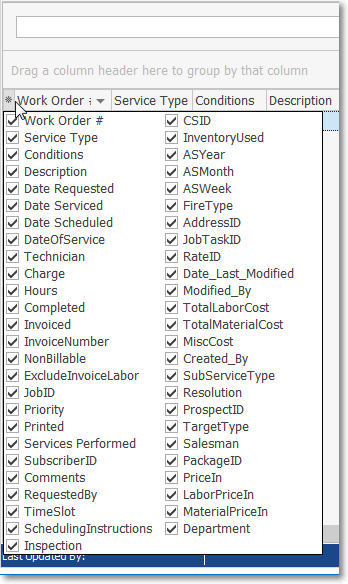
Work Orders - List of available Columns (header Names)
oCheck each column that is to be included (by default all columns will be Checked).
oRemove the Check to exclude that column (Header Name).
8.Plus Work Order Option Icons (see immediately below)
❑Work Order Option Icons:
![]()
A.Print option on the Work Order Form has three (3) options:
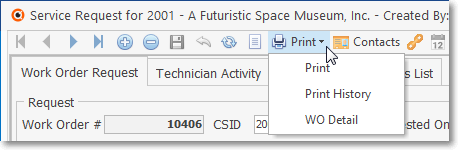
Work Order Requests Form - Print options
1)Print - Opens the Service Request Form dialog with the current Work Order Number set as the default Work Order to be Printed
2)Print History - Prints the Work Order History of the currently selected Subscriber
3)WO Detail - Opens the Work Order Details dialog where the User may customize the contents of the report, and then Print or Email those results
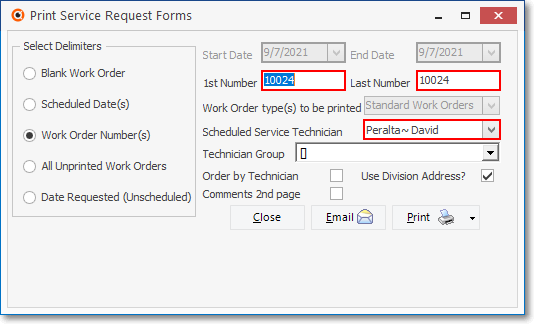
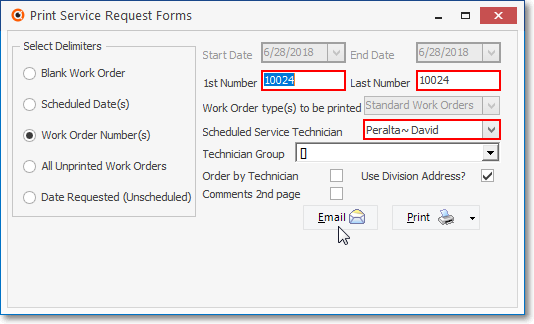
I.Print - Opens the Print Service Request Forms dialog preset for the currently displayed Work Order
Work Order Requests Form - Print option - Print Service Request Forms dialog
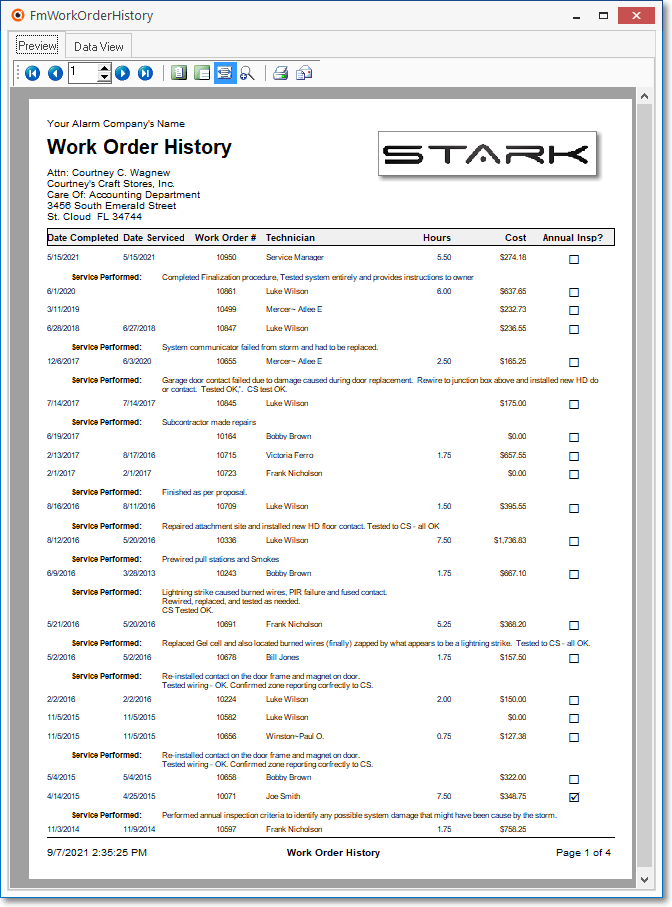
II.Print History - Prints the complete Work Order History for this Subscriber.
Work Order Requests Form - Print History option - Work Order History report
III.WO Detail - Opens the Work Order Detail dialog
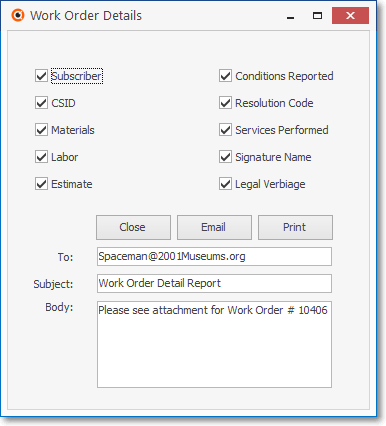
Work Order Requests Form - WO Detail option - Work Order Details dialog
B.Contact - Click this Contacts option to open the Contacts Form to identify anyone who should be/was previously associated with this Work Order.
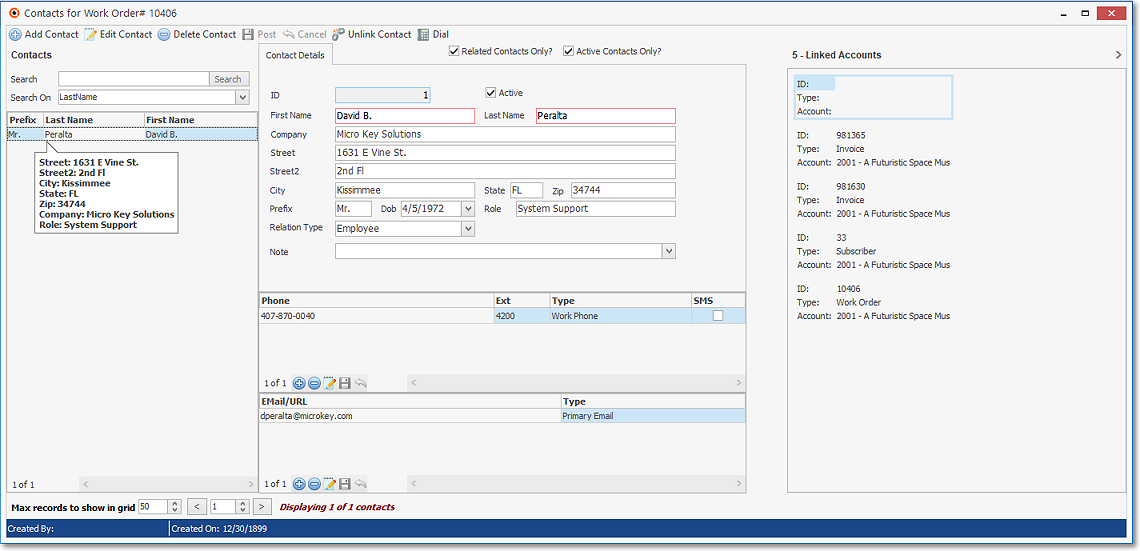
Contacts Form - Work Order Form
C.Link WO (Link a previously entered Work Order to a new Work Order
D.Schedule (a Work Order using the available Technician Scheduling Form)

E.Order Inventory (for this Work order)
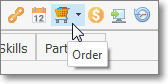
Work Order Ribbon Menu - Order Icon
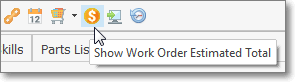
F.Show Total (for currently record charges on this Work Order)
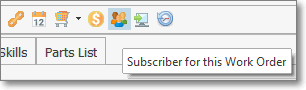
G.Subscriber for this Work Order (only displayed if the Work Order was retrieved using the Search by Work Order feature).
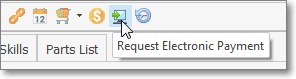
H.E-Payment (enter an Electronic Payment for this Work Order)
I.View History (of changes to this Work Order record since it was originally saved)
❑Updating information on a Completed Service Request:
•If a modification of a Service Request - which has already been Invoiced and/or marked as Completed - becomes necessary:
✓An Authorize Transaction dialog may be displayed in which case the User must Specify the reason for the Modification.
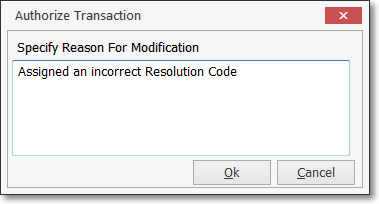
Authorize Transaction - Specific Reason For Modification
✓Work Order has been Completed or Invoiced! - Confirm that these changes are required by Clicking the Yes button.
▪A record of these changes will be posted to the Work Order Modification History for this Work Order (see the "Work Order Options" section's item #6 "View
❑Using these special Work Order Options:
•These Work Order Option buttons include Printing, History Review, Work Order Linking, Scheduling, Inventory Ordering, Totaling, and Electronic Payment functions:
A. Print the currently displayed Work Order, or Print the Work Order History for this Subscriber.
1.Print the Service Request Form:
oThe currently selected Service Request may be printed at any time.
oClick the Print Icon at the top of the Form to open the Print Service Request Forms dialog.
Print Service Request Forms - Email and Print buttons - Email selected
a)The Start and End Dates will default to Today and cannot be changed.
b)The 1st and Last (Work Order) Number will be that of the current Service Request and should not be changed.
c)The Work Order Type of the Service Request will be inserted automatically and will therefore determine the format of the printed Service Request.
d)The Technician selected for this Service Request will be inserted automatically, but may be changed using the Drop-Down Selection List provided, if appropriate (e.g., more than one Technician has been assigned to this Service Request and that other Technician needs a copy, too).
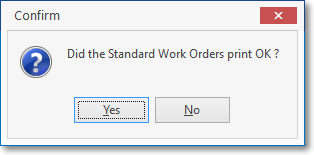
e)Print - Click the Print button at the bottom of the Print Service Request Forms dialog to Preview and optionally Print (to a File or a Printer) this Service Request.
i.Confirm that the Work Order printed properly.
ii.When the UseDivisionAddress option is set to True ("T"), if a Subscriber has been assigned to a Division, except on an Installation Order, that Division's Address will be printed as the Company Address on a printed Service Request Form.
oEmail - Click this Email Icon (the Envelope) on the Print Service Request Forms dialog to Email this Work Order to the assigned Technician.
a)Your email application will load automatically.
b)Enter the email address where indicated.
c)Click Send - the Work Order information will be attached to the Email message, automatically.
2.Print History associated with the current Work Order
oClick the Print Icon and then select the Print History option.
oThis selection will immediately list all Work Orders completed for this Subscriber.
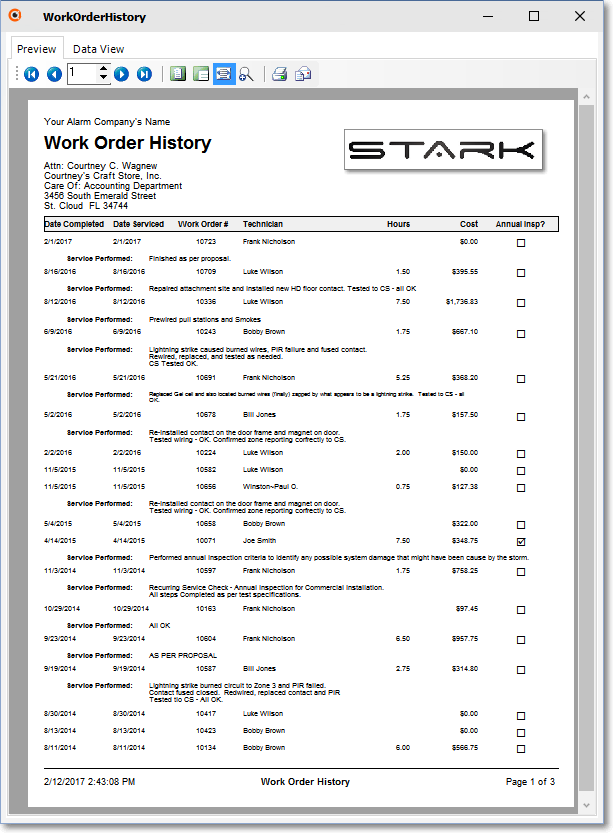
Work Order History report
3.WO Detail - Opens the Work Order Detail dialog where a User may customize the results of this report
Work Order Requests Form - WO Detail option - Work Order Details dialog
a.Subscriber - Include the Name of this Account on the report
b.CSID - Include the CSID assigned to this Work Order on the report
c.Conditions Reported - List the Conditions Reported that required this Work Order
d.Materials - List the Type, Quantity, and Price for the Materials Used to complete this Work Order
e.Labor - List the Technician(s), Pay Rate Type(s), and the Hours they worked to complete this Work Order
f.Estimate - List the Estimated Charges, Tax and Total cost incurred to complete this Work Order
g.Services Performed - Include the description of what was done to complete this Work Order
h.Resolution Code - Show the Resolution Code's Description assigned to this Work Order
i.Signature Name - Include a Signature Line on this report
j.Legal Verbiage - Include the Legal Verbiage for customer acceptance on this report
a)Print - Creates the Work Order Detail report as configured
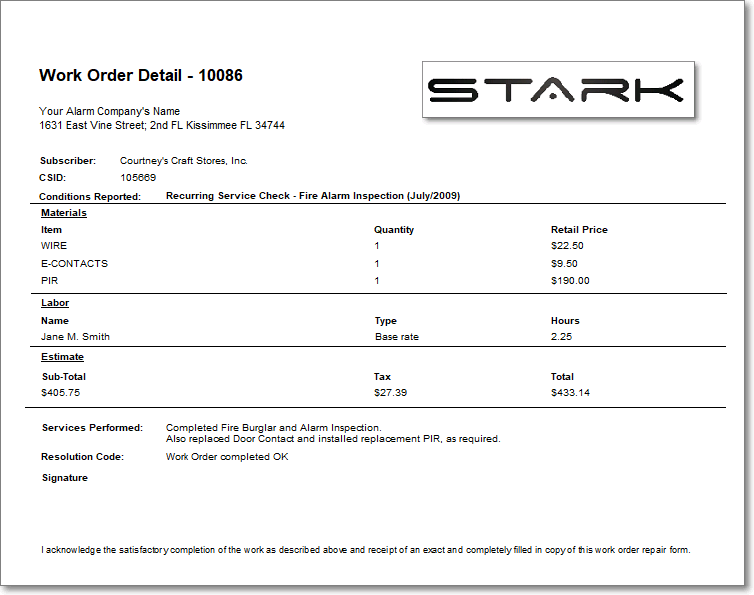
Work Order Requests Form - WO Detail option - Work Order Details sample
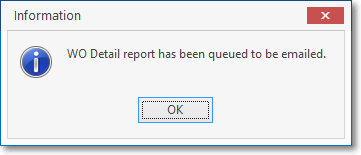
b)Email - Inserts the Work Order Detail report (including a PDF file of the report as defined above) into the Email queue as configured
c)Close - Closes the Work Order Detail dialog
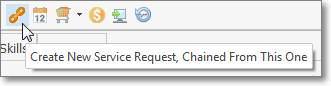
B.Link a new service issue to a previously entered Work Order
▪Combine any existing Work Order (which has not yet been marked as Completed) with a newly reported service issue.
oUsing either the Table View tab or the Search Icon described above, Select the Work Order record to be worked on in conjunction with the Subscriber's new service issue.
oClick the Chain Icon at the top of the Service Request Form.
➢Note: The User may have to Authorize this Transaction.
oWhen the Link WO button is Clicked (and after an Authorization is granted, if required):
i.A New Work Order record is created
ii.It will contain the information from the currently selected (previously entered but not yet Completed) Work Order
iii.This includes any special Scheduling Instructions that may have been entered. (The instructions should be no longer than 200 characters or they will not be fully shown on the Technician's printed Work Order)
oModify this new Work Order record to include the new service issue(s) identified by the Subscriber.
oFollow the normal Entering a Work Order data entry process thereafter.
oBe sure to Click the Save button to record this new "Linked" Work Order.
➢Note #1: When this Work Order is Completed, be sure to Check the Completed box on the previously selected Work Order as Completed, also.
➢Note #2: A Work Order created for a Job Task cannot be Chained.
C.Schedule this Work Order
▪Click the Schedule Icon
oThe Technician Scheduling dialog will be displayed for Today with the Schedule of the Technician who is assigned to this Service Request.
oClick the New Appointment option and enter the appropriate information.
❖See the Using the Schedule Icon chapter for more detailed information.
D.Order Inventory for the current Work Order:
1.Click the Down-Arrow ‚ on the Order Inventory Icon to see a list of the Purchase Order Numbers that were previously created to order Inventory Items for the currently selected Service Request.
a.Clicking on any listed Purchase Order Number will display that Purchase Order
b.The "Understanding and Using the Work Order Number field on the Purchase Order Form" discussion in the Creating a Purchase Order chapter will provide detailed information on how this affects a Purchase Order.
2.To order the Inventory Items which are required for the currently selected Service Request
a.Frequently, specific Inventory Items will be required to perform the requested service(s).
b.These required Inventory Items may be Ordered from a Vendor from within the Service Request Form.
c.Click the Order Inventory Icon itself (not the Down-Arrow ‚) to open the Vendor Search dialog.
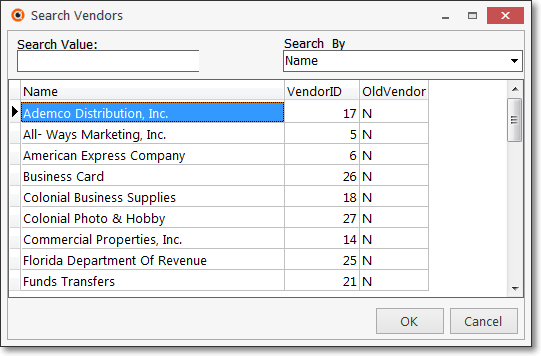
Vendor Search dialog
d.Select the desired Vendor from whom the Inventory Item(s) will be ordered.
e.Click the OK button to Close the Vendor Search dialog and display the Purchase Order Form for that Vendor.
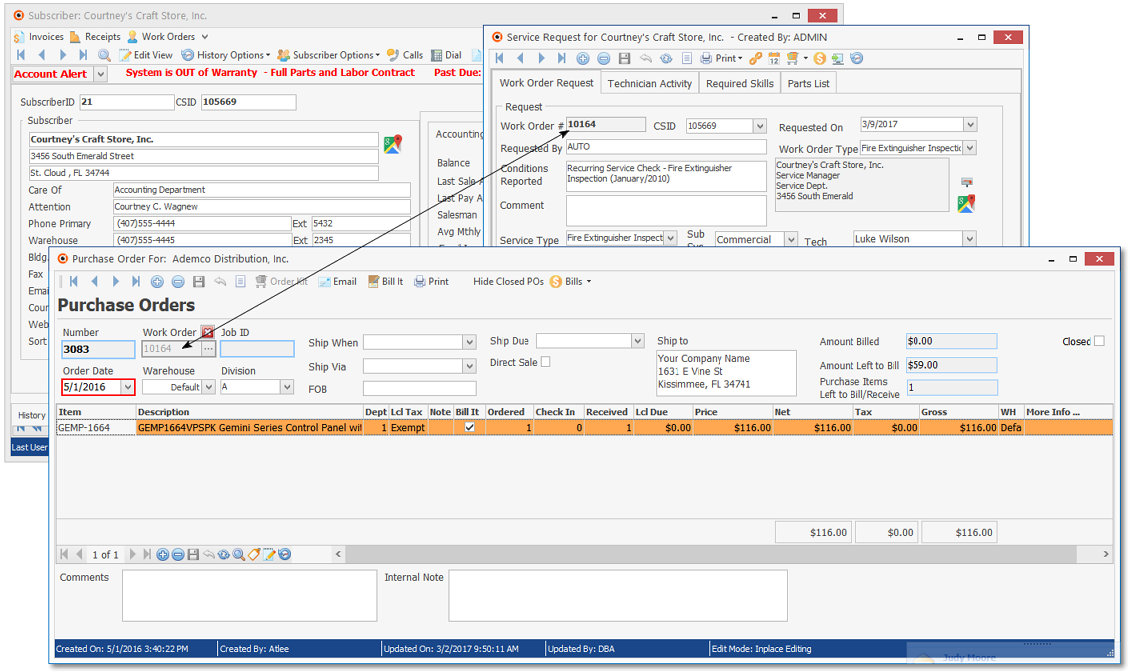
a)Click the ![]() Icon to enter a new Purchase Order for the required Inventory Items.
Icon to enter a new Purchase Order for the required Inventory Items.
b)Click the Close ![]() box to Close the Purchase Order Form.
box to Close the Purchase Order Form.
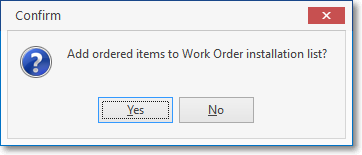
Add ordered items to Work Order installation list?
c)Indicate whether or not these ordered Inventory Items should be added into the Work Order's Parts List.
oIf Yes was Chosen, the Inventory Items on the Purchase Order will be inserted into the (existing) Parts List tab on this Work Order.
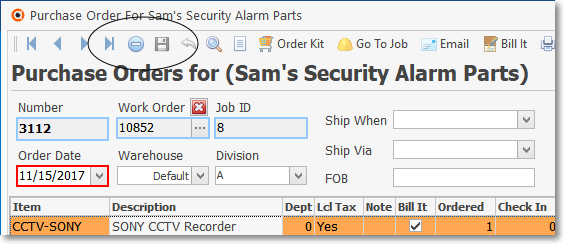
➢Note: When a Purchase Order Form is opened from a Work Order that was created for a Job Task, that Purchase Order Form's Ribbon Menu will not include an Insert ![]() Icon
Icon
No additional Purchase Order for that Work Order may be created unless it is saved and closed.
By doing so, it prevents an accidental creation of another Purchase Order which is not associated with the currently selected Job Task
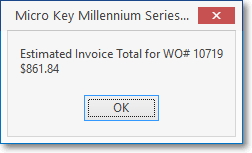
E.Show Total display the Total Balance Due for this Work Order
▪Click the Show Total Icon to display this information.
F.E-Payment will open the E-Payments Form where a Credit Card payment for this Work order may be initiated.
1.First, Click the Show Total Icon to display the Estimated Invoice Total information.
2.Then, Click the E-Payments Icon to display the E-Payments Form
3.The E-Payments dialog will be displayed.
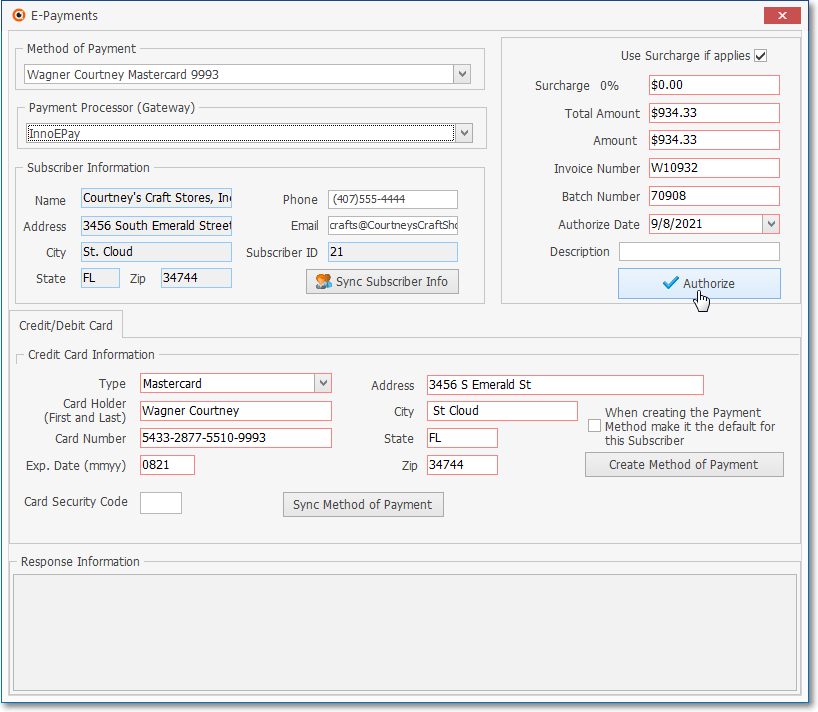
a.Enter the Credit Card Information
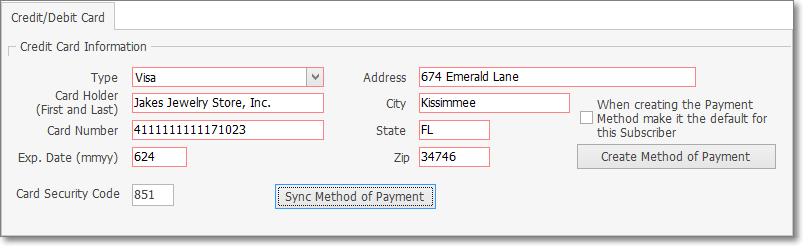
1)If no Credit Card information is on file, enter it now (existing Credit Card information will be inserted automatically, if available).
2)See the E-Payments chapter for more information about this Credit/Debit Card tab.
b.Enter the Check Information
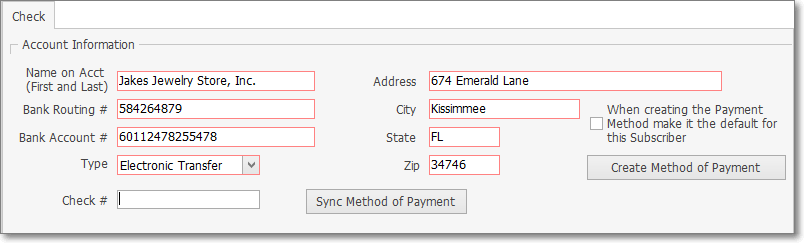
1)See the E-Payments chapter for more information about this Check tab.
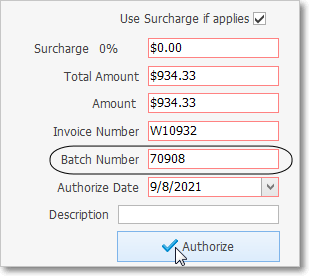
c.Enter the Transaction Information.
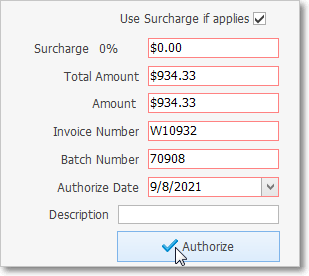
Transaction Information
1)Amount - Enter the Amount to be charged to the Credit Card (entered automatically based on the Show Total Amount)
2)Invoice Number - By default, this will be the Work Order Number preceded with a "W".
3)Batch Number - (see Batch Number below) - By default if NOT using an automatic Payment Gateway to process your Credit Card payments, this will be the Calendar's Day Number for Today
4)or enter the appropriate Batch Number to be assigned to this Credit Card transaction.
5)Authorize Date - By default, this will be Today but may be changed by using the Drop-Down Date/Calendar provided.
6)Description - Enter a brief description of the reason for this charge.
7)Authorize - Click this option to transmit the Credit Card or Bank Charge information
d. Batch Number - By default, this Batch Number will be formatted based on the Credit Card type or Check being charged, plus the 2 digit Month and two digit Day number
1)If necessary, enter a different Batch Number as appropriate, keeping on mind that this is an internal control for the Company's selected Payment Gateway.
Batch Number for Payment Gateway
❖See the Defining your Company's Batch Numbers discussion in the E-Payments chapter for detailed information; and the "Batch Number Assignment" discussion in the Receipts chapter for more information about Batch Numbering.
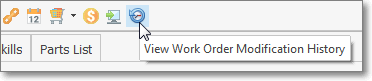
G.View the Work Order Modification History : Click the View History Icon to see a list of any authorized changes, the User who made them, and when they were made to this Work Order after it was Invoiced and/or marked as Completed.
1.Click the View History Icon.
2.The Accounting History dialog will be displayed.
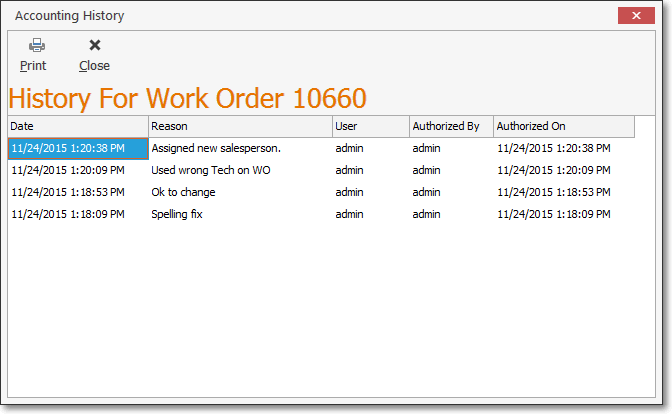
Work Order History Form - Column Headers & Modified Service Request sample
3.You may Print this log whenever necessary.
❖This option immediately sends the information to your default Printer, with no Preview option offered!!!
4.Click the Close Ñ option to exit the Accounting History dialog.