❑There are two was to access Job Costing related information for a Subscriber.
1.Open the Subscribers Form, set the History Options Filter to Jobs and set the appropriate Date Range for that (Job) History to be displayed.
✓Click the Job # (in the Document ID field) that you want to view and the Job Costing Form for that selected Job will be opened.
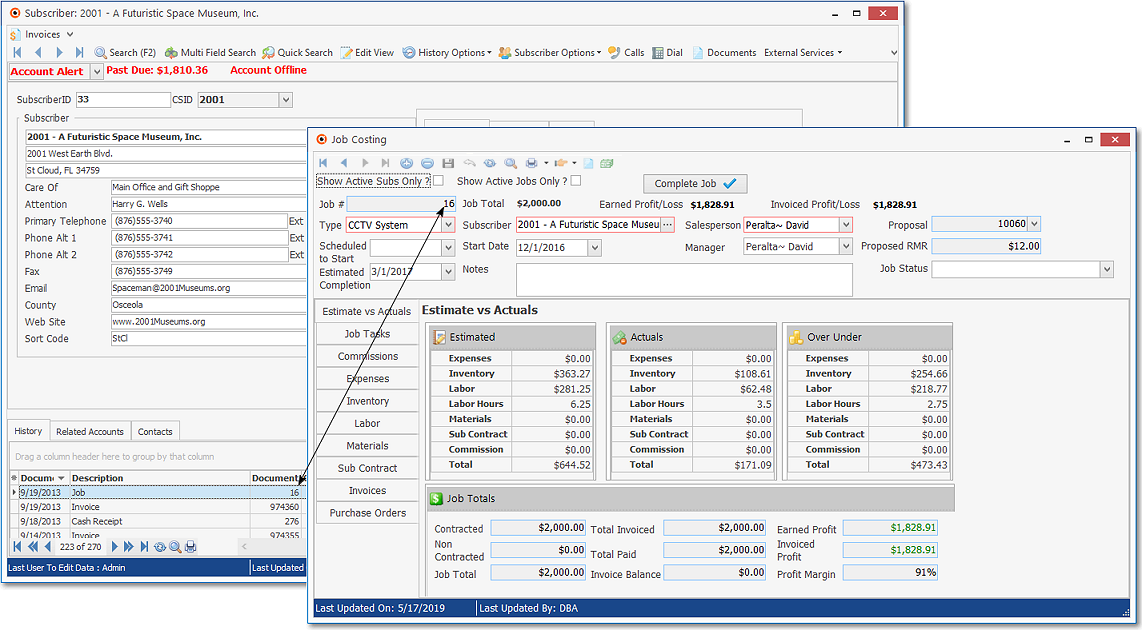
Subscribers Form - Filtered History - Job Form displayed
2.On the Quick Access Menu Select Maintenance and Choose Job Costing
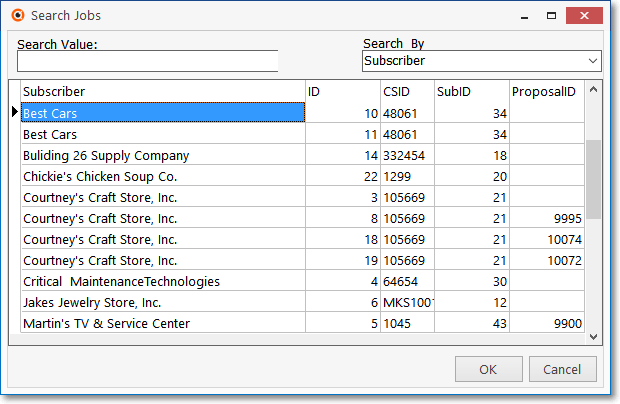
✓Use the Search Icon to open the Search Jobs dialog to Locate the Subscriber with the Job you want to view.
✓If you are just starting to use the Inventory Tracking & Job Costing System, you should use these methods only to enter and update Job Costing information.
❑The Job Costing Form contains buttons, tabs and fields that, used together properly, will provide all the functionality needed to effectively perform the Job Costing process.
•To view a Job Costing Form,
a)From the Backstage Menu System Select Maintenance, then in the General sub-menu Choose Job Costing, or
b)From the Quick Access Menu, Select Maintenance and Choose Job Costing.
✓A Job Costing Form will be displayed.
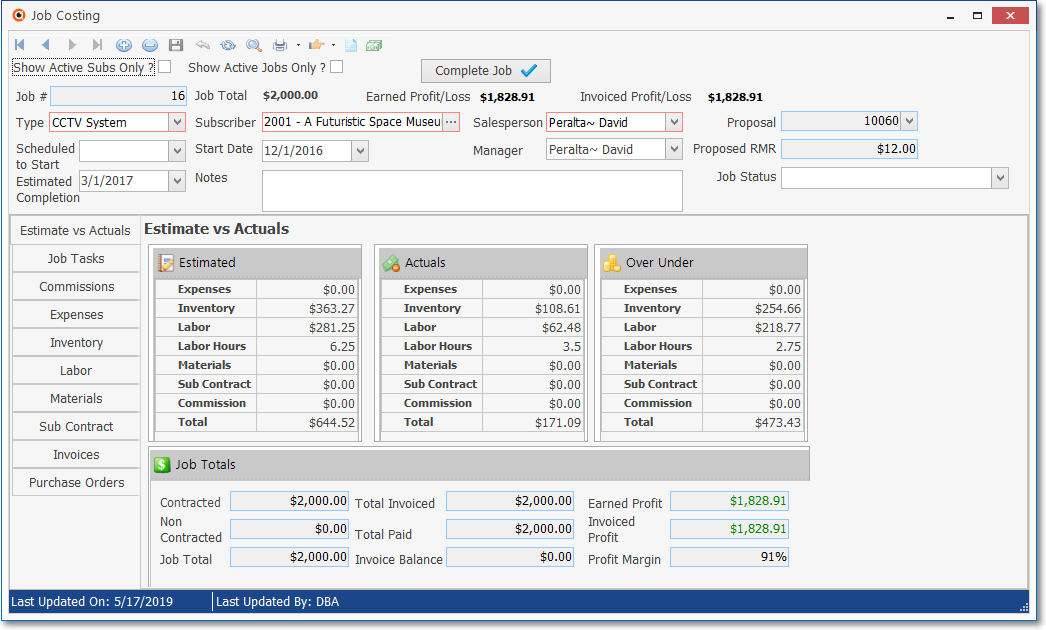
Job Costing Form - Estimate vs Actual tab
❖Most of the Job Costing features also link directly to the:
✓Accounts Receivable System (A Proposal for a System once accepted, may be converted to a Job, and ultimately that System is Invoiced when the Job is Completed)
✓Accounts Payable System (you have to Order the Inventory required for a Job, then Bill for those materials and equipment, and sometimes Payments to Vendors who are Sub Contractors are required)
✓Inventory Tracking System ( any Inventory Items required for a Job must be identified, tracked, and accounted for)
✓Service Tracking System (Job Tasks must be requested using of Work Orders)
✓General Ledger System (Any Financial Transactions associated with a Job are ultimately posted to the General Ledger).
▪Also see the "Creating a Job Costing System entry directly from the General Journal" discussion in the General Journal Entries chapter.
•Employees who will serve as the Manager of a Job (and Work Orders) should be so identified:
✓Specifically, on the Employee Form's Personal tab, identify those Employees who are being designated as a Job Manager by assigning the Type of All or Administration and placing a Check in the Job Manager box.
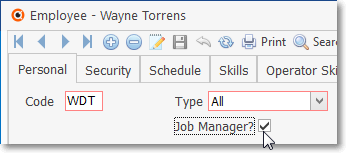
Job Manager box on the Personal tab of the Employee Form
•Employees who will serve as the Lead Technician on Work Orders (created as Tasks required for the completion of a Job) are identified as such by being the first person assigned to the Work Order and so must be identified with an Employee Type of either All or a Technician.
•The Employee entering Job Costing Labor related information must be permitted to Manage Time Sheets (assigned on the Employee Form's Security tab) and perhaps to also be able to view the Pay Rates (Check Display Rates? on the Employee Form's Security tab).
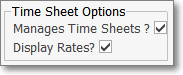
Time Sheet Options
❖A full understanding of the Job Costing system's capabilities will only come after reading this chapter, and its related sub-chapters, on Job Costing.
❑Navigation and other Icons and Options:
![]()
![]() Click the First Icon to move to the first record (alphabetically or numerically) based on the field (usually the first field) that is determining the Listing Order of the records.
Click the First Icon to move to the first record (alphabetically or numerically) based on the field (usually the first field) that is determining the Listing Order of the records.
✓Keyboard Command = Ctrl+Home
![]() Click the Prior Icon to move to the record immediately before the currently displayed record (alphabetically or numerically) based on the field (usually the first field) that is determining the Listing Order of the records.
Click the Prior Icon to move to the record immediately before the currently displayed record (alphabetically or numerically) based on the field (usually the first field) that is determining the Listing Order of the records.
✓Keyboard Command = Ctrl+PageUp
![]() Click the Next Icon to move the to the record immediately after the currently displayed record (alphabetically or numerically) based on the field (usually the first field) that is determining the Listing Order of the records.
Click the Next Icon to move the to the record immediately after the currently displayed record (alphabetically or numerically) based on the field (usually the first field) that is determining the Listing Order of the records.
✓Keyboard Command = Ctrl+PageDown
![]() Click the Last Icon to move to the last record (alphabetically or numerically) based on the field (usually the first field) that is determining the Listing Order of the records.
Click the Last Icon to move to the last record (alphabetically or numerically) based on the field (usually the first field) that is determining the Listing Order of the records.
✓Keyboard Command = Ctrl+End
![]() Click the Insert Icon to clear the fields in the Record Editing section in preparation for adding information to a new Job record.
Click the Insert Icon to clear the fields in the Record Editing section in preparation for adding information to a new Job record.
![]() Click the Delete Icon to remove the current Job record (or identify it as a Deleted record if it has already been used in the system)
Click the Delete Icon to remove the current Job record (or identify it as a Deleted record if it has already been used in the system)
![]() Click the Save Icon to record any modifications (or a new record entry) displayed in the Record Editing View.
Click the Save Icon to record any modifications (or a new record entry) displayed in the Record Editing View.
✓Keyboard Command = Ctrl+S
![]() Click the Cancel Icon to abandon any new or modified information that is displayed in the Record Editing section but has not yet been saved.
Click the Cancel Icon to abandon any new or modified information that is displayed in the Record Editing section but has not yet been saved.
![]() Click the Refresh Icon to "reload" the information displayed for the current Job Costing record
Click the Refresh Icon to "reload" the information displayed for the current Job Costing record
![]() Click the Search Icon to open the Search dialog which is used to Locate and Select an associated Job Number for a specific Subscriber.
Click the Search Icon to open the Search dialog which is used to Locate and Select an associated Job Number for a specific Subscriber.
![]() Click the Print Down-Arrow to display the Job Worksheets option
Click the Print Down-Arrow to display the Job Worksheets option
![]() Click the Go To Down-Arrow and Choose what Form is to be opened:
Click the Go To Down-Arrow and Choose what Form is to be opened:
✓Select Subscriber to open the Subscribers Form associated with the currently selected Job.
▪If the Subscriber Account for the currently selected Job Costing record is inactive (Deleted), an error message will be displayed indicating that you will not be able to access that Subscribers Form.
✓Select Proposal to open the Proposals Form associated with the currently selected Job.
▪This option will not be available if there is no Proposal associated with this Job Costing record
![]() Click the Documents Icon which is used to (electronically) attach any important Documents specifically associated with the currently selected Job such as Contracts, Letters, Proposals, Change Orders, etc.
Click the Documents Icon which is used to (electronically) attach any important Documents specifically associated with the currently selected Job such as Contracts, Letters, Proposals, Change Orders, etc.
![]() Click the New Bill Icon to enter a Bill for charges relating to one of the following:
Click the New Bill Icon to enter a Bill for charges relating to one of the following:
a)Record an Invoice representing a Vendor Bill for Inventory
b)A Commission, a general Expense,
c)A Materials expense,
d)A Sub Contractor charge - either received from a Vendor or paid to a Salesperson
✓Vendor Search - The Vendor Search dialog will be displayed
▪Locate the Vendor from whom you received the Bill for items to be charged to this Job Costing record.
▪Select the required Vendor and Click OK
✓The Bill Form for that Vendor is displayed.
▪Click Add to enter an Invoice (Bill) from a Vendor that should be charged to this Job.
▪See the Entering Purchases chapter for a complete discussion of how to use the Bill Form.
•Description - If present, this will be the Title of the current Job as originally entered in the Title field of a Proposal which was converted to a Job Costing record.
❑Display and Status Choices available on the Job Costing Form:
•Display Choices appear below the Navigation/Options Menu located at the top of the Job Costing Form:

✓Show Active Subs Only? - Check this box to exclude Inactive (those that have been deleted) Subscribers from appearing in the Job Costing Form.
✓Show Active Jobs Only? - Check this box to exclude Inactive Jobs (those that have been marked Completed (see Complete immediately below) from appearing in the Job Costing Form.
✓Complete Job - Click the Complete Job button when the currently displayed Job has been finished.
❖See the "Completing a Job" discussion at the end of this chapter.
❑Starting a New Job Costing Entry:
•The single page Job Costing Form (shown in the screen image below) seems quite simple until you notice all of those Option Tabs along the left side of the Job Costing Form - and that's where the real power resides.
•To Start a New Job, open the Job Costing Form and Click the Insert ![]() Icon
Icon

Job Costing Form - Insert Icon - New Job Costing record
✓Job # - The system's record number of this new Job will be inserted automatically when the Job is initially saved.
✓Type - Use the Drop-Down Selection List to Choose the appropriate Job Type.
✓Subscriber - Click the Ellipse button (...) to open the Select Subscriber dialog.
▪Choose the Subscriber for whom this Job Costing record is being created.
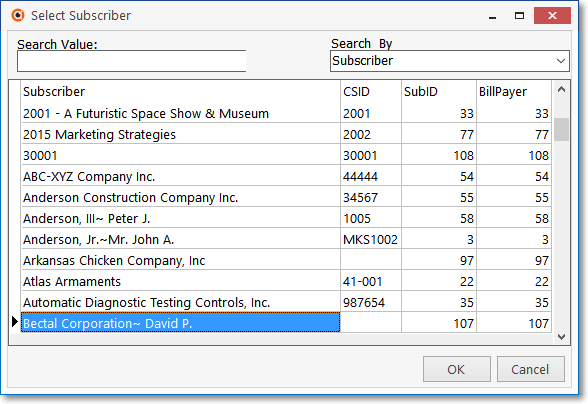
Select Subscriber dialog
▪Search By - Use the Drop-Down Selection List to Choose the method to Search By (Subscriber, CSID, Sub ID, or Bill Payer).
▪Search Value - Enter the first few characters to narrow the search.
oAs you make your entry, the records most closely matching the entry will be displayed.
oSelect the appropriate Subscriber record.
▪Click OK - Inserts that Subscriber's Name into the Subscriber field.
➢Important Note: To avoid the loss of Job Costing data integrity:
▪Once a Subscriber has been identified and a Work Order, Invoice, or Inventory Used entry has been created, the Subscriber assigned to the Job cannot be changed.
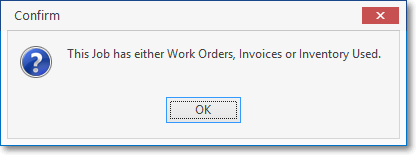
This Job has either Work Orders, Invoices or Inventory Used
oIf an attempt is made to do so, a reminder message (as illustrated above) will be displayed.
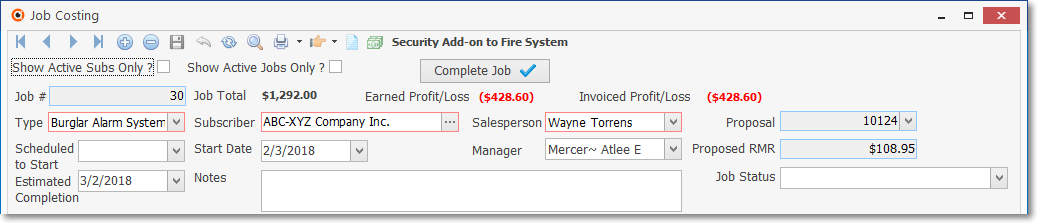
Job Costing Form - New Job Costing record - Initial Setup Entries
✓Salesman - Use the Drop-Down Selection List to Choose the Salesperson (Employee) who sold this Job.
✓Scheduled to Start - Use the Drop-Down Calendar/Date Entry field to enter the expected Schedule Date for this Job.
✓Start Date - Use the Drop-Down Calendar/Date Entry field to enter the expected Starting Date for this Job.
✓Estimated Completion - Use the Drop-Down Calendar/Date Entry field to enter the expected Finish Date for this Job.
✓Manager - The Job Manager is an individual who is assigned the duties of installation supervisor and manager for this Job.
▪Use the Drop-Down Selection List provided to Choose the Employee who will be the Manager of this Job.
oThe Job Manager qualification is established by Checking the Job Manager box on the Personal tab of the Employee Form.
oEmployees should be identified as a Job Manager if they will be the Manager of a Job in the Inventory Tracking & Job Costing System
✓Proposal - No entry required. If this Job Costing record is being created by Converting a Proposal to a Job, the Proposal Number is automatically inserted here.
✓Proposed RMR - No entry required. If this Job Costing record is being created by Converting a Proposal to a Job, the monthly RMR Rate offered on that Proposal is inserted here.
✓Estimated Completion - Use the Drop-Down Calendar/Date Entry field to enter the expected Completion Date for this Job.
✓Notes - Enter whatever comments are deemed important for this Job.
▪Double-Click within the Notes field to a basic Rich Text Editor dialog that allows bold, italics and underlines of text, and the selection of Font type, it's size, color, and highlight.
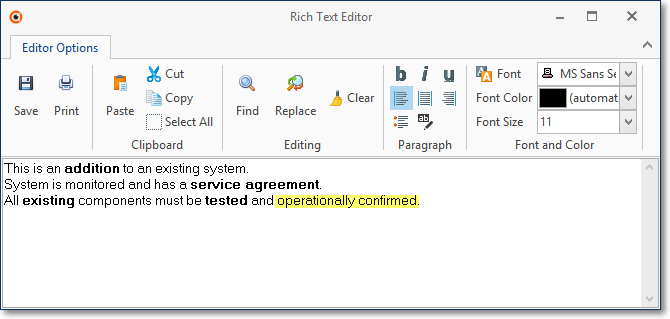
Job Costing Form - Notes field - Rich Text Editor dialog
▪The Notes (including all Rich Text Editor enhancements) will print on the Job Work Sheet. and that information will be saved to the Job Information box on page 1 of a Job Work Sheet.
▪This information may exceed the size of the displayed Notes field because the User may use their up and down keyboard arrows to view the entire entry, when necessary.
✓Job Status - Use the Drop-Down Selection List provided to Choose the Job Status which indicates this Job is awaiting it's first Job Task assignment.
▪Once the Job has started, periodically update the Job Status description, as appropriate.
•Save - Click the Save ![]() Icon to record your initial Job Costing entries (an example of which is shown below).
Icon to record your initial Job Costing entries (an example of which is shown below).

Job Costing Form - New Job Costing record - Initial Setup Entries - No Proposal #, No RMR
❖See Job Costing Option Tabs discussion (immediately below) for links to each chapter that fully explains the purpose, use and operations of each Option tab on the Job Costing Form.
❑Job Costing Option Tabs
•All of the Option tabs on the Job Costing Form are listed below and explained in detail in their own chapter.
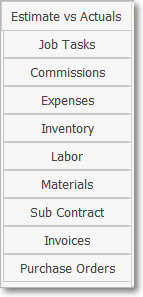
✓Estimate vs Actual - Enter the estimated expenses - by category - for this Job Costing record
✓Job Tasks - Define tasks, Invoice for those tasks, and/or create Work Orders for those tasks required to complete the Job.
✓Commissions - Record the commissions paid for the Sale of this Job.
✓Expenses - Record the general expenses incurred while completing of this Job.
✓Inventory - Record the Inventory required, reserved, and used to complete this Job.
✓Labor - Record the Labor expense required for completing of this Job.
✓Materials - Record the Material costs incurred while completing of this Job..
✓Sub Contract - Record any Sub Contractor's charges that were required to complete this Job.
✓Invoices - Lists the Invoices billed to the Subscriber for this installation.
✓Purchase Orders - Lists Purchase Orders that were created for ordering the Inventory required to complete the Job.
➢Note: Also read the Recording an (emergency and/or unscheduled) "in-the-field" Credit Card charge discussion in the Credit Card Register chapter for additional information.
▪Also see the "Creating a Job Costing System entry directly from the General Journal" discussion in the General Journal Entries chapter.
•When a Job is actually completed (i.e., all Tasks, Commissions, Expenses, Inventory, Labor, Materials, and/or Sub Contractor related charges and expenses have been posted) and all associated Service Requests (Work Orders) have been appropriately Invoiced,
✓Click the Complete button.
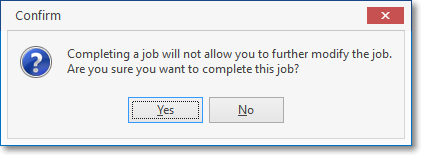
Complete this Job?
•See the Completing a Job chapter for the detailed instructions.
❑Deleting a Job:
•Press the Delete Icon on the Ribbon Menu at the top of the Job Costing Form to remove a Job Costing record.
✓Confirm- If the selected Job has already been Completed, it cannot be deleted
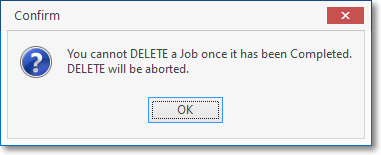
Cannot delete a Job that has been completed!
✓Confirm- Deleting a Job is permanent and it cannot be reversed using the Review Deleted Entries dialog.
▪If the Job has not yet been completed and you're sure you want to remove it, answer Yes to execute this deletion
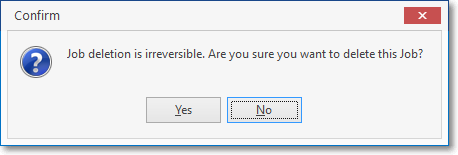
Job deletion is irreversible. Are you sure you want to delete this Job?