❑The Edit View on the Vendors Form is used to enter the actual Vendor information.
•Press F4 to open a Vendors Form
•Use the Vendor Search option to Locate the appropriate Vendor (only required if you are making changes)

Edit View Icon on the Vendor Form
•Select the Edit View Icon (see illustration above).
•When the Edit View is displayed, that Icon changes to a Browse View Icon which will be selected when the User wants to the Vendors Form's Browse View format.
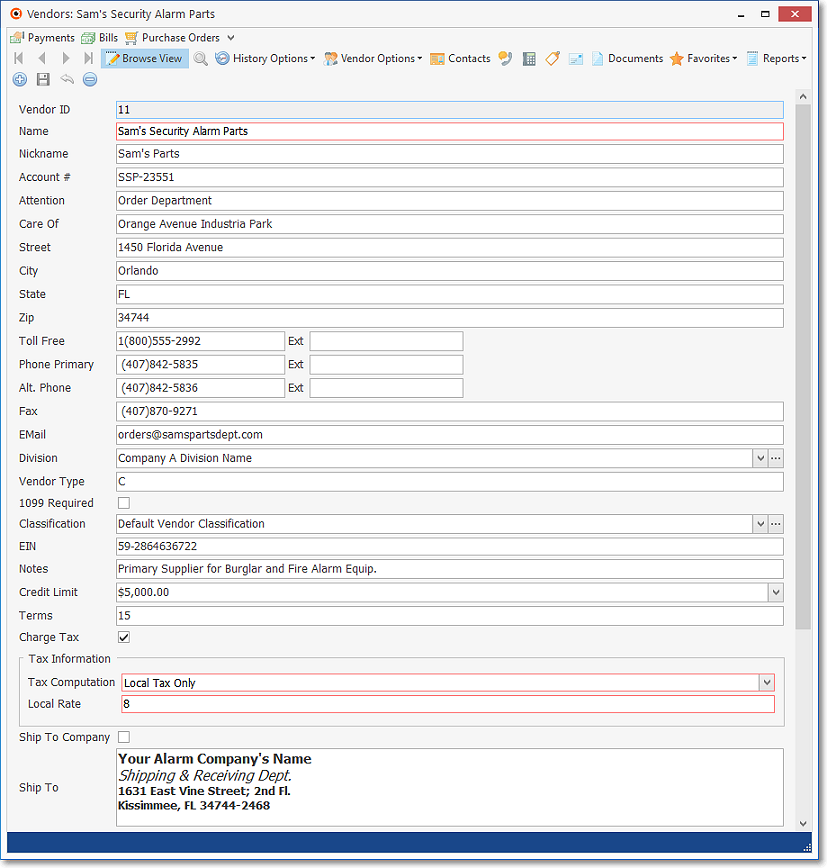
Vendors Form - Edit View
❑Entering a new Vendor record:
•Click the ![]() Icon to start a new Vender record (or simply modify the current Vendor record if you are making changes).
Icon to start a new Vender record (or simply modify the current Vendor record if you are making changes).
•Vendor ID - This is the internal Record Number assigned by MKMS when a Vendor record entry is initially saved.
•Name - Enter the name of the Company or Person as it would appear in a Telephone Book.
✓The first letter will be capitalized automatically,
✓A total of 30 characters are allowed including upper & lower case letters, numbers, spaces and normal punctuation.
✓Entering a Business's Name
▪Enter the Company's Name as it would be listed in the Telephone Directory
▪If a prefix is part of the name but that name is not normally alphabetized by that prefix (such as the word "the"), enter the name followed by a tilde ("~") and the prefix.
▪Example: "ABC Company~The"
✓Entering an individual Person's Name
▪Last Name is entered first
▪Type a tilde ("~")
▪(The tilde tells the system that everything after it is the Person's first name and middle initial.)
▪Enter the First Name and Middle Initial
▪For Prefixes (Mr., Mrs., Ms., etc.), enter them after the Tilde and before the first name
▪For Suffixes (MD., Jr., III, etc.), enter them after the last name and before the tilde.
▪Example: "Smith, MD~Dr. James T."
•Nickname - Enter a brief "nickname" for this Vendor which will be included in the F2 Vendor Search columns
•Account # - This is the Account Number assigned by this Vendor that represents your Company in their accounting system.
✓Up to 20 characters are allowed including upper & lower case letters, numbers, spaces and normal punctuation.
✓If the Account # assigned by the Vendor is greater than 20 characters in length, enter the last 20 characters.
✓This Account # will be printed on Check Payments printed for this Vendor.
•Attention - For additional addressing information, if needed.
✓If the first character is a letter, it will be capitalized automatically,
✓A total of 30 characters are allowed including upper & lower case letters, numbers, spaces and normal punctuation.
•Care Of - Secondary address line.
✓If the first character is a letter, it will be capitalized automatically,
✓A total of 30 characters are allowed including upper & lower case letters, numbers, spaces and normal punctuation.
•Street - Enter the property's address number and full street name.
✓If the first character is a letter, it will be capitalized automatically,
✓A total of 30 characters are allowed including upper & lower case letters, spaces, numbers and normal punctuation.
•City - Enter the name of the City.
✓If the first character is a letter, it will be capitalized automatically,
✓A total of 25 characters are allowed including upper & lower case letters, numbers, spaces and normal punctuation.
•State - This field will accept up to 20 characters.
✓Characters that are letters are NOT capitalized unless you type them that way.
✓A total of 20 characters are allowed including upper & lower case letters, numbers, spaces and normal punctuation.
•Zip - Enter a Zip Code, or Postal Code for this Vendor.
✓If any character is a letter, it is NOT capitalized unless it is typed that way.
✓A total of 10 characters are allowed including upper & lower case letters, numbers, spaces and normal punctuation.
•Toll Free - Enter their Toll-Free telephone number as follows:
✓<Space> or '1', left parenthesis, the three digit area code, a right parenthesis, the first three digits of the phone number, a dash, and the last four digits of the phone number
•Primary Tel - Enter the Primary telephone number which is not Toll-Free.
a)If an area code is needed (for 10 digit dialing) enter a <Space> if the one is not needed (or '1' if it is), left parenthesis, the three digit area code, a right parenthesis, the first three digits of the phone number, a dash, and the last four digits of the phone number
b)If no area code is needed, enter the first three digits of the phone number, a dash, and the last four digits of the phone number
•Ext - Enter any Extension, if required.
•Alt. Phone - Enter their first alternate telephone number following the Primary Tel directions above.
•Ext - Enter its Extension, if required.
•Fax - Enter a Fax number telephone number following the Primary Tel directions above.
•Email - Enter the appropriate contact's Email address.
•Division - A Vendor may be assigned to a specific Division within your Company.
✓A Division entry may be assigned a Default Level 1 Warehouse
✓This Divisions field allows your Company to associate this Vendor with that Warehouse
▪Use the Drop-Down Selection List to Choose that Division, if appropriate.
▪If a Division code is assigned in error (or no longer needed), open the Drop-Down Selection List and Press the Delete key.
✓Thereafter, when Purchase Orders, and/or Bills are created for a Vendor who was assigned to a Division (a Division assignment to a Vendor is optional), by default, any Inventory related Transaction posted to either of those documents will automatically be assigned to and associated with that Warehouse but that Warehouse designation may be changed when needed.
✓An Accounts Payable Report By Division is also available.
•Vendor Type - This one character field may be used to help you classify this Vendor.
✓e.g., "C" for Corporation, "P" for Partnership, or "S" for Sole Proprietor, "D" for Distributor, "G" for Government
✓Vendor Types are not predefined in a Maintenance Form, nor validated upon entry.
•1099 Required? - Check this box if any IRS rule require that you to send this Vendor a 1099 Form at the end of the calendar year.
•Classification - Use the Drop-Down Selection List to Choose the appropriate Vendor Classification code.
•EIN - Enter the Employers Identification Number (or Social Security Number if a Sole Proprietor).
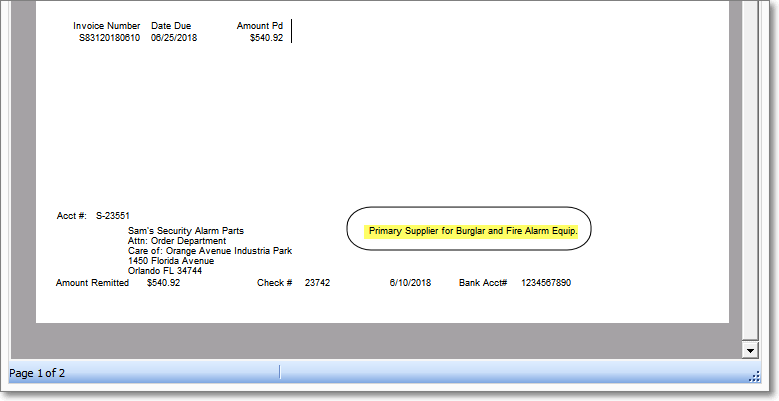
•Notes - Enter a brief note (up to 50 characters) about this Vendor, if appropriate.
✓This Note entry will be printed on the bottom stub of the Check (as illustrated below) to that Vendor.
•Credit Limit - If appropriate, enter your Company's Credit Limit with this Vendor.
•Terms - Enter the number of Days after the Purchase Date on a Vendor's Bill when Payment is Due (i.e., the Due Date).
•Charge Tax? - Check this box if the items purchased from this Vendor are ever Taxable.
✓See the Vendor Tax Information chapter for detailed Taxing information.
➢Note: Purchase Orders, when created, may be set up for delivery to one of the following locations:
i.Your Company's default Address entered in the Company Tab of the User Options Form (No Ship To address will appear on the Purchase Order)
ii.A predefined "Ship To" address (explained in this chapter) will be entered automatically in the Ship To field of the Purchase Order
iii.The address of an end-user may be identified by Checking this "Direct Sale" box and entering that Address in the Ship To field of the Purchase Order
✓Regardless of where they are delivered, All purchases will still be billed to your Company's Address when they are converted to a Bill
•Ship To Company - A Check Box
a.If the items ordered on a Purchase Order issued to this Vendor should be shipped to your Company's address as entered in the Company Tab of the User Options Form, Check this box.
▪The Ship To address field below this Ship To Company Check box will be removed
b.To establish a specific (different) default Shipping Address for Purchase Orders issued to this Vendor, do not Check this Ship To Company box.
▪When the Ship To Company box is not Checked, a Ship To field will be available.

Vendors Form - Edit View - Ship To Company and Ship To fields
✓See the Vendor Ship To chapter for detailed information on how to create a special Shipping Address for Purchase Orders
•Alert - Check this box to have an Alert Notice displayed in the Information Box to alert the User that there was an Alert placed on this Vendor's Account.
•Comments - Enter any appropriate Comment.
✓You may simply type in your comments as needed.
✓However, there is a built in Rich Text Editor available - accessed by Double-Clicking within the Comments field
▪This Editor Options box provides word processing level features - most of which - you will find familiar.
▪These include bold, underline, italics, highlighting and font and font color selections.
✓If you have opened the Rich Text Editor dialog to make your entry by Double-Clicking within the field, you must save your entry separately.
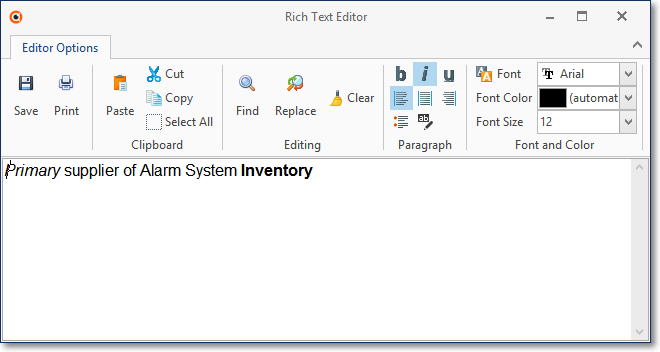
▪Click the Save Icon on the Rich Text Editor when that was used to make a Comment entry
•Save - Click the ![]() Icon to record the Vendor entry.
Icon to record the Vendor entry.
➢Note: If the User attempts to Close this Form by Clicking the Browse View Icon or the Close button ( X ) before saving the current entry (or modification), a Save Vendor Information? message will be displayed.
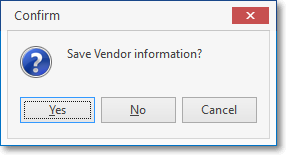
Save or Cancel Changes?
✓Select Yes to Save the information, No to abandon the changes and exit, or the Cancel button to abort the exit, as appropriate.
❖See the Vendor Tax Information chapter for a detailed explanation of how to set the Sales Tax Rate(s) and Rule(s) charged by the Vendor, if required
❖See the Vendor Ship To chapter for information on how to identify a specific Shipping Address for Purchase Orders issued to this Vendor.
•Account Status - These items are maintained by the system:
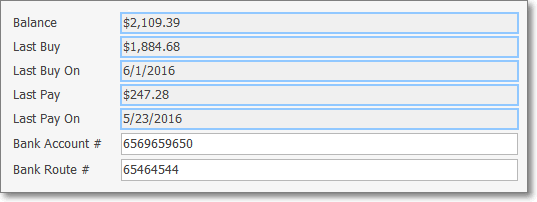
✓Balance - The amount currently owed to this Vendor.
✓Last Buy - The amount of the last purchase from this Vendor.
✓Last Buy On - The date of the last purchase from this Vendor.
✓Last Pay - The amount of the last payment made to this Vendor.
✓Last Pay On - The date of the last payment made to this Vendor.
✓Bank Account # - Information only required when implementing the the Beanstream ACH FTP Upload process.
✓Bank Route # - Information only required when implementing the the Beanstream ACH FTP Upload process.