❑To establish a Subscriber as a Monitored Account, Central Station Data must be entered:
•Once you have entered your Company's Subscribers, The Monitoring tab within the Edit View of the Subscribers Form is used to enter the information associated with Central Station Monitoring for this Subscriber
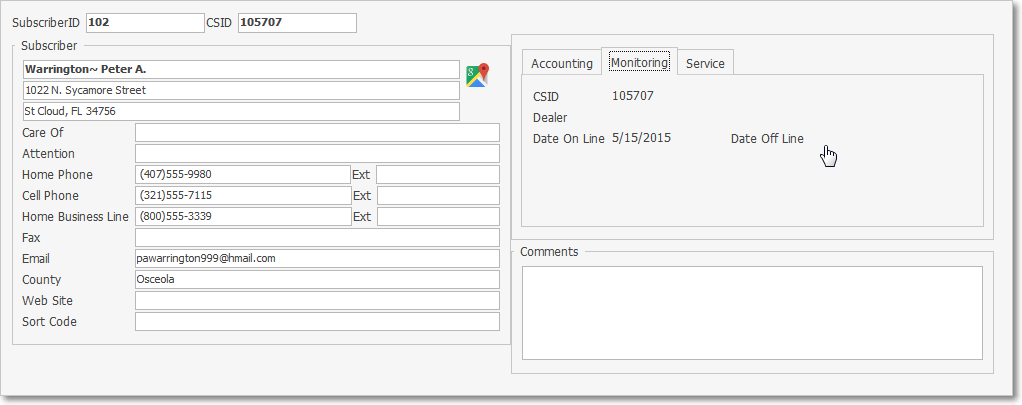
•The basic Central Station Data section (see example in the illustration below) is filled in first.
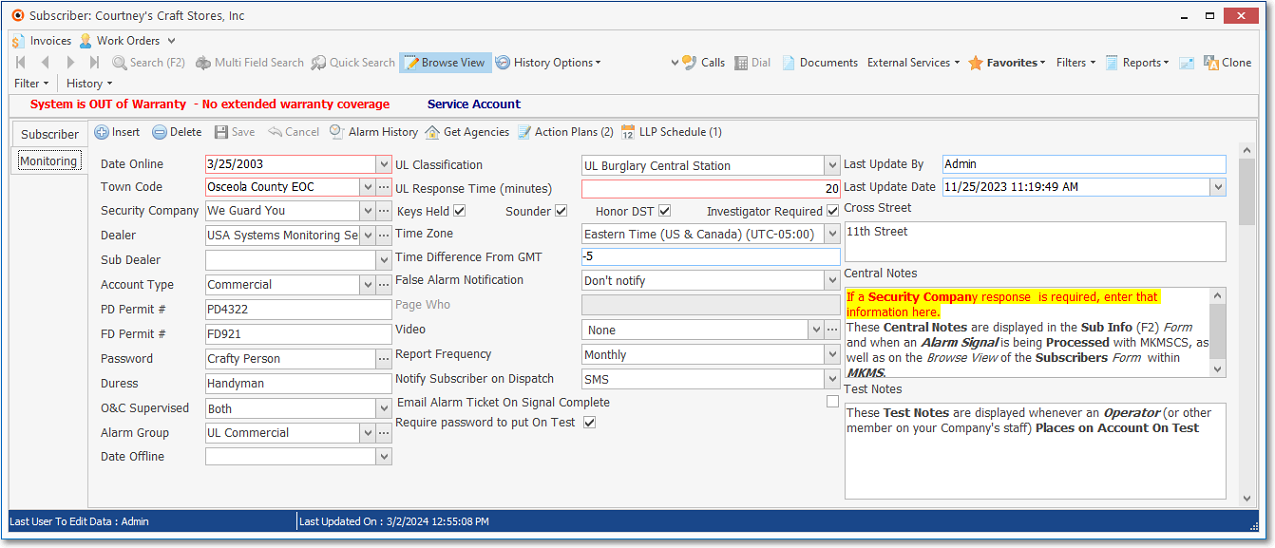
Subscribers Form - Edit View - Monitoring tab - basic Central Station Data section
•There are useful special Icons in the Monitoring tab Ribbon Menu:
1.Alarm History - The Alarm Signal History dialog provides the ability to look-up (and add to if necessary) the Signal History for a specific CSID
2.Get Agencies - Get Agencies (when installed) automatically assigns Police, Medical, and Fire Agencies based on the Subscriber's Address by creating (when needed) a Town Code record and adding it to the Subscriber record
3.Action Plans - Icon on the Ribbon Menu - This option displays the Action Plans Grid where any number of Action Plan + Alarm Condition combinations may be assigned to a Subscriber (or Dealer)
4.LLP Schedule - This option supports Adding, Modifying, and/or Deleting the Schedules assigned to the Subscriber
•To enter an existing Subscriber's Central Station Data:
✓Open the Subscribers Form.
✓Retrieve (F2 Search) the appropriate Subscriber record.
✓Select the Edit View Icon on the Subscribers Form
✓Choose the Monitoring tab.
•The Central Station Data section will be displayed.
➢Note: Certain rules apply to creating and deleting Central Station Data:
a.The Central Station Data information entered for the Subscriber may have any number of Subscriber Panels (and their related CSIDs) identified for that same Subscriber.
b.You cannot remove the Central Station Data information, or delete the Subscriber record if there are Subscriber Panels defined for the Subscriber.
c.However, the Subscriber may be taken Off Line, if necessary.
d.See the Deleting a Subscriber chapter for additional information.
❑Entering the Central Station Data required to set up this Account for Central Station Monitoring:
•Basic Monitoring Information:
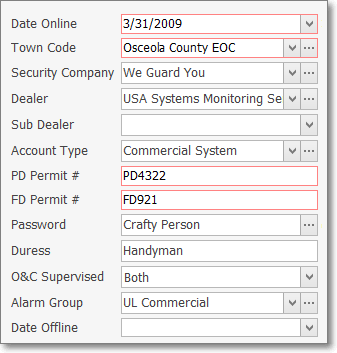
Basic Monitoring data
✓Date Online - By default, the Date offered is Today.
▪Use the Drop-Down Calendar/Date Entry field to reset that Date, if needed.
➢Note 1: How to Automatically Activate an Account (set the Date Online) when their first Alarm Signal is Received
a)Normally, when entering/updating Subscriber information within the Monitoring tab of the Edit View of the Subscribers Form, the Date Online field must be populated with that Date.

Company Settings - Central Station section - CS_DateOnLine_Allow_NULL option
b)However, if the CS_DateOnLine_Null option in Company Settings is set to True ("T"), a Date Online field entry is not required
c)Thereafter, when an Account which has not been activated (their Date Online field is blank) transmits their first Alarm Signal (which will automatically be inserted into their Alarm History Table), the system will update the Date Online field to Now (Now = Date and Time) in the Monitoring tab of the Edit View of the Subscribers Form
d)It will also allow the Date Online field entry to be cleared (removed and/or updated) if that should become necessary.
➢Note 2: For those Companies who provide Monitoring Services for other Alarm Dealers and the the CS_DateOnLine_Null option in Company Settings is set to True ("T"):
a)A Dealer record should be created, and that Dealer should be assigned in the appropriate Subscriber in the Monitoring tab of the Edit View of the Subscribers Form
b)Then, an RMR Dealer Billing entry with an empty Date to Start field may be created for this Subscriber
c)When this Subscriber transmits their first Alarm Signal, the system will update the Subscriber's Date On Line field with the current Date & Time, and do the same to the Date to Start field for any corresponding RMR Dealer Billing entry(ies) for this Subscriber
d)If that Subscriber subsequently has an Off Line Date entered in the Monitoring tab of the Edit View of the Subscribers Form, any corresponding RMR Dealer Billing entry(ies) will have the Date to End field updated automatically (with Credits issued for any unearned monitoring related services, as needed)
✓Town Code - This code represents an abbreviation for a Municipality (or similar governmental entity) that provides Emergency Response Services when requested by an Operator (while Processing an Alarm Signal) during a Dispatch procedure.
▪Use the Drop-Down Selection List, Choose the appropriate Town Code (responding authority) for this Subscriber.
▪Click the Ellipse to Add/Update existing Town Code records.
▪Optionally, if your Company has subscribed to the Precisely.com service, use the Get Agencies option to look-up and/or create the appropriate Town Code.

Edit View - Monitoring Tab - Navigation Menu - Get Agencies Icon
✓Security Company - If this Subscriber has contracted for Response from an outside Security Company, use the Drop-Down Selection List to Choose that Security Company.
▪Using the Drop-Down Selection List, Choose the appropriate Security Company (special responding authority) for this Subscriber.
▪Click the Ellipse to Add/Update existing Security Company records.
➢Note: If the installation will be issued a UL® Alarm Certificate, also identify the UL Classification and enter the required Response Time (see "Other Special Settings" below).
✓Dealer - If this Account is being monitored by your Company's Central Station for another Alarm Dealer, use the Drop-Down Selection List to Choose that Dealer Name.
▪Click the Ellipse to Add/Update existing Dealer records.
✓Sub Dealer - This field may be populated by the system when required for the MKS Dealer Billing module.
✓Account Type - Each monitored Subscriber must be assigned an Account Type - which is a general classification of the type of monitored account this will be.
▪Using the Drop-Down Selection List provided, Choose the appropriate Account Type for this Subscriber.
▪Click the Ellipse to Add/Update existing Account Type records.
➢Note: Many governmental entities which provide Response Services to Alarm Signals require that each Alarm System installed within their jurisdiction has a Permit (and enforces this requirement by asking for that Permit Number prior to accepting an Operator's Dispatch request for that Subscriber).
a)The Town Codes Form contains a Police Department Permit and Fire Department Permit Check box that corresponds to the PD Permit # and FD Permit # fields below.
b)If a PD Permit and/or an FD Permit box is Checked in the Town Codes Form, those Subscribers assigned to that Town Code must have the corresponding Permit Number(s) entered - as described below.
✓PD Permit # - If the Operator is required by this Emergency Response Service to provide a Police Department Permit Number before a Dispatch request will be accepted, the required Permit Number must be entered in this PD Permit # field (see the Town Codes chapter for more information about Permit Requirements).
✓FD Permit # - If the Operator is required by this Emergency Response Service to provide a Fire Department Permit Number before a Dispatch request will be accepted, the required Permit Number must be entered in the FD Permit # field (see the Town Codes chapter for more information about Permit Requirements).
➢Note: The term "Password" and "Passcode" may be considered interchangeable terms throughout these Help Files.
✓Passcode - For identification purposes, enter the Password that the Subscriber will use to Verify their identity.
▪The Password entered may be up to 25 characters in length and contain numbers and letters.
▪Keep in mind that a Password will be communicated verbally and so should be entered as it would be "heard" by an Operator.
✓Duress - For identification purposes, enter a Duress code to be used by the Subscriber to indicate that this Subscriber (customer, employee, agent, etc.) is unable to verbally request the need for help because that person is communicating with an Operator while under duress.
▪The Duress code entered may be up to 25 characters in length and contain numbers and letters.
▪Keep in mind that a Duress code will be communicated verbally and so should be entered as it would be "heard" by an Operator.
✓O&C Supervised - Using the Drop-Down Selection List provided, Choose the appropriate option¬:
▪None - No Opening and/or Closing Events are Supervised.
▪Both - All Opening and Closing Events are Supervised.
▪Open - Only Opening Events are Supervised.
▪Close - Only Closing Events are Supervised.
➢Note: When any option other than None is chosen for O&C Supervised:
a)Any CSID Zone defined with an OCTAR definition of either Open or Close must have a corresponding Event defined; otherwise
b)An Invalid Alarm signal will be generated (by SPA) with either an IO* or IC* Alarm Condition Code.
¬ Implementation of this feature requires the following:
oSPA Version 1.0.28.497 or greater,
oMKSAlarmProcSvcs v.6.1.0.11 or greater
oMKSReceiverSvcs v.6.1.0.15 or greater.
✓Alarm Group - Use the Drop-Down Selection List to Choose their Alarm Group assignment.
▪Assigning an Alarm Processing Group classification that is different than the "Default" Alarm Group assures - when appropriate - that each Subscriber's Alarm Signals are routed to an Operator that:
1.Will better understand the type of system being monitored,
2.Have the specialized skills needed to properly handle the signals,
3.Speaks the language that the person to which she/he is currently responding will also be speaking.
▪Click the Ellipse to Add/Update existing Alarm Group records.
➢Important Note!: It is very, very important (critical) to keep in mind that a Subscriber assigned to an Alarm (Processing) Group will not have their Active Signals processed unless at least one Operator - which has been assigned to that Alarm Group - is actively Processing Signals!
oTherefore:
a)Until a specific requirement dictates otherwise, initially assign all Subscribers (in this Central Station Data Form) to the "Default" Alarm Group.
b)At a minimum, also assign all Employees, whose Employee Type is either All or Operator, to the same "Default" Alarm Group on the Alarm Groups tab of the Employee Form.
c)Any number of additional Alarm Group may then be assigned to each Operator, as the need arises, and the appropriate training has been completed.
✓Date Offline - If this Account is ever canceled, Click the Date Off Line button (see the mouse pointer in the illustration below).
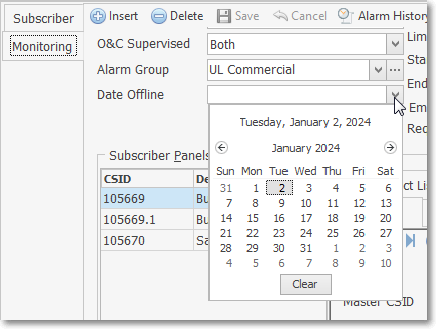
Date Offline field - Drop-Down Calendar/Date Entry field
▪Caution! This action takes All CSIDs defined in the Subscriber Panels section Off Line.
▪See the Central Station Off-Line Date discussion later in this chapter for detailed information about using this field.
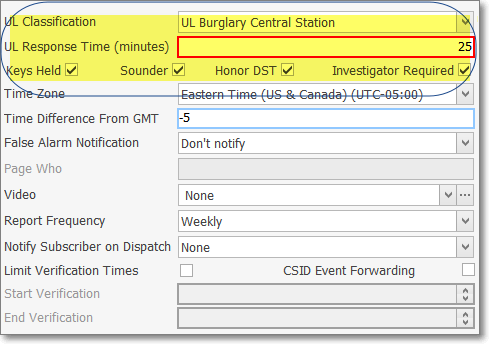
•Other Special Settings:
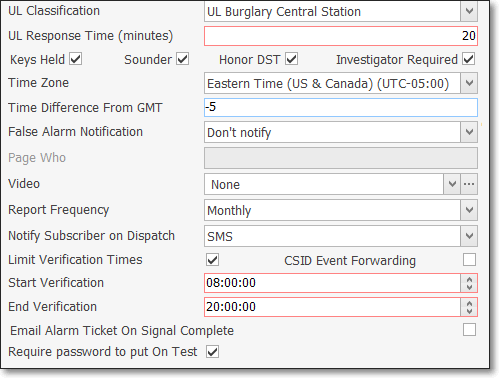
Other Special Settings
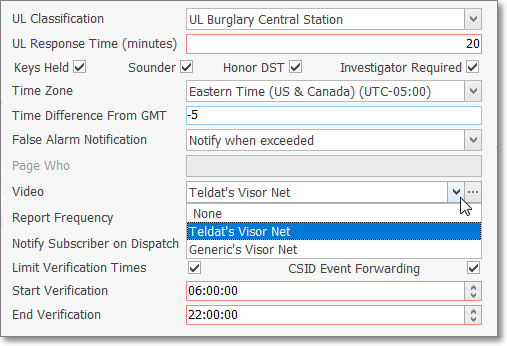
✓UL Classification - If the installation will be issued a UL® Alarm Certificate, use the Drop-Down Selection List provided to Choose the UL Classification category of the system.
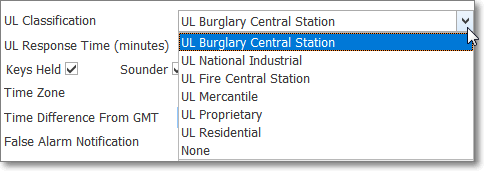
❖UL® Categories: All statistics shall be broken down by certificate type, which are
1.UL® Central Station fire alarm systems,
2.UL® Central station burglar alarm systems,
3.UL® proprietary burglar alarm systems,
4.UL® national industrial burglar alarm systems,
5.UL® mercantile burglar alarm systems,
6.UL® residential burglar alarm systems, and account number.
✓UL Response Time (minutes) - If a UL Classification has been identified, enter the required Response Time (in the number of Minutes).
✓Keys Held - Check this box if your Company has a set of keys to the Subscriber's premises.
✓Sounder - Check this box if there is a audible alarm at the premises.
➢Note: UL® requires that you document whether the central station holds keys, and if a sounding device is provided with the alarm system:
✓Honor DST - Check this box if this Subscriber's location honors Daylight Savings Time.
✓Investigator Required - Check this box when an Investigator is required to be dispatched, and to respond to certain Alarm Signals.
Special UL fields
UL Classification - UL Response Time - Keys Held - Sounder fields
➢Note: If the installation will be issued a UL® Alarm Certificate, see the UL Settings, Signal Processing & Reporting Procedures chapter for additional information!
✓Time Zone - Use the Drop-Down Selection List provided to Choose the Subscribers Time Zone.
✓Time Difference From GMT - The system will insert the time difference - in the number of hours - between Greenwich Mean Time and the Subscriber's local time zone (e.g., Eastern Time in US is five hours behind [-5] Greenwich Mean Time and Pacific Time is eight hours behind [-8] Greenwich Mean Time).
✓False Alarm Notification - Using the Drop-Down Selection List provided, Choose the appropriate Notification requirement:
▪Notify When Exceeded - Choose this option to Notify the Operator when the Maximum number of allowable False Alarms has been exceeded.
oUse these False Alarm Tracking tools within MKMS as follows:
a)Define the False Alarm Tracking requirements for each Responding Governmental Authority (using the Town Codes Form).
b)Identify each Subscriber who needs False Alarm Tracking using the False Alarm Account Maintenance Form.
c)Review Alarm Signals to determine whether they were False or Valid using the False Alarm Dispatch Tracking dialog.
▪Don't Notify - Choose this option to ignore any False Alarm Tracking reporting requirements relating to False Alarms from this Subscriber.
❖Refer to these three chapters which discuss the various MKMS methods designed to help reduce the Company's False Alarm Rate:
1.The False Alarm Account Maintenance Form for designating which Subscribers are to be specifically tracked for False Alarms.
2.The False Alarm Dispatch Tracking dialog provides the means to manage, update and comment on the Alarm Signal records that were initially classified as False Alarms.
3.The Town Codes Form can also identify those municipalities that track the number of False Alarms created by each Premises.
✓Page Who - This field has been deactivated.
✓Video - Using the Drop-Down Selection List provided, Choose the appropriate Video Verification option if it is in use.
▪Click the Ellipse to Add/Update existing Generic Video Setup records.
▪See the "Video Setup dialogs" information at the end of this chapter.
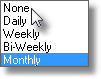
✓Report Frequency - If Opening and Closing activity will be supervised, use the Drop-Down Selection List to Choose how often the Subscriber should receive an Open and Close Report.
✓Notify Subscriber on Dispatch - For those Companies using the MKS Connect Service, the system may automatically notify the Subscriber whenever a Dispatch is executed for an Alarm Signal received from their premises.
▪Use the Drop-Down Selection List at the top right of the Central Station Data Form to Choose the appropriate Notification method (i.e., Pager, E-Mail, SMS, Voice).
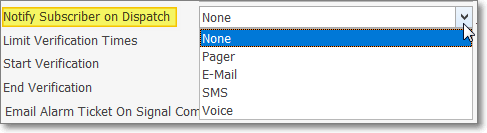
Notify Subscriber on Dispatch - options
▪By default, None is the entry.
✓Email Alarm Ticket on Signal Complete - Check this box to send an Alarm Ticket via Email when an Alarm Signal has been completed..
✓Require password to put On Test - Check this box to implement this feature.
▪If the Require Password On Test option is set to True in Company Settings, this field will default to Checked automatically (thus requiring that a Password be required before an Account may be Placed On Test).
▪See Place an Account On Test, and the Alarm Conditions chapters, the Password On Test Default option and the Require Password On Test option in Company Settings for more information about this requirement.
•System Information & Notes Fields:

System Information & Notes fields
✓Last Update By - This system maintained field displays the Log In Name of the User who made the most recent modification to this record.
✓Last Update Date - This system maintained field displays the Date and Time when the most recent modification was made to this record.
✓Cross Street - Enter the closest Cross street to the Subscriber's premises.
✓Central Notes - This populates the Comments field on the Sub Info (F2) Form and is displayed for the Operator as an Alarm Signal is being Processed.
✓Test Notes - See discussion immediately below
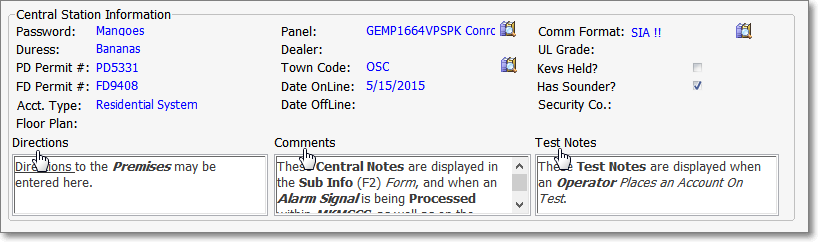
MKMSCS Sub Info (F2) Form - Central Station Information section - Directions (from Service Info section), Comments (Central Notes), & Test Notes
✓Test Notes - This is a Note or Comment - which is entered in the Central Station Data Form of a Subscriber (and/or on the Dealer Form associated with that Subscriber) - that will always be presented to an Operator when any CSID defined in the Subscriber Panels section of their Central Station Data Form is Placed on Test.
▪Enter the Note that should be displayed for the Operator whenever this Account is Placed on Test.
▪Subscriber Note tab - When an Operator Places an Account on Test, this Test Notes entry will be displayed in the Subscriber Note tab of the Test Notes dialog, and when viewing this Subscriber record on the Sub Info (F2) Form.
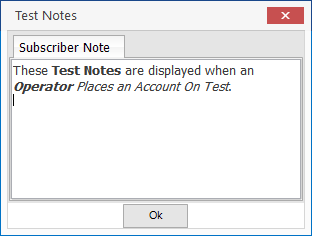
Test Notes dialog - Subscriber Note tab
Displayed as Account is Placed on Test
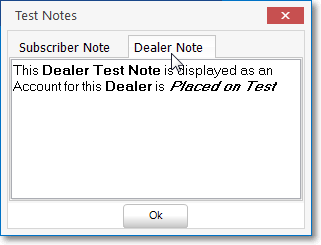
▪Dealer Note tab - For those Accounts that are being monitored for an Alarm Dealer, the associated Dealer's Test Notes entry (created in the Dealer record) is also accessible in the Dealer Note tab within the Test Notes dialog.
❖Also see the Service Info Section chapter to learn about the Directions field - used to assist the Operator with the dispatching process, and the Comments Section chapter to learn about another Comments field, and using the Rich Text Editor.
❑The Central Station Data section Monitoring tab's Date Offline field permits an authorized User to take an Account Off-Line, and also return them to an On-Line status, as required:
❖The Date Offline field is used to indicate that a Subscriber Account has been canceled (or has temporarily been discontinued), and is entered in the Central Station Data section within the Edit View's Monitoring tab.
❖This process takes ALL of the Subscriber Panel CSIDs defined for this Account (Subscriber) Off Line!
•Date Offline - Use the Drop-Down Calendar/Date Entry field provided to enter the Date this Subscriber went Off-Line.
Date Offline field - Drop-Down Calendar/Date Entry field
Off-Line Date is entered in Central Station Data section
✓Warning: This action takes All of the CSIDs Off Line which are defined in the Subscriber Panels section for this Subscriber.

✓Click the Save Icon on the Edit View Menu to record the Off Line date.
•Date Off Line - The Date Off Line field on the Monitoring tab of the Subscribers Form's Browse View will be updated with this information.
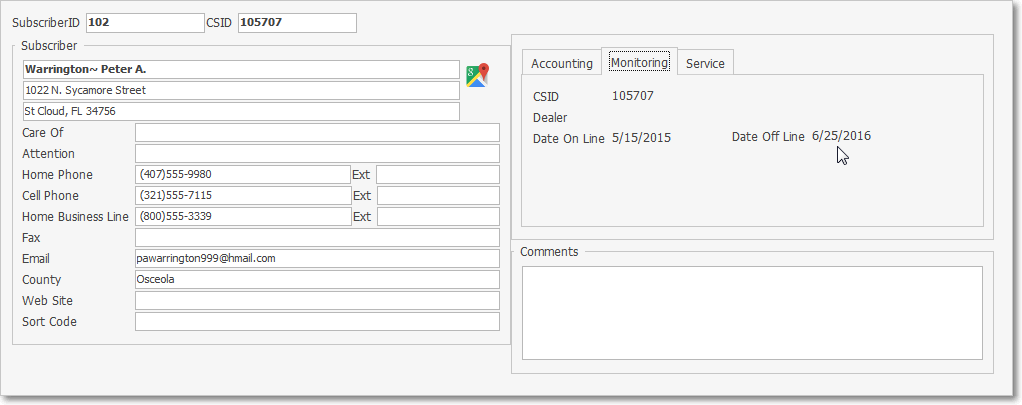
Subscribers Form - Monitoring tab - Date Off Line field - with Date entry
•Date Offline - To put this Subscriber back On Line, use the Clear option on the Drop-Down Calendar/Date Entry field to cancel the previously entered Off Line Date.
✓This action puts All CSIDs defined in the Subscriber Panels section for this Subscriber back On Line.
✓The Date Off Line field on the Monitoring tab of the Subscribers Form's Browse View will now show no Date.
Subscribers Form - Monitoring tab - Date Off Line field - No Date entry
❑The Subscriber Panels section on the Monitoring tab allows you to define each Control Panel's CSID which has been installed at the premises of the currently selected Subscriber.
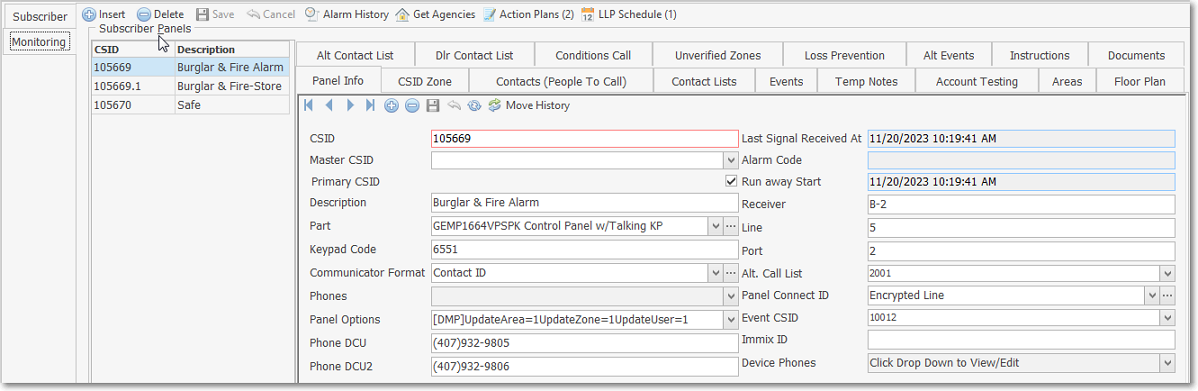
Subscribers Form - Edit View - Monitoring sub-tab - Subscriber Panels section
•Panel Info - Define each CSID programmed to report from this Subscriber's Premises.
•Account Testing - Define the Account Testing information for the selected Subscriber Panel CSID thereby establishing what constitutes a valid Test Signal for this Account.
•Alternate Call List - Assign an Alternate Contacts (People To Call) List which is entered as a CSID in the Alt.Call List field which then attaches that Alternate CSID's Contacts (People To Call) list to this Subscriber Panel's CSID record.
•Alt Events - Identify another Account's CSID which contains Events to be used with this Subscriber Panel's CSID record (Event CSID Field must have an entry).
•Areas - Define each Area within a Subscriber's Premises that needs to be monitored individually, Armed and Disarmed individually, and have Opening, Closing, and other types of Test Events Supervised individually.
•Call Order - Redefine the Calling Order - the sequence in which individuals are to be called - for the existing list of Contacts (People To Call) is available in the Call Order sub-tab of the Contacts (People To Call) tab)
•Conditions Call List - Identify an Alarm Condition Code (and optionally a Signal ID and/or Physical Zone) which, when assigned to an Alarm Signal received from a specified Subscriber Panel(s) CSID, will utilize a customized People To Call List and Calling Order specifically defined for that purpose (in a special CSID Zones record).
•CSID Zones - Define the Exceptions to the default Panel Zones of the Communicator Format assigned to the currently selected CSID.
•Dealer Call List - Assign the appropriate Dealer's People To Call List which is entered as a CSID in the Alt.Call List field which then attaches that Alternate CSID's Call Order list to this Subscriber Panel's CSID record.
•Documents - Associate and/or attach specific Documents to this Subscriber Panel's CSID record.
•Events - Define the supervised Events that are to be monitored for this Subscriber Panel's CSID record.
•Floor Plan - Attach a Floor Plan image to this Subscriber Panel's CSID record.
•History - Look up Alarm Signal History for this Subscriber Panel's CSID record.
•Instructions - Look up the Control Panel's Instructions entered in the Installed Equipment Codes Form for the Part identified in this Subscriber Panel's CSID record
•Loss Prevention - Define and/or update a Loss Prevention tracking record for this Subscriber Panel's CSID record.
•Contacts (People To Call) - Enter the People To Call information for this Subscriber Panel's CSID record.
•Contact Lists - Define Contact Lists and assign those to one or more Schedules for an additional Notification method
•Temp Notes - View the active Temporary Notes for this Subscriber Panel's CSID record.
•Unverified Zones - Look-up and/or reset the Unverified Zones information for this Subscriber Panel's CSID record.
❖See the Subscriber Panels Section chapter and all of its sub-chapters (listed above) for complete information on the purpose and use of the Subscriber Panels section and its Tabs.
❑Special Purpose sub-tab - The Action Plans sub-tab located below the Subscriber Panels section on the Monitoring tab:
•The Notifications sub-tab located below the Subscriber Panels section on the Monitoring tab provides the ability
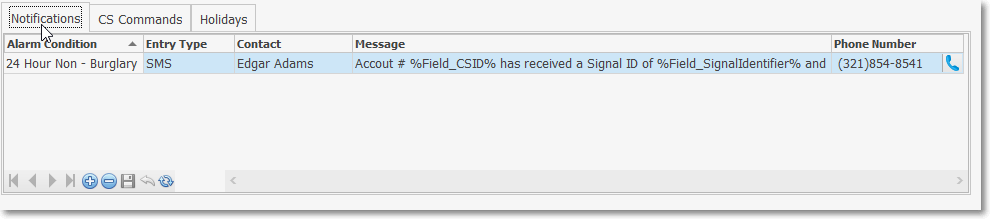
Subscriber Form - Edit View - Monitoring tab -Notifications sub-tab
•The CS Commands sub-tab located below the Subscriber Panels section on the Monitoring tab provides the ability to define specific Commands for an Operator to display a Web Site or open an Application for their use while Processing an Alarm Signal for this Subscriber.

Monitoring tab - CS Commands sub-tab
•Once any CS Commands are defined for a Subscriber, the Operator will see a Command option on the top right of the Signal Processing Form that offers a Drop-Down Selection List of the Web Site(s) and/or Application(s) defined for that specific Subscriber
•The Holidays sub-tab located below the Subscriber Panels section on the Monitoring tab provides the ability to define which of the predefined set of Holidays are celebrated by the currently selected Subscriber.

Holidays assignment sub-tab
❑Subscriber Form - Edit View - Subscriber tab - Contact information is needed to Notify the Subscriber when an Alarm Dispatch (or other necessary Notifications) is required.
•On the Subscriber tab within the Edit View of the Subscriber Form there is an section where all of the required Telephone Numbers for the Subscriber may be entered

✓When the Communications Module and/or the MKS Connect Service is enabled, the Subscriber Notification feature will be activated, otherwise these fields will be unavailable:
▪Pager Service ID - Double-Click on the appropriate Page Service ID using the Drop-Down Selection List, if applicable for this Subscriber.
oClick the Ellipse Icon to open the Page Service Maintenance Form where a new or revised entry may be made (if the appropriate User Access Rights have been granted for the Page Service Form)
▪Pager Unit - Enter the Pager Unit name.
✓When the MKS Connect Service is enabled, these additional Notification Methods will be enabled: Enter the appropriate Telephone Numbers following the rules below:
▪If no Area Code is required, enter the seven (7) digit telephone number (it cannot start with a 1) and the proper formatting will be applied automatically
▪When the10 digit dialing format is in effect - no "1"prefix is needed, but you do need to dial an Area Code as part of the telephone number:
oPress the <Space Bar> first.
oThen, enter the three digit Area Code.
oFinally, enter the seven digit Telephone Number.
oCorrect formatting will be applied automatically.
oLong distance Telephone Numbers (with a "1" prefix) are entered as such, and the appropriate formatting parentheses and dash is applied automatically.
▪SMS Notify # - Enter the telephone number that should be used to send a Text Message (SMS) Notification to this Account
▪Voice Number # - Enter the telephone number that should be used to send a Voice Message (IVR) Notification to this Account
❑Video Setup dialogs - If you are using Video to validate an alarm, use the Drop-Down Selection List to Choose the system being used.
•Video - Using the Drop-Down Selection List provided, Choose the appropriate Video Verification option, if it is in use.
•Generic Video Setup:
✓Click the Ellipse to Add new and/or Update existing Generic Video Setup records.
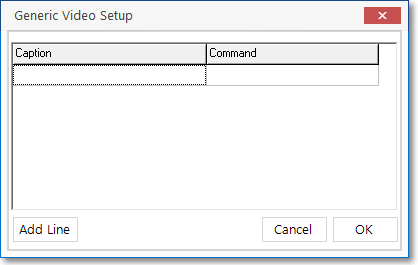
Generic Video Setup
✓Configuration - If you are using Video to assist in validating an alarm, Click the Configuration button and enter the required information.
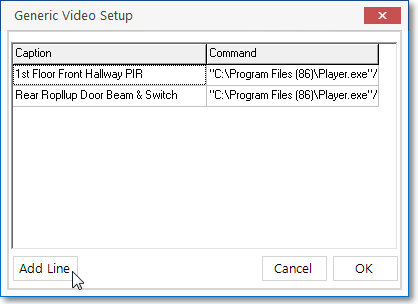
Generic Video Setup entries
✓Caption - Enter a brief description of this point of protection.
▪When this signal is received, a message will be sent to the Operator, with this description, alerting them that there is a Video feed attached.
✓Command - Enter the command line call that will be used by the MKMSCS module to run the selected Video application when this signal is received.
▪Ex. "C:\program files\Video Player Folder\YourPlayer.exe"
✓Click OK to record all of the Video Setup information.
•Teldat Video Setup
✓Click the Ellipse to Add a new and/or Update an existing Teldat Video Setup records.
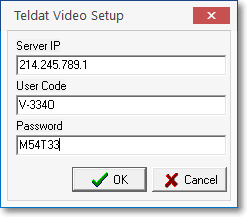
Teldat Video Setup dialog
✓Server IP - As assigned
✓User Code - As assigned
✓Password - As assigned
✓Click OK to record all of the Video Setup information.