❑Event and Alarm Condition Codes are assigned to all Panel Zones and, if CSID Zones are required, to all CSID Zone entries to define the reason why those Signals were transmitted from a Subscriber's Control Panel to the Central Station's Receiver.
•An Alarm Condition record:
1.Describes the Failure of a Supervised Event (e.g., Failed to Open, Failed to Test, Failed to Close)
2.Describes what Alarm Condition is being reported by an Alarm Signal,
3.Identifies the required Operator Skill set that is needed to properly process the Alarm Signal,
4.Sets the Priority Level for the monitoring response, and
5.Defined the Report Printing Options for the Event or Alarm Signal.
•Several Alarm Conditions are predefined and should not be deleted (see the "Mandatory Condition Codes and Panel Zones" chapter).
✓Some of these Alarm Condition Codes are mandatory for the proper operation of SPA - The Signal Processing Application.
❖Also, implement the instructions in the "Special Information for UL® 1981 Listed Users" section at the end of this chapter, if appropriate.
•To Access the Alarm Conditions Form:
a)From the Backstage Menu System Select Maintenance and Choose the General option, then select the General Maintenance option which displays the secondary Maintenance Menu, or
b)From the Quick Access Menu, Select Maintenance and Choose General Maintenance to display the secondary Maintenance Menu.
✓Once the Maintenance Menu is displayed, Choose the Monitoring sub-menu, then Click on the Alarm Conditions option.
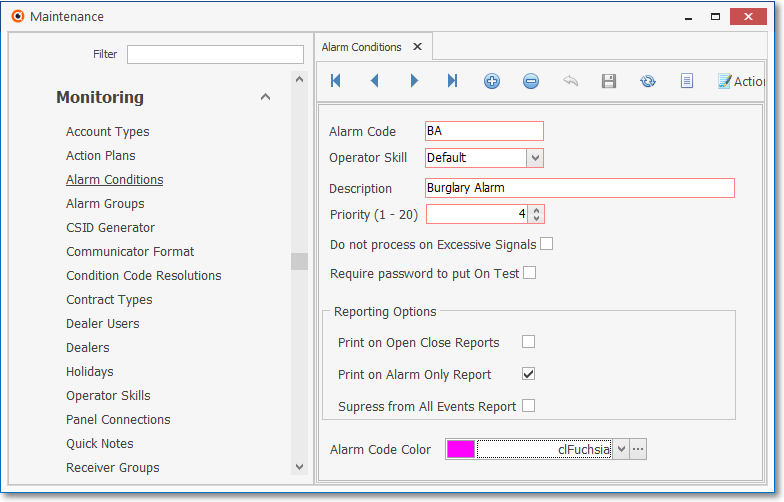
Alarm Conditions Form
✓This Alarm Condition Codes Form may be Re-sized by Dragging the Top and/or Bottom up or down, and/or the Right side in or out.
•Navigation Menu - The Navigation Menu is located at the top of the Alarm Conditions Form.

✓This Navigation Menu provides the normal Record Movement, New, Delete, Save, Refresh, List and Action Plans options.
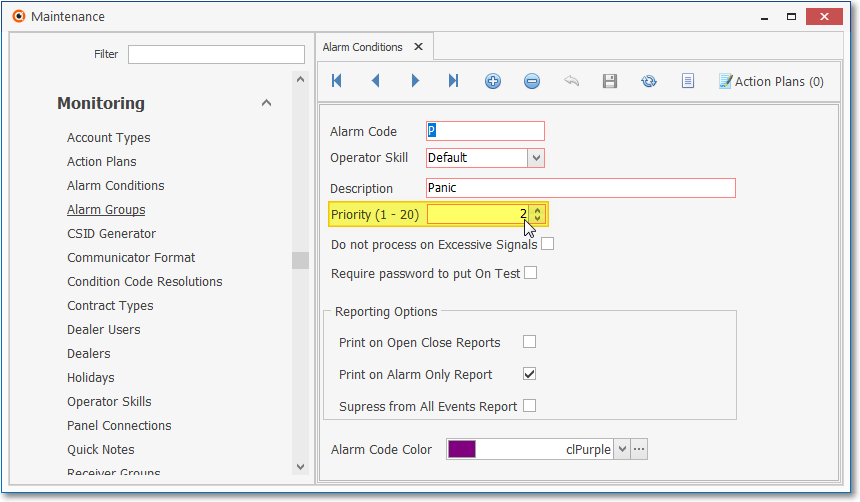
•Record Editing section - The details of the currently selected record are displayed below the Navigation Menu at the center (Main Body) of the Alarm Conditions Form.
Alarm Conditions Form - Record Editing section
•To enter the Alarm Conditions which define the reason why those Signals were transmitted from a Subscriber's Control Panel to the Receiver.
✓Click the ![]() Icon to start the Account Type entry in the Record Editing section.
Icon to start the Account Type entry in the Record Editing section.
✓Alarm Code - You may enter up to three characters - Capital letters, spaces, numbers and basic punctuation marks are accepted - to identify a "code" for this Alarm Signal or Event.
✓Operator Skill - Use the Drop-Down Selection List provided to Choose any specialized Operator Skill that would be required to properly process this type of Alarm Signal or Event, otherwise Choose the "Default" Operator Skill.
❖In MKMSCS, when an Operator with somewhat basic skills (e.g., Trainee) is handling a non-critical signal and another signal comes in from that same Account that should not be handled by that Operator because of their limited Skill level, the new (higher Priority) signal will not be assigned a Waiting Status (waiting for that Operator because they are already processing another signal for that Account), but instead will assign the signal a Pending Status and store it in the Alarm Stack until an Operator becomes available who does have the Skill set required to process that signal.
✓Description - Enter a concise description - up to 30 characters in length - consisting of letters, numbers, spaces and punctuation marks - of this Alarm Signal or Event.
✓Priority - Enter the appropriate Prioritization Level (the higher the Priority Number - the lower its importance in relation to life safety) for this Alarm Signal or Event.
▪Typically, priority 1 is reserved for Fire Alarms, 2 for Ambush or Hold Up Alarms, 3 for CO detected and other Medical and Life Safety related issues, 4 for Burglary, 5 for other general alarm events, 6 for System Trouble reports, 7 for Low battery, tamper, and other system status reports, 8 for Opening & Closing related signals, and 9 for Tests and other general system reporting may be assigned a Priority Level up to 20.
❖Third Edition UL® 1981 Module users must set the correct Priority level of specified Alarm Condition Codes during installation (see the "UL® Alarm Condition - Priority Ranking" discussion below).
✓Do not process on Excessive Signals - Check this box if Signals with this Alarm Condition (typically for Account Testing or Opening & Closing Signals) are not to be counted or billed when calculating and Invoicing Excessive Signals.
▪There are certain types of Alarm Conditions which incur little ongoing cost to the Central Station (e.g., passive Account Testing or Opening & Closing Signals).
▪For those Dealers and/or Subscribers being monitored for these types of passive Account Testing or Opening & Closing Signals, a Flat Rate Recurring Fee is usually charged monthly (either to the specific Subscribers, or to the Alarm Dealer for whom the Monitoring Services are being provided).
▪This option exempts those Subscribers, or the Alarm Dealers from being assessed an Excessive Signals charge for these types of Alarm Conditions.
✓Require password to put On Test - Check this box if the Operator must enter a Password to Place this Alarm Condition On Test (See the Require Password on Test option in Company Settings for additional information)
✓Reporting Options - Because your Company's Central Station may not want every Alarm Signal or Event included on every type of Central Station Report, you may identify which Alarm Conditions (and therefore the associated Alarm Signal or Event sent for them) will, or will not be, included in the following reports:
▪Print on Open Close Reports - To include any Alarm Signal or Event assigned this Alarm Condition Code on Open Close Reports, Check this box.
▪Print on Alarm Only Report - To include any Alarm Signal or Event assigned this Alarm Condition Code on Alarm Activity Reports when the Alarms Only option is selected, Check this box.
▪Suppress from All Events Reports - To Not include any Alarm Signal or Event assigned this Alarm Condition Code on the All Events Report, Check this box.
✓Alarm Code Color - Click the Ellipse on the right of the field to o-pen the Color selection dialog and select the desired color for this Alarm Condition Code.
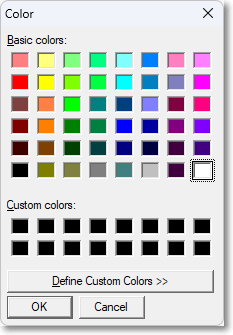
Color selection dialog
▪When an Alarm Event for this Alarm Condition is displayed in the Alarm Stack, the Alarm Code Color selected above will be included.
✓Click the ![]() Icon to record this Alarm Condition entry.
Icon to record this Alarm Condition entry.
✓Repeat this process, as needed, to define each of the Alarm Condition Codes which provide contract monitoring and other recurring services for your Company.
❖Assigning an Action Plan to an Alarm Condition - If the Automated Signal Processing - Enhanced is in use and there is a Response Needed for this Alarm Condition and the normal Operator Guided Response is not appropriate instructions for the Operator, assign a predefined Action Plan to to this Alarm Condition to provide the exact Signal Processing steps that are required.
✓Choose the appropriate Action Plan for this Alarm Condition by Clicking the Action Plans(0) Icon on the Ribbon Menu which will display the Actions Plans For: dialog
•Using the Action Plans For: dialog:
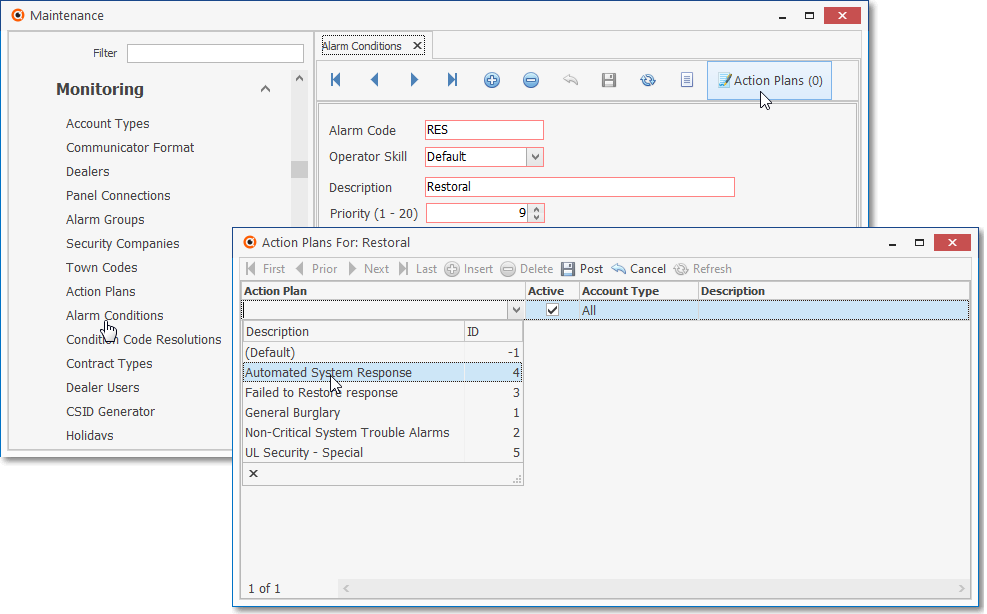
Alarm Conditions Form - Action Plans Icon with Action Plans entry dialog
✓Click the ![]() Icon on the Action Plans For: dialog.
Icon on the Action Plans For: dialog.
▪Action Plan - Using the Drop-Down Selection List provided, Choose either a standard type of Action Plan, or the appropriate Automated System Action Plan.
oSelect the Action Plan that should always be processed by the MKS Connect Service by assigning that appropriate Automated System Action Plan.
▪Active - By default, this will be Checked. To temporarily deactivate an entry, remove the Check mark.
▪Account Type - Using the Drop-Down Selection List provided, Choose either All (the default entry), or the appropriate Account Type.
▪Description - Enter a brief explanation for this entry
✓Click the Post Icon on the Action Plans For Ribbon Menu to save this entry.
✓Thereafter, when an Alarm Signal is received for this Alarm Condition, the designated Action Plan will be implemented instead of the normal Operator Guided Response
![]() List Icon - The Navigation Menu also has a List option which provides a tabular view of these Alarm Condition records.
List Icon - The Navigation Menu also has a List option which provides a tabular view of these Alarm Condition records.

Alarm Conditions Form - List View
✓Some columns may contain expanded comments or other information which may make the List View's display somewhat difficult to use.
Ø - Click the Asterisk at the left of the row of Header Names to display a Drop-Down Check List of each column's Headed Name.
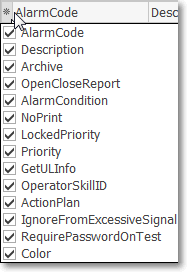
Available Columns
▪Check any Header Name to be included in the List View (by default, All Header Names will be Checked)
▪Remove the Check for any Header Name (see illustration below) that is to be removed from the List View.
✓Click the List Icon to display the associated Grid Data.
✓The columns of Grid Data may be rearranged, filtered, sorted, and exported as a PDF file and/or an Excel formatted file.

✓Find - Enter text to search for a specific record, then Click the Find option.
✓Clear - To remove the text to search for entry, Click the Clear option

Navigation Menu shown with the List Options for Export & Print
✓Click the List Icon again to Close the List View and return to the Record Editing View.
❖See the Grid & Lists - Print Preview - Export Data chapter for complete information on using the List View, including its Export & Print options.
❑Special Information for UL® 1981 Listed Users
•Special Information for Setting Alarm Condition Priority Levels when the MKMS Third Edition UL® 1981 Version is Active
❖This is a Third Edition UL® 1981 Standard requirement.
a.Optionally, a specific Action Plan may be identified for these Alarm Conditions, if appropriate.
b.Otherwise, the Signal Processing of these Alarm Conditions will follow the default Operator Guided Response procedure.
•Certain Alarm Conditions and their associated Priority Ranking are required when the MKMS UL® 1981 Version is Active
Alarm Conditions Code - Priority Level field
•UL® Alarm Condition - Priority Ranking
✓The chart below lists the Alarm Conditions and their preferred and alternate Priority Levels as stated in Section 11.1.5.g., (1 - 10) of the Third Edition UL® 1981 Standard
UL Priority |
Alarm Condition |
|---|---|
1 |
Fire Alarm |
2 |
Emergency Call System |
3 |
Hold-up or Panic Alarm |
4 |
Medical, Carbon Monoxide |
5 |
Industrial Supervision (if a danger can result) |
6 |
Burglar Alarm (with line security) |
7 |
Burglar Alarm (without line security) |
8 |
Supervisory Signal |
9 |
Trouble Signal |
10 |
Other |
Alarm Conditions - Preferred UL® Priority ranking
UL Priority |
Alarm Condition |
|---|---|
1 |
Fire Alarm |
2 |
Emergency Call System Hold-up or Panic Alarm Medical, Carbon Monoxide |
3 |
Industrial Supervision (if a danger can result) |
4 |
Burglar Alarm (with line security) |
5 |
Burglar Alarm (without line security) |
6 |
Supervisory Signal |
7 |
Trouble Signal |
8 |
Other |
Alarm Conditions - Alternate UL® Priority ranking
•Signal Priority - Multiple Function systems shall be configured according to the following functions in descending order of priority:
1)Fire alarm;
2)Emergency call system; (mass notification / E911 / reverse 911 / fire system);
3)Hold-up or panic alarm;
4)Medical including carbon monoxide;
5)Industrial supervision if a danger can result;
6)Burglar alarm (with line security);
7)Burglar alarm (without line security);
ÙÙÙÙÙÙÙÙ
Above the arrows are required (priorities 2,3,4 may share the same priority number)
8)Supervisory signal
9)Trouble signal;
10)Other.
▪Items 2), 3), and 4) are not prohibited from having equal priority.
✓The method used to implement the requirement that the Operator needs to send and then verify the alarm investigator's arrival is affected by:
1.An entry in the UL Classification field in the Central Station Data section of the Monitoring tab in the Edit View of the Subscribers Form, and
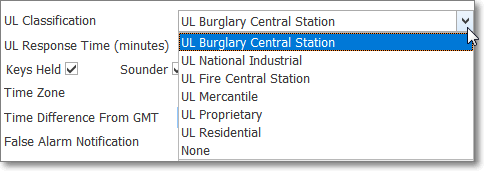
UL Classification field
oUL Classification - If the installation will be issued a UL® Alarm Certificate, use the Drop-Down Selection List provided in the Central Station Data section to Choose the UL Classification of the system.
2.The Priority Level of the associated Alarm Condition for each of those Alarm Signals is identified as 1, 2, 3, or 4.
Alarm Condition Form - Priority field
3.The Investigator Required box is Checked in the Central Station Data section
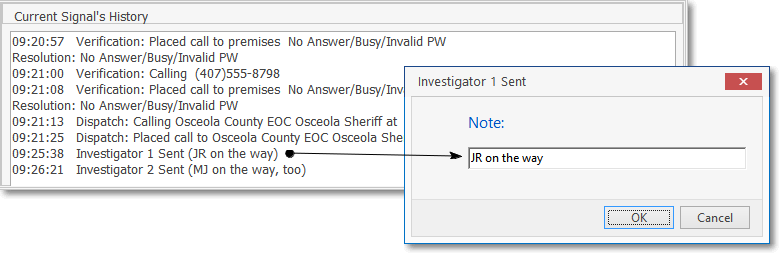
•Selecting the proper UL® Classification for the Subscriber (and Checking the Investigator Required box when the Subscriber's UL® Classification requires it) in the Central Station Data section on the Edit View - Monitoring tab; and having an appropriate Priority Level assigned to the Alarm Condition Code (see the mouse pointer in the illustration above) of the alarm event being reported, allows the MKMSCS application to get, report, and store the “Investigator Sent" and “Investigator Arrival" information entered by the Operator in those dialog boxes as illustrated below:
✓Inv 1 Sent - This option displays the Investigator 1 Sent dialog
▪It is used in conjunction with processing a Priority Level 1, 2, 3 or 4 Alarm Signal that was received from a Subscriber who was assigned a UL Classification, .
Investigator Sent dialog
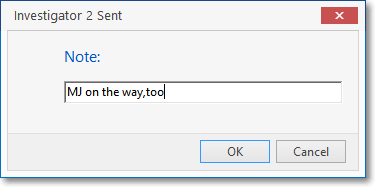
✓Inv 2 Sent - This option displays the Investigator 2 Sent dialog
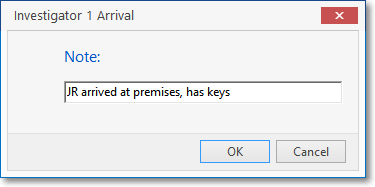
✓Inv 1 Arrival - This option displays the Investigator 1 Arrival dialog
▪Once the Investigator Arrival Information is entered and saved, the elapsed time between Dispatch and Arrival is calculated and recorded..
Investigator 1 Arrival
✓Inv 2 Arrival - This option displays the Investigator 2 Arrival dialog
▪Once the Investigator Arrival Information is entered and saved, the elapsed time between Dispatch and Arrival is calculated and recorded, along with the Investigator's Name, in the Signal History table.
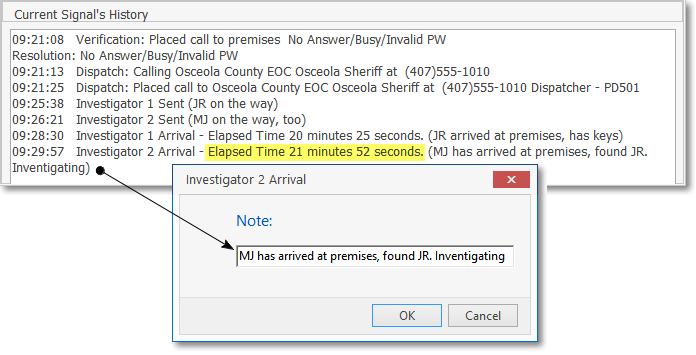
Investigator 2 Arrival dialog - Elapsed Time calculated automatically
✓Once the Alarm Signal is completed, all of the processing information is stored in the Signal History table.
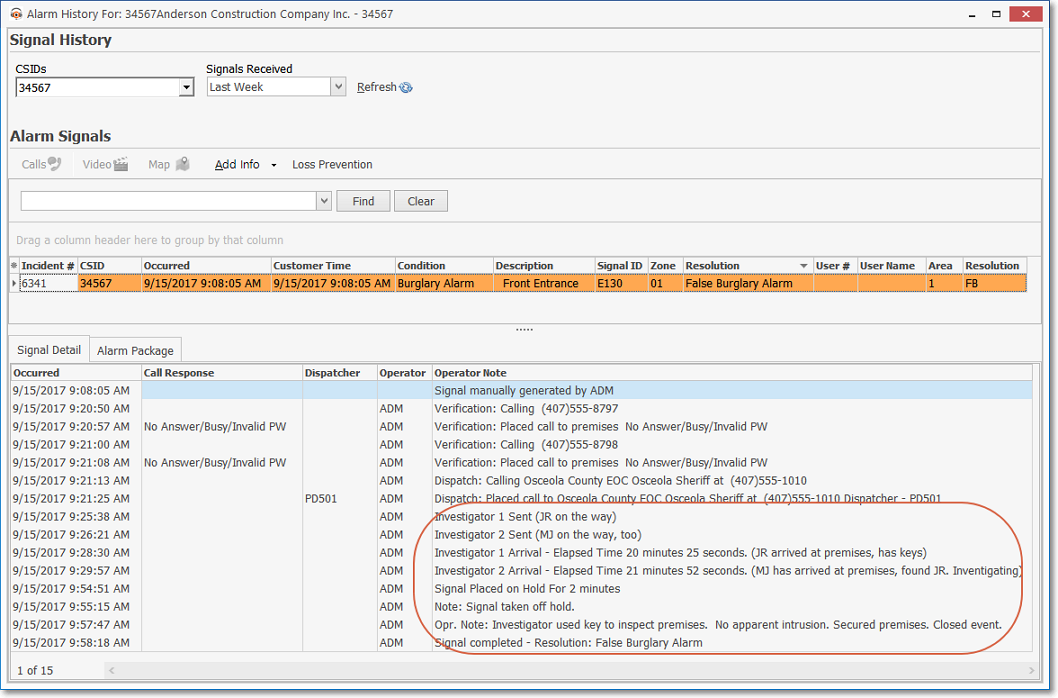
Signal History record of Completed Alarm Signal that required UL specific processing
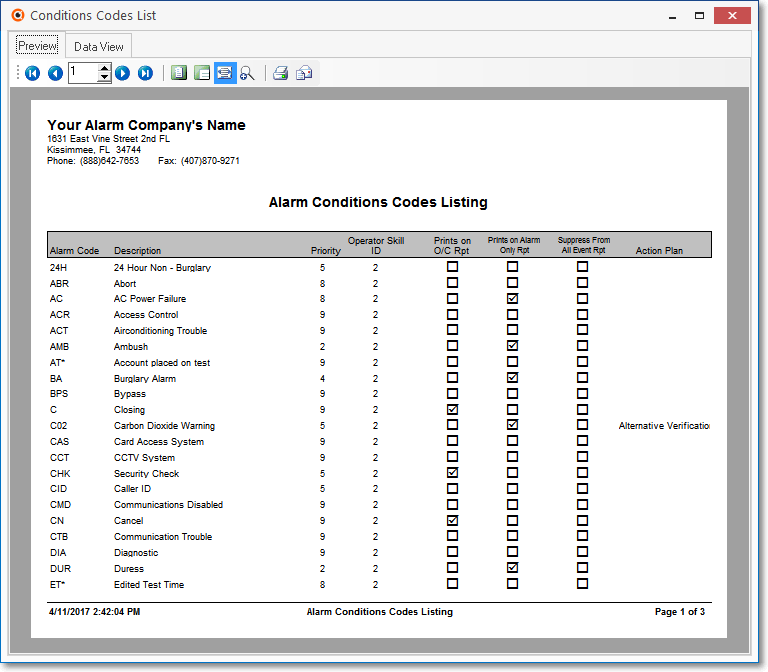
•Use the Condition Codes List (report) to see all defined Alarm Conditions Codes with the associated Priority, Operator Skill, Printing Rules and Action Plan assignments.
Conditions Codes Listing - Preview tab