❑-Notification - If the Operator has attempted to Verify the Alarm Signal (if Verification was required), and then had to Dispatch the proper authorities (as required), in most cases a person on the Subscriber's People to Call list should also be notified.
•The Signal Processing screen presents a series of tabs which the Operator may use, as needed, to properly Notify a responsible party (from those designated by the Subscriber and entered in the People To Call Form) that this Alarm Signal has occurred and what was done about it.
•If the Operator Guided Response or an Action Plan requires a Contact be made for Notification purposes, the Contacts tab will be displayed automatically.
I.Operator Guided Response dialog:
▪The information for the first of the available Contacts will be shown - with complete information about the contact on the General tab if using the Operator Guided Response dialog.
▪The Comments sub-tab on the Contacts tab may be shown with the Comments sub-tab displayed when (if) the selected Contact has a comment defined in their People To Call record.
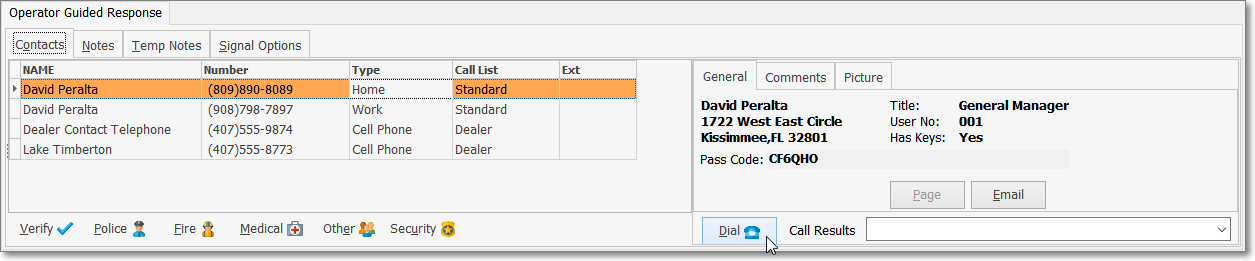
Signal Processing screen - Operator Guided Response - Contacts tab - Dial option
▪Operator Guided Response - The general Notification process is outlined below:

Signal Processing screen - Operator Guided Response - Contacts tab - General sub-tab - Dial option
i.Dial - Press Alt+D, or Click the Dial Icon to automatically dial the telephone number of the first Contact on the Contacts tab.
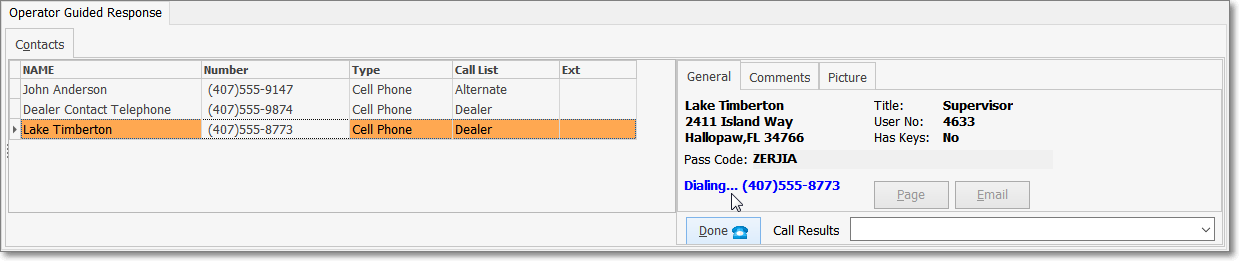
ii.Notify - Validate the name of the person who answers, then Notify the person of the alarm event and the steps taken by the Operator to Verify the Alarm Signal and Dispatch the appropriate Emergency Response Service Provider, if either were required.
iii.Press Alt+D, or Click the Dial Icon again to automatically hang up (disconnect) the telephone line.
iv.Call Resolution - Using the Drop-Down Selection List provided, Choose the appropriate Verification Response Code.
v.Based on the result of this Contact, there are several next steps which will (and/or may) be required:
a)Call Resolution - Using the Drop-Down Selection List provided, Choose the appropriate Verification Response Code.
b)Notes tab - Click the Notes tab and enter a Comment (see the "Entering a Note" discussion below) to describe the results of this Notification effort (the Notes may be entered manually, or using the Quick Notes feature).
c)Next Contact - If the Contact was unsuccessful, based on the selected Verification Response Code, the Next available Contact will be highlighted automatically. Repeat the Dial process.
d)No more Contacts - When all available Contacts have been called, the Dial Icon will be deactivated.
e)Page or Email - See the "Using the Page and/or Email options" discussion below.
f)Signal Options tab - Select the Signal Options tab and Place the Signal On Hold (see Understanding the Hold function in the Completion chapter for more information about placing an Alarm Signal On Hold).
vi.Repeat this procedure until you have exhausted the available names to contact, or until an appropriate contact has been made.
vii.Then, follow the Completion instructions by putting the Alarm Signal on Hold (if appropriate), or Complete it, based on the results of the Dispatch and the Notification.
II.Action Plan dialog:
▪The information for the first of the available Contacts will be shown - with complete information about the contact on the General tab if using the Operator Guided Response dialog.
▪The Comments sub-tab on the Contacts tab may be shown with the Comments sub-tab displayed when (if) the selected Contact has a comment defined in their People To Call record.
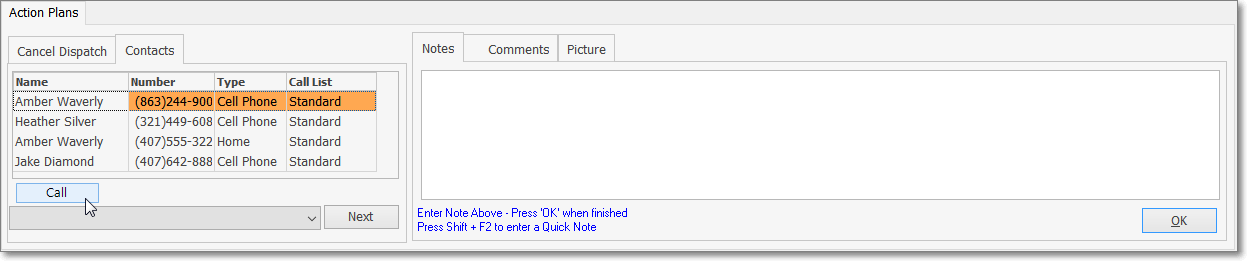
Signal Processing screen - Action Plan - Contacts tab - Call option
▪Action Plan - If Notification is required, the Contacts dialog will be displayed automatically. The general Notification process is outlined below:
i.The instructions for this Action Step may be presented just above the Comments box.
ii.Call - Click the Call button to automatically dial the telephone number of the first Contact on the Contacts tab.
iii.Notify - Validate the name of the person who answers, then Notify the person of the alarm event and the steps taken by the Operator to Verify the Alarm Signal and Dispatch the appropriate Emergency Response Service Provider, if either were required.
iv.Call Resolution - Using the Drop-Down Selection List provided, Choose the appropriate Verification Response Code.
v.Based on the selected Verification Response Code for this Contact, the next (appropriate) Action Step will be determined by the Action Plan.
•Entering a Note: Click the Notes tab and enter an additional Note or Comment to describe the results of the Notification efforts
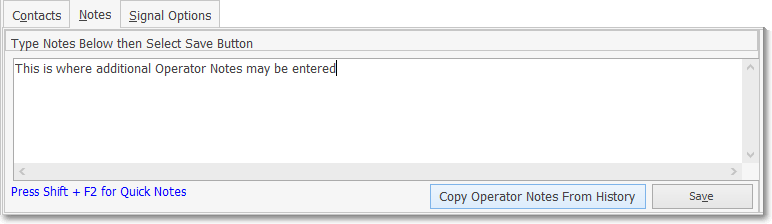
✓Pressing Shift+F2 when inside the Note field in the MKMSCS Signal Processing mode, enables the Selection of an appropriate predefined Quick Note from a Drop-Down Selection List presented.
▪More than one Quick Note may be used in the same Notes field.
▪Manually entered Notes may also be added at that time, or used instead of any predefined Quick Notes.
✓Finally, Click the OK button to indicate that you have completed the Note.
▪These Quick Notes and any manual additions are then inserted into the Subscriber's Alarm History for the Alarm Signal or Event currently being processed.
❑Using the Page and/or Email options
•When Email or Pager information is available and the MKS Connect Service is installed, in addition to the Dial button, the General tab will also display the Page and/or Email buttons based on whether or not the People To Call Form has a Pager number and/or an Email address for the selected Contact.
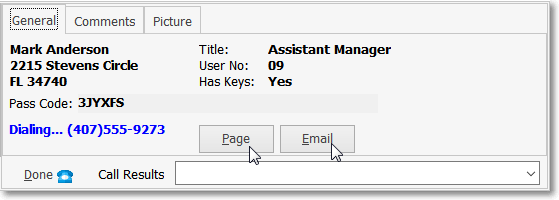
•Pager - If the Page button is not "grayed out" there is available Pager information and the MKS Connect Service is installed.
✓Click Page to initiate a Pager message to the selected Contact.
✓The Manual Contact dialog will be displayed.
✓The Contact, Contact Via and Pager Contact information fields will be predefined.
▪Message - Choose the type of message to be transmitted.
oPredefined - Click this button to be able to select from the Predefined Messages. Enter the Message Text - Use the Drop-Down Selection List to Choose the appropriate Predefined Message.
oManual Message - Click this button to create a specific message. Enter the Message Text - Type the required message text.
▪Send - Click the Send button to send the message to the MKS Connect Service.
▪Close - Click the Close ![]() box, or the Close button to exit this Manual Page Form.
box, or the Close button to exit this Manual Page Form.
•Email - If the Email button is not "grayed out" there is available Email Address information and the MKS Connect Service is installed.
✓Click Email to initiate sending an Email message to the selected Contact.
✓The Manual Contact dialog will be displayed.
✓The Contact, Contact Via and Contact information fields will be predefined.
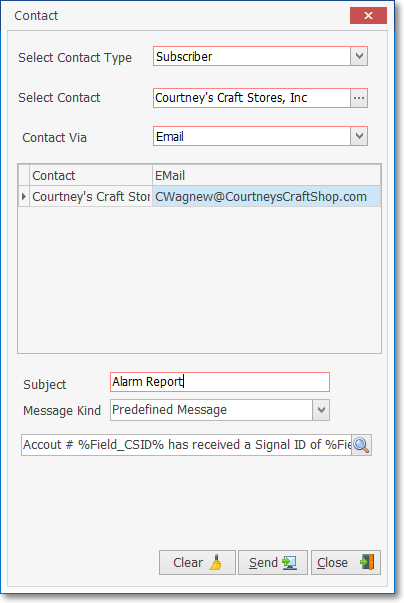
Manual Email for Contact
▪Subject - Enter a Subject Line for this Email
▪Message - Choose the type of message to be transmitted.
oPredefined - Click this button to be able to select from the Predefined Messages. Enter the Message Text - Use the Drop-Down Selection List to Choose the appropriate Predefined Message.
oCustom - Click this button to create a specific message. Enter the Message Text - Type the required message text.
▪Send - Click the Send button to send the message to the MKS Connect Service.
▪Close - Click the Close ![]() box, or the Close button to exit this Manual E-mail Form.
box, or the Close button to exit this Manual E-mail Form.
•Must Contact - For those situations where, regardless of who was contacted prior to, or during the Notifications process, a specific person (or persons) must also be contacted (notified) prior to displaying the Signal Options tab on the Signal Processing screen a Contact List may be created for that purpose.
✓When the Must Contact List Type is assigned to a Contact List entry, the List Members for that Contact List must be notified as described below:
a)The List Member(s) must be contacted prior to Completion of the Signal Processing procedure
b)To ensure this action is taken, the List Member(s) will be shown:
i.In a Must Call List sub-tab within the Signal Options tab or
ii.If an Action Plan is in effect, an Action Step will be presented with that instruction
c)These Must Contact Contact(s) must be reached before a Resolution Code is selected
•Also see the Understanding the MKS Connect Service chapter for additional information.
❑What's Next?
•Completion - Finish the process or place the signal on Hold for later follow up, as appropriate.