❑Dispatch - The process of Telephoning a designated Police or Fire Department, an Emergency Medical Response Agency; and/or some other Security Specialist or Service Response provider, for the purpose of providing assistance for, or resolution of, the Alarm Signal (the current signal the Operator is processing).
•If the selected Verification Response code, or an Action Plan requires the Operator to perform a Dispatch procedure, the Dispatch dialog will appear automatically.
✓In most cases, if a Verification was unsuccessful, or there was simply no response at the Premises, a Dispatch will need to be performed based on any combination of one or more of these:
1.The Operator Guided Response requires it, or
2.It was the next step in the assigned Action Plan, or
3.The CSID Zone (or Panel Zone) associated with the Signal requires it, and/or
4.The follow up instructions for the selected Verification Response code requires it.
✓So typically, unless the Signal is Verified as "OK", the next step is to Dispatch.
❖Important - See the instructions and images that illustrate the processing steps for handling an Alarm Event when the associated Subscriber Panel has a Contact List with one or more Before Dispatch and/or After Dispatch List Types defined:
✓Before & After Dispatch Contact Lists are created in the Contact List tab and are implemented as follows:
a.When Processing Alarm Signal - as the software is preparing to enter the Dispatch phase, the system checks to see if there is a “Before Dispatch” Contact List created for this Account (CSID).
b.Assuming there is a Contact List entry which is Active and has not expired:
1)If that Contact List entry's Alarm Condition, Signal Identifier and Physical Zone fields are all empty, then the “Before Dispatch” List Members Call List is always presented to the Operator before proceeding to the actual Dispatch phase,
2)If there are specified conditions (Alarm Condition, and/or Signal Identifier, and/or Physical Zone) assigned to the Contact List entry, then the Alarm Signal must have those same specified conditions before it is presented to the Operator prior to the actual Dispatch phase,
3)If the specified conditions do not match the "Before Dispatch" Contact List created for this Account (CSID), the software proceeds directly to the normal Dispatch sequence described below.
c.Any “After Dispatch” Contact List created for this Account (CSID) will adhere to the same rules but are presented after the Alarm Signal has been Dispatched.
1)If that Contact List entry's Alarm Condition, Signal Identifier and Physical Zone fields are all empty, then the “After Dispatch” List Members Call List is always presented to the Operator after preforming the required Dispatch phase,
2)If there are specified conditions (Alarm Condition, and/or Signal Identifier, and/or Physical Zone) assigned to the Contact List entry, then the Alarm Signal must have those same specified conditions before it is presented to the Operator after the Dispatch phase,
3)If the specified conditions do not match the "After Dispatch" Contact List created for this Account (CSID), the software proceeds directly to the next logical step in the Operator Guided Response, or Action Plan.
d.There is no default "fall back to" for Before Dispatch and After Dispatch Contact List entries
1)When there is no matching Before Dispatch and/or After Dispatch Contact List entry, the software moves on the next logical step in the Operator Guided Response, or Action Plan (usually Dispatch if there was no "Before Dispatch" requirement, or to Notification if there was no "After Dispatch" requirement)
2)Contact List(s) will be displayed in the same format, same locations, and in the normal manner (as were shown previously) when presented to the Operator.
•When a Dispatch is required, the Dispatch dialog will be displayed automatically (as part of a Operator Guided Response or as an Action Plan's - Action Step).
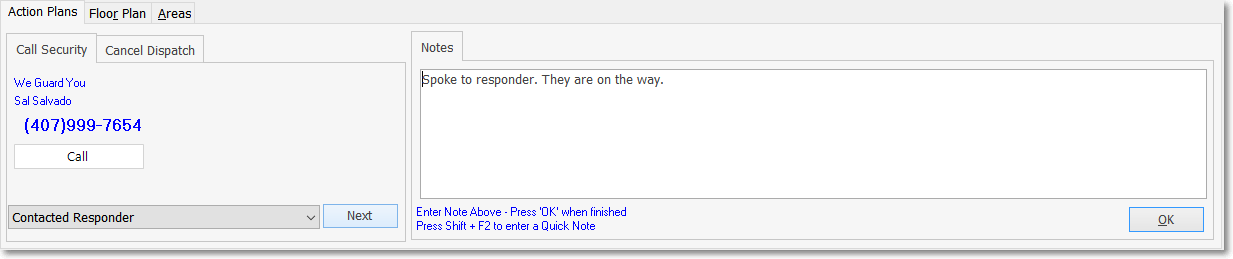
Signal Processing - Action Plans tab - Security Dispatch action - Response Code entered - Mandatory Notes entered
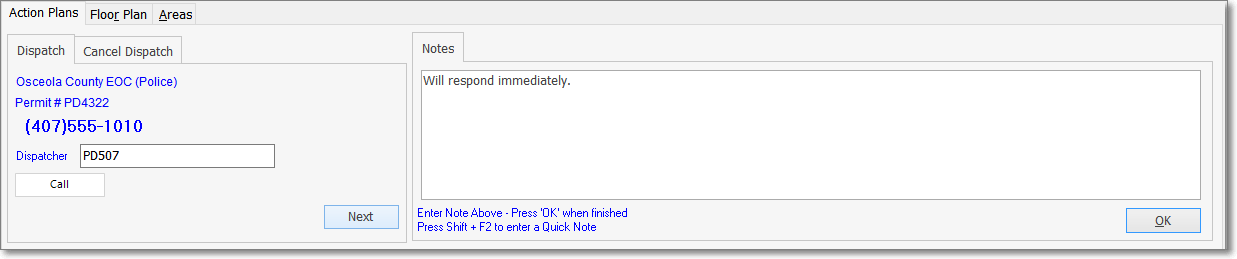
Signal Processing - Action Plans tab - Police Dispatch action - Dispatcher ID entered - Mandatory Notes entry
•However, if a Dispatch is required, and the Number of False Alarms allowed (by the municipality before a punitive action is instituted) has been exceeded (see Town Codes), a special Dispatch Who? Form will be displayed.
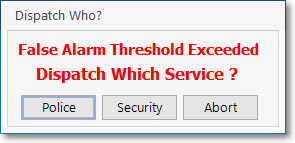
Dispatch Who? False Alarm Threshold Exceeded
✓Following the Company's Policy associated with its False Alarm Tracking procedures, Choose the appropriate Responding Service.
❖False Alarm Tracking Review:
✓The Town Codes Form allows you to:
▪Define the Maximum number of allowable False Alarms for a specific municipality
▪Reset the tally annually (or however the municipality tracks them)
▪View all (False) Alarm Signals which an Operator had to Dispatch within each municipality.
✓Every Alarm Signal that required a Dispatch, using a municipality defined in the Town Codes Form, is initially recorded as a False Alarm in that Town Code's False Alarm Tracking counter.
▪The False Alarm Account Maintenance Form allows you to identify those Subscribers who are subject to penalties from a "Anti-False Alarm" ordinance.
▪The False Alarm Dispatch Tracking Form is used to update this False Alarm Tally by identifying which dispatched Alarm Signals were actually a False Alarm, and removing from the Town Code's False Alarm Tally those Dispatched Alarm Signals that were not a False Alarm.
•Precise Agencies Active - If the Precisely Get Agencies feature has been implemented, this Map Icon and Precise Agencies Active Description is displayed above the Subscriber's premises address information box
✓When the Precise Agencies Active Map Icon and Message is displayed above the Subscriber Address Information box:

Map Icon & Premises Agencies Active message
▪It indicates the the proper Emergency Contact information has been identified based on the validated GEO coordinates for this Subscriber's location.
▪Click the Map Icon to display the GEO Location
▪During the Dispatch procedure, a Premise Agencies Active box will be displayed.
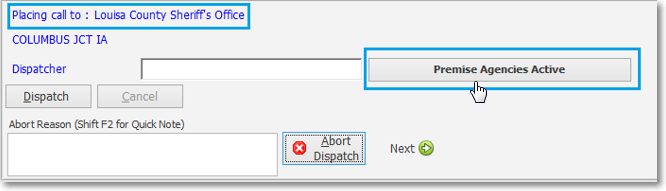
Dispatch dialog - Premise Agencies Active box
▪To view the Agencies for GEO Location information, Click this Premise Agencies Active box
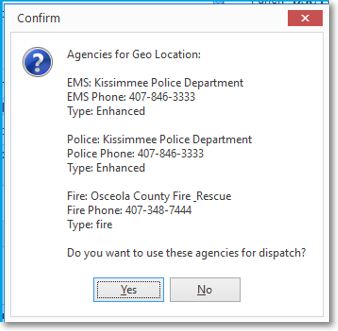
Agencies for GEO Location information pop-up
▪Click Yes to use this information for Dispatch
oThe proper Dispatch Address is update for this Subscriber based on the GEO Location
oThe Premise Agencies Active box's name is changed to GEO Location Agencies
▪Click No to use the Town Code and Subscriber address information currently on file for this Subscriber
•Performing a Dispatch - These are the steps generally required to execute a proper Dispatch an Alarm Signal:
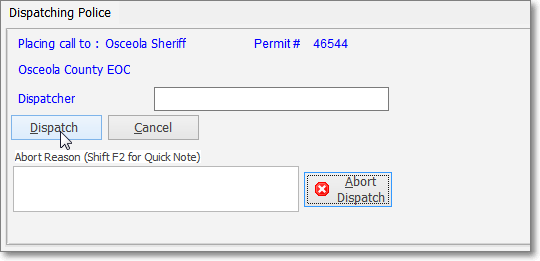
Signal Processing - Operator Guided Response tab - Dispatch dialog - Dispatch button
✓Dial - Press the <Space Bar>, or Click the Dispatch button (see the illustration above) to automatically dial the proper - predefined - Emergency Service Provider (based on the Subscriber's Town Code and the Type of Alarm Signal being processed).
✓Dispatch - When the Emergency Service Responder answers, provide the following information:
▪The Company's Name and your Operator ID,
▪A clear and concise description of the Alarm Signal,
▪The Name of the Subscriber and Location of the Subscriber's premises,
▪If required, the Subscriber's Permit Number will be displayed for the Operator
▪If appropriate, describe the Verification Response that necessitated in this Dispatch.
▪Once you Click the Dispatch button it changes to a Complete button.
✓Dispatcher - Enter the Dispatcher's ID, (which may be their Badge number, 911 Operator ID, or an event Confirmation number).
✓Cancel - Click the Cancel button to cancel this dispatch.
▪Enter the Dispatcher's ID, (which may be their Badge number, 911 Operator ID, or an event Confirmation number) of the person who received the Cancellation information.
▪OK - Click the OK button.
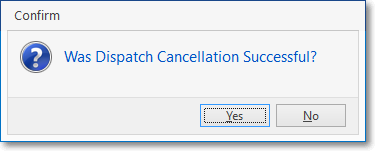
Confirm - Was Dispatch Cancellation Successful?
▪Answer accordingly.
V Abort Dispatch - If necessary, Click the Abort Dispatch button to cancel this operation.
✓Other - Certain Signals ay require some other type of Dispatch information:
▪The Company's Name and your Operator ID,
▪A clear and concise description of the Alarm Signal,
▪The Name of the Subscriber and Location of the Subscriber's premises,
▪The Reason (Condition) for the Dispatch
▪Enter the Contact Name of the person to whom you provided this information.
▪Once you Click the Dispatch button it changes to a Complete button.
✓Complete - Press the <Space Bar>, or Click the Complete button to indicate that you have completed the steps outlined above and want to terminate the call and have these steps recorded in the Alarm History for this event.
❑Cancel Dispatch - Dispatch Cancellation Procedures:
•Sometimes, immediately after performing a Dispatch, new information becomes available indicating that this Dispatch was not needed.
•See the Cancel Dispatch chapter for detailed instructions on the ways a Dispatch Cancellation may be executed.
❑For UL® 1981 Listed Central Stations Only - If using the Third Edition UL® 1981 Standard version of MKMSCS; and
a)the Operator is processing an Account with a UL® Classification assigned; and
b)there is an Alarm Signal with a Priority Level from 1 to 7; and
c)she/he had to perform a Dispatch; then
d)an Alarm Ticket Report for the currently displayed alarm event will be displayed as certain Processing steps are completed and may be printed at any time.
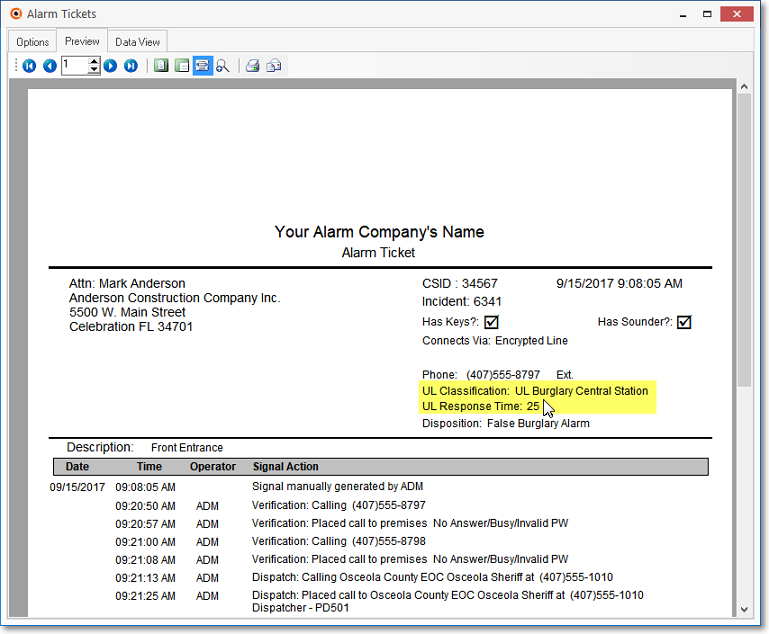
✓The Alarm Ticket Report for the currently displayed alarm event may be printed at any time while that alarm event is still being Processed by selecting the Print Alarm Ticket option accessed using the Actions button

•Dispatching an Investigator: An Alarm Signal from a UL® Classified Account with a Priority Level from 1 to 7 must have an Investigator Dispatched to the Premises.
✓A Security button is included with the other Dispatch & Contact buttons.
![]()
✓Security - Click the Security button to display the Security Dispatch dialog and Dispatch an Investigator to the Subscriber's Premises.
▪Place Call - Click the Place Call button to contact the Security company.
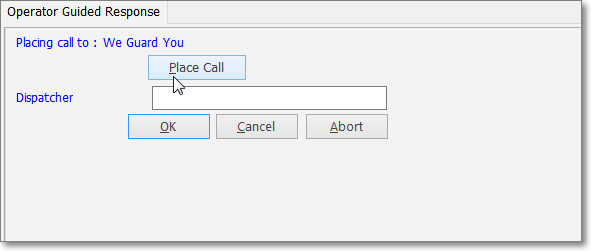
▪Dispatcher - Record the Dispatcher's ID
▪OK - Click the OK button.
▪An Internal Timer will be started automatically as soon as an Investigator Dispatch is executed (see below).
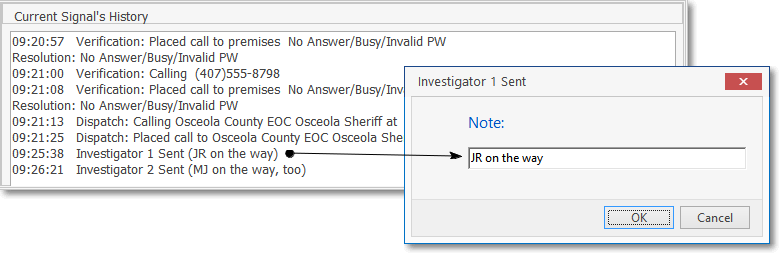
✓Inv 1 Sent - This option displays the Investigator 1 Sent dialog
▪It is used in conjunction with processing a Priority Level 1 - 7 Alarm Signal that was received from a Subscriber who was assigned a UL Classification, .
Investigator 1 Sent dialog
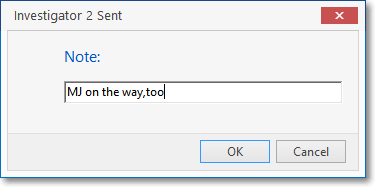
✓Inv 2 Sent - This option displays the Investigator 2 Sent dialog
Investigator 1 Sent dialog
•Recording the Arrival of an Investigator:
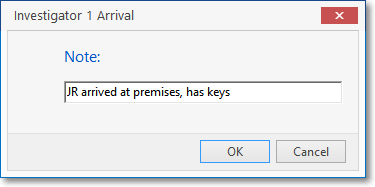
✓Inv 1 Arrival - This option displays the Investigator 1 Arrival dialog
▪Once the Investigator Arrival Information is entered and saved, the elapsed time between Dispatch and Arrival is calculated and recorded.
Investigator 1 Arrival
▪When the OK button is Clicked, the Internal Timer will be stopped, the elapsed time calculated, and the results noted in the Current Signal's History.
✓Inv 2 Arrival - This option displays the Investigator 2 Arrival dialog
▪Once the Investigator Arrival Information is entered and saved, the elapsed time between Dispatch and Arrival is calculated and recorded, along with the Investigator's Name, in the Signal History table.
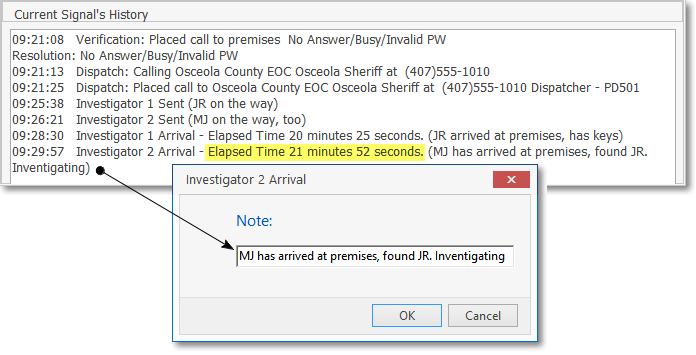
Investigator 2 Arrival dialog - Elapsed Time calculated automatically
▪When the OK button is Clicked, the Internal Timer will be stopped, the elapsed time calculated, and the results noted in the Current Signal's History.
✓As the Alarm Signal is processed and completed, all of the processing information is stored in the Signal History table.
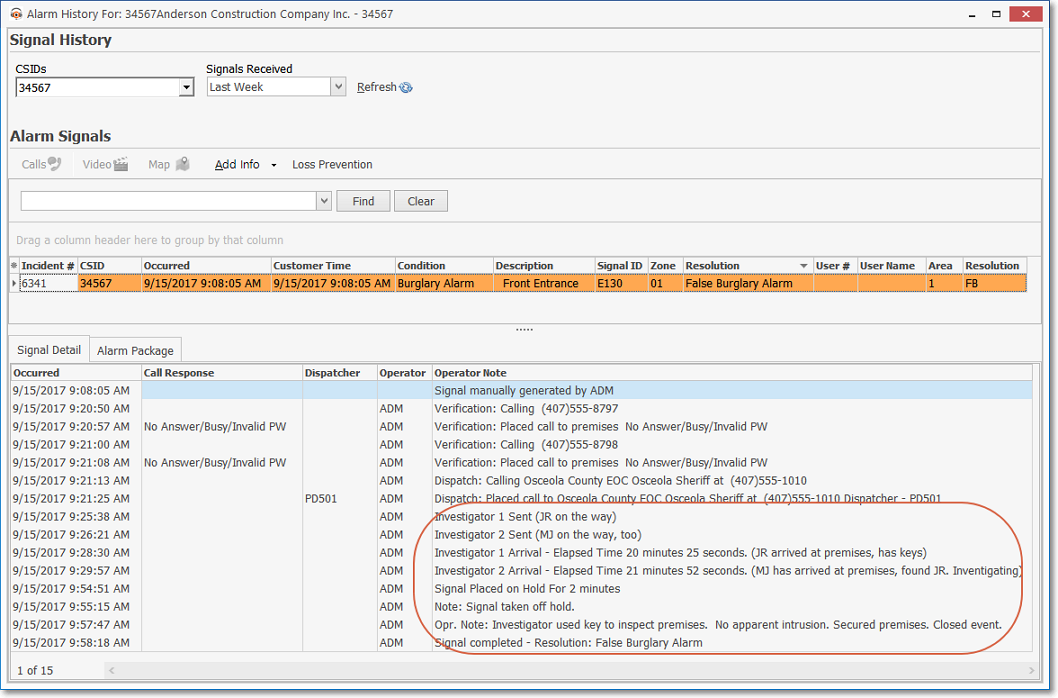
Signal History record of Completed Alarm Signal that required UL specific processing
•The Contacts tab will be displayed when the required Dispatch(s) are completed.
•Regardless of what version of MKMSCS is in use, once you successfully Dispatch the Alarm Signal, enter a Note or Comment explaining the result of the Dispatch in the Note field provided.
✓Quick Notes - Press Shift+F2 to enter a Quick Note and/or any appropriate Comment to help clarify the Dispatching steps that have just been completed.
▪Manually entered Notes may also be added at that time, or used instead of any predefined Quick Notes.
▪More than one Quick Note may be inserted in the Note box.
▪Save - Click the Save button to indicate that you have completed the Note.

Enter a summary Note about the Dispatch
❑What's Next?
•Notification - If the Operator Guided Response or an Action Plan requires a Contact be made for Notification purposes, the Contacts tab will be displayed automatically.
Signal Processing screen - Contacts tab - Dial option
•Completion - If the Operator Guided Response or Action Plan does not require a Contact be made, or there are no People To Call defined for this event (or the Subscriber), then Complete the process or place the signal On Hold, as appropriate.
❑Converting to Manual Mode - Manual Mode allows the Operator to switch to the Operator Guided Response user interface.
•If the Operator needs to exit from an Action Plan, Press Ctrl+Shift+M.
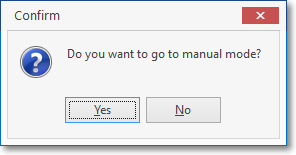
•Click the Yes button to Confirm the switch to Manual Mode.
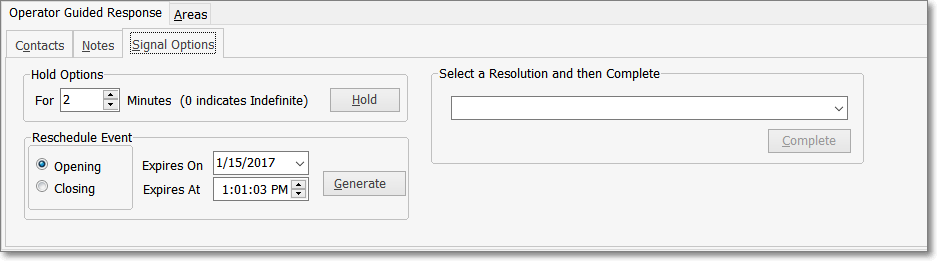
Operator Guided Response view with Signal Options tab activate
•The Action Plan user interface will be converted to the generic Operator Guided Response view with the Signal Options tab selected.
•The Contacts, Notes, History, Temp Notes and/or Signal Options tabs may now be accessed, as needed.