❑This is why it frequently ends up here at the CSID Zones Form:
a.The Subscriber purchases an Alarm System.
b.They contract for Central Station Monitoring.
c.A Technician installs that contracted security system.
d.The Subscriber's Control Panel is programmed for a specific Communicator Format and its related Panel Zones to properly report various events, alarms, and supervisory signals, based on the specific needs of that Subscriber.
e.Frequently, the Subscriber's Alarm System is a little bit different than the standard setup (aren't they always?), so some custom CSID Zone definitions are often required.
❑The CSID Zones Form provides the means to identify Exceptions to the standard, predefined Panel Zones for each Communicator Format programmed into the Control Panel that is installed at the Subscriber's Premises.
•A Little Review:
✓Communicator Formats are provided to identify the transmission formats of the Communicators your Company is installing (most of these are predefined).
▪A full set of default Panel Zones should be defined for each of these Communicator Formats (most of these are predefined).
✓When the Subscriber's Central Station Data is entered within the Edit View of the Subscribers Form, the CSIDs reported by their Alarm System are identified in the Subscriber Panel(s) section of the Edit View's Monitoring Tab.
▪In this Subscriber Panels section - where the CSID(s) for the Subscriber are entered, a Communicator Format is assigned to each CSID
▪This automatically associates (assigns) that Communicator Format's Panel Zones to that CSID.
▪A Subscriber may have multiple Subscriber Panels (i.e., CSIDs) and each of these may (but usually won't, but could) report using a different Communicator Format.
✓The net result is that each CSID identified in the Subscriber Panel section will inherit all of the default Panel Zones that have been defined for its assigned Communicator Format.
•The Problem:
✓The default Panel Zones (for the Selected Communicator Format that was installed in the Subscriber's Alarm System) may not completely match the actual purpose, description, and/or notification rules of the Alarm Signals that could be sent by this specific Subscriber.
✓Here are six reasons why you may need to define one or more CSID Zones to replace the default Panel Zone information predefined for the selected Communicator Format:
1.More information is needed to clarify a particular event or alarm than what was provided in the default Panel Zone record.
2.The default Panel Zone record's Signal ID (and/or Physical Zone) is being used for a completely different purpose for this CSID.
3.There are multiple - non-standard - Physical Zones for the default Panel Zone record's Signal ID.
4.The Subscriber's default Calling Order for Notifications is not sequenced correctly for some Alarm Signals.
5.Specific processing steps will be different than those defined in the default Panel Zone record.
6.There may be a need to define an additional Signal ID (and perhaps also a Physical Zone) which is not actually sent from the Receiver, but rather is defined to alert an Operator to perform some special task for a specific Subscriber, or for the Central Station itself (see the "User Defined Signal IDs" discussion below).
•The Solution: Why this Works:
✓Generally speaking, when an Alarm Signal is received:
▪To properly interpret that signal, the system searches the CSID Zones table first for the appropriate alarm processing information.
▪If no matching Signal ID - and if available - Physical Zone combination is found there, it then looks at the Panel Zones that were predefined for this Subscriber's Communicator Format.
▪If neither source (and some other variables outlined below) contains the information for the Alarm Signal that was transmitted, is it reported as an Invalid Alarm.
✓Therefore, the Panel Zones Form allows you to define the default information for the most common purposes of the Alarm Signals sent by your Subscribers.
✓Information representing Exceptions to these Panel Zones are defined for those Specific Subscribers using this CSID Zones Form.
•How it Works
✓To be precise, the Signal Processing Order in which the Signal Processing Application (SPA) searches for, and validates, an incoming Alarm Signal is as follows:
1.Exact Match on a CSID Zone Override (Signal ID & Physical Zone).
2.Exact Match on a CSID Zone (Signal ID & Physical Zone).
3.Exact Match on a Panel Zone (Signal ID & Physical Zone).
4.Partial Match on a CSID Zone (Signal ID).
5.Partial Match on a CSID Zone using the Wild Card feature (Signal ID).
6.Partial Match on a Panel Zone (Signal ID).
7.Signal ID from the Receiver + CSID Zone's Physical Zone.
8.Signal ID from the Receiver + Panel Zone's Physical Zone.
9.Reports as an Invalid Alarm.
•Why special, internally defined Signal ID (and optionally a Physical Zone) combinations which cannot be transmitted from the Subscriber's Control Panel, may still be required.
✓A CSID Zone record may be entered for the purpose of defining a required task, matching a special Event record, which then presents an Alarm Signal on Processing Screen to remind an Operator that this required task must be performed (now).
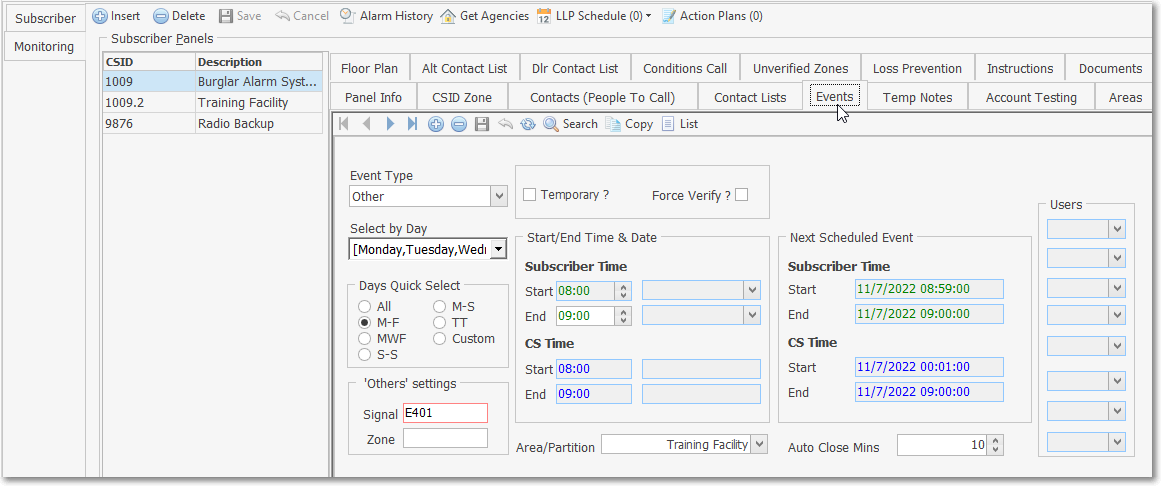
Monitoring tab - Subscriber Panels section - Events tab - Event Type = Other
✓See Other Events for information on entering the matching 'Other' Settings on the Events Form.
➢Important Note: This 'Others' Settings feature on the Events Form is quite different then the "Other" Dispatch selection on this CSID Zones Form which is explained below.
❑To view the CSID Zones Form for a selected Subscriber Panel CSID:
•Open the Subscribers Form and Retrieve (F2 Search) the appropriate Subscriber's record.
•Select the Edit View Icon
•Click on the Monitoring Tab to view the Central Station Data section.
•Select the Subscriber Panel's CSID for which the CSID Zone information must be defined
•At the bottom of this Central Station Data section, there are a series of tabs
•Select the CSID Zone tab on which the Zones sub-tab is selected by default.
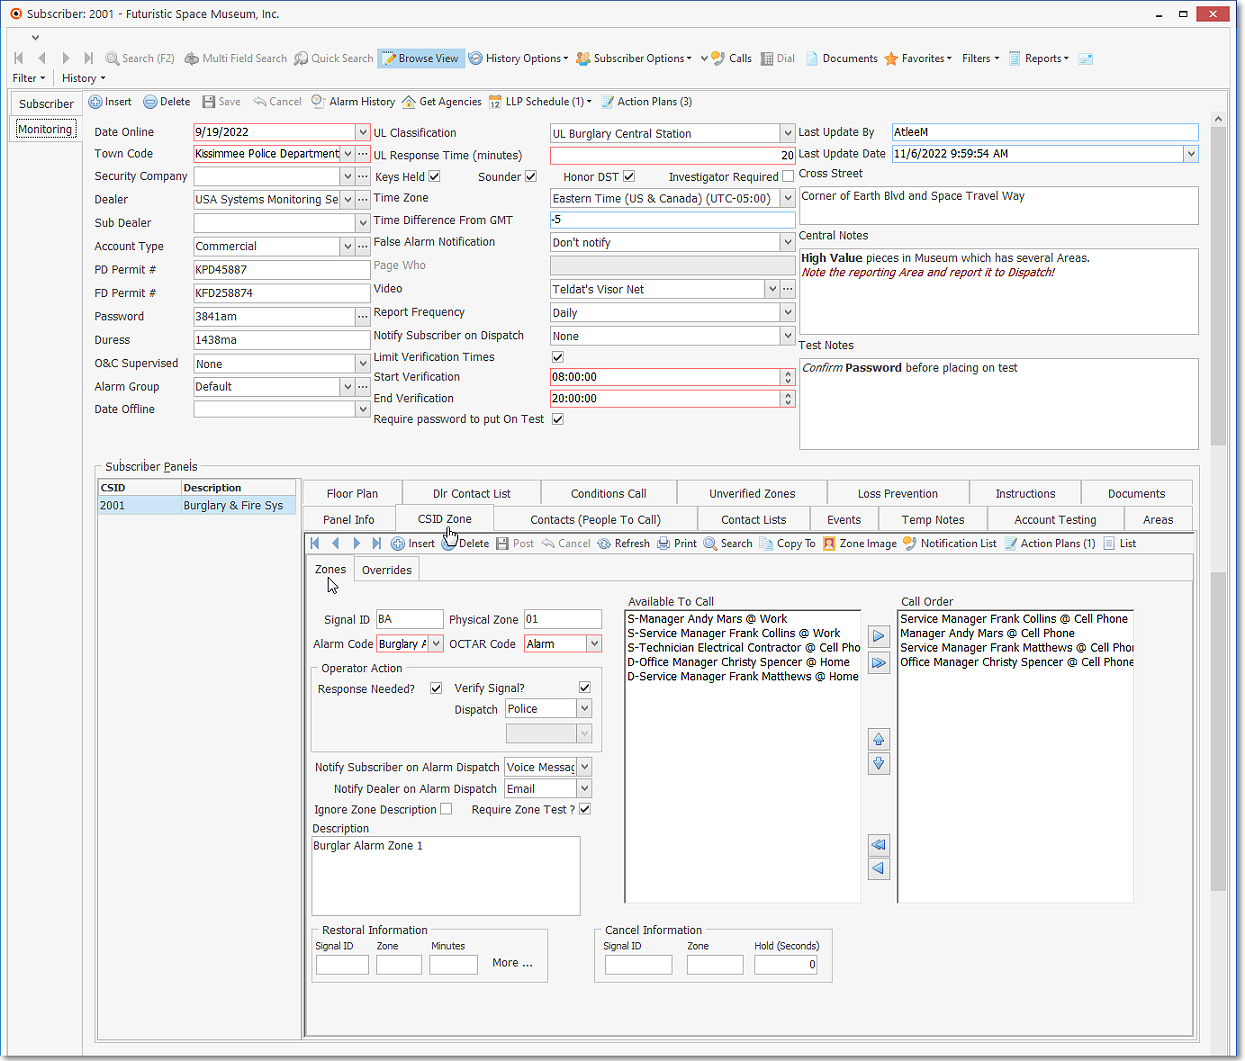
Subscriber Edit View - Monitoring tab - Subscriber Panels - CSID Zone tab
✓This CSID Zone Form may be Re-sized by Dragging the Top and/or Bottom up or down, and/or the Right side in or out.
•Navigation Menu - The Navigation Menu is located at the top of the CSID Zone Form.
![]()
✓This Navigation Menu provides the normal Record Movement, Insert, Delete, Post, Cancel, and Refresh options; as well as the Print, Search, Copy To, Zone Image, Notification List, Action Plans, and List options
✓See the "Additional Options on the Navigation Menu for this CSID Zones Form" discussion below for information about the Print, Search, Copy To, Zone Image, Notification List, Action Plans and List options.
•Zones tab - The details of the currently selected CSID Zone record are displayed below the Navigation Menu within the Edit View tab at the center (Main Body) of the CSID Zone Form.
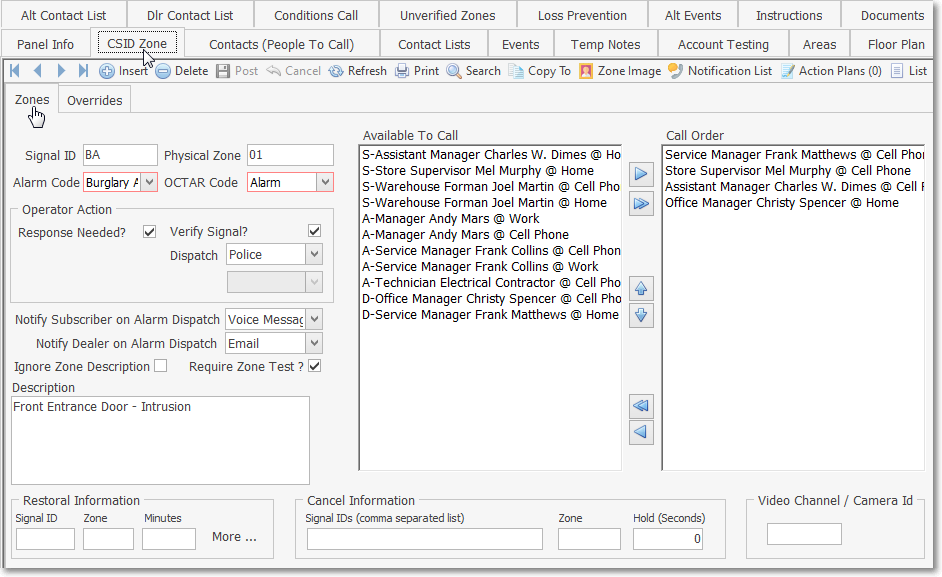
CSID Zone tab
❑Defining a CSID Zone: Select the Zones tab then Click the ![]() Icon to start a new CSID Zone entry.
Icon to start a new CSID Zone entry.
•Signal ID - Enter the specific Signal Identifier for this alarm signal, keeping in mind the Communicator Format assigned to the Subscriber's CSID in Subscriber Panel(s).
✓"Wild Cards" may be used when defining the Signal ID.
▪Wild Cards are specific characters that represent a range of substitution possibilities for Signal Identifiers when an Alarm Signal, whether sent from the Receiver or entered as a Manual Alarm, is being interpreted by SPA. They include:
oUnderscore - The underscore mark (" _ ") may be inserted anywhere within the Signal Identifier field to represent that another (any other) character may be received in that same position.
oPercent Sign - The percent sign (" % ") may be inserted at the end of the Signal Identifier field to represent that any number of additional characters, from that position on, may be received.
❖See Using the Wild Card Feature for more information about this feature.
•Physical Zone - Enter the Zone Code, if one is transmitted along with the Signal Identifier.
✓If a Wild Card was used in the Signal ID, a Physical Zone must be entered.
✓For the SIA Format Only - When the additional modifiers: PT (point), ID (user id), or RT (rt point) are received, the number that follows these modifiers will be placed in the Physical Zone field appended to actual Physical Zone number.
•Alarm Code - Use the Drop-Down Selection List provided to Choose the appropriate Alarm Condition.
•OCTAR Code - Use the Drop-Down Selection List provided to Choose (the list is shown below) the type of signal or event you are defining.
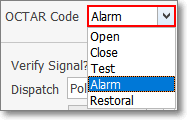
OCTAR field options
•Operator Action - If this is a Active Signal (one that needs some type of Operator Response), indicate the Alarm Processing step(s) the Operator is to take when this Alarm Signal is received.
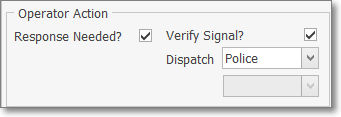
CSID Zones - Operator Actions section
✓Response Needed? - Check this box when some type of Operator Response is required.
▪Whether or not the Response Needed? box is Checked, the Call List section with the Available To Call and Call Order columns will be accessible.
➢If Response Needed? is not Checked, it will be considered a Passive Signal (one that does not need any specific Operator Response) and no other Operator Action or Notification options will be available.
➢Note: For MKS Connect Service Users - When using the Off Test Warning feature (which notifies a Technician via Email that an Account which she/he placed On Test is about to come Off Test), to have an Operator also get this Off Test Warning Signal, Check the Response Needed? box.
✓Verify Signal? - Check if this Signal is to be Verified by telephoning the premises in advance of any Dispatch, or other Notification process.
✓Dispatch - If this is an Active Signal, use the Drop-Down Selection List to Choose (the list is shown below) the type of response that is needed.
▪Fire = Notify the appropriate Fire Department of the reported Fire Alarm Condition.
▪Medical = Notify the appropriate Medical Emergency Response Service of the reported Medical Alarm Condition.
▪Police = Notify the appropriate Police or Sheriff's Department of the reported Burglary, Silent or Hold-Up Alarm Condition.
▪Other = Notify the appropriate Responsible Person responsible for responding to the reported Emergency Condition (see Other Call below for more information about this selection).
▪<None> = No specific "Dispatch" related Response is needed (see ØNote immediately below).
➢Note: For Accounts using a Security Company for their Burglar Alarm Response,
a)The Comments entered on the Central Station Data Form should clearly reflect that a Guard Response is required for all Burglar Alarm signals.
b)Each of the CSID Zone records defining these Burglar Alarm signals should be Checked Response Needed? and have <Other> selected for the Dispatch type.
c)The Security Company's emergency contact number must be entered in the Subscriber's Contacts (People To Call) list.
d)Select the Contact record representing that Security Company when defining who is contacted for the <Other> response (see "Other Call" below).
e)Be sure that the CSID Zone's Description field clearly reflects this response requirement (see "Other Call" below).
✓The Other Call option - when the type of Dispatch Response that was chosen above is <Other>,
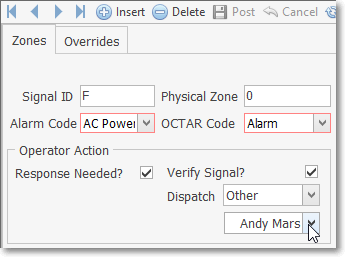
▪Use the Drop-Down Selection List (located immediately below the Dispatch field) to Choose that Name (from the Subscriber's Contacts (People To Call) table) of the person/company who is to be notified
➢Important Note: The information below is specific to those Signals which are to be processed using the MKS Connect Service:
▪Signal ID - Enter the specific Signal Identifier for this Signal and/or
▪Physical Zone - Optionally, enter the Zone Code, if one will be transmitted along with the Signal Identifier.
▪Alarm Code - Use the Drop-Down Selection List provided to Choose the appropriate Alarm Condition Code.
▪OCTAR Code - Use the Drop-Down Selection List provided to Choose Alarm.
▪Response Needed? - Check this box when the Response is to be provided by the ASP service.
▪Action Plan - Because there is a Response Needed for this Alarm Signal - which will be provided by the ASP service - a predefined Automated System Action Plan must be identified.
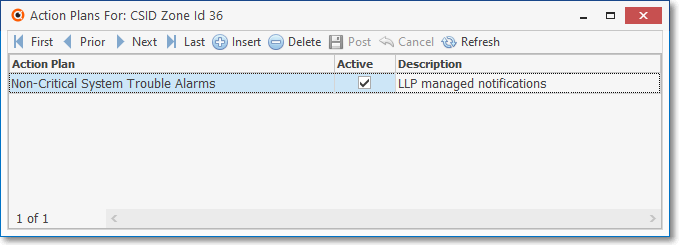
a)Select the Action Plans option on the CSID Zone tab's Ribbon Menu to display the Actions Plans For: dialog
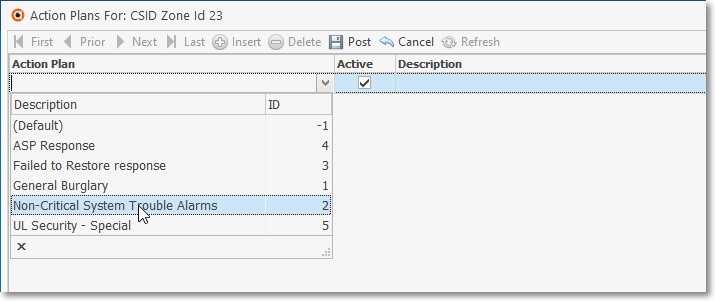
Action Plans For: CSID Zone id (nn) dialog
b)Click the ![]() Icon on the Actions Plans For: dialog's Ribbon Menu
Icon on the Actions Plans For: dialog's Ribbon Menu
c)Action Plan - Use the Drop-Down Selection List to Choose the appropriate Automated System Action Plan for processing this Alarm Signal.
d)Active - By default, this field will be Checked
e)Description - Enter a brief description for this Action Plan entry

Action Plans For: CSID Zone id (nn)- Description column
f) Click the ![]() Post Icon to record this Action Plan entry
Post Icon to record this Action Plan entry
✓Available To Call - This list contains the Contacts (People To Call) associated with for the CSID for which this CSID Zone is created, plus any others Contacts available from the Global Call List members (see above)
▪It represents the default order in which Operator Notifications should proceed until someone is successfully notified. (see the "Available To Call" discussion below).
✓Call Order - You may also set a specific Call Order using any of the Contacts (People To Call) and Contacts available from the Global Call List who should be notified when this CSID Zone signal is received.
•If using the MKS Connect Service, and only when a Signal ID has been entered above:

✓Notify Subscriber on Alarm Dispatch - Use the Drop-Down Selection List to Choose the Subscriber's notification preference.
✓Notify Dealer on Alarm Dispatch - Use the Drop-Down Selection List to Choose the Dealer's notification preference.
•Ignore Zone Description - This special setting is used to properly process certain types of Supervisory Signals.
✓Check this box to ignore the Zone Code (Physical Zone) and it's Description, and instead use the default Description field information defined in the Panel Zones record when this Supervisory Signal is displayed for an Operator.
✓This option is available because - when a Supervisory Signal is received - it generally consists of a Signal Identifier (which identifies the Problem or Situation) and also frequently includes a Physical Zone (which actually does not represent a "real" Zone within the Alarm System).
▪The Signal Identifier is virtually always predefined in the Panel Zones Form of the Communicator Format (identified in the Subscriber Panels section) installed at the Subscriber's premises.
✓Certain Communicator Formats may add a Zone Code to the Signal Identifier transmitted for some Supervisory Signals
▪There is a possibility that this Signal Identifier + Zone Code (Physical Zone) combination might be misinterpreted as an Actual Zone in the Alarm System in use (e.g., LB+001).
▪This would occur when the Signal Identifier in the Panel Zones record is matched with a Physical Zone identified in a CSID Zones record creating something like " Low Battery/Front Door" when there is no battery at the front door (it's in the Control Panel).
•Require Zone Test? - Check the Require Zone Test? box if you want this specific CSID Zone to be included in the Unverified Zones process and included in the Zone Test Verification Report (see "Understanding the Unverified Zones feature and it's related Zone Test Verification Report" section below, and those associated chapters for more information), and to be included in the Web Tech Service Zone Testing list (see the Web Tech On Test Panels & Zone Testing chapter for more information).
•Description - Provide a clear, concise description of this Signal ID and/or Physical Zone.
➢Note: As noted above, for Accounts using a Security Company for their Burglar Alarm Response, this Description field should also clearly reflect this response requirement.
•Click the ![]() Post Icon to record this CSID Zone.
Post Icon to record this CSID Zone.
❑Understanding the Unverified Zones feature and it's related Zone Test Verification Report.
•The CSID Zones Form has a Require Zone Test? Check Box field (see "Require Zone Test?" above) which identifies which specific Zones will be tracked by the Zone Test Verification Report and the Unverified Zones Form.
➢Note: This feature will not be available unless the VerifyZones option is set to True ("T") in the Company Settings dialog available in the Company tab of the User Options Form. If the VerifyZones option in the Company Settings dialog is set to False ("F") - regardless of whether or not any Require Zone Test? box is Checked on any CSID Zones Form - neither the Unverified Zones dialog, nor the related Zone Test Verification Report, will be available.
•Unverified Zones dialog:
✓The Unverified Zones dialog is used to (re-)set the Test Status of an Account (Subscriber Panel) that has been Placed On Test by a Technician working on that system at the Subscriber's premises.
✓The Unverified Zone dialog is accessed using a button located on the Subscriber Panels section of the Central Station Data Form, on the Central Station Maintenance Menu in MKMS, and on the Miscellaneous Menu within the Sub Info (F2) Form in MKMSCS.
•Zone Test Verification Report:
✓The Zone Test Verification Report allows you to view a selectable list of those Accounts which have been Placed On Test,
✓The Zone Test Verification Report displays the current Test Status of each of these Accounts.
✓All Zones that are displayed may be Reset to a Waiting ("W") Test Status, if needed.
❖For Web Tech Service Users: See the Web Tech On Test Panels and Zone Testing chapter for additional information.
❑Restoral Information Overview (also see the separate Restoral Information chapter for more detailed information):
•For an Alarm Event or Signal which requires that a subsequent Restoral Signal also be received (when everything has "restored to normal"):
a.Instead of Checking the Response Needed? box, complete the Restoral Information section (described below).
b.When that CSID Zone Signal is received, because there is Restoral Information defined, MKMSCS will immediately insert the Signal into the Subscriber's Alarm History while waiting for the associated Restoral Signal.
c.The time that the system will wait for the Restoral Signal to be received, before creating the Failed to Restore Signal, is measured (and entered) in Minutes.
d.If the Alarm Event or Signal, that indicates this CSID Zone has been successfully restored, has not been not received within that designated number of Minutes, an FR* (Failed to Restore) Alarm Condition Alarm Event will be generated automatically by MKMSCS.
e.Because of this process, if the default Panel Zone with this Restoral Information is not appropriate, a separate FR* (Failed to Restore) CSID Zone record must be defined as follows.
i.FR* - You must also create an additional "Failed To Restore" CSID Zone - with FR* entered as the Signal Identifier and also selecting the FR* Alarm Condition
ii.Response Needed? - Check in the Response Needed? box of this FR* CSID Zone entry.
iii.Do Not enter a Physical Zone .
iv.Operator Action - Define the appropriate Operator Guided Response (i.e., Response Needed?, Verify Signal?, and Dispatch information) for this FR* CSID Zone entry.
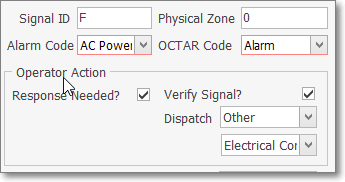
Operator Action for Other Response steps
▪Optionally, because this additional FR* record is a Response Needed? "Failed To Restore" Alarm Signal, if the fields that identify the normal Operator Guided Response (i.e., Response Needed?, Verify Signal?, and Dispatch as shown in the illustration immediately above) are not capable of providing the (Subscriber requested) appropriate instructions for the Operator, you may instead use a predefined Action Plan to dictate the exact Signal Processing steps that are required.
oSelect the Action Plans option on the CSID Zone tab's Ribbon Menu to display the Actions Plans For: dialog
oClick the ![]() Icon on the Actions Plans For: dialog's Ribbon Menu
Icon on the Actions Plans For: dialog's Ribbon Menu
oAction Plan - Use the Drop-Down Selection List to Choose the appropriate Action Plan for processing this "Failed To Restore" Alarm Signal.
oActive - By default, this field will be Checked
oDescription - Enter a brief description for this Action Plan entry
o Click the ![]() Post Icon to record this Action Plan entry
Post Icon to record this Action Plan entry
f.The Restoral Signal record containing the Signal ID (and optional Physical Zone) that is transmitted to indicate that everything has "restored to normal", must either be an existing Panel Zone or be defined as an additional CSID Zone record with the following data:
▪Response Needed? - Do not Check the Response Needed? box because this is actually a Passive Signal.
▪Signal ID - Enter the corresponding Signal ID representing the Restoral of the originating CSID Zone's Signal ID.
▪Zone - Optionally, enter the Physical Zone representing the Restoral of the originating CSID Zone's Physical Zone.
▪No data is entered in any of the Restoral Information fields.
➢Note: If the Signal ID (and optionally the Physical Zone) of the Restoral Information identified above is not defined as a separate and appropriate Panel Zone, or a special CSID Zone created for that purpose:
i.When this Restoral Signal is received, the Restoral Information's Signal Identifier (and optional Physical Zone) combination would be considered an Invalid Alarm.
ii.Furthermore, the proper recording of the Restoral will not occur, even if it is transmitted within the proper time frame.
•Restoral Information: Enter the data requested below to identify the appropriate Restoral Information for this CSID Zone.
✓Response Needed? - You do not Check the Response Needed? box for this CSID Zone (which is the one reporting the problem).
▪This is because by completing these Restoration Information fields, it eliminates the need for an immediate response.
▪Either the required Restoral Signal will be received within the allowable time frame (thus completing the Signal automatically), or the "Failed To Restore" Alarm Signal will be generated automatically.
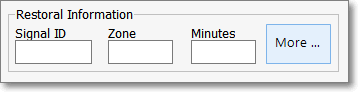
Restoral Information
✓Signal ID - Enter the corresponding Signal ID representing the Restoral of the CSID Zone's Signal ID entered above.
✓Zone - Optionally, enter the Physical Zone representing the Restoral of the CSID Zone's Physical Zone entered above.
✓Minutes - If this Alarm Condition is not to be reported to the Operator until after a specified number of minutes has passed (allowing the Subscriber's system to restore to its normal mode in a reasonable period of time), enter that number of minutes here.
▪If the Restoral signal has not been received within this time frame, a Failed to Restore (FR*) Alarm Event will be generated for the Operator indicating that the original Event or Alarm Signal was not restored within the appropriate time frame.
▪Additional Restoral Information may be entered (by Clicking the More... button), if required (see Restoral Information for more information).
✓This Restoral Information and the Cancel Information (see below) are also included with the CSID Zones on the Subscriber Information Form Report.
❑Cancellation Information Overview:
•For an Alarm Event or Signal which has a corresponding Cancel (Abort) Code that will transmitted by the Subscriber's communicator via a system reset/disarm action on their part.
a.The time the system waits for the Cancellation Signal to occur is measured (and entered) in Seconds.
b.The Alarm Signal is automatically placed on Hold in the Alarm Stack until that number of Seconds has passed.
c.If the Cancel Signal is received within the designated time frame, the original Alarm Signal is taken off of Hold, and Internally completed.
▪The Alarm Signal is Logged into the Subscriber's Alarm History table with the Cancel (Abort) Code information included.
d.If not Canceled within that time period, the Alarm Signal, which was placed on Hold in the Alarm Stack, will be reset to a Pending Alarm Signal.
▪The Alarm Signal is sent to the next available Operator in the normal manner.
e.In addition, the actual Cancel Signal record, containing the Signal ID (and optionally Physical Zone) that is transmitted, must also be defined as a CSID Zone.
▪Because this is a Passive Signal, the Response Needed? box should not be Checked for this Cancel Signal record.
➢Note: It is important to know that:
i.If an Operator manually pulls an Alarm Signal from the Alarm Stack that was previously placed on Hold pending receipt of the Cancel (Abort) Code,
ii.Then, if that Operator manually places it back on Hold,
iii.If (when) the Cancel (Abort) Code is subsequently received, it will cannot be processed automatically.
iv.Thereafter, it must be manually completed by an Operator
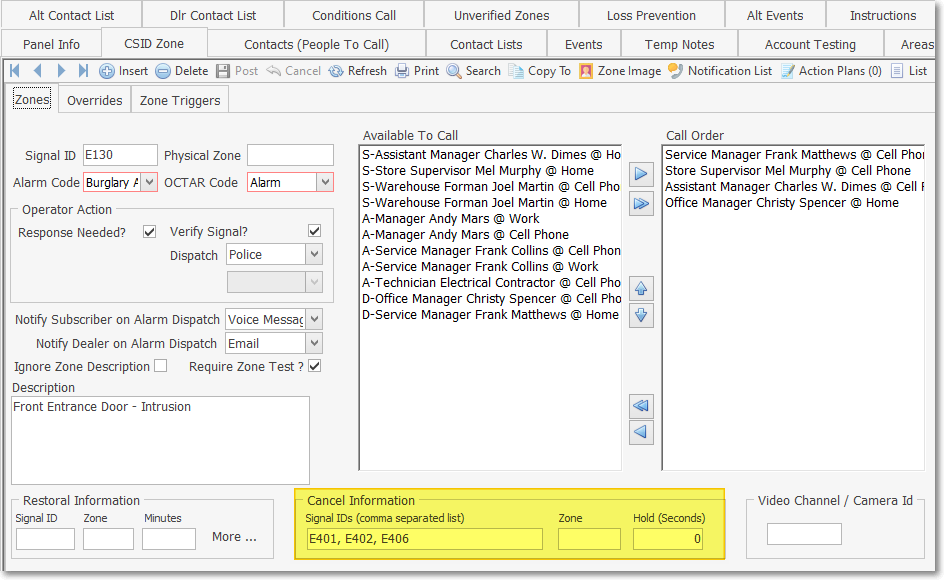
•Cancellation Information: Enter the data requested below to identify the appropriate Cancellation Information for this CSID Zone.

Cancel Information
✓Signal IDs (comma separated list) - Enter the specific Signal Identifier which would be displayed for the Operator to indicate that the previously reported emergency condition, defined above, has been canceled by the Subscriber via a system reset/disarm action on their part (e.g., a Cancellation Signal sent by the Subscriber's Control Panel).
❖There is an option in the SPA Setup - System tab titled Cancel Signals on Pending Status (if unchecked only Cancel while On Hold)
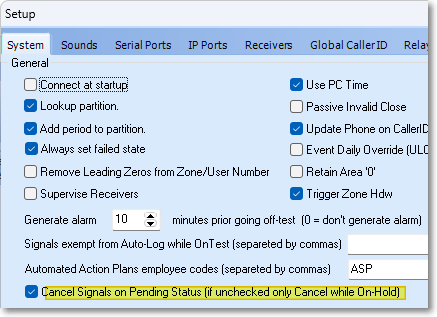
1.When not Checked, only those Signals which were Placed On Hold will be Canceled when the specific Cancel Signal entered in the Cancel Information Signal ID field in the CSID Zones Form is received.
2.Checking this box will enable the Cancel Signal on Pending Status feature. Once Checked::
a)Any number of Cancel Signal IDs may be entered in the Cancel Information Signal ID field in the CSID Zones Form for an Alarm Condition
b)Any Pending Burglar Alarm, Failed To Open, Failed To Test, or Failed To Close Alarm Condition received from the same Subscriber which has not yet been presented to an Operator (i.e., they are still in a Pending ("P") Status) will be Canceled (and Completed) automatically if/when any of the associated Signal IDs entered in the Cancel Information Signal ID field are received.
c)Each additional Cancel Information Signal ID entered in the Cancel Information Signal ID field must be separated by a comma.
✓Zone - Enter the Physical Zone Code, if one is transmitted with the Signal Identifier, which would be presented to the Operator indicating that the previously reported physical zone code, defined above, has been canceled by the Subscriber via a system reset/disarm action on their part (e.g., a Cancellation Signal Zone sent by the Subscriber's Control Panel).
✓Hold (Seconds) - Enter the number of seconds that the originating Alarm Signal should be placed on Hold (automatically) while awaiting a possible Cancel (Abort) Code from the Subscriber.
▪When the Cancel Signals on Pending Status feature outlined above has been implemented, always set the Cancel Signals on Pending Status value to '1'
•Click the ![]() Post Icon to record your entry.
Post Icon to record your entry.
✓This Cancel Information and the Restoral Information (see above) are also included with the CSID Zones on the Subscriber Information Form Report.
❑(Re-)Setting the Call List Order - Each Alarm Signal may have the Subscriber's default Call List Order altered for a specific signal based on that Subscriber's needs.
•Understanding how the correct Notification sequence (Call Order) of the available Contacts (People To Call) is determined when Processing an Alarm Signal:
✓This Call Order may be established for every Subscriber Panel CSID installed for every Subscriber on a case by case basis as outlined below:
1.The default sequence in which Contacts (People To Call) records were originally entered for a Subscriber Panel CSID.
2.The revised sequence established for a Subscriber Panel CSID using the Call Order Form.
▪All Global Call List entries available for this Subscriber Panel CSID may be used.
3.The specific Call Order established for an individual CSID Zone entered for a Subscriber Panel CSID.
▪All Global Call List entries available for this Subscriber Panel CSID may be used.
4.The specific Call Order established for an individual CSID Zone Override record entered for a Subscriber Panel CSID.
▪All Global Call List entries available for this Subscriber Panel CSID may be used.
5.The Call Order established in the CSID Zone Default Call List (CALL DEF) record entered for a Subscriber Panel CSID.
▪All Global Call List entries available for this Subscriber Panel CSID may be used.
•Available To Call - This list contains the Contacts (People To Call) associated with for the CSID for which this CSID Zone is created, plus any others Contacts available from the Global Call List members (see above), and represents the default order in which Operator Notifications should proceed until someone is successfully notified.
✓The Available To Call Names are listed by source and sorted alphabetically within each type as follows:
1)S - The Contacts (People To Call) entered specifically for this Subscriber;
2)A - The Alternate Contacts;
3)D - The Dealer Contacts.
CSID Zones - Available To Call & Call Order lists
✓With the Global Call List, the list of Names in the Available To Call column may contain all of the following, if that source is defined:
▪S - Contact - The Subscriber's Contacts (People To Call) for this CSID and/or
▪A - Alternate Call List - The Names associated with an Alternate Call List which is identified for this CSID in the Subscriber Panels section of the Central Station Data Form, and/or
▪D - Call List of Dealer - The Names associated with a CSID with the Call List for that Dealer for whom you are providing monitoring services this Account, which is identified in the Subscriber Panels section of the Central Station Data Form.
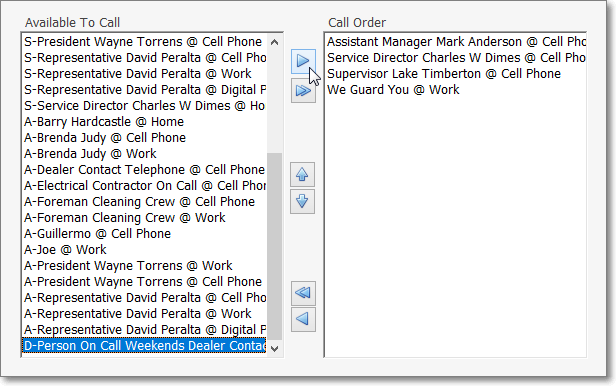
•(Re-)Setting the Call Order - The Call Order column displays the list of Contacts (People To Call) in the sequence (for this specific CSID Zone) in which the Operator should proceed with Notifications until someone is successfully contacted and notified.
a)Populate the Call Order List:
▪Select a Name from the Available To Call column and Click the right arrow ![]() to move that Name to the Call Order column.
to move that Name to the Call Order column.
▪To move all Names from the Available To Call column to the Call Order column Click the two-right-arrow cluster.![]()
b)Relocate a Name within the Call Order column
▪To establish the correct Notification sequence, You may move Names up and down the Call Order column by Selecting them, and then Clicking either the up or down arrow, as needed, to relocate then to the desired position.![]()
c)Remove a Name or Names within the Call Order column
▪Select a Name from the Call Order column and Click the left arrow ![]() to move that Name to the Available To Call column.
to move that Name to the Available To Call column.
▪To move all Names from the Call Order column to the Available To Call column Click the two-left-arrow cluster.![]()
•Click the ![]() Post Icon to record the revised Call List Order for this CSID Zone.
Post Icon to record the revised Call List Order for this CSID Zone.
❑Additional Options on the Navigation Menu for this CSID Zones Form:
•Delete - If a User attempts to delete a CSID Zone record, a Confirmation message will be displayed.
Delete this Zone?
✓Answer appropriately.
•Search CSID Zones - If you want to look up a specific CSID Zone, Click on the Search option on the Navigation Menu.
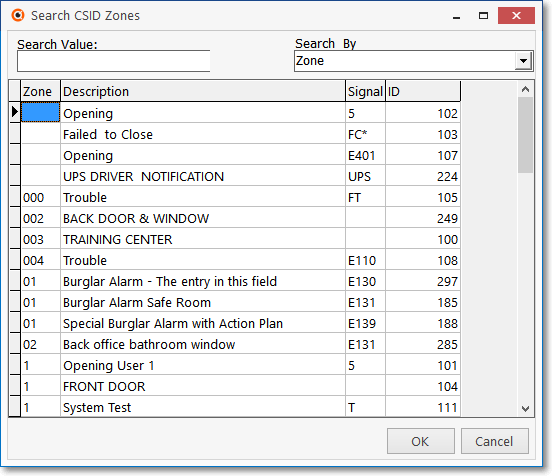
✓Search By - Select the method you'll use for this search with the Drop-Down Selection List provided.
▪Description - Search by the CSID Zone's Description.
▪Signal - Search by the Signal ID.
▪Zone - Search by the Physical Zone.
▪ID - Search by the actual Record Number
✓Search Value - Enter the appropriate characters to locate the desired CSID Zone.
✓Click on the desired CSID Zone record.
✓Click OK to select the record and return to the CSID Zones Form.
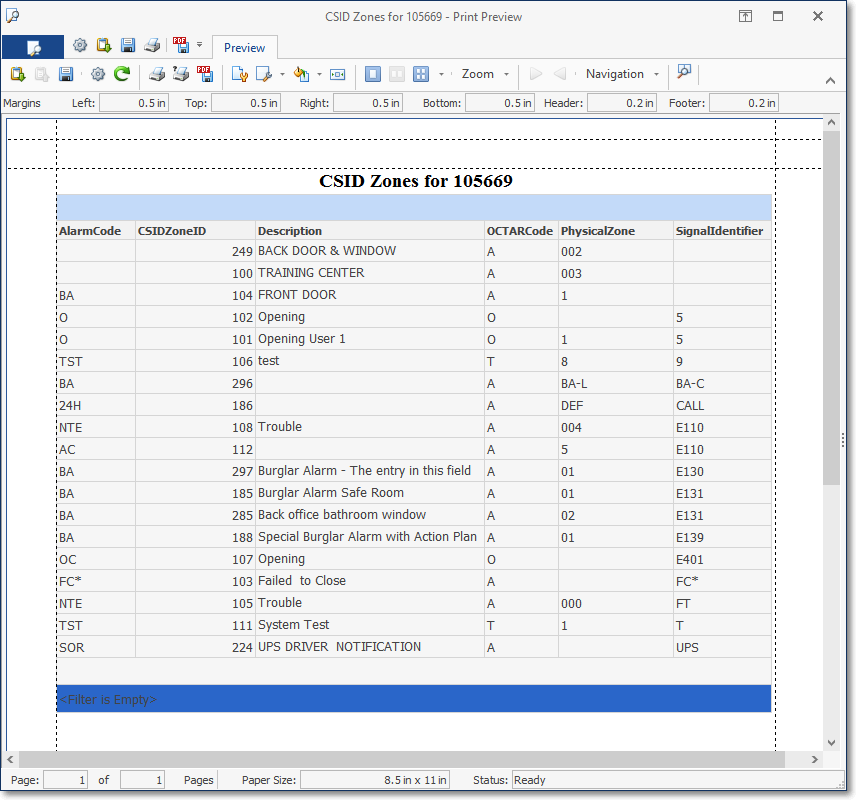
•Print - Click on the Print option on the Navigation Menu to create a simple listing of the CSID Zones defined for this Subscriber.
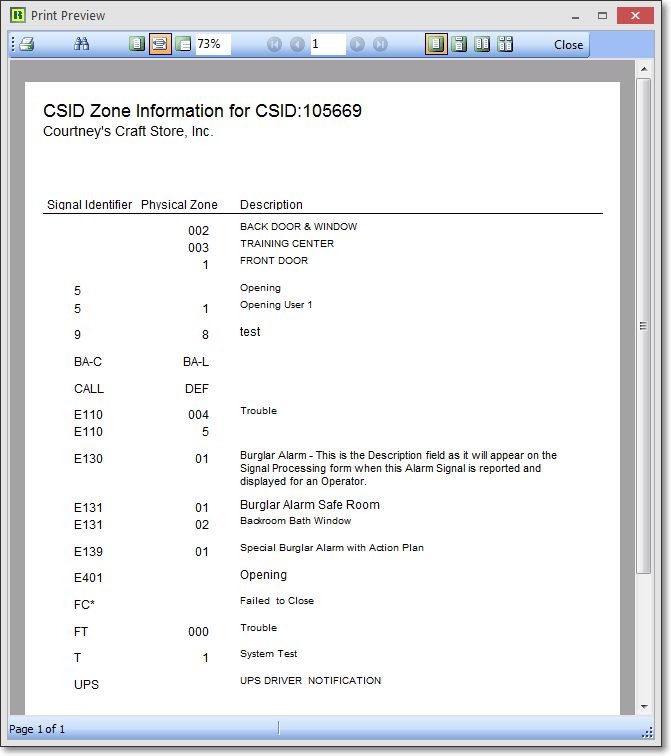
Print Icon - CSID Zone Information Report - Print Preview
•Copy To... - You may copy all of the CSID Zones defined for one Subscriber Panel's CSID, to another Subscriber Panel's CSID (either to a different CSID installed at the Same Subscriber's premises, or to a Subscriber Panel's CSID for a completely different Subscriber).
✓Click on the Copy To option on the Navigation Menu
✓It will display the Select CSID dialog.
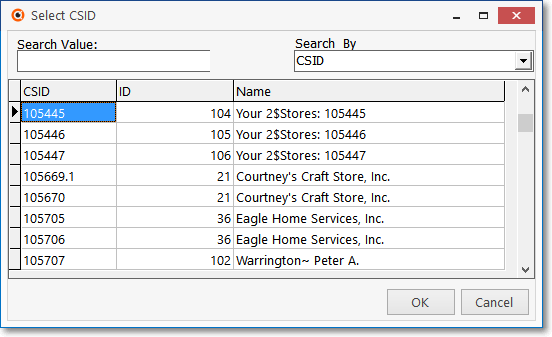
✓Search By - Select the method you'll use for this search with the Drop-Down Selection List provided.
▪CSID - Search by the CSID.
▪ID - Search by the actual internal record number.
▪Name - Search by the Subscribers Name.
✓Search Value - Enter the appropriate characters to locate the desired Subscriber to which you want to copy the currently selected CSID Zones.
✓Click on the desired Subscriber's CSID record.
✓Click OK to select the record to copy to, and then return to the CSID Zones Form.
•Zone Image - You may add an image file - which will be available to the Operator - illustrating this specific CSID Zone.
✓Click on the Zone Image option on the Navigation Menu.
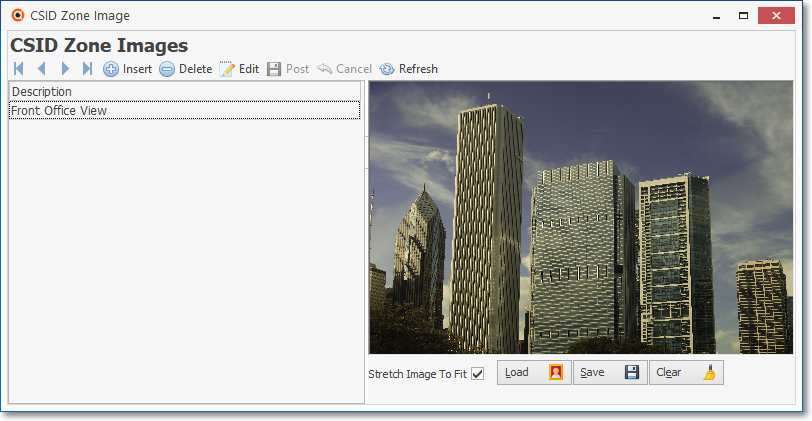
CSID Zone Images dialog
✓Add - Click the ![]() Icon to start loading Zone Image.
Icon to start loading Zone Image.
✓Description - Enter a brief description of the image.
✓Stretch Image to Fit - Check this box if the image you will select is small, and you want it to fill the allowable space.
✓Load - Click the Load button. This will display the standard Windows® Files Locator dialog.
▪The Image file you choose must be a ".BMP" file saved with 256 colors (or Less) and be no larger than 64K.
▪The file representing your CSID Zone must be on your Computer (or, if you're using a Networking System, on the File Server where MKMS is installed).
✓Save - Click the ![]() button to save the currently selected image.
button to save the currently selected image.
✓Clear - Click the Clear button to remove the currently selected image.
•Notification List - For MKS Connect Service users:
✓Each CSID Zone (and/or CSID Zone - Override entry) may have an additional Notification List to be used for an Event/Alarm Signal Notification for this signal, as needed.
✓When an alarm signal is received that matches the CSID Zone's (or Panel Zone's) Signal ID and Physical Zone combination, a Notification (via the communication Type identified below) is initiated.
✓To view and/or update the Notification List for this CSID Zone Click on the Notification List Icon on the Ribbon Menu.
✓Add - Click the ![]() Icon to create a new record.
Icon to create a new record.
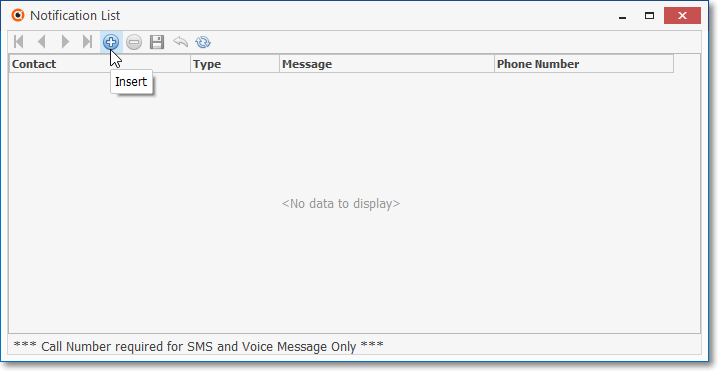
Notification List dialog
▪Contact - Use the Drop-Down Selection List to Choose the person or entity to contact from those entered on the Call Numbers section of the Contacts (People To Call) Form

Notification List dialog - Contact Drop-Down Select List
oSelect only those Contacts who have the necessary Type of communication capability defined on the Call Numbers section of the Contacts (People To Call) Form.
oGlobal Call List entries (which - in addition to or in lieu of the Subscriber's Contacts - include the Alternate Call List and Dealer's Call List assignments, if defined) are also available in the Notification List selection.
▪Type - Use the Drop-Down Selection List to Choose the communication method (i.e., Email, Pager, SMS, Voice Message, or RS232) for how this message is to be sent.
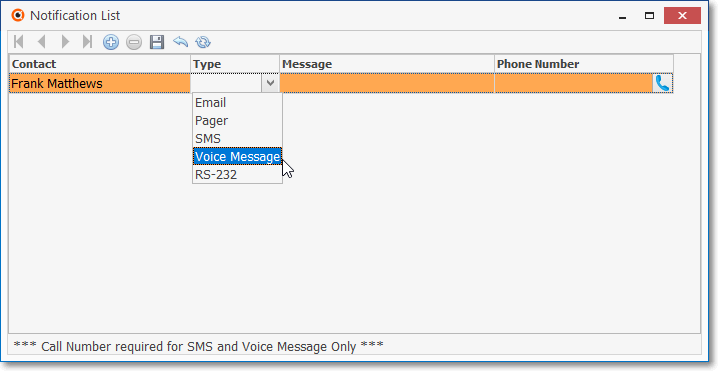
Notification List dialog - Type Drop-Down Select List
▪Message ID - Use the Drop-Down Selection List to Choose the appropriate Predefined Message that is to be transmitted when needed.
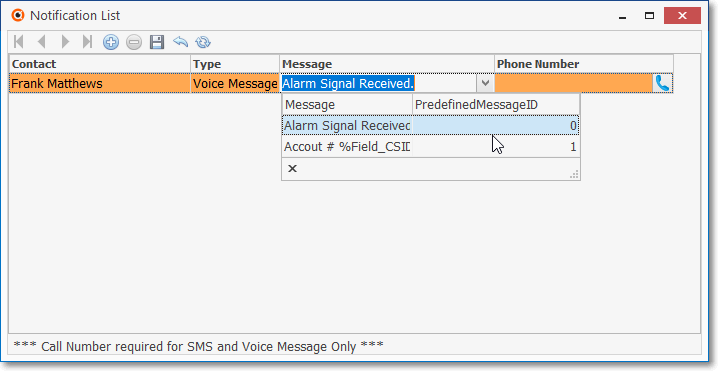
Notification List dialog - Message Drop-Down Select List
▪Phone Number - If SMS or Voice Message was chosen as the communication method Type,
oClick the Phone Icon to the right of the Phone Number field to open the Select Call Number dialog
oLocate and Select the desired Phone Number (with the required Type)
oPress OK
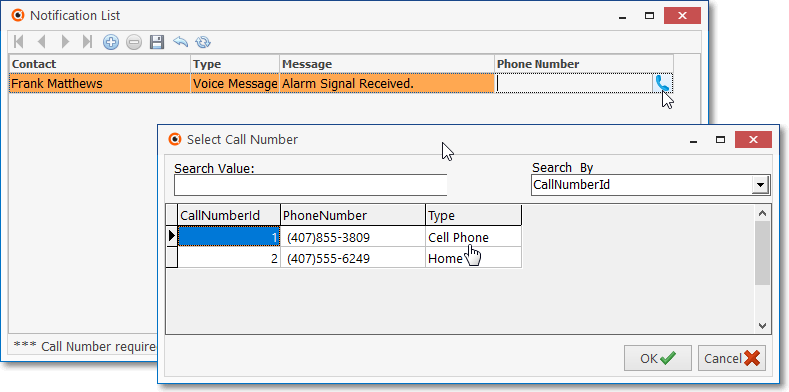
Notification List dialog - Phone field Icon - Select Call Number Dialog
✓Save - Click the ![]() Icon to save the entry.
Icon to save the entry.
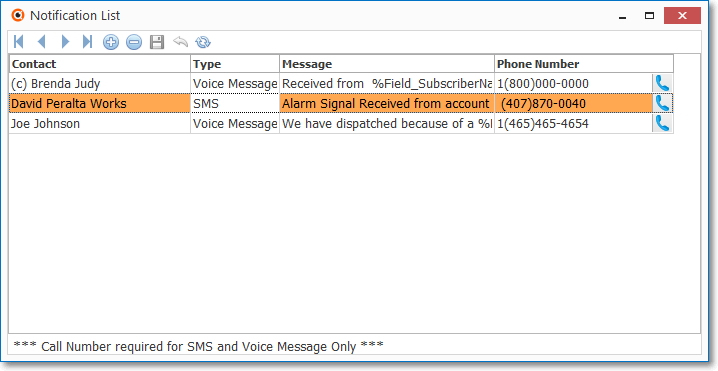
Notification List dialog - with entries
•Action Plan Icon - If there is a Response Needed for this Alarm Signal and the normal Operator Guided Response is incapable of providing the appropriate instructions for the Operator, you may instead use a predefined Action Plan to dictate the exact Signal Processing steps that are required.
✓Assign the appropriate Action Plan to any CSID Zone when the Response Needed for this Alarm Signal is to be managed by a predefined Action Plan.
▪Select the Action Plans Icon on the CSID Zones tab's Ribbon Menu to display the Actions Plans For: dialog

CSID Zone Form - Action Plan Icon - (1) selected
▪Click the ![]() Icon on the Actions Plans For: dialog's Ribbon Menu
Icon on the Actions Plans For: dialog's Ribbon Menu
▪Action Plan - Use the Drop-Down Selection List to Choose the appropriate Automated System Action Plan for processing this Alarm Signal.
▪Active - By default, this field will be Checked
▪Description - Enter a brief description for this Action Plan entry
▪Click the ![]() Post Icon to record this Action Plan entry
Post Icon to record this Action Plan entry
✓The Action Plans Icon will show the number of Action Plans assigned [in this case (1) ]
•List - This option displays a tabular view of the CSID Zone records.
✓Click on the List option on the Navigation Menu.
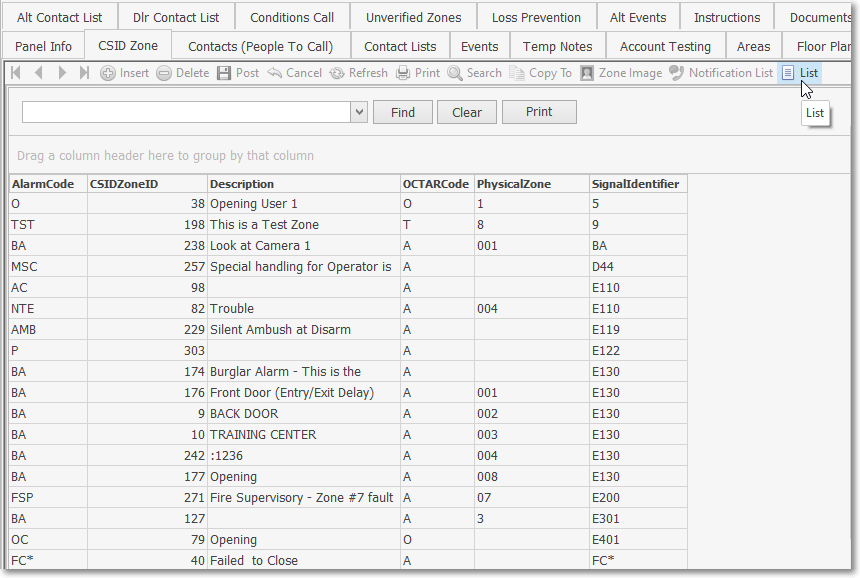
✓Click the List Icon to display the associated Grid Data.
✓The columns of Grid Data may be rearranged, filtered, and sorted.
✓Find - Enter text to search for a specific record, then Click the Find option.

▪Click on the Enter text to search... field and enter characters that best represent the specific record that you are searching for.
▪This is an incremental search from left to right.
▪As you type, based on the data type you've chosen, the record(s) that most closely matches your entry will be highlighted.
▪Click on an Account Testing record to Choose that record.
✓Clear - To remove the text to search for entry, Click the Clear option
✓Print - To display the Print Preview dialog of the contents of the CSID Zones List, Click the Print option.
Print Preview - CSID Zones
✓Click the List Icon again to return to the Record Editing section.
❖See the Grids - Print Preview - Export Data chapter for additional information about using the List option
❑CSID Zone Overrides - The Overrides tab on the CSID Zones Form allows you to modify the default CSID Zone procedures based on certain Days, or Times within those days, including Signal Processing Procedures, Action Plans, and Restoral and Cancel Information that was established for the selected CSID Zone.
1.See CSID Zone Overrides for more information.
2.See Signal Processing Order to better understand how SPA and MKMSCS attempt to validate an Alarm ( Event, Test, Restoral) Signal before declaring it an Invalid Alarm.

Overrides tab on the CSID Zones Form