❑Understanding the Areas feature:
•When a Subscriber's premises has an Alarm System installed in such a way as to be able to sub-divide sections of that premises into separate Areas (often referred to as Partitions).
✓These sub-divided sections allow each such division to be identified as a separate, unique, supervised Area.
✓The result is that each of these individual sections (Areas) may then be monitored as separate "systems" within the Alarm System as a whole.
•Areas are used to accommodate this need and are implemented as follows:
a)Area(s) are defined for a specific CSID (with each CSID identified in the Subscriber Panels section (within the Edit View's Monitoring tab).
b)Areas do not represent the Subscriber's premises as a whole, but instead represent a specifically sub-divided section of that Subscriber's premises.
c)Each Area may therefore be monitored individually, Armed and Disarmed individually, and have Opening, Closing, and Other types Events Supervised individually, as well as Test Events.
•By appending the Area (Partition Number) to the "root" CSID, each "root" CSID being monitored at the Subscriber's premises may also have one or more CSID.Partition or CSIDPartition combinations (Areas) defined in the Panel Info tab within the Subscriber Panels section of the Central Station Data Form.
✓These additional Area definitions identify the Alarm System's Partitions for SPA and also allows for specific Contacts (People To Call), Events, Tests, CSID Zones, etc. to be entered for each Area.
✓Areas defined, using either the CSID.Partition or the CSIDPartition Lookup Format (as selected in the Setup Form within SPA), must also be defined in this Areas Form.
✓When a CSID for an Area is identified in the Panel Info tab of the Subscriber Panels section, the "root" CSID should also be entered as a separate record in the Panel Info tab.
✓If Area information (a Partition Number) is received which has not been defined either as a CSID.Partition or the CSIDPartition, the information related to the "root" CSID will be used to process the signal.
➢Note: A word of caution is required here if your Central Station has Subscribers who are reporting the Areas within their Alarm System.
i.Unless each Area Number and Description - for each CSID listed in the Subscriber Panel section that was identified using either the CSID.Partition or the CSIDPartition format - is defined in the Areas Form associated with that CSID selected in the Subscriber Panels section, when Alarm Signals are actually received, the correct Description of that Area will not be displayed for the Operator, or included in the Alarm History for that Subscriber.
ii.If you are using the Areas feature, the SPA Setup System tab Form within SPA must indicate how you want Area (Partition) information reported to MKMSCS, and the format in which the Area (Partition) should be reported.
iii.The Alarm System and the Receiver must both have the capability to transmit the Area (Partition) Number to SPA.
❑Implementing Monitored and individually Supervised Alarm System Partitions:
•Lookup partition - Check the Lookup partition box in the SPA Setup System tab to notify SPA that Partitions may be reported by one or more of the Receivers.
•Add period to partition - Check the Add period to partition box in the SPA Setup - System tab to notify SPA to insert a Period (.) between the "root" CSID and the Partition (Area) Number reported by the Receiver.
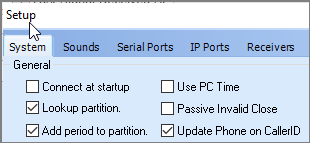
SPA Setup Form - System tab - Partition options
•Enter the required CSID and Partition information:
✓Each of the CSIDs that are Partitioned will be defined in the Panel Info tab and listed in the Subscriber Panels section of the Central Station Data Form.
✓The CSID's Partition definitions follow either the CSID.Partition or the CSIDPartition Lookup Format based on what is entered in the SPA Setup System tab (as explained immediately above).
✓Areas records must be defined for each CSID.Partition or CSIDPartition listed in the Subscriber Panels section of the Central Station Data Form.
✓For each of the CSID.Partition or CSIDPartition combinations entered, one of these two options is available:
i.Specific Contacts (People To Call), Events, Tests, CSID Zones, etc. may be assigned for each Area, or
ii.A Master CSID may be assigned to the CSID and Partition combination defined in the Panel Info tab.
•To access the Areas Form:
✓Open the Subscribers Form.
✓Retrieve (F2 Search) the appropriate Subscriber record.
✓Select the Edit View Icon.
✓Choose the Monitoring Tab and locate the Subscriber Panels section.
✓Select the appropriate CSID (which was previously entered in the Panel Info tab)
✓Click the Areas tab.
•The Areas will be displayed
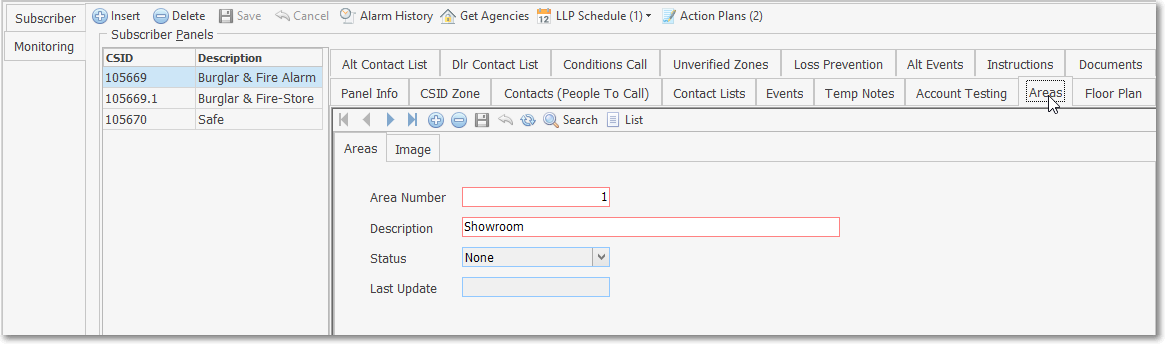
Subscriber Panels section - Areas Form
✓This Areas Form may be Re-sized by Dragging the Top and/or Bottom up or down, and/or the Right side in or out.
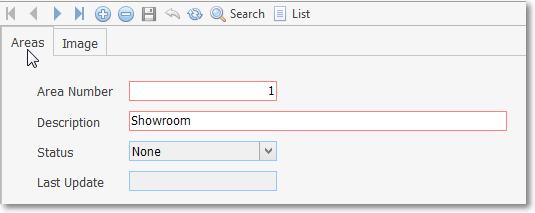
•Navigation Menu - The Navigation Menu is located at the top of the Areas Form.
![]()
✓This Navigation Menu provides the normal Record Movement, New, Delete, Save, Cancel, and Refresh options; as well as a Search and List function.
•In the Record Editing section in the center (Main Body) of the the Areas Form there are two sub-tabs:
Areas sub-tab
1.Area sub-tab - The details of the currently selected Area record are displayed below the Navigation Menu in the center (Main Body) of the Areas Form and is where an Area is initially defined.

Image sub-tab
2.Image sub-tab - The Image of the currently selected Area record may be attached and viewed within this tab (see the "Image for an Area record" section below. This sub-tab may be used to store an Image of the Floor Plan or other important Imagery.
❑To enter an Area record, Select the Edit View tab in the Record Editing section.
•Click the ![]() Icon to start the Area entry.
Icon to start the Area entry.
✓Area Number - Enter the area number that will be transmitted with the Opening/Closing supervised Event Signal.
✓Description - Enter a concise description of this system's area or partition.
•Click the ![]() Icon to record this Area entry.
Icon to record this Area entry.
✓Status - Initially set at None until the first valid Opening/Closing signal is received, then automatically updated each time a supervised Event is reported.
✓Last Update - The most recent date and time is automatically updated each time a supervised Event is reported by this Area for this Subscriber.
•Repeat this data entry procedure until you have identified all of the Areas for this Subscriber.
❑Image for an Area record - Select the Image tab in the Record Editing section to attach a Photographic Image or Floor Plan of each Area
•This Image may be viewed by an Operator while Processing an Alarm.
•To import and save an Image:
Image tab on the Areas Form
✓Click the Load button.
▪Using the standard Windows® dialogue box provided, locate and Select the desired file.
▪The image will be inserted into the Image tab.
✓If you are satisfied with the Image, Click the Save button to store it in the Areas table.
✓If not, Click the Clear button and repeat the Load, View, and Save process after re-sizing or otherwise modifying the Image, as needed.
✓Only one Image may be stored for each Area record.
❑Using the Search Function on the Navigation Menu at the top of the Areas Form:
•Search - Click the Search Icon to open the Search Areas dialog.
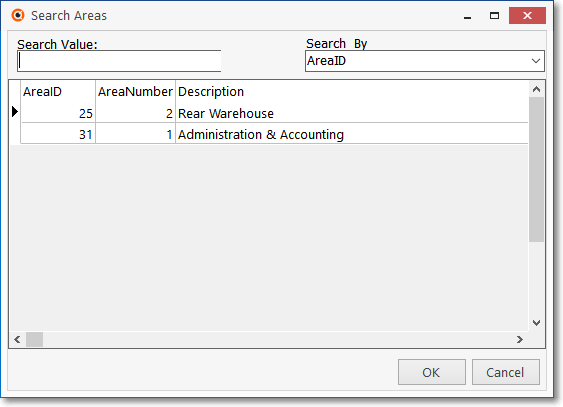
Search Areas dialog
✓See the "Using the Generic Search dialog" section in the Advanced Search Dialog chapter for more information about this Search dialog.
•List - To view a tabular list of the Area records:
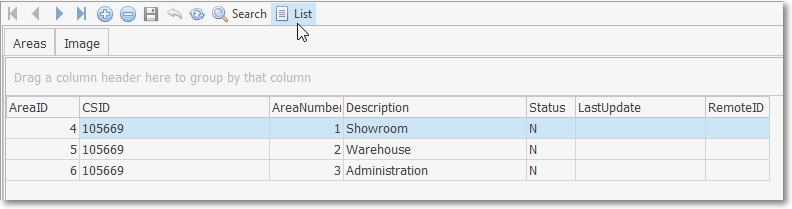
Areas Form - List View
✓Click the List option to display the associated Grid Data.
✓The columns of Grid Data may be rearranged, filtered, and sorted.
✓Click on an Area record to Choose that record.
✓Click the List option again to return to the Record Editing section.
❖See the Grids - Print Preview - Export Data chapter for additional information about using the Grid