❑The Town Codes Form is used to define the governmental entities that provide the majority of the Security Response Services requested during a Dispatch.
•Whether because a local government will not respond to alarm notifications by Central Stations (resulting from an Excessive False Alarm issue, or simply a policy and/or budget decision), or because of an Insurance Company or UL® requirement, in some areas, or for certain Subscribers, a private Security Company provides these Security Response Services.
➢Note: For any Accounts using a Security Company for their Alarm Response,
a)The Central Notes information entered on the Central Station Data Form should clearly reflect this Security Company response requirement.
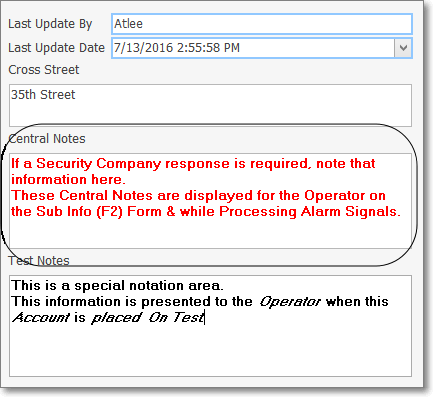
Central Station Data section - Central Notes field
oCentral Notes - This populates the Comments field on the Sub Info (F2) Form and is displayed for the Operator as an Alarm Signal is being Processed.

MKMS Sub Info Form - Comments field contains Central Notes entry
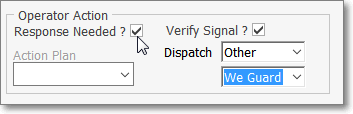
b)The CSID Zone records defining these Alarm Signals should be Checked Response Needed? and have <Other> selected for the Dispatch type.
c)The Security Company's emergency contact number (see Dispatch in the "Phones" section below) may also be entered in the Subscriber's People To Call list.
d)Select the record representing the appropriate Security Company when defining who is to be contacted for the <Other> response identified on the CSID Zone Form.
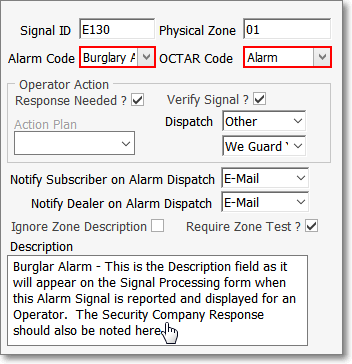
CSID Zone - Description field - Security Company notation
e)The CSID Zone's Description field should also clearly reflect this Security Company response requirement.
•To Access the Security Companies Form:
a)From the Backstage Menu System Select Maintenance and Choose the General option, then select the General Maintenance option which displays the secondary Maintenance Menu, or
b)From the Quick Access Menu, Select Maintenance and Choose General Maintenance to display the secondary Maintenance Menu.
✓Once the Maintenance Menu is displayed, Choose the Monitoring sub-menu, then Click on the Security Companies option.
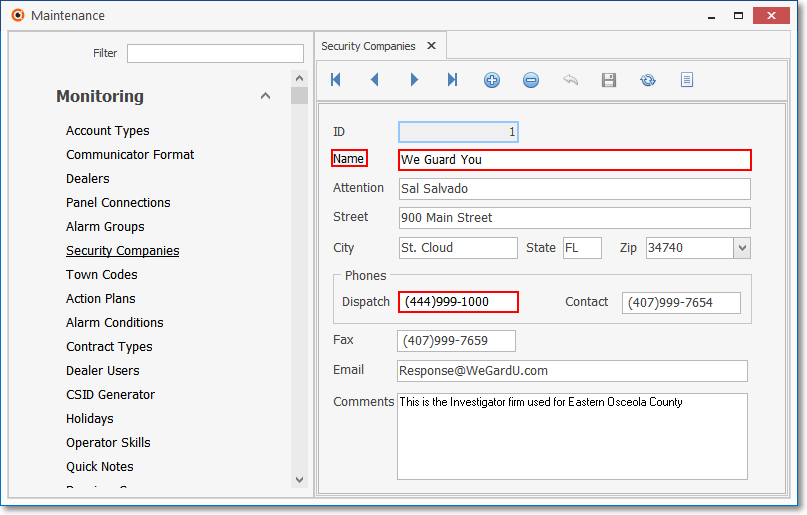
Security Companies Form
✓This Security Companies Form may be Re-sized by Dragging the Top and/or Bottom up or down, and/or the Right side in or out.
•Navigation Menu - The Navigation Menu is located at the top of the Security Companies Form.

✓This Navigation Menu provides the normal Record Movement, New, Delete, Save, Refresh, and List options.
•Record Editing section - The details of the currently selected record are displayed below the Navigation Menu at the center (Main Body) of the Security Companies Form.
Security Companies Form - Record Editing section
•To define the required Security Companies:
✓Click the ![]() Icon to start the Security Company entry in the Record Editing section.
Icon to start the Security Company entry in the Record Editing section.
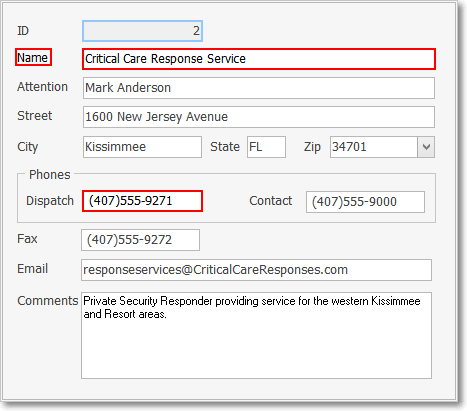
✓ID - The record number is assigned by the system when the Security Company entry is initially saved.
✓Name - Enter the Name of the Security Company as it should appear on screen, and on the Alarm Ticket.
✓Attention - Enter the primary Contact person for this Security Company.
✓Street - Enter the (building number and street name) Address where this Security Company is located.
✓City - Enter the City where this Security Company is located.
✓State - Enter the State code abbreviation where this Security Company is located.
✓Zip - Enter their Zip Code for where this Security Company is located.
✓Phones - Enter the contact information as requested below (if available).
▪Dispatch - Enter the Telephone Number to be dialed by the Operator when a Dispatch of this Security Company is required.
oIf no Area Code is required, enter the telephone number (it cannot start with a 1 and the dash between the third and fourth number will be inserted automatically).
i.If 10 digit dialing is in effect - no "1"prefix is needed, but you do need to dial an Area Code as part of the telephone number:
ii.Press the <Space Bar> first.
iii.Then enter the three digit Area Code.
iv.Finally, enter the seven digit Telephone Number.
v.Correct formatting will be inserted automatically.
oLong distance Telephone Numbers (with a "1" prefix) are entered as such with the formatting parentheses and dash applied automatically.
▪Contact - Enter the Telephone Number to be dialed to contact this Security Company for non-emergency purposes as outlined above.
✓Fax - Enter the Telephone Number to be dialed to transmit a Fax of an Alarm Ticket, and other necessary information to this Security Company.
✓EMail - Enter the (email) Address to be used to send any security related emails to this Security Company.
✓Comments - Enter any additional explanatory notes or comments relating to this Security Company entry.
✓Click the ![]() Icon to record this Security Company entry.
Icon to record this Security Company entry.
✓Repeat this process, as needed, to define each Security Company service provider.
![]() List Icon - The Navigation Menu also has a List option which provides a tabular view of these Security Company records.
List Icon - The Navigation Menu also has a List option which provides a tabular view of these Security Company records.

Security Companies Form - List View
✓Some columns may contain expanded comments or other information which may make the List View's display somewhat difficult to use.
Ø - Click the Asterisk at the left of the row of Header Names to display a Drop-Down Check List of each column's Headed Name.
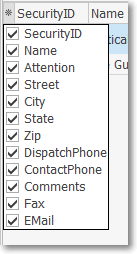
▪Check any Header Name to be included in the List View (by default, All Header Names will be Checked)
▪Remove the Check for any Header Name (see illustration below) that is to be removed from the List View.
✓Click the List Icon to display the associated Grid Data.
✓The columns of Grid Data may be rearranged, filtered, sorted, and exported as a PDF file and/or an Excel formatted file.

✓Find - Enter text to search for a specific record, then Click the Find option.
✓Clear - To remove the text to search for entry, Click the Clear option

Navigation Menu shown with the List Options for Export & Print
✓Click the List Icon again to Close the List View and return to the Record Editing View.
❖See the Grid & Lists - Print Preview - Export Data chapter for complete information on using the List View, including its Export & Print options.