❑As an Alarm Signal is being processed by an Operator, the active Call Order - the one to be used for the Notification step - is derived from one of five sources:
1.The order in which the People To Call were entered originally.
2.The revised order for People To Call re-set in the Call Order Form.
3.The special Call Order established in a CSID Zone record.
4.The special Call Order established in a CSID Zone Override record.
5.The special Call Order established in the CSID Zone Default Call List in that CSID Zone record.
➢Note: See the Call Order Tab for a complete discussion relating to the sequence in which Notifications are made.
Also see the Contact Lists and Schedules chapters with additional information on using the Contacts (People To Call) for other contact methods (see If the Contact Lists functionality is in use immediately below).
❑If the Contact Lists functionality is in use (i.e., this Subscriber Panel has Contact List(s) defined and the Alarm Signal being processed matches the parameters of a Contact List entry,
1.The order in which the Contacts (People To Call) were originally entered
2.Any Before Dispatch request from a Contact List matching the parameters in that Contact List and the assigned Schedule
3.Any After Dispatch request from a Contact List matching the parameters in that Contact List and the assigned Schedule
4.The revised order for Contacts (People To Call) re-set in the Call Order Form.
5.The special Call Order established in a CSID Zone record.
6.The special Call Order established in a CSID Zone Override record.
7.The special Call Order established in the CSID Zone Default Call List in that CSID Zone record.
➢Note: See the Call Order tab chapter for a complete discussion on how to set the sequence in which Notifications are made.
Also see Contact Lists information to understand that feature's capabilities.
❑The Monitoring of Alarm Systems requires that:
a.Police Departments, Fire Departments, Emergency Medical Services - which are identified in the Town Codes Form - may be Dispatched, and/or other specialty service responders (e.g., Security Companies) are also able to be identified so they may be Dispatched when required, and/or
b.Before Dispatch and After Dispatch Contacts may be identified as needed (see Contact Lists), and/or
c.Provisions for the Notification of a "third party" are available when there has been an emergency which requires they be notified, and perhaps to also respond in some manner.
•Different types of emergencies may require different sets of people be notified. These may include any combination of:
i.Family members.
ii.Friends and Neighbors,
iii.Specialty service providers,
iv.Designated Company Employees,
•Because there are many types of emergencies (i.e., Alarm Conditions), each alarm event may require that those who are being notified, are contacted in a different sequence.
✓In some case, this "third party" call may be the only notification that occurs.
•To accommodate this need, an appropriate list of People To Call must be maintained for each Subscriber, and/or each Subscriber Panel CSID, for whom the Central Station is providing monitoring services.
❖Contact List information may also be defined for any Subscriber Panel CSID for whom your Company provides Monitoring Services.
•The tabs and sub-tabs on the Contact Lists Form provide the interface to:
1.Create Contact Lists for specific Purposes, that will be used for Contacts which, among other purposes, are to be made prior to or instead of a Dispatch, and/or after a Dispatch has been completed
2.Assign List Members (selected from the list of Available Contacts) to a designated Contact List
3.Assign a Contact List to:
a.An existing Schedule for permanent usage, or for specific Days and/or Times, and Alarm Events
b.A newly created Schedule for permanent usage, or for specific Days and/or Times, and Alarm Events
4.Assign a Schedule to an individual Contact, and/or member(s) of an Alternate Call List, and/or Dealer Call List
❑The Contacts tab on the Contacts (People To Call) Form contains the names, telephone numbers, and other important information for each Contact needed while Processing Alarms and for other purposes.
•To access the Contacts (People To Call) Form, open the Subscribers Form and Retrieve (F2 Search) the appropriate Subscriber record.
✓Select the Edit View Icon and Choose the Monitoring Tab and locate the Subscriber Panels section.
✓Select the appropriate Subscriber Panel's CSID.
✓Click on the Contacts (People To Call) tab.
✓Select the Contacts sub-tab.
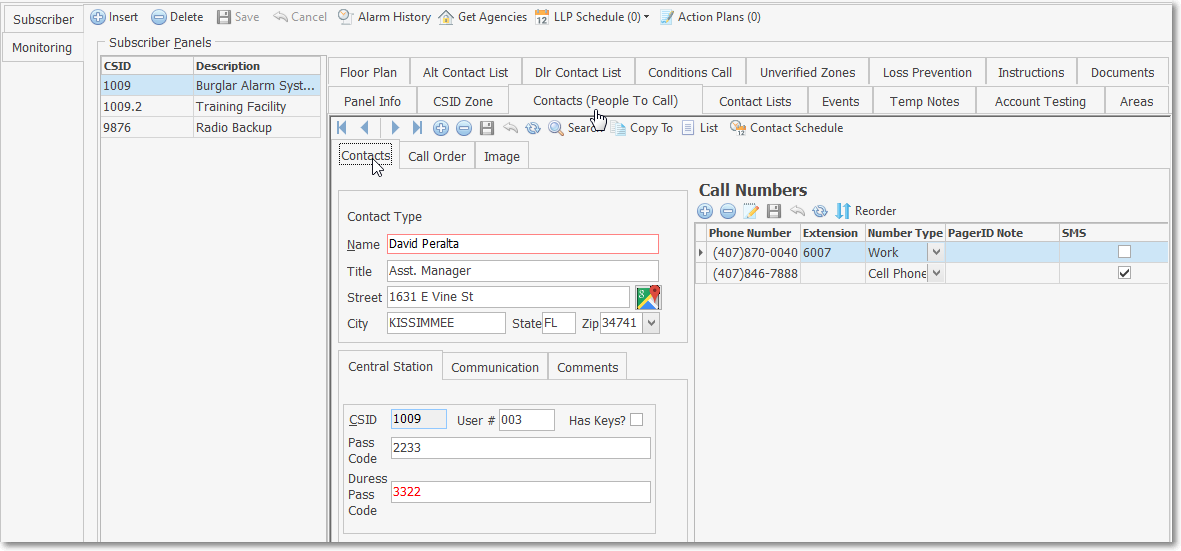
Subscriber Panels section - Contacts (People To Call) tab - Contacts sub-tab showing its Central Station tab
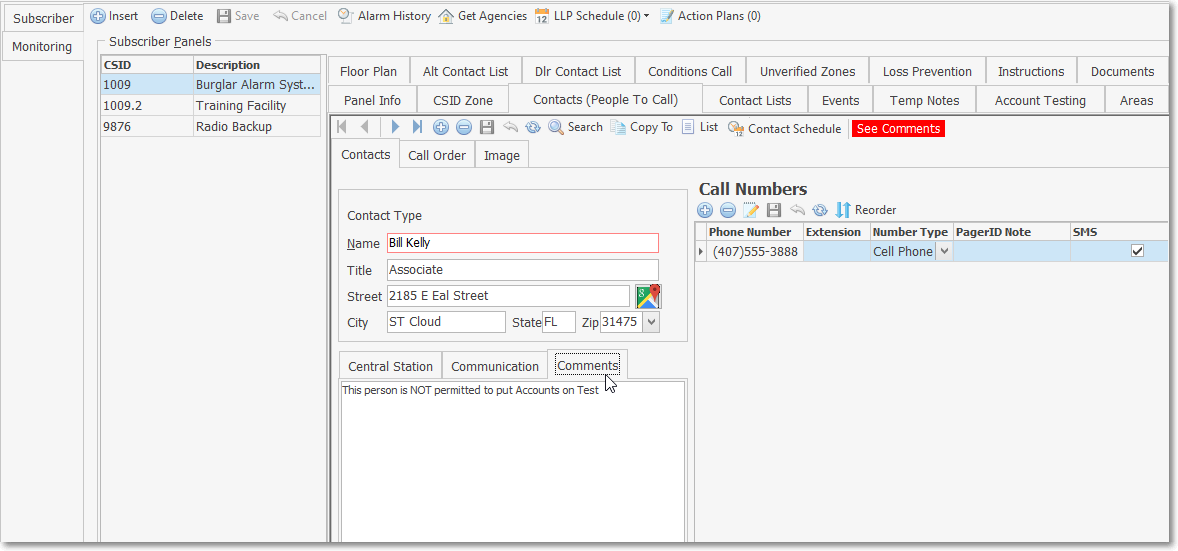
Subscriber Panels section - Contacts (People To Call) tab - Contacts sub-tab showing its Comments tab
•The Contacts (People To Call) tab, with the Names and Contact Information that were entered for the selected Subscriber Panel's CSID, will be displayed
✓This Contacts (People To Call) tab may be Re-sized by Dragging the Top and/or Bottom up or down, and/or the Right side in or out.
•Navigation Menu - The Navigation Menu is located at the top of the People To Call tab.
![]()
✓This Navigation Menu provides the normal Record Movement, Add, Delete, Save, Cancel, and Refresh options; as well as the special Search, Copy To, List and Contact Schedule functions.
✓If a Comment has been entered for the currently selected contact, a See Comments message is flashed.
•Record Editing section - The details of the currently selected record are displayed below the Navigation Menu of the Contacts tab of the Contacts (People To Call) tab.
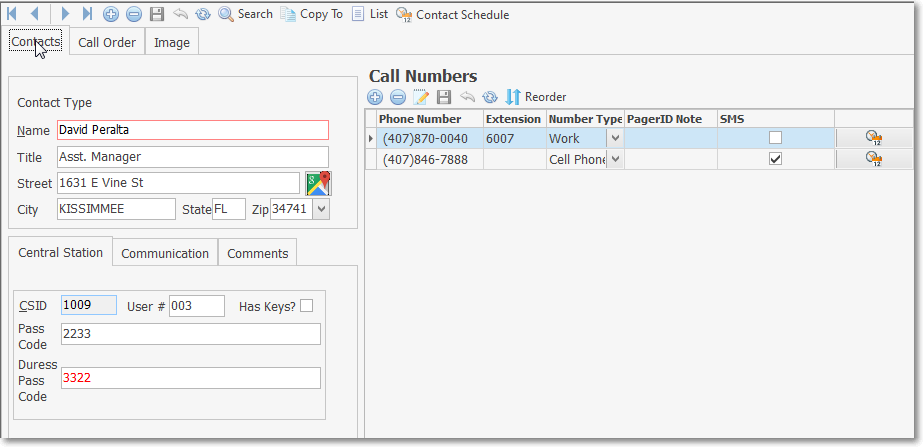
Contacts tab - Record Editing section
➢Note: The purpose of assigning a Master CSID to a Subscriber Panel's CSID is to avoid having to enter more than one set of CSID Zones, Contacts (People To Call) records, and/or Events for a Subscriber.
For those Subscribers with multiple CSIDs defined, using the Master CSID feature explained in the Subscriber Panels chapter, you may:
a)Create one set of Contacts for a specific Subscriber Panel CSID.
b)Assign that CSID as the Master CSID to any other Subscriber Panel CSIDs being monitored for that Subscriber.
c)Each of the CSIDs to which that Master CSID has been assigned, will "inherit" all of the Contacts (CSID Zones and Events) entered for the Master CSID.
❑Entering the Contacts: On the Navigation Menu located the Ribbon Menu at the top of the Contacts tab
•Click the Insert ("+") Icon to start the entry.
![]()
✓These Contacts are only being entered for the currently selected Subscriber Panel CSID (unless this CSID is identified as the Master CSID (see ØNote above).
•Contact Type Section:
✓Name - Enter the Name - as the Operator should normally say it.
✓Title - Enter the appropriate title of this individual, if needed.
▪The same person may have many telephone numbers defined.
▪However, if there is more than one individual with this same Name, be sure to enter a different Title for each person with that Name.
✓Street - Enter the person's street address.
✓City - Enter their city.
✓State - Enter the state.
✓Zip - Enter the zip code.
•Click the ![]() Icon to record this Contact entry.
Icon to record this Contact entry.
❑Call Numbers - Enter as many contact Telephone Numbers for this individual, as are available and appropriate.
•Click the ![]() Icon to start a new Call Numbers entry
Icon to start a new Call Numbers entry
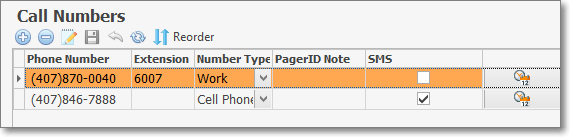
Contacts (People To Call) - Contacts tab - Call Numbers section
•Phone Number - Enter the telephone number following the rules below.
➢Note: If you have not Checked Remove Phone Formatting in User Options Form's Company Options tab, Formatting - parentheses and dashes - is applied automatically by the system - you do not have to type them
▪If no area code is needed, enter the telephone number (it cannot start with a 1)
▪If you have 10 digit dialing where no "1"prefix is needed, but you do need to dial an area code as part of the telephone number:
oPress the <Space Bar> first.
oEnter the three digit area code.
oThen enter the seven digit telephone number.
oCorrect telephone number formatting will occur automatically.
oLong distance numbers (with a "1" prefix) are entered as such with the formatting parentheses and dash supplied automatically
•Extension - Enter the appropriate extension number (up to 8 characters), if required.
•Number Type - Use the Drop-Down Selection List to Choose the type (or location) of this Telephone Number.

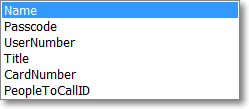
Number Types
•Pager ID Note - If using a Pager for contact, enter Pager ID information, when required.
•SMS - Check this box if this individual and this Cell Phone Number may be used to notify this Subscriber's Contact (via an SMS Text Message) for Low Level Priority (LLP) Alarm Signals
✓This assumes that the Subscriber has opted into this Automated Text Notification service.
•![]() - Click the Schedules Icon on the right of the currently selected Contact's Call Number to open the Phone Number (nnn)nnn-nnnn dialog for the currently selected Contact's Call Number :
- Click the Schedules Icon on the right of the currently selected Contact's Call Number to open the Phone Number (nnn)nnn-nnnn dialog for the currently selected Contact's Call Number :
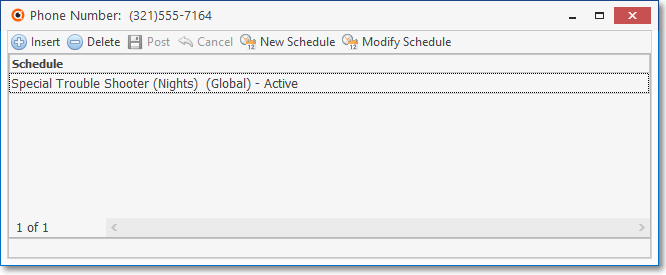
Contacts (People To Call) - Call Numbers -Schedules Assignment Dialog
✓Insert - Click the Insert Icon to assign an Existing Schedule to the currently selected Call Number
▪Use the Drop-Down Selection List provided to Choose the required Schedule
▪Post - Click the Post Icon to save this Schedule assignment
❖Delete - Click the Delete Icon to remove the currently selected Schedule
❖Cancel - Click the Cancel Icon to abandon any change that was just made to the currently selected Call Number
❖New Schedule - Click the New Schedule Icon to create (and then assign) a new Schedule for the currently selected Call Number
❖Modify Schedule - Click the Modify Schedule Icon to update the information for a Schedule that has already been assigned to the currently selected Call Number
•Click the ![]() Icon to record this Call Number information.
Icon to record this Call Number information.
❑Using the Contact Schedules Icon in the Ribbon Menu on the Contacts (People To Call) tab:
•Click the Contact Schedules Icon to open the Contact: Contact Name dialog for the currently selected Contact :
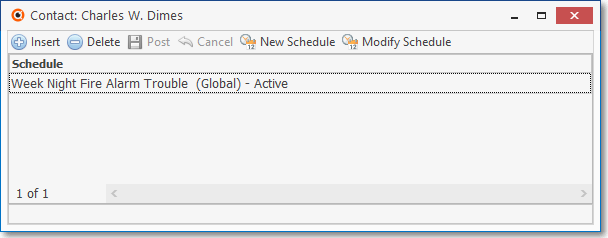
Contacts (People To Call) - Contact Schedules Assignment Dialog
✓Insert - Click the Insert Icon to assign an Existing Schedule to the currently selected Contact Name
▪Use the Drop-Down Selection List provided to Choose the required Schedule
▪Post - Click the Post Icon to save this Schedule assignment
❖Delete - Click the Delete Icon to remove the currently selected Schedule
❖Cancel - Click the Cancel Icon to abandon any change that was just made to the currently selected Contact Name
❖New Schedule - Click the New Schedule Icon to create (and then assign) a new Schedule for the currently selected Contact Name
❖Modify Schedule - Click the Modify Schedule Icon to update the information for a Schedule that has already been assigned to the currently selected Contact Name
❖See the Schedules chapter for more information on how and why Schedules are created and Used.
❑Call Order tab - Provided for setting the default sequence in which these Contacts should be notified
•See the Call Order Tab chapter for a complete discussion on how to set the sequence in which Notifications are made.
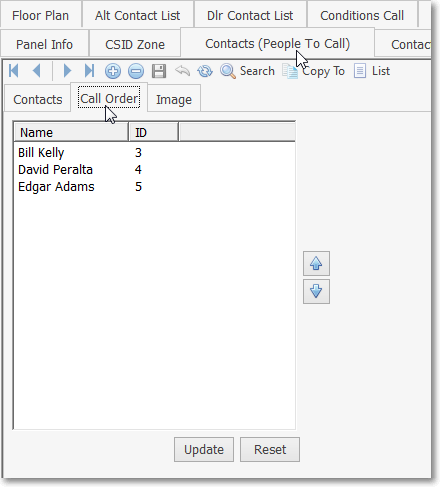
Contacts (People To Call) tab - Call Order tab
❑Using the Reorder button in the Call Numbers section of the Contacts (People To Call) Form:
•Reorder - You may adjust the sequence that the Call Numbers will be listed (when displayed for the Operator).

✓Click the Reorder button above the Call Numbers list.
✓Reorder Call Numbers - The Reorder Call Numbers dialog will be displayed.

Reorder Call Numbers dialog
✓Click to select the Phone Number to be relocated on the list:
✓Click the Up ![]() or Down
or Down ![]() arrow button, as needed.
arrow button, as needed.
✓Click the Save ![]() button to record its new position in the list.
button to record its new position in the list.
✓Click the Cancel ![]() button to abort any changes to the order.
button to abort any changes to the order.
❑Using the Special Functions on the Navigation Menu at the top of the Contacts (People To Call) Form:
•Search - To locate a specific Contacts (People To Call) record, Click the Search Icon at the top of the Form.
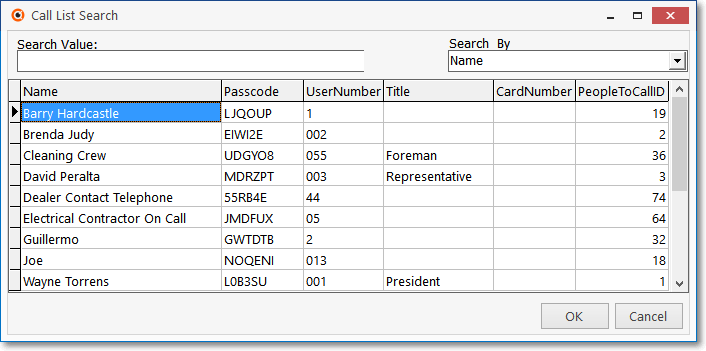
✓The Call List Search dialog will appear.
✓Enter the Search By method using the Drop-Down Selection List.
✓Enter the Search Value characters until the desired record is displayed.
✓Click on the record when it is displayed.
✓Click OK to select the record and Close the Call List Search dialog.
•Copy To - You may copy all of the Contacts (People To Call) numbers for one Subscriber's CSID, to another Subscriber (either to a different CSID installed at the Same Subscriber's premises, or to a Subscriber's CSID being monitored for a completely different Subscriber).
✓Click the Copy To Icon ![]()

✓It will display the Select CSID dialog.
✓Search By - Select the method you'll use for this search with the Drop-Down Selection List provided.
▪CSID - Search by the CSID.
▪ID - Search by the actual internal record number.
▪Name - Search by the Subscribers Name.
✓Search Value - Enter the appropriate characters to locate the desired Subscriber to which you want to copy the currently selected Contacts (People To Call).
✓Click on the desired Subscriber's CSID record.
✓Click OK to select the record to copy to, and then return to the Contacts (People To Call) Form.
✓All People To Call will be copied to the selected Subscriber's CSID.
✓If any names are not required at the new location, go to that Subscriber, Select Monitoring and then Choose Contacts (People To Call) where you will then be able to delete any unnecessary names.
❑Understanding the Special Information sub-tab's Requirements and Usage:
•Selecting a sub-tab - There are three sub-tabs on the Contacts (People To Cal) tab.
1.Central Station sub-tab - Enter any available information relating to this individual and the Subscriber's Alarm System.
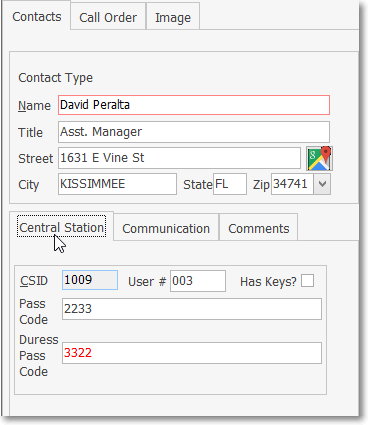
Central Station sub-tab on the People To Call tab
a.CSID - Inserted by the system, this is the selected Subscriber Panel's CSID.
b.User # - Enter the User ID # that would be transmitted by the control panel, if this individual disarmed the Alarm System.
▪In some cases the User # may be transmitted as a Physical Zone rather than as a discreet User #.
▪See the Receiver Setup Dialog for more information about User Numbers versus Physical Zones.
c.Has Keys? - Check this box if this individual has keys to the premises.
d.Pass Code - Enter the pass code, if this individual is required to provide one.
e.Duress - Enter the duress code, if this individual when this person needs to provide one.
2.Communication sub-tab - For users of the MKS Connect Service only:
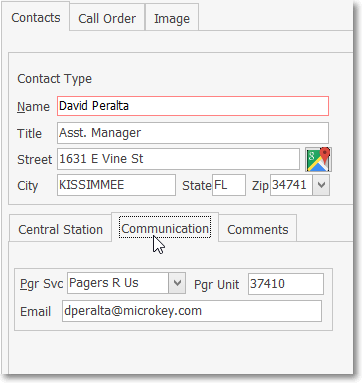
Communication sub-tab on the People To Call tab
a.Pgr Svc - Use the Drop-Down Selection List to Choose this individual's Pager Service that should be used for Alarm Signal notifications.
▪If no Pager Service is used, leave this field blank.
b.Pager Unit - Enter their Pager's ID.
▪If no Pager Service is used, leave this field blank.
c.Email - Enter the Email address that should be used for Signal notifications.
▪If any or the only communication with this Contact will be by Email, this is where that Email address must be entered.
▪If no Email communication to this person will be required, leave this field blank.
3.Comments sub-tab - Will be displayed when an Operator accesses this Contact
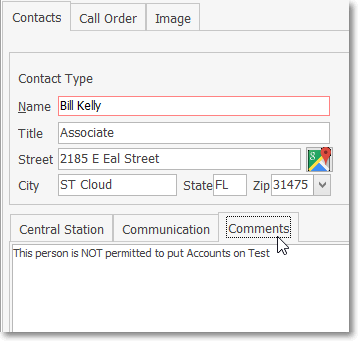
Comments sub-tab on the People To Call tab
a.Comment - Double Click within the Comments box to open this as a Rich Text Edit field
b.It may also be used as a basic text entry field, as appropriate.
c.Once a Comment is entered for the currently selected contact, a See Comments message is flashed when this Contact is viewed anywhere within MKMSCS and MKMS..
❑Image sub-tab - Entering an Image of the Contact:
•On the People To Call - Contacts) tab , Click the Image sub-tab to insert an Image of the selected Person.
➢Note: You must enter a Name before attempting to attach an image to a Contacts (People To Call) record.
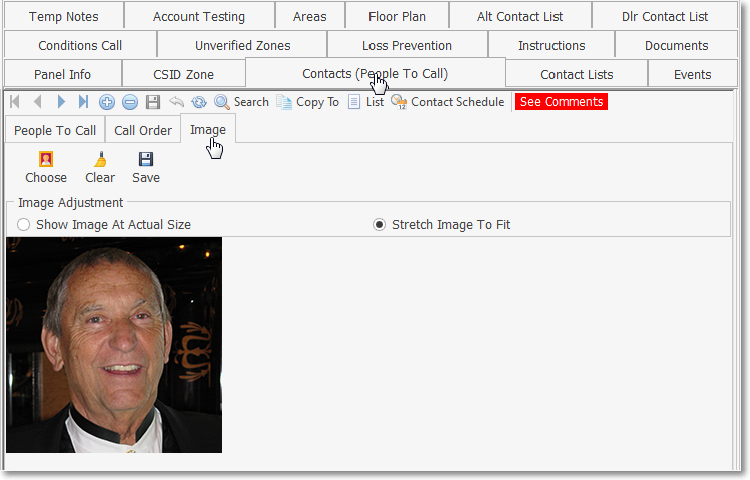
Contacts (People To Call) - Image tab
✓Choose - Click the Choose button and, using the standard Windows® dialogue box provided, locate the desired image file.
▪This should be a BMP or JPG file approximately 5 x 5 inches at 72 ppi.
✓Image Adjustment - Once the People To Call's BMP or JPG image file is selected, Choose the Image Adjustment method that best displays your Contacts (People To Call) Image in the display box by alternately Clicking Show Image At Actual Size and Stretch Image To Fit.
✓Save - Click the ![]() Icon on the Image tab once you are satisfied with the Image Adjustment setting.
Icon on the Image tab once you are satisfied with the Image Adjustment setting.
➢Note: If you want to re-do this process, Click the Clear Icon and repeat the steps above.