❑Schedules were created because certain situations require very customized responses to Alarm Signals based on the day(s) or the week, the month(s) of the year, various time cycles and/or other special circumstances.
•The Schedules Form has three sections:
1)Schedule - Grid with all of the previous defined Schedules, and Schedule Type column, plus Available and Active columns
2)Availability - Grid with all of the Days of the Week and a Start and End time column used to set when the selected the Schedule should be used
3)Assignments - Grid containing all of the Entities - which may individuals, sets of individuals, and/or specific telephone numbers previously entered in one or more Subscriber's Contacts Lists - that are assigned to the selected Schedule
•When a Schedule is created, it will be assigned one of three Schedule Kinds based on the following conditions:
1)Global - A Schedule created from the Schedules Form is considered to be Global and may therefore be used by anyone.
2)Account (Subscriber) - A Schedule created, and Assigned using the LLP Schedule option on the Monitoring tab of the Edit View of a Subscriber entry is reserved for use by that Subscriber Account
3)Panel - A Schedule created, and Assigned from within the Contact List tab for a specific Subscriber Panel is reserved only for use by this CSID
❑Assigning Schedules:
•A Subscriber may be associated with a specific Schedule by being assigned to it using the LLP Schedule Icon on the Monitoring Tab within the Edit View of the Subscribers Form
✓The selected Schedule will define when an LLP Service response should be executed.
✓Any number of Schedules may be assigned to a Subscriber
•The Available Contacts section on the Contact Lists Form displays a list of those Contacts [drawn from Contacts (People To Call), Alternate Contact Lists and Dealer Contact Lists] who have not yet been assigned to the selected Contact List
✓ Any Available Contact may be assigned to any number of Schedules
✓Click the View Schedules Icon ![]() to the right of any Available Contacts entry to view the Schedules For dialog associated with that Available Contact.
to the right of any Available Contacts entry to view the Schedules For dialog associated with that Available Contact.
•A Contact List is used to define who should respond to a designated Alarm Condition and/or CSID Zone and/or Physical Zone Code within the Availability Day, Date and/or Time parameters of the Schedule to which the Contact List has been assigned
✓ A Contact Lists may be assigned to any number of Schedules
✓Click the View Schedules Icon ![]() to the right of any Contact List entry to view the Schedules For dialog associated with that Contact.List
to the right of any Contact List entry to view the Schedules For dialog associated with that Contact.List
•List Members of a Contact List entry will be chosen from of the Available Contacts (selected from that Subscriber Panel's Contacts (People To Call), Alternate Call List, and/or Dealer Call List)
✓List Members of a Contact List entry may be assigned to any number of Schedules
✓Click the View Schedules Icon ![]() to the right of any List Member to view the Schedules For dialog associated with that List Member
to the right of any List Member to view the Schedules For dialog associated with that List Member
❑Why use the Schedules Form's capabilities?
A.When individualized notification(s) and/or response(s) from the appropriate individual(s) and/or service provider(s) must be custom defined to properly respond to special circumstances (i.e. problems)
1.These problems are identified by various sensors at the Subscriber's premises
2.Each Problem is defined for that Account's CSID in the Contact Lists tab within the Subscriber Panels section in the Edit View of a Subscribers Form
3.A specific Description, List Type, and some combination of an Alarm Condition Code, and/or Signal ID, and/or Zone Code will designate what and how this special situation (i.e. problem) is communicated to the Central Station
4.Each Contact List definition also has a set of List Members, at least one of them is to be notified when this problem occurs
5.A Contact List may be assigned to a Schedule to specify when it should be implemented (i.e., scheduled)
B.Any number of custom defined Contact Lists may be created based on the response required for a problem being reported (i.e., List Type, Alarm Condition Code, and/or Signal ID, and/or Zone Code)
1.A Contact List is designed for the purpose of managing and responding to reported failures/malfunctions/anomalies in designated Services, Situations, Facilities, and/or Systems
2.A Contact List may then be assigned to an existing or newly created Schedule
3.The List Members of a Contact List are individually chosen from existing Contacts (selected from a combined list of that Account's Available Contacts which include Contacts (People To Call), Alternate Call List, and/or Dealer Call List)
4.Any number of Contacts may designated as Members of a Contact List
5.A Contact List Member is referred to as an "Entity" in the Schedules Form (See item C. immediately below)
C.Entities are individuals, sets of individuals, and/or specific telephone numbers previously entered in one or more Subscriber's Contacts Lists which include Contacts (People To Call), Alternate Call List, and/or Dealer Call List that may then be assigned to one or more Schedules.
1.A Entity is a record containing
a.a Contact's Name,
b.the Subscriber (which may be a Dealer) associated with that Contact
c.a CSID assigned to that Subscriber
d.the Type of that will be used (Call List, Phone Number, SMS, Email, etc.).
2.An Entity may be a specifically selected:
a. Contact chosen from Contacts (People To Call), Alternate Call List, and/or Dealer Call List), and/or a specific Telephone Number of a selected Contact
b.a specific Contact Number for a Contacts (People To Call) record
c.Member(s) of a Contact List for a selected Subscriber Panel (CSID)
3.Once an Entity is selected, it will be listed in the Assignments section of the Schedules Form
❑The Schedules Form will display:
A.Ribbon Menu - Options available on this Schedules Form
B.Schedule List - Provide for the entry of a Schedule, list all of the existing (previously created) Schedules and provide for the modification of an existing Schedules
C.Availability - A Check List of the Day(s) of the week when the currently selected Schedule should be implemented
D.Assignments - Identifies one or more Contact List(s) currently assigned to the selected Schedule, which are referred to here as an Entity (i.e., a specific Contact List)
•To Access the Schedules Form:
a)From the Backstage Menu System Select Maintenance and Choose the Monitoring option, then select the Schedules option, or
b)From the Quick Access Menu, Select Maintenance and Choose the Monitoring option, then select the Schedules option
✓The Schedule Form will be displayed.
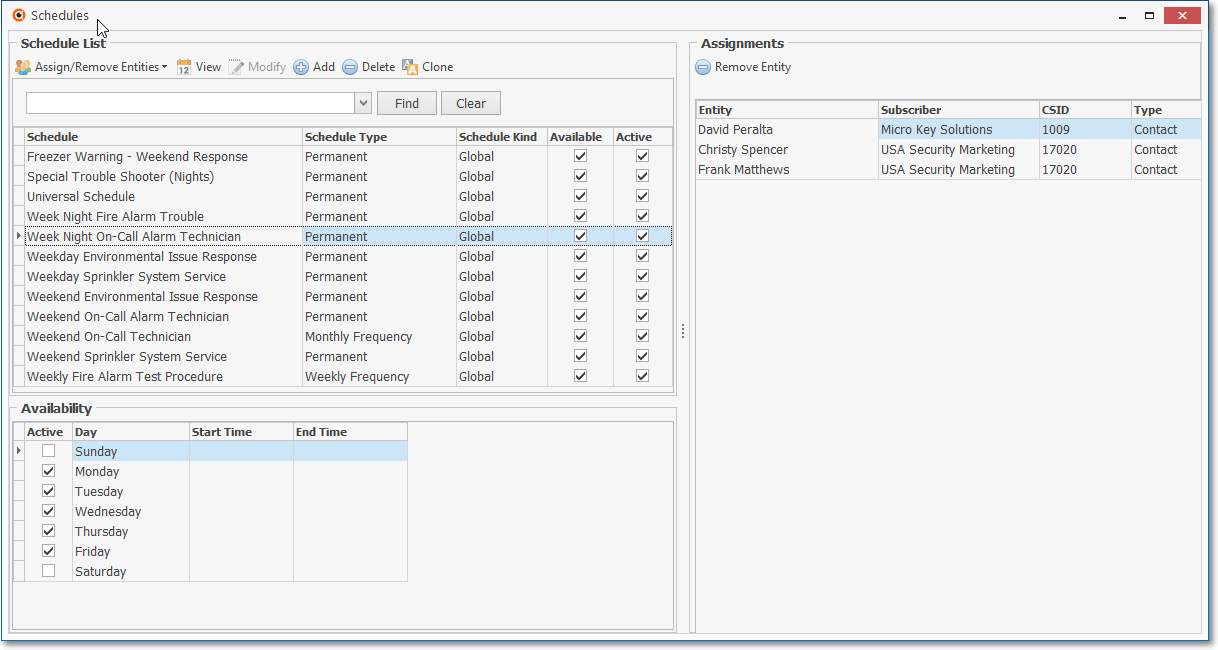
Maintenance - Monitoring Menu - Schedules Form
❑Using the Schedules Form:
A.Schedule List section - Its Ribbon Menu has these five Options:
1.Assign/Remove Entities - Use the Drop-Down Selection List provided to Assign an Entity to the selected Schedule, or Remove a previously assigned Entity from this Schedule:
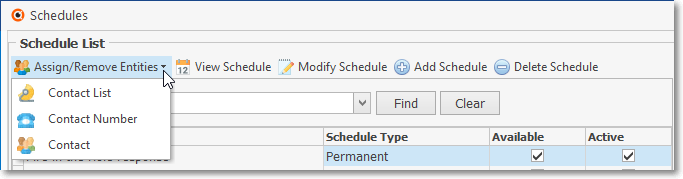
Schedules Form - Schedule List section - Assign/Remove Entities selections
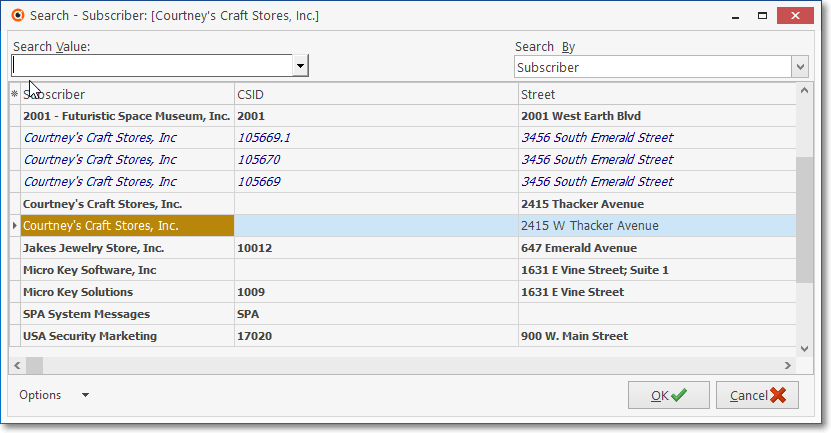
a.Contact List - This option displays the Select Account dialog which is used to choose the Account (CSID / Name) of the Entity (i.e., a Contact List entry) to be assigned or removed
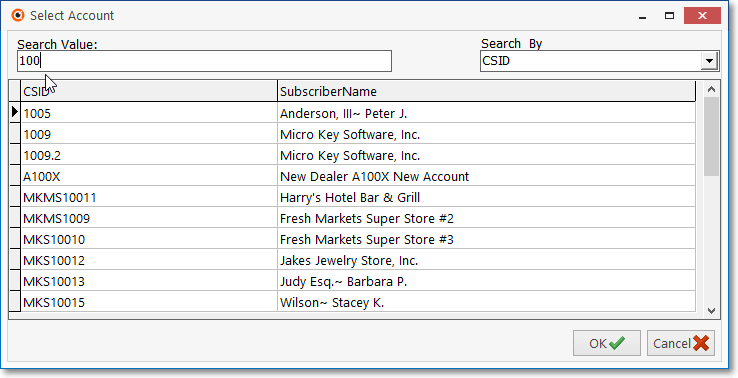
Schedule List section - Assign/Remove Entities - Select Account dialog
i.Search Value - Enter the characters that best identify the Entity that needs to be assigned to or deleted from this Schedule
ii.Search By - The search may be conducted on the CSID or the Subscriber Name field. The default is CSID but may be changed to Subscriber Name if appropriate.
iii.Select the desired Account
iv.Click OK ü to execute this selection
v.The Contact List Schedule Assignment dialog will be displayed with all of the previously defined Contact Lists for that selected Account
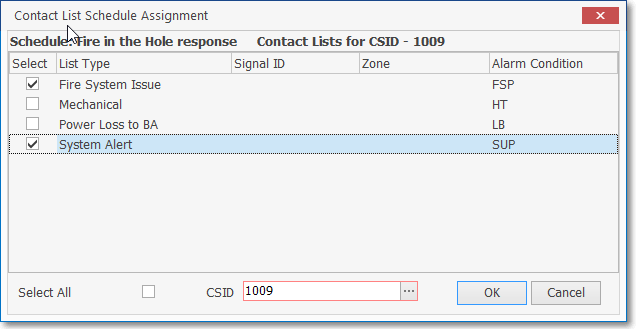
Assign/Remove Entities - Select Account - results in Contact List Schedule Assignment dialog
a)Check the appropriate Contact List entries which are to be Assigned to this Schedule; or
b)Remove the Check from those that are to be Removed
c)Click OK to execute this step
d)This addition or removal of Contact List Entities will be updated in the Assignments section (see C. Assignments section below)
b.Contact Number - This option displays the Select Account dialog which is used to choose the Account (CSID / Name) of a Subscriber, then to select Telephone Numbers for Contact(s) - which include Contacts (People To Call), Alternate Call List, and/or Dealer Call List) - that are to be assigned to, or removed from this Schedule
Schedule List section - Assign/Remove Entities - Select Account dialog
i.Search Value - Enter the characters that best identify the Entity that needs to be assigned to or deleted from this Schedule
ii.Search By - The search may be conducted on the CSID or the Subscriber Name field. The default is CSID but may be changed to Subscriber Name if appropriate.
iii.Make the selection - Select the desired Account
iv.Click OK ü to execute this selection
vi.The Contact Schedule Assignment dialog containing the list of Contact Telephone Numbers [Contacts (People To Call), Alternate Call List, and/or Dealer Call List)] for the selected Account will be displayed
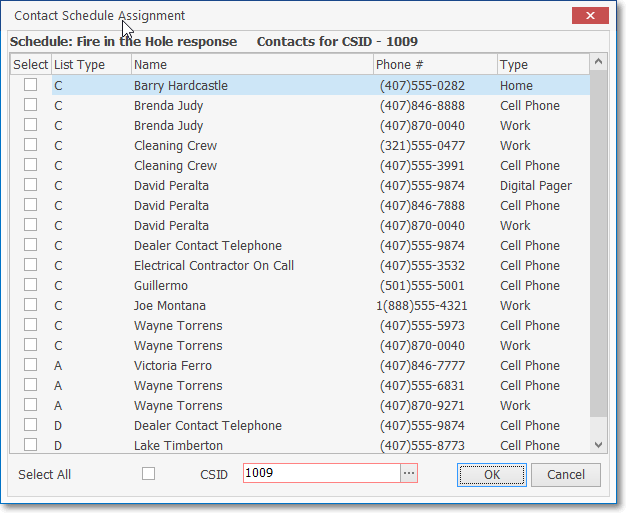
Assign/Remove Entities - Select Account - lists Telephone Numbers in a Contact Schedule Assignment dialog
a)Check the appropriate - previously defined - Contacts Phone Numbers(s) that are to be Assigned; or
b)Remove the Check from those that are to be Removed
c)Click OK ü to execute this step
e)The designated Contact Telephone Number Entity assignments or removals will be updated in the Assignments section (see C. Assignments section below)
c.Contact - This option displays the Select Account dialog which is used to choose the Account (CSID / Name) of a Subscriber, to then select Names of Contact(s) - which include Contacts (People To Call), Alternate Call List, and/or Dealer Call List) - that are to be assigned to, or removed from this Schedule
Schedule List section - Assign/Remove Entities - Select Account dialog
i.Search Value - Enter the characters that best identify the Entity that needs to be assigned to or deleted from this Schedule
ii.Search By - The search may be conducted on the CSID or the Subscriber Name field. The default is CSID but may be changed to Subscriber Name if appropriate.
iii.Make the selection - Select the desired Account
iv.Click OK ü to execute this selection
v.The Contact Schedule Assignment dialog contains the list of Contact Names for the selected Account
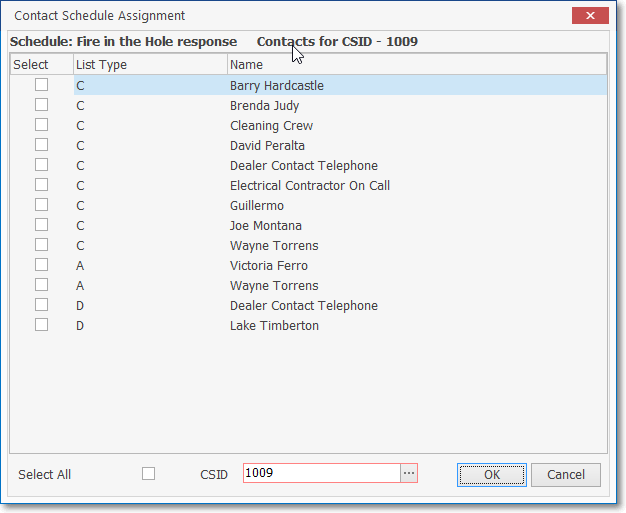
Assign/Remove Entities - Select Account - lists Contact Names in a Contact Schedule Assignment dialog
a)Check the appropriate - previously defined - Contacts Name(s) that are to be Assigned; or
b)Remove the Check from those that are to be Removed
c)Click OK to execute this step
d)The designated Contact Name assignments or removals will be updated in the Assignments section (see C. Assignments section below)
2.View - Provides a read-only view of the selected Schedule's details
Schedules Form - Schedule List section - View Schedule option - Schedule view
3.Modify - Provides an editable Schedules dialog for the selected Schedule
Schedules Form - Schedule List section - Modify Schedule option - Schedules dialog
a.For information about the contents of the fields in the Schedules dialog, see 4. Add Schedule - Defining the Availability of a Schedule below.
4.Add - Add a new Schedule to the Schedules List section on Schedules Form
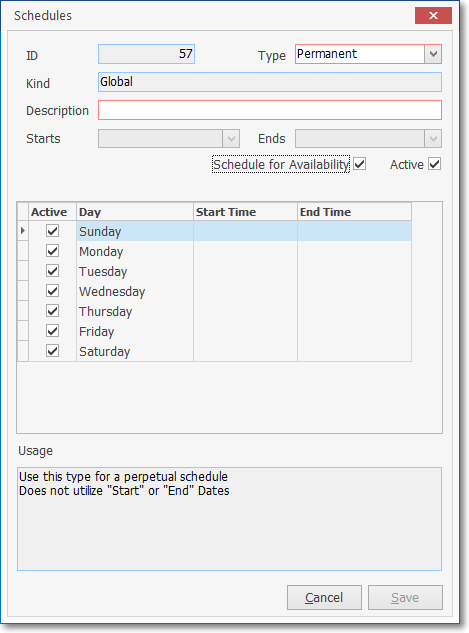
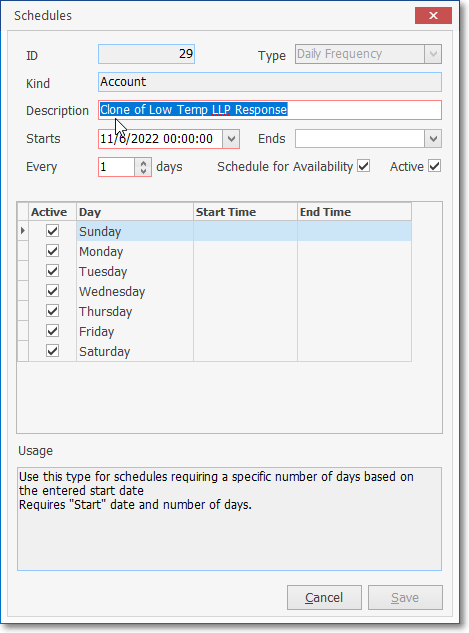
Schedules Form - Schedule List section - Add Schedule option - Schedules dialog
❖ Defining the Availability of a Schedule
a.ID - This is a record number field that is populated when the new Schedule is initially Saved.
b.Type - Use the Drop-Down Select List provided to Choose the type of Schedule that is being defined
i.Daily Frequency - Use this type for schedules requiring a specific number of days based on the entered start date.
a)It requires "Starts" date and number of days.
a)Implementation also based on, and subject to, the Day(s) Checked in the Days List (see i. Days List below)
ii.Fixed Period - Use this type for specified date ranges and requires "Start" and "End" Dates
a)Schedule implemented from the Starts date (see d. Starts below) to the Ends date (see e. Ends below),
b)Implementation also based on, and subject to, the Day(s) Checked in the Days List (see i. Days List below)
iii.Monthly Frequency - Use this type for schedules requiring a specific number of months based on the entered start date and requires
a)"Starts" date and number of months between implementation are required.
b)An Ends date is optional.
c)Schedule implemented from the Starts date (see d. Starts below)
d)Optional to the Ends date (see e. Ends below) may be entered, otherwise it's Perpetual
e)Implemented every month unless a value is inserted in the Every nn months field (see f. Every below for more information)
f)Implementation also based on, and subject to, the Day(s) Checked in the Days List (see i. Days List below)
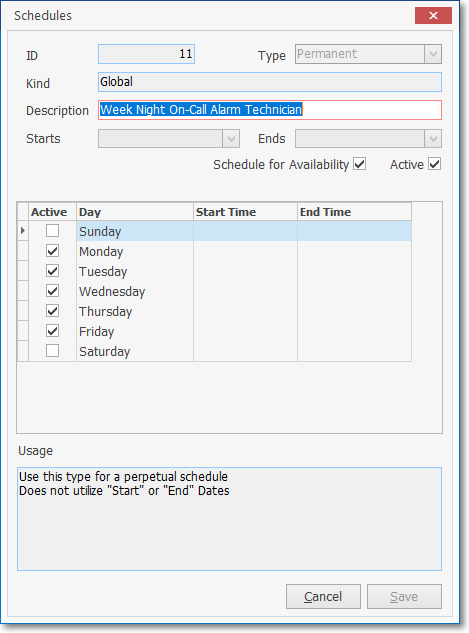
iv.Permanent - Use this type for a perpetual schedule and so does not require "Starts" or "Ends" Dates
a)Schedule implemented immediately and continues until deleted
b)Implementation also based on, and subject to, the Day(s) Checked in the Days List (see i. Days List below)
v.Specific Months - Choose this Type for Schedules which are only required/used for specific months of the year .
a)A "Starts" date is optional.
b)Leaving the Starts date field blank automatically makes the schedule perpetual.
c)There is no default for the Months of the year.
d)The Specific Months of the year when this Schedule is to be implemented must be individually Checked in the Months Grid
e)By default, All Days of the Week will be Checked
f)Specific Days of the Week may be specified by removing the Checks from the days the Schedule is not to be used (see i. Days List below)
vi.Specific Weeks - Choose this Type for Schedules which are only required/used for specific weeks of the year .
a)A "Starts" date is optional.
b)Leaving the Starts date field blank automatically makes the schedule perpetual.
c)There is no default for the Weeks of the year.
d)The Specific Weeks of the year when this Schedule is to be implemented must be individually Checked in the Weeks Grid
e)By default, All Days of the Week will be Checked
f)Implementation also based on, and subject to, the Day(s) Checked in the Days List (see i. Days List below)
g)Specific Days of the Week may be specified by removing the Checks from the days the Schedule is not to be used
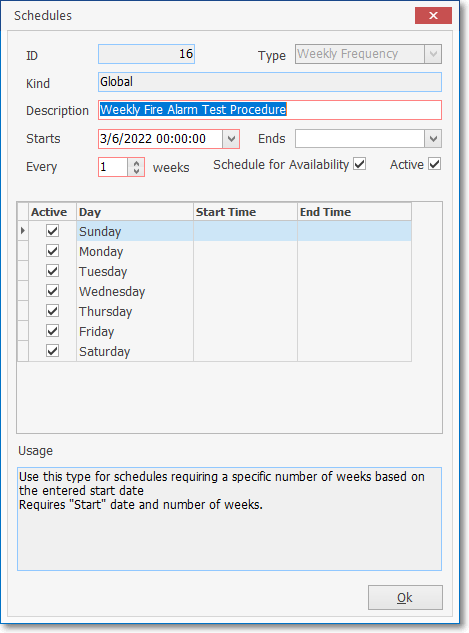
vii.Weekly Frequency - Use this type for schedules requiring a specific number of weeks based on the entered start date
a)Requires a "Start" date and number of weeks between implementation.Schedule implemented from the Starts date (see d. Starts below),
b)Implemented every week unless a value is inserted in the Every nn weeks field (see f. Every below for more information)
c)By default, All Days of the Week will be Checked
d)Specific Days of the Week may be specified by removing the Checks from the days the Schedule is not to be used (see i. Days List below)
c.Kind - Inserted automatically based on where and for what Account this Schedule is (was) being created
i.Global - Created in the Schedules Form and available to all
ii.Account - Created for a specific Subscriber and only available for that Subscriber
iii.Panel - Created for a specific Subscriber Panel (CSID) and only available for that CSID
d.Description - Enter a concise description of the purpose for this Schedule
e.Starts - If required, enter a Starting Date for this Schedule using the Drop-Down Date/Calendar provided.
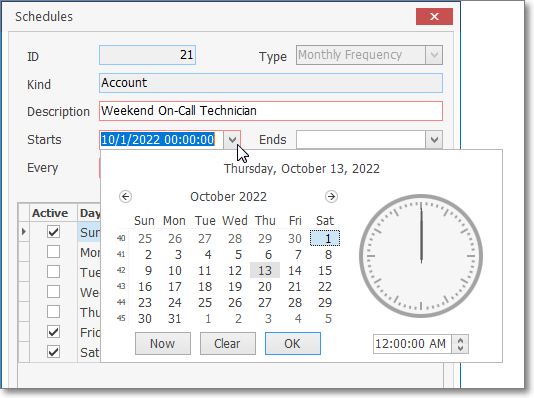
Schedules Form - enter Schedule - Starts field - Drop-Down Date Calendar dialog
f.Ends - If required or optionally, enter an Ending Date for this Schedule using the Drop-Down Date/Calendar provided.
i.When the Schedule with an End date defined has expired, it will automatically be deleted from the LLP Schedule gird,
ii.When a Contact List Schedule with an End date defined expires for a Call List Type, the Schedule is deleted from the Contact List and the Call List Members grids
iii.When a Scheduled Report with an End date defined expires the Schedule record is deleted
g.Every - When presented, the default will be zero ("0")
i.Every nn months - where the nn represents the monthly interval for when this Schedule will be implemented
ii.Every nn weeks - where the nn represents the weekly interval for when this Schedule will be implemented
h.Schedule for Availability - By default, this box will be Checked.
i.This may be entered or removed when the Schedule is initially defined.
ii.Thereafter, if the Schedule is to become unavailable, it must be deleted.
i.Active - By default, this box will be Checked.
i.This may be entered or removed when the Schedule is initially defined.
ii.Thereafter, if the Schedule is to become unavailable, it must be deleted.
j.Days List - Contains a list of the Days of the Week
i.By default, all will be Checked.
ii.Add or Remove Check Marks as needed (see B. Availability below for more information)
iii.The Schedule is implemented as described and defined above, but finally subject to the Day(s) Checked in this Days List
k.Usage (information section) - Explanation of how this Schedule is to used based on the Type entry selected above (see b. Type above)
i.Daily Frequency - Use this type for schedules requiring a specific number of days based on the entered start date. It requires "Starts" date and number of days.
ii.Fixed Period - Use this type for specified date ranges and requires "Start" and "End" Dates
iii.Monthly Frequency - Use this type for schedules requiring a specific number of months based on the entered start date and requires "Start" date and number of months. An Ends date is optional but required the number of months between implementation.
iv.Permanent - Use this type for a perpetual schedule and so does not require "Starts" or "Ends" Dates
v.Specific Months - Choose this Type for Schedules which are only required/used for specific months of the year .
vi.Specific Weeks - Use this type for schedules required for specific weeks of the year. A "Starts" date is optional. Leaving the Starts Date field blank automatically makes the schedule perpetual. The Specific Weeks of the year when this Schedule is to be implemented must be individually Checked
vii.Weekly Frequency - Use this type for schedules requiring a specific number of weeks based on the entered start date and requires a "Start" date and number of weeks between implementation.
5.Delete - Choose this option to remove the selected Schedule from the Schedules Form
a.Yes - Confirm that this Schedule is to be deleted
b.No - Cancel the deletion procedure
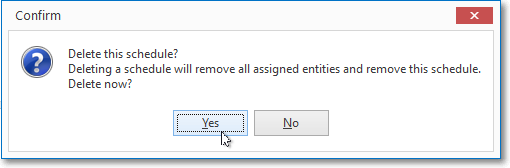
Delete the schedule?
6.Clone - From time to time, when entering new Schedules, there may be one already defined Globally, or for an Account or Panel that is very similar to what is needed
a.A current, similar Schedule may be cloned and assigned to a different Account
b.Select that Schedule in the Schedules List
c.Click the Close option on the Schedules Form's Ribbon Menu
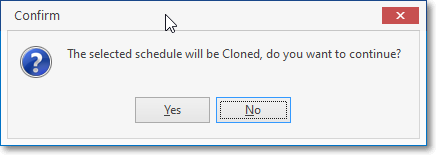
Confirm - The selected schedule will be cloned
d.Confirm that this is what you want to do
e.Choose the appropriate Subscriber Account that will have this Schedule available
Subscriber Search to select Account to be assigned this Cloned entry
f.A duplicate Schedule record will be created
Modify Cloned Schedule as needed
g.Modify this cloned Schedule record
h.Save those modifications to that Schedule entry
B.Availability section - Contains a list of the Days of the Week which have been chosen for the currently selected Schedule
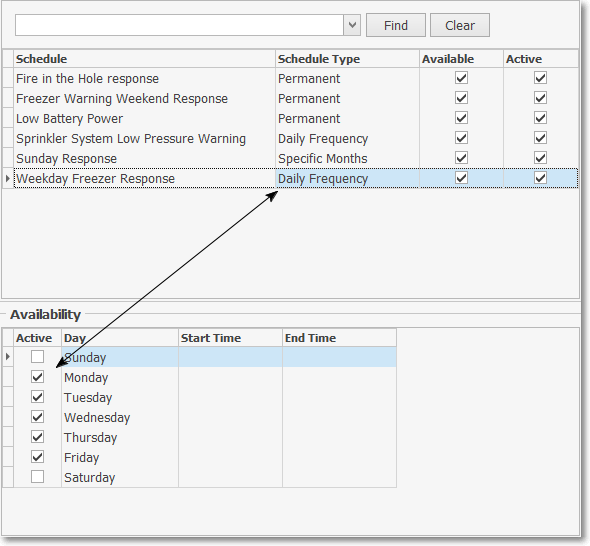
Schedules Form - Availability section
1.See i4., i. Days List above for how and why the Days are selected)
C.Assignments section - The Entities (e.g., Contact List and/or Contacts' Telephone Numbers and/or Contacts' Names) previously assigned (see A., 1. above for detailed Assign/Remove Entities information) to the currently selected Schedule will be listed here.
1.Entities may be assigned to a Schedule
a.Using the Assign/Remove Entities option as described A.,1. above,
b.In the Available Contacts section of the Contacts List tab
c.In the Contact Lists section of the Contacts List tab
d.In the List Members section of the Contacts List tab
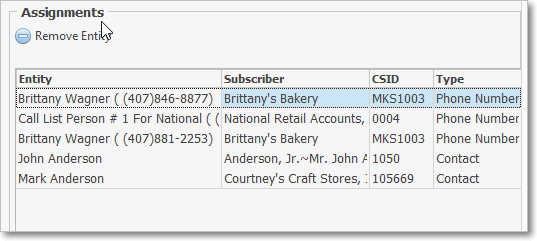
Schedules Form - Assignments section
2.Remove Entity - Click this option to remove the selected Entity (Contact List) from the Assignments section
a.The action does NOT delete the Contact List from the Contact List tab, it only removes it from this Assignments list of Entities for the currently selected Schedule