❑There is no greater threat to the success, and long term survival of the alarm business, than excessive False Alarms.
•Using the tools in the list below, and requiring the use of this False Alarm Dispatch Tracking dialog, will ensure that your Company is focusing on a plan to reduce False Alarms.
1.The Verification procedures that are proven to reduce False Alarms.
2.The False Alarm Account Management Form is used to identity which Accounts must be specifically tracked for False Alarms.
3.The Town Codes Form allows you to record the Maximum Number of False Alarm events permitted before punitive action is taken.
4.The Excessive Signals Report which will list those Accounts that are not supervised and, based on being a Dealer's Account with an established Signal limitation for Active and Passive signals - but have Accounts that are transmitting signals in excess of those number of signals. Or, are not Dealers' Accounts (or are Dealer's Accounts, but have no limitations established for Active and Passive signals in their Dealers Form) and send excessive signals beyond the limitation set in this Excessive Signals Report dialog.
5.The Excessive False Alarms Report provides a detailed analysis of who, what, and why these alarms are occurring.
•This False Alarm Dispatch Tracking Form provides an easy to use interface to retrieve, review and properly identify - as to whether or not an Alarm Signal was False - all of the Alarm Signals for which an Operator had to initiate a Dispatch.
❑Performing your Alarm Signal Review:
•To Access the False Alarm Dispatch Tracking Form:
a)From the Backstage Menu System Select Maintenance and Choose the Monitoring Menu, then select the False Alarm Dispatch Tracking option, or
b)From the Quick Access Menu, Select Maintenance and Choose the Monitoring Menu, then select the False Alarm Dispatch Tracking option.
![]()
False Alarm Dispatch Tracking form with Date Range and CSID specified
•These are the six steps - outlined here and explained in detail below - required to Complete the Review (and reclassification where appropriate) of these selected Alarm Signals on the False Alarm Dispatch Tracking Form:
1.Specify the Date Range for which Alarm Signals are to be reviewed based on when the Alarm Signals were Received, optionally selecting a specific CSID to be reviewed.
2.Select the Alarm Signals for review and after contacting the appropriate persons or authorities (e.g., Police, Subscriber, Technician) Check or Un-Check the False Alarm box, as appropriate.
oIf the Status of the False Alarm field changes - by default it is Checked - the Verified On and Verified By fields will be populated automatically based on the current date and time and who (which User) performed the edit.
oYou may Modify the Date and/or User information, if appropriate.
3.Update Alarm Signal Detail by individually adding Alarm History Detail line item(s), as required, to properly document the False Alarm Status changes that were made.
4.Click the Verify button (if required because none of the False Alarm Check boxes were changed) to populate the Verified On and Verified By fields.
5.Click the Post button (which appears when you modify any of the Alarm Signals) to indicate acceptance of the entries made in the Verified On, the Verified By and the False Alarm fields.
6.Click the Commit To Database button when you are satisfied with all of the changes in the Alarms Signals list, and all of the Alarm Signal Detail entries you've made.
❑Specifying which Alarm Signals are to be Reviewed:
•For Signals Received On - These two fields allow you to specify a Date Range for the Alarm Signals you will be reviewing.
✓By default, the Date Range offered will represent the immediate past week (up to Today).
✓Using the Drop-Down Calendar/Date Entry fields, you may re-set the Date Range of the Alarm Signals that you want to review.
![]()
✓Refresh - Click the Refresh button to list the Alarm Signals that occurred within the specified Date Range.
•For a specified CSID? - You may review the Alarm Signals for a specified Date Range you entered, and you may further limit your review to Alarm Signals received for a specific CSID within that specified Date Range.
✓To limit your review to Alarm Signals for a specific CSID, Check this box.
✓CSID - Click the Ellipse ![]() and Choose the appropriate CSID using the Subscriber Search dialog that will be displayed.
and Choose the appropriate CSID using the Subscriber Search dialog that will be displayed.
✓Retrieve - Click the Retrieve button to list only the Alarm Signals that were transmitted from this CSID within the specified Date Range.
➢Note: If you set a Date Range and/or identify a CSID and there are no Alarm Signals matching these selection parameters, a No Signal Information Found message will be shown on the False Alarm Dispatch Tracking Form.
![]()
❑Select the specific Alarm Signals that you want to review and validate whether they were False or Actual alarm events.
•Alarm Signals - Based on the selection criteria entered above, the Alarm Signals that you want to review will be listed.
✓One by one, Select each listed Alarm Signal for review and after contacting the appropriate person(s) - Police, Subscriber, Technician, etc -
✓Un-Check any False Alarm box for an Alarm Signal that is determined to have been an actual and valid alarm event, as appropriate.
•Understanding the columns on the Alarm Signals Grid of the False Alarm Dispatch Tracking dialog:
✓Incident - The internally assigned Alarm Signal event number.
✓CSID - The Subscriber Panel's CSID which transmitted the alarm.
✓Date Time Occurred - The Date and Time that this signal was received by SPA.
✓Condition - The Alarm Condition assigned for the CSID Zone (or Panel Zone) that was transmitted.
✓Description - The Description that was entered for the CSID Zone (or Panel Zone).
• Updating (as appropriate) the columns on the Alarm Signals section of the False Alarm Dispatch Tracking dialog:
✓Locate the Alarm Signal record that you will be verifying.
✓False Alarm - By default, this box will be Checked.
▪If, during your review, it was determined that this Dispatch was not due to a False Alarm, you may Un-check the False Alarm box.
✓Verified On - By default, this will be blank until you Click Verify, then it will be set as Today.
▪If you Un-checked the False Alarm box (see above), the Verified On field will be populated with Today's date automatically.
▪You may use the Drop-Down Calendar/Date Entry field to change this information, if appropriate.
✓Verified By - By default, this will be blank until you Un-check the False Alarm box or Click OK Verify button, then it will be set as the current User's Employee Name.
▪You may use the Drop-Down Selection List to Choose a different Employee Name, if appropriate.
![]()
•Completing the initial review of the False Alarm Dispatch Tracking process by using one of these three options:
1.Verify - There are two reasons you may want to use this option:
a.If no False Alarm Check boxes has to be changed after review, Click the Verify button and Confirm that action to populate the Verified On and Verified By fields automatically.

Verify All Alarms?
b.If you removed the Check on some but not all records and want to populate the Verified On and Verified By fields for records you did not change, Click the Verify button.
2.Post - Click the Post button which will appear if you have Removed the Check Mark from any record.

Post button on the False Alarm Dispatch Tracking Form
3.Cancel - To completely abort the Verify function, Click the Cancel button which will also appear when you have modified any record,
•Add Detail Tab - If required, Select a specific Alarm Signal and then Click the Add Detail Tab on the top right of the Alarm Signal Detail Grid on the False Alarm Dispatch Tracking dialog to explain why you removed a specific Alarm Signal's False Alarm Check box.
![]()
✓The Alarm Signal Detail editor will be displayed.
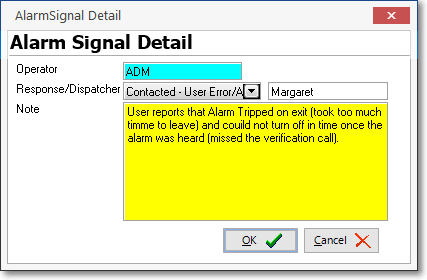
Alarm Signal Detail entry
▪Operator - The Employee code of the User who is performing this review is inserted by the system.
▪Response/Dispatcher - Enter a Dispatch Response (Description) and identify the individual to whom the Operator had spoken.
oResponse - Use the Drop-Down Selection List to Choose the appropriate Dispatch Response.
oDispatcher - Enter the Dispatcher ID (or person's Name) to identify the individual with whom you Confirmed the validity of this alarm.
▪Note - Enter a note to substantiate the review that was performed for this Alarm Signal.
▪OK - Click the OK button to insert this entry in the Alarm Signal History table of this Alarm Signal.
▪Click the Close ![]() box to Exit the Alarm Signal Detail Form and return to the False Alarm Dispatch Tracking Form.
box to Exit the Alarm Signal Detail Form and return to the False Alarm Dispatch Tracking Form.
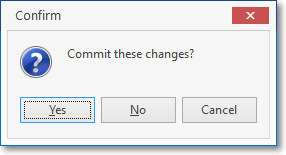
❑Commit To Database - Once you have made your Alarm Signal and added any Alarm Signal Detail entries, this is the final step in reviewing these Alarm Signals:
![]()
Commit To Database button on the False Alarm Dispatch Tracking Form
•Click the Commit To Database button to write the changes to the database and permanently remove them from the False Alarm Dispatch Tracking Form.
✓Committed Records are permanently removed from the False Alarm Dispatch Tracking list so you will not have to deal with them again on this False Alarm Dispatch Tracking Form.
✓Confirm that this is what you want to do.
✓This will write this information to the appropriate places within the database.