❑There are three methods available for managing and executing the Dispatch, Notification, and Enhanced Automated Response processes for any Alarm Signal received from a Subscriber
•Normally, a Notification occurs after - but in some cases - instead of any Dispatch, and/or Before a Dispatch, and/or After a Dispatch, or when a Contact List is assigned a Must Contact - List Type regardless of how or when a Dispatch is executed
•There are three Signal Processing methods which manage those situations for (and/or in some cases instead of) an Operator
3.Enhanced Automated Responses of various types
•Additionally, the newer Control Panels for Alarm Systems have become much more complicated, more powerful, and will supervise the condition and/or status of many more things than in the past, and the customer's expectations and requirements for processing those signals have followed the same path.
✓Because of this - more complex methods for controlling the response to an Alarm Signal have become necessary, and sometimes they exceeded the capability of the three original response methods.
✓To accommodate these new capabilities, more flexible before and after Dispatch, and customizable Notification processes have been implemented.
✓Using special user defined response Schedules and specialized Contact Lists, MKMS and MKMSCS can provide that needed flexibility, without effecting any of the original three tried and true processing methods listed above.
❑Understanding user defined response Schedules and Contact Lists, and their Implementation
➢Note: The Legacy People To Call [Now Contacts (People To Call) ] tab's functionality using Operator Guided Responses and/or Action Plans and/or system managed Enhanced Automated Response methods has been preserved to accommodate those Central Stations that wish to continue using the central station monitoring software (MKMSCS) as presented before the 5.1.35.7200 implementation of user defined Schedules and Contact Lists which are provided in MKMS 5.1.35.8400
A.The 5.1.35.7200 and later version of MKMSCS automatically determines when to utilize the appropriate method to retrieve the applicable Call List (1.- use one created from Contacts (People To Call), Alternate Call List, Dealer Call List, or 2.- use a Contact List associated with a Schedule, as appropriate) for the Operator. Therefore, the system will, as needed:
a)Apply the Legacy People To Call functionality now shown in the Contacts (People To Call) tab, or
b)Use the Contact List assigned to a Schedule,
c)Use both.
B.The following outline describes how the software retrieves the applicable Call List's (Legacy or Contact List) contact information for Before Dispatch, After Dispatch, and Notification purposes while Processing Alarm Signals.
1.When the Account (CSID) does not have a Contact List defined in the Contact Lists Form:
a.The software automatically reverts to its Legacy methodology and presents the appropriate Call List contents to the Operator.
b.The Legacy Call List's contents presented to the Operator are assembled from the Account's Contacts (People To Call), and/or the Alternate Call List, and/or the Dealer Call List entries.
2.When the Account (CSID) does have a Contact List defined in the Contact Lists Form:
a.If the Alarm Signal matches the parameters of a Contact List created for a specific signal configuration (Alarm Condition, and/or Signal Identifier, and/or Physical Zone), that Contact List - assuming it's received within the timing parameters of the associated Schedule - will be presented to the Operator, as and when appropriate,
b.If there is no match, the Legacy Call List (see B. 1. b. above) will be presented to the Operator.
c.This "must be one or the other" process ensures a Call List is ALWAYS presented.
3.Before Dispatch & After Dispatch Call Lists:
a.When Processing Alarm Signal - as the software is preparing to enter the Dispatch phase, the software checks to see if there is a “Before Dispatch” Contact List defined in Contact Lists Form created for the Account.
b.Assuming the Contact List entry is active and not expired:
1)If the Contact List entry's Alarm Condition, CSID Zone Signal Identifier and Physical Zone fields are all empty, then the “Before Dispatch” Call List is always presented before proceeding to the actual Dispatch phase,
2)If there are specified conditions (Alarm Condition, and/or Signal Identifier, and/or Physical Zone) assigned to the Contact List entry, then the Alarm Signal must have those same conditions before the list is presented
3)If the specified conditions do not match the "Before Dispatch" Contact List entry, the software proceeds directly to the normal Dispatch sequence.
c.Any “After Dispatch” Contact List entries adhere to the same rules outlined immediately above, but are presented after the Alarm Signal has been Dispatched.
d.There is no default "fall back to" for Before Dispatch and After Dispatch Contact List entries
1)When there is no matching Before Dispatch and After Dispatch Contact List entry, the software moves on the next logical step in the Operator Guided Response, or Action Plan.
2)The appropriate Call Lists will be displayed in the same format and same locations as they always have, and will be shown to the Operator as expected.
3)The only exception is for the Before and After Dispatch Contact Lists described above
❖See the Before Dispatch and After Dispatch example illustrations at the end of this chapter
4.Must Contact - List Type: For those situations where, regardless of who was contacted prior to, or during the Notifications process, a specific person (or persons) must also be contacted (notified) prior to selecting a Resolution Code in the Signal Options tab on the Signal Processing screen.
a.When the Contact List's Must Contact List Type is selected, the List Members for this Contact List entry must be notified as described below:
1)Prior to the finishing Completion processing step, Must Contact List Members will be displayed to the Operator in a special Must Contact List tab within the Signal Options tab
2)Those List Members assigned the Must Contact List Type in a Contact List entry must be notified prior to Completion of the Signal Processing procedure
3)Specifically, those List Member Contact(s) identified as Must Contact have to be notified before a Resolution Code is selected.
5.Automated Processing without the use of an Operator
a.There are many situations where a predefined, automated response is appropriate for an alarm and/or supervisory signal
b.This response may be by Email, Pager, a Test Message (SMS/LLP), or a Customer voice communication following the instructions identified in a previously defined Smooth Operator process
c.See List Type below for information about assigning the appropriate response sequence and/or contact method to a Contact List entry
•System Requirements
a.Windows® 10 or higher operating system.
b.MKMS.exe version 5.1.35.8400 or higher
c.MKMSCS.exe version 5.1.35.7200 or higher
d.SQL Database scripted to release 20220630 or higher
❑Understanding the Contact List tab
•The Contact Lists tab has three sections:
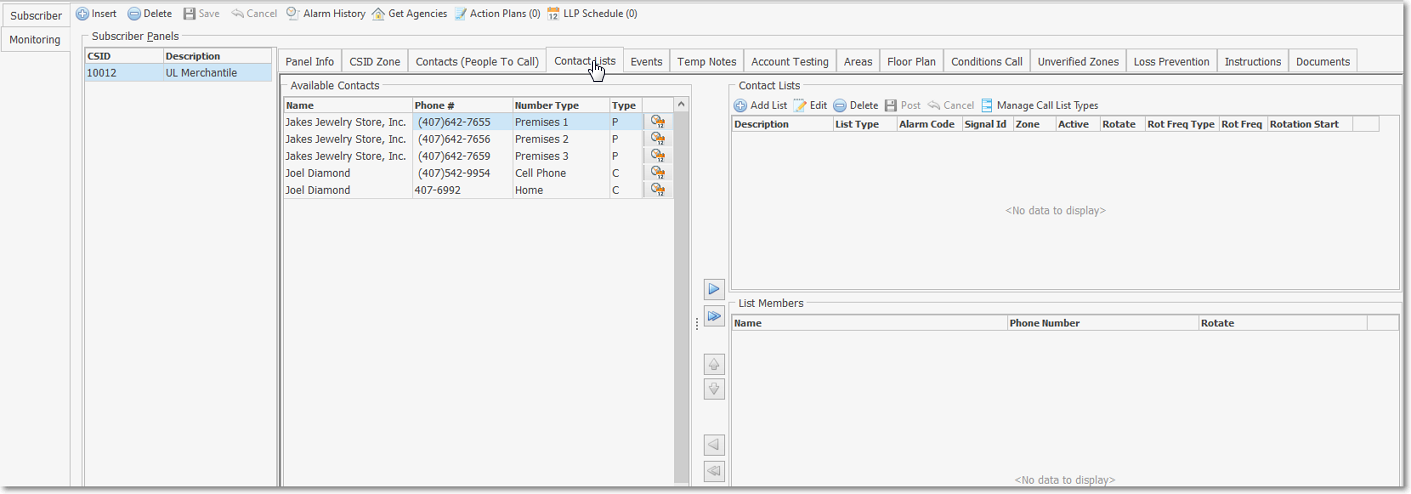
Monitoring tab - Subscriber Panels section - Contact Lists tab (Available Contacts only)
1.Available Contacts section - Displays the list of Contacts that includes the selected Subscriber Panel CSID's: Contacts (People To Call, Alternate Call List, and Dealer Call List members as may have been defined
a.Name, Phone #, and Number Type columns are presented
b.There is a View Schedules Icon ![]() which open the Schedules for: Grid containing a list of all Schedules assigned to this Contact
which open the Schedules for: Grid containing a list of all Schedules assigned to this Contact
2.Contact List section - Displays all previously created Contact Lists, and is used to enter a Contact List item
a.A Contact List item may be created with or without specified parameters (Description, Type, and some combination of an Alarm Condition Code, and/or Signal ID, and/or Zone Code) which will define what, how and when this Contact List item is communicated to the Central Station Operator,
b.A Manage Call List Types option
c.Additionally, there's an Active (Check box), Rotate (Check box), Rotate Frequency Type (Drop Down Selection List), Rotate Frequency (number), and Next Rotation (system maintained date) columns
d.Finally, there is also a View Schedules Icon ![]() which open the Schedules for: Grid containing a list of all Schedules assigned to this Contact List entry
which open the Schedules for: Grid containing a list of all Schedules assigned to this Contact List entry
3.List Members section - Displays all of the currently selected Contact List's List Members and is where a Contact from the list of Available Contacts section may be moved to the List Members section
a.Name, Phone Number, and Rotate columns are presented
b.There is a View Schedules Icon ![]() which open the Schedules for: Grid containing a list of all Schedules assigned to the selected List Member
which open the Schedules for: Grid containing a list of all Schedules assigned to the selected List Member
•The Contact Lists Form's Features include the ability to:
a.Assign an existing or new Schedule to an individual Contact, and/or Alternate Call List, and/or Dealer Call List entry that is included in the Available Contacts section
b.Assign an existing or new Schedule to a Contact List entry which will determine when this Contact List item should be implemented (See the Defining the Availability of a Schedule discussion in the Schedules chapter for that information)
c.Assign an existing or new Schedule to a List Member
•The result is that a Contact List item in the Contact List section, and/or specifically assigned Contact from the Available Contacts list, and/or a specifically assigned Contact List Member will identify who will provide the required response to (and therefore will be notified of) a special circumstance (as defined by the parameters set for that Contact List item)
✓That Response will be some type of notification to one or more of the designated Contacts and may be made prior to and/or instead of a Dispatch, and/or after a Dispatch has been completed
✓That Response may also be a Standard notification, or be communicated by Email, Pager, Custom, SMS (text message), or IVR (Interactive Voice Response message)
✓Whether or not that response is executed will always be determined by the Schedule to which it has been assigned, based on that Schedule's availability. (See the Defining the Availability of a Schedule discussion in the Schedules chapter for that information)
❑Open Contact Lists Form
•To access the Contact Lists tab,
✓Open the Subscribers Form and Retrieve (F2 Search) the appropriate Subscriber record
✓Select the Edit View Icon and Choose the Monitoring Tab and locate the Subscriber Panels section
✓Choose the appropriate Subscriber Panel's CSID.
✓Select the Contact Lists tab.
❑The Contact List tab contains three sections
I.Available Contacts - Lists all Contacts [ i.e., Contacts (People To Call) members, and/or Alternate Call List members and/or Dealer Call List members] with a cell phone and/or digital pager number previously entered for the selected Panel (CSID) (See A. Available Contacts section below)
II.Contact Lists - Lists all Contact Lists which were previously defined for the selected Panel (CSID) (See B. Contact Lists section below)
III.List Members - Those Contacts (see #1. Available Contacts above) who have been assigned to a selected Contact List (See C. List Members section below)
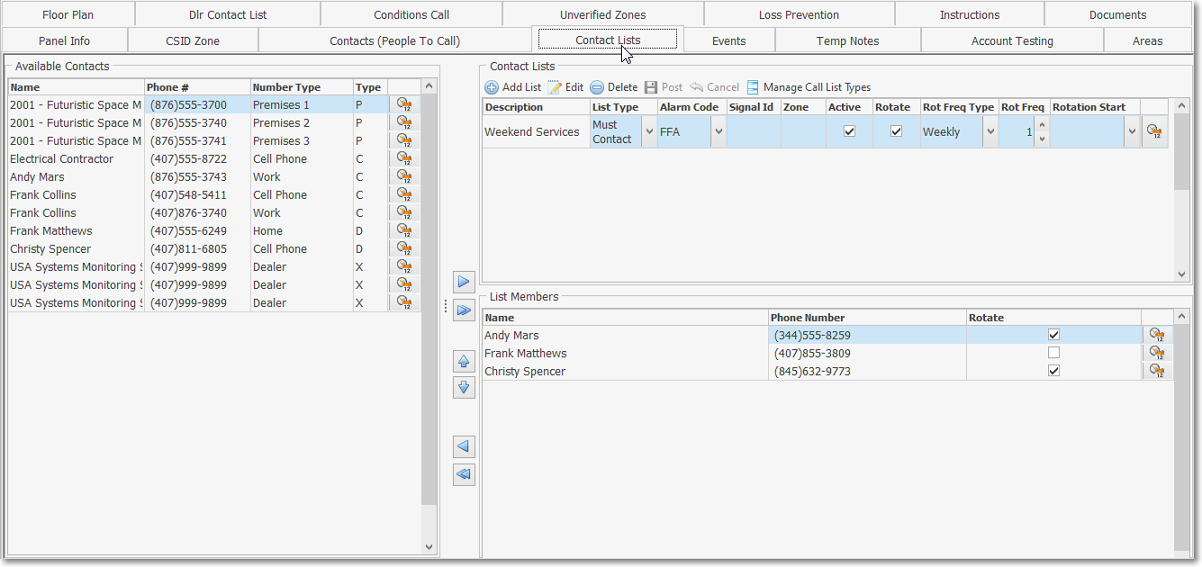
Edit View - Monitoring tab - Subscriber Panels section - Contact Lists tab with data
A.Available Contacts section - All Contacts (see # I. Available Contacts above) who are associated with the currently selected selected Panel (CSID) with a telephone number assigned will be included in this section.
1.Available Contacts section - displays all Contacts - which were entered in the Contacts (People To Call) tab and should have telephone numbers assigned - displayed for the selected CSID and will also include Contacts from “Alternate” and “Dealer” call lists when available, and will be listed in the following order:
a.Contacts in Contacts (People To Call) for the selected CSID (which includes Contacts only with an email address)
b.Contacts in associated Alternate call list,
c.Contacts of associated Dealer call list.
2.When an Available Contact is assigned as a List Member of a selected Contact List, that Contact will no longer be listed in the Available Contacts section, unless or until a different Contact List entry is started/selected.
3.To assign a Contact to an existing or new Schedule, Right-Click on that List Member, or Click the View Schedules Icon ![]()
a.See the Schedules chapter for detailed information about using and applying Schedules
B.Contact Lists section - Displays all previously entered Contact List item(s) in a Grid format (see # II. Contact Lists above):
✓Adding, Updating and Deleting a Contact List

Contact Lists section
1.The Contact Lists section has a dedicated Ribbon Menu with five options:

Contact Lists tab - Ribbon Menu
a.![]() Add List - Click this Icon add a new line item and enter the data as described below to create a new Contact List item
Add List - Click this Icon add a new line item and enter the data as described below to create a new Contact List item
i.Description: Enter a brief description for this Contact List entry.
a)This is a free form field that allows the User to identify how and why this Call List entry is to be used.
ii.List Type: By default, the List Type will be Standard and the Active field will be Checked - To modify that behavior, Select one of the other available options, as appropriate.
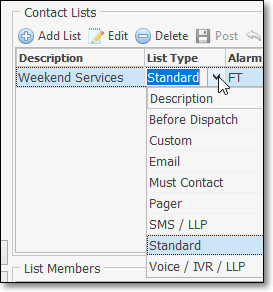
Contact List Management - Contact List Types
a)After Dispatch: Used specifically when a special Contact List is required after an alarm signal has been Dispatched, but before the Notification process has been started
b)Before Dispatch: Used specifically when a special Contact List is required after Verification (if required), but before an alarm signal has been Dispatched.
c)Custom - May be used specifically when a Contact List is required for a specific Alarm Code and/or Signal Id and/or Zone combination has been received that matches a previously defined Automatic Action.
d)Email - May be used specifically when a Contact List is required for a specific Alarm Code and/or Signal Id and/or Zone combination has been received that matches a previously defined Automatic Action.
e)Must Contact - The List Member(s) for this Contact List entry must be reached when this Contact List's Must Contact Type is selected:
i.The List Member(s) must be contacted prior to Completion of the Signal Processing procedure
ii.To ensure this action is taken, the List Member(s) will be shown in a Must Call List sub-tab within the Signal Options tab
iii.These Contact(s) must be reached before a Resolution Code is selected
f)Pager - May be used specifically when a Contact List is required for a specific Alarm Code and/or Signal Id and/or Zone combination has been received that matches a previously defined Automatic Action.
g)SMS / LLP - May be used specifically when a Contact List is required for a specific Alarm Code and/or Signal Id and/or Zone combination has been received that matches a previously defined Automatic Action.
h)Standard - This Contact List to be used for Notification based on the signal parameters of that Contact List entry.
i)Voice / IVR / LLP - May be used specifically when a Contact List is required for notification of a specific Alarm Code and/or Signal Id and/or Zone combination has been received that matches a previously defined Automatic Action (See Smooth Operator and IVR Management for additional, related information)
iii.Alarm Code, Signal Id, and/or Zone: Any combination of these fields may be populated, as appropriate:
a)Used to create a Contact List definition for a specific signal configuration (the situation that requires the notification response being defined here).
b)When all three fields are blank, this Contact List will be used for ALL signals received from this CSID (thus replacing the standard Operator Guided Response for Verification and/or Notification)
iv.Active: Will be Checked by default. A Contact List entry must be Active to be used in the MKMSCS application.
v.Rotate - If the responding List Members of this Contact List item are to be rotated, Check this box (see Rotating List Members below for more information)
vi.Rot Freq Type - Use the Drop-Down Select List provided to Choose the appropriate Rotation Frequency Type
a)Hourly - Rotation occurs Hourly
b)Daily - Rotation occurs Daily
c)Weekly - Rotation occurs Weekly
d)Monthly - Rotation occurs Monthly
vii.Rot Freq - Code representing the Rotation Frequency Type ("Rot Freq Type") entered above
viii.Rotation Start - Use the Drop-Down Calendar/Date/Time dialog to Choose the initial Rotation Starting Time
ix. Click the View Schedules Icon ![]() to open the list of all Previously Defined Schedules List
to open the list of all Previously Defined Schedules List
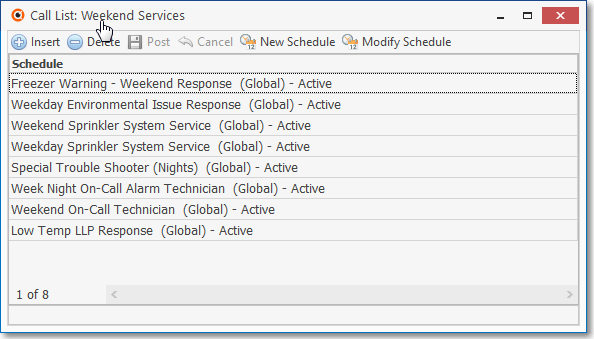
Contact Lists tab - Contact List section - Schedules for (selected Contact List)
a)Previously defined Schedules may be deleted or modified, and new Schedules may be added
❖See the Schedules chapter for detailed information about defining, using and applying Schedules
b.![]() Edit - Click this Icon to modify the selected Contact List item
Edit - Click this Icon to modify the selected Contact List item
c.![]() Delete - Click this Icon to remove the selected Contact List item
Delete - Click this Icon to remove the selected Contact List item
d.![]() Post - Click this Icon to save any additions and/or changes made to the Contact List item
Post - Click this Icon to save any additions and/or changes made to the Contact List item
➢Note: Attempting to create a Contact List entry with a configuration that already exists will:
▪Present a message informing the User that a list with that configuration already exists
▪Ask the User to modify it so it's unique
▪Allows the User to abort the entry
e.![]() Cancel - Click this Icon to abandon any additions and/or changes made to the Contact List item
Cancel - Click this Icon to abandon any additions and/or changes made to the Contact List item
f.![]() Manage Call List Types - A default set of Call List Types is predefined, but additional ones may be added
Manage Call List Types - A default set of Call List Types is predefined, but additional ones may be added
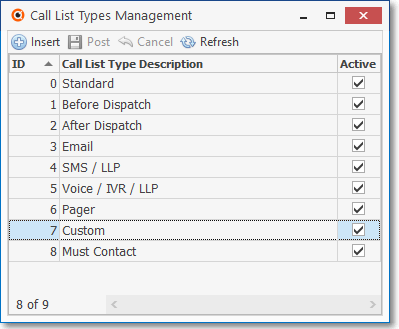
Call List Types Management dialog
▪This is the list of the currently defined List Types (see 1. a., ii above) and may be used to view all available options
▪Click the Insert Icon ![]() to add to this list
to add to this list
▪You may add as many as may be required.
❖Rotating List Members - If the Contacts used for Notification are never rotated, the same Contact (person) may get virtually all of the notification calls for which this Contact List entry was designed.
•For many individuals (Contacts), this situation may be unfair and inappropriate.
•Periodically Rotating who gets notified helps to resolve this "fairness" problem
•In some cases, the specific place (e.g., third to be called, last to be called, etc.) of a List Member for a Contact List entry may be "locked in place" by not Checking the Rotate box for that individual List Member
•In special cases, the List Members of a Contact List entry should never be rotated, so the Contact List entry's Rotate box would not be Checked
➢Rotation setup rule:
▪The CallListRotateWorkerEnabled option in Company Settings is set to True (on) by default, but may be set to False (off) if Rotation will never be used by your Company.
2.Contact Lists Grid displays the Contact Lists defined for the selected Subscriber Panel (CSID)
a.To assign an existing or new Schedule to a Contact List item, Right-Click on that Contact List item and Choose either Assign Existing Schedule or Add New Schedule,
b.To Assign an existing or new Schedule to this Contact List item, View existing Contact List Assignments, Modify, and/or Remove a Schedule assignment, Click the View Schedules Icon ![]() to open the Schedules For Contact List item dialog.
to open the Schedules For Contact List item dialog.
c.Click the View Schedules Icon ![]() to open the Schedules For (this Contact List) dialog
to open the Schedules For (this Contact List) dialog
C.List Members - displays all Contacts who are assigned to the currently selected Contact List entry.
1.Understanding the columns in the List Members section
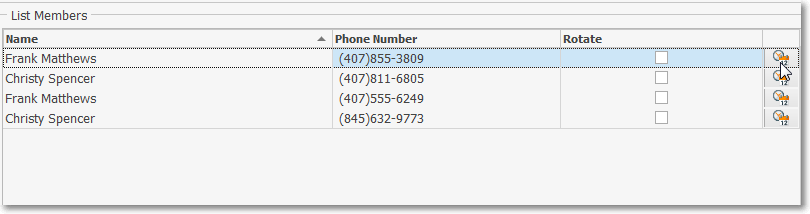
Contact Lists tab - List Members section
a.Name - The Name assigned to the Contact
b.Phone Number - The Telephone Number assigned to the Contact
c.Rotate - If this List Member is to be rotated, Check this box (see Rotating List Members above)
d.Click the View Schedules Icon ![]() to open the Schedules For (this List Member) dialog with Create a New Schedule, Delete (Un-assign) an Existing Schedule, Add a New Schedule for this Contact, Modify an Existing Schedule
to open the Schedules For (this List Member) dialog with Create a New Schedule, Delete (Un-assign) an Existing Schedule, Add a New Schedule for this Contact, Modify an Existing Schedule
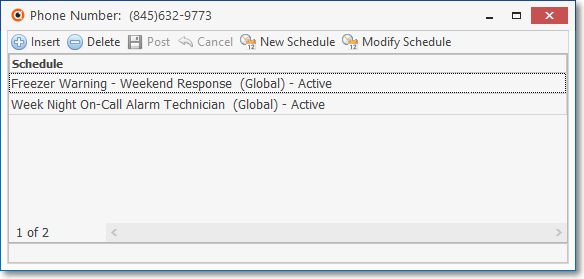
Contact Lists tab - List Members section - Schedules for (selected List Member) Phone Number
2.Identifying List Members:
a.To add a Contact to the List Members Grid for the selected Contact List item:
i.Choose the Contact List item that requires another List Member be added
ii.Locate the appropriate Contact in the Available Contacts section to be added to this Contact List item's List of Members
iii.Double-Click on the desired Contact
iv.That Contact will be moved from the Available Contacts section to the List Members section
b.Right-Click on any List Member entry to
i.Assign this entry to an existing Schedule
ii.Assign this entry to a new Schedule
c.To Assign an existing or new Schedule to a List Member item, and/or to View existing List Member Assignment(s), Modify, and/or Remove a Schedule assignment from a List Member,
i.Click the View Schedules Icon ![]() to open the Schedules For List Member item dialog
to open the Schedules For List Member item dialog
ii.See the Schedules chapter for detailed information about using and applying Schedules
d.To remove a Contact from the List Members Grid and return it to the Available Contacts Grid :
i.Double-Click an individual Contact on the List Members Grid
ii.That Contact will be moved from the List Members section back to the Available Contacts section
e. Utilize any of the directional arrows located to the left of the List Members Grid Add, Remove, and/or Reorder List Members:
![]() Add the currently selected Contact in the Available Contacts Grid to the List Members Grid
Add the currently selected Contact in the Available Contacts Grid to the List Members Grid
![]() Add All Contacts in the Available Contacts Grid to the List Members Grid
Add All Contacts in the Available Contacts Grid to the List Members Grid
![]() Move the currently selected Contact Up or Down within the List Members Grid
Move the currently selected Contact Up or Down within the List Members Grid
![]() Remove the currently selected Contact from the List Members Grid
Remove the currently selected Contact from the List Members Grid
![]() Remove All Contacts from the List Members Grid
Remove All Contacts from the List Members Grid
❑Before Dispatch and After Dispatch - The instructions and images below illustrate the processing steps for any Alarm Event that is implementing a Before Dispatch and/or After Dispatch Contact List
1.When an Operator Guided Response is in effect, Operators will utilize the same familiar interface
Operator Guided Response - Before Dispatch Call List
a.The Dial button and Call Results Drop-Down Select List are located in the same places,
b.The only difference is that once the Call List is exhausted, the Operator will have to Click on the Next button to move to the Dispatch sequence.
c.Clicking Next will move the Operator to the actual Dispatch dialog.
Operator Guided Response - Typical Dispatch dialog
d.Operator will carry out the Dispatch sequence as normal and when complete, Click on the Next button.
Operator Guided Response - After Dispatch Call List
e.If there is an “After Dispatch” Contact List assigned, once the call list is exhausted or an applicable response is logged, the system moves on to the next logical step.
f.If there is no “After Dispatch” Contact List assigned, the system will move on to the next logical step in the Operator Guided Response.,
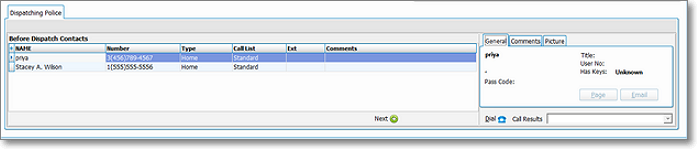
2.When an Action Plan is in effect, the Action Plan functions in the same manner (as the screens below illustrate)
a.Action Plan - Before Dispatch
1)The Operator will Call the listed Before Dispatch Contacts as presented
2)Enter the related Contact results information using the Drop-Down Selection List presented, then
3)Click on the Next button
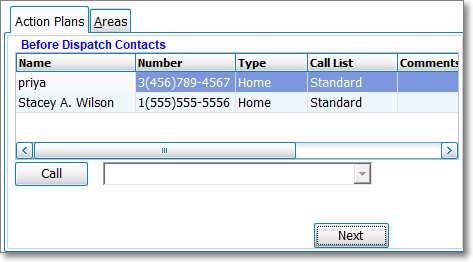
Action Plan - Before Dispatch dialog
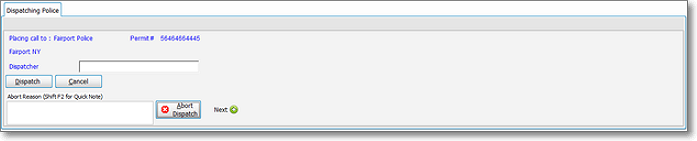
b.Action Plan's (typical) Dispatch dialog -
1)The Operator will Call the listed Dispatcher as presented,
2)Enter the Dispatcher information
3)Respond to any other prompts presented, then
4)Click on the Next button
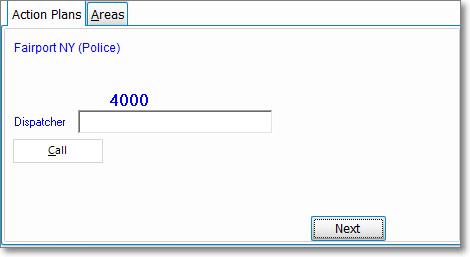
Action Plan - Typical Dispatch dialog
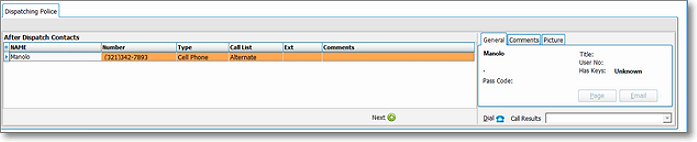
c.Action Plan - After Dispatch
1)The Operator will Call the listed After Dispatch Contacts as presented
2)Enter the related Contact results information using the Drop-Down Selection List presented, then
3)Click on the Next button
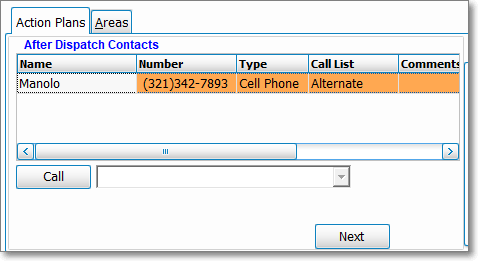
Action Plan - After Dispatch dialog