❑Service Info section within the Edit View of the Subscribers Form:
•The Service Info section is used to initialize the Service Tracking System's portion of the Subscriber record.
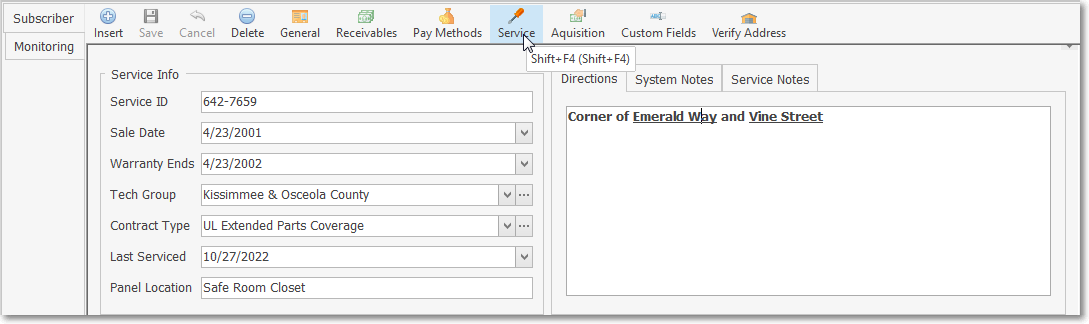
Subscribers Form - Edit View - Service Info section
❑Accessing the Service Info Section,
•Select the Receivables Tab on the MKMS Desktop and Click the Subscribers (F3) Icon.
•On the Subscribers Form, Locate the appropriate Subscriber record using the Subscriber Search function.
•Click the Edit View Icon and Choose the Subscriber Tab
•Click the Service Icon to view the Service Info section.
❑Entering or Updating Service Information:
•Service ID - Accepts all alphanumeric characters (a-z, A-Z, 0-9) and regular punctuation marks - up to a total of 15 characters in length.
✓Many users assign the Subscriber's Primary Telephone Number as the Service Account Number such as "407-870-0040"
✓Their original Sale Date plus their Primary CSID (or visa versa) is another choice such as "2007-09-24/3277".
✓Just be consistent - and most importantly - have the Service ID entry actually mean something to the Technicians.
•Sale Date - Use the Drop-Down Calendar/Date Entry field to enter the Sale Date (or the installation's completion date - if you prefer) on which their Warranty Ends Date.
a)Click on the Date field and type the desired Date using a MM/DD/YYYY format; or
b)Use the Drop-Down Calendar/Date Entry field provided to Choose the desired Date
✓By default, the Value of the DefaultWarrantyTerms option in the Company Options Form will be set to 12.
▪This Value represents the number of Months after the Sale Date entered in the Service Info section of the Edit View of the Subscribers Form when the installation's Warranty Ends.
▪The Value will automatically populate that Warranty Ends field (i.e., Sales Date + Value in months = Warranty Date).
▪This Value may be changed, based on your individual Company's Warranty Policy.
•Warranty Ends - The warranty expiration date may be entered or modified as needed, but will be initially set based on the DefaultWarrantyTerms option's setting.
•Tech Group - Use the Drop-Down Selection List to assign a Technician Group to this Account.
✓Double-Click on the appropriate Technician Group within the Drop-Down Selection List provided.
✓Click the Ellipse Icon to open the Technician Group Maintenance Form. where a Technician Group may be created new or revised (if the appropriate User Access Rights have been granted for the Technician Group Form)
•Contract Type - If - and only if - the Subscriber has a Service Agreement (or any other type of Extended Warranty), use the Drop-Down Selection List to Choose the appropriate Service Contract type. Otherwise, leave this field blank!
✓Double-Click on the appropriate Service Contract within the Drop-Down Selection List provided.
✓Click the Ellipse Icon to open the Service Contract Maintenance Form. where a Service Contract may be created new or revised (if the appropriate User Access Rights have been granted for the Service Contract Form)
•Last Serviced - When initially setting up this Service Information record, enter the Date of Completion as the Last Serviced Date using the Drop-Down Calendar/Date Entry field provided. This field may be manually updated later, if needed.
a)Click on the Date field and type the desired Date using a MM/DD/YYYY format; or
b)Use the Drop-Down Calendar/Date Entry field provided to Choose the desired Date
✓Once this field is initially populated, each time a Service Request (Work Order) is Completed, the Last Serviced Date field will be automatically updated with that just Completed Work Order's Serviced On Date.
•Panel Location - Enter the Control Panel's location (this is printed on each Work Order which makes the Technician's task of locating it at the premises so much easier).
❑Tabs in the Service Info section:
•Directions tab - Enter concise Directions to this location.
✓Double-Click this field to use the Rich Text Editor dialog (see the Rich Text Editor chapter for more information about this feature).
•System Notes tab - Enter System Notes to briefly describe the installation.
✓Double-Click this field to use the Rich Text Editor dialog (see the Rich Text Editor chapter for more information about this feature).
•Service Notes tab (Internal Only) - Enter any additional Comments that would be useful to Users interacting with this Subscriber.
✓Double-Click this field to use the Rich Text Editor dialog (see the Rich Text Editor chapter for more information about this feature).
✓These special - internal use only - Service Notes will will be displayed on a special Service Notes (Internal) tab when a Service Request Form is opened.

•Click the Save Icon on the Edit View Menu to record the entries.
❑Editing with the Rich Text Editor (See Rich Text Editor)
•Text fields - in this case the Directions, System Notes and Service Notes fields listed above - support the Rich Text Editor that allows bold, italics and underlines of text, and the selection of various Font types, it's sizes, with color, and highlighting available, too.
✓Double-Click the text field to see if the Rich Text Editor dialog appears - here it is available in the Directions, System Notes and Service Notes fields
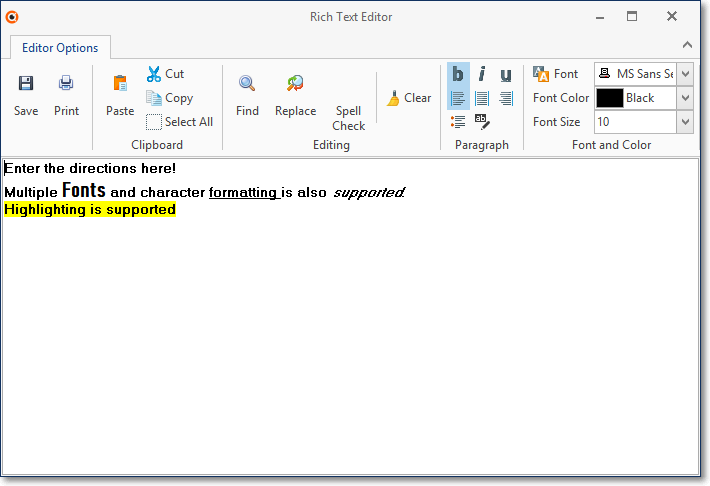
Directions displayed in the Edit Rich Text Form
✓Always Click Save to record any changes made in the Rich Text Editor Form.
✓Also, be sure to Click the Save button on the Service Info Section to permanently record this information.
✓What is entered in the Rich Text Editor is printed on the Work Orders with that special text formatting (except the Service Notes which are not printed on any externally available format).