❑Job Work Sheets provide a detailed (selectable) listing of all Job Costing entries for a selected Job, or All Jobs.
•There are three ways to access the Print Job Work Sheets report's dialog:
a)From the Backstage Menu System Select Reports and Choose Job Costing and Select the Job Costing 2.0 option and Click the Job Work Sheets option
b)From the Quick Access Menu, Select Reports and Choose Job Costing and Select the Job Costing 2.0 option and Click the Job Work Sheets option
c)Click the down arrow ‚ on the Print Icon at the top of the Job Costing Form and the Choose Job Work Sheets.
❑Print Job Work Sheets tabs - There are two tabs on the Print Job Work Sheets dialog.
•Options - Initially only the Options tab is shown (until you make your Options selections and Select Print).
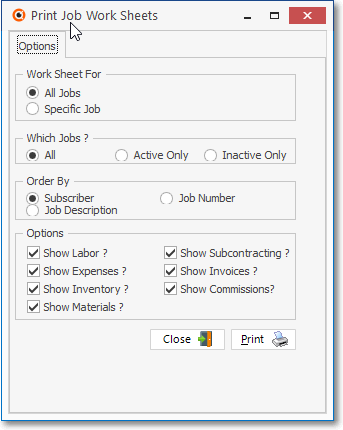
✓Work Sheet For - Select which Job(s) are to be reported.
Print Job Work Sheets - Options tab
▪All Jobs - If this Form was accessed through the Job Costing Reports menu, All Jobs is the default.
▪Specific Jobs - If this was accessed through the Job Costing Form the Specific Jobs field is unchangeable and the currently selected Job Number is inserted automatically.
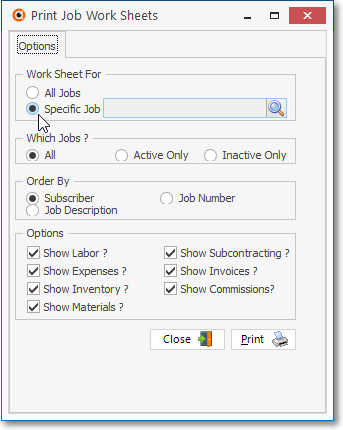
Print Job Work Sheets - opened in Job Costing Form
▪Specific Job - Optionally, If this Form was accessed through the Job Costing Reports menu, the User may specify the Job(s) to be reported
oIf Specific is selected, Click the Search Icon to display the Select Job dialog.
oCheck the Subscriber records - as many as needed - that are to be included in the Jobs Work Sheets report.
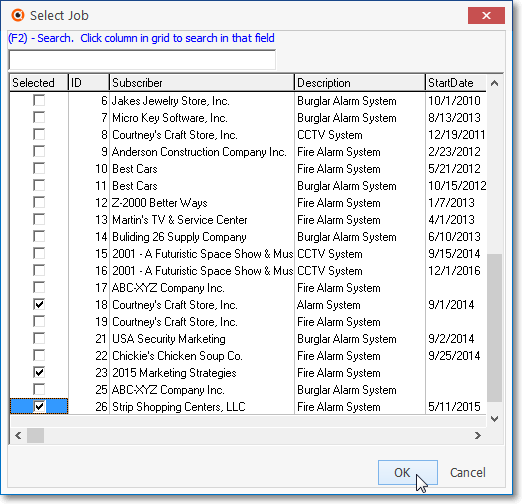
Select Job dialog
oClick OK when you have located and Checked all of the desired Job records.
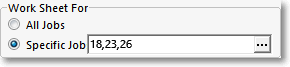
Specific Job Numbers
oThe Select Job dialog will Close and all of the selected record numbers will be inserted into the Specific Job field.
✓Which Jobs ? - Choose which Job(s) are to be printed based on their status.
▪All - All (or all Selected) Jobs will be listed.
▪Active Only - All (or all Selected) Jobs will be listed that are still Active (the Complete field on the Job Costing Form is blank).
▪Inactive Only - All (or all Selected) Jobs will be listed that are Inactive (the Complete field on the Job Costing Form has a Date entered).
✓Order By - Choose the sequence in which the data will be listed.
▪Subscriber - Listed alphabetically by Subscriber's Name.
▪Job Number - Listed numerically by the system assigned Job Number.
▪Job Description - List alphabetically by the Job Type's Description (assigned to each Job), then within each Description set, alphabetically by the Subscriber's Name.
✓Options - By default All Options Boxes are Checked. Check the appropriate boxes to indicate what types of Job Costing related information you want included on these Job Work Sheets.
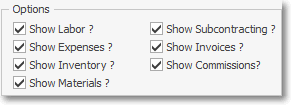
Job Work Sheet - Options
▪Show Labor? - Check this box to include the Labor charged to the Job.
➢Note: The Technician's Pay Rate will not be included in the Labor data if the User (Employee) does not have access rights to that information.
To grant access rights to the Pay Rates information the Employee must have a Check in the Display Rates box on the Security tab of the Employee Form.
▪Show Expenses? - Check this box to include the Expenses charged to the Job.
▪Show Inventory? - Check this box to include the Inventory Items used for the Job.
▪Show Materials? - Check this box to include the Materials costs charged to the Job.
▪Show Subcontracting? - Check this box to include any Subcontractor fees charged to the Job.
▪Show Invoices? - Check this box to include the Invoices that were Generated Invoices created within the Job Tasks tab.
▪Show Commissions? - Check this box to include the Commissions charged to the Job.
✓Print - Click the Print button ![]() to Preview and optionally Print (to a File or a Printer) this Job Work Sheets report.
to Preview and optionally Print (to a File or a Printer) this Job Work Sheets report.
✓To Exit this Report dialog, Click the Close button ![]() toward the bottom of the Options tab.
toward the bottom of the Options tab.
•Preview - The Preview tab presents the report which resulted from the Options you've selected.
✓Up Arrow/Down Arrow - hi - Moves the report one line up, or one line down, respectively.
✓Page Up/Page Down - Moves the report to the previous or next page, respectively.
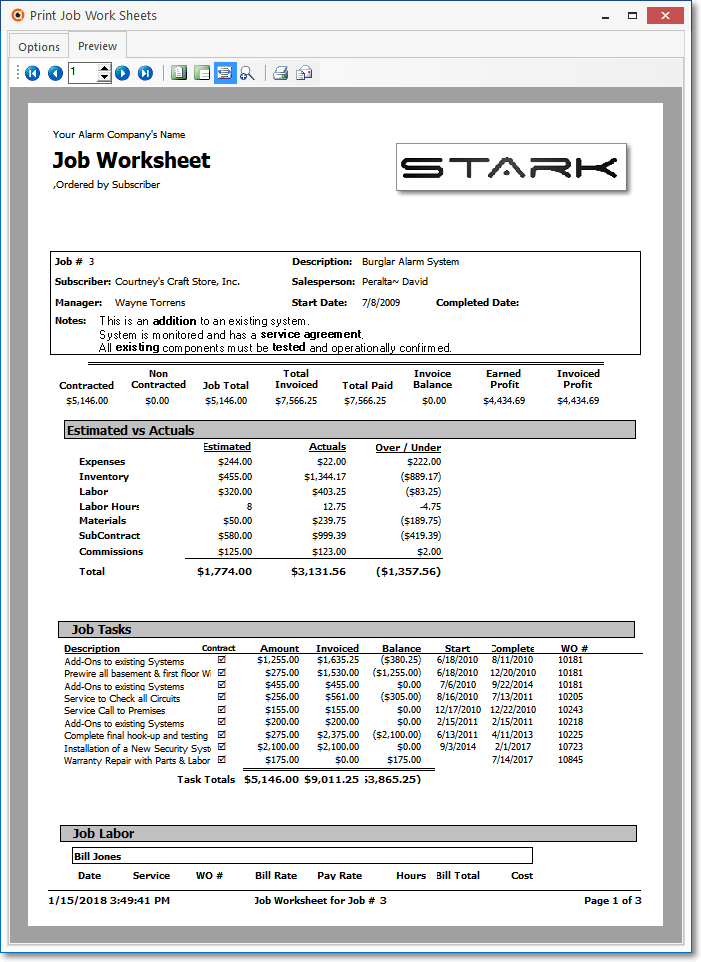
Job Worksheet - Preview tab
✓Home - ![]() - Using either the screen Icon or your Keyboard's Home key, moves the report to the top of the first page.
- Using either the screen Icon or your Keyboard's Home key, moves the report to the top of the first page.
✓End - ![]() - Using either the screen Icon or your Keyboard's End key, moves the report to the bottom of the last page.Arrows - The arrows allow you to move back and forth, from page to page.
- Using either the screen Icon or your Keyboard's End key, moves the report to the bottom of the last page.Arrows - The arrows allow you to move back and forth, from page to page.
✓Number - Indicates the page number you are viewing.
▪You may also type in a specific page number, Press 8 Enter and that page will be displayed immediately.
▪If you enter an invalid page number, it will be ignored.
✓Fit To Page - Click the first button after the arrows to size a full page of the report to fit the screen.
✓Zoom To 100% - Click the second button after the arrows to display the page at 100% (of the printed view).
✓Fit To Page Width - Click the third button after the arrows to size the page of the report to fit the full width of the screen.
✓Zoom To Percentage - Click the fourth button after the arrows to re-size the page of the report by percentage.
![]()
▪When you Click the Zoom To Percentage button, the Percentage selector will be displayed.
▪You may then Click the Up or Down ‚ arrow to set the exact amount of Zoom you want.
✓Print - Click the Print button to Print (to a File or a Printer) ![]() the displayed Print Job Work Sheets report.
the displayed Print Job Work Sheets report.
✓Email - Click the Email button ![]() to send the Report to an Email Address of your choosing.
to send the Report to an Email Address of your choosing.
•To Exit the Preview tab and Close this Report dialog Form, Click the Close ![]() box on the right at the top of the Preview tab.
box on the right at the top of the Preview tab.