❑Employee codes are used by Service Tracking, Accounts Receivable, Inventory Tracking & Job Costing, and the Monitoring Module
•As each module is implemented, the instructions for that particular module reference the Employee Form - generally requiring the entry of additional information.
✓For example, during the implementation of the Accounts Receivable System module, the instructions would concentrate only on accounting specific Employee information requirements.
•Employee information may be printed using the Employee Codes List report.
➢Note: The Employee Code "0" with the name of "Default Do Not Delete" is a system record and should not be modified or deleted.
❑Employee - Defining the required Employee information:
•To open the Employee Form:
a)From the Backstage Menu System Select Maintenance and Choose Employee to access this Employee Form, or
b)From the Quick Access Menu, Select Maintenance and Choose Employee to access this Employee Form.
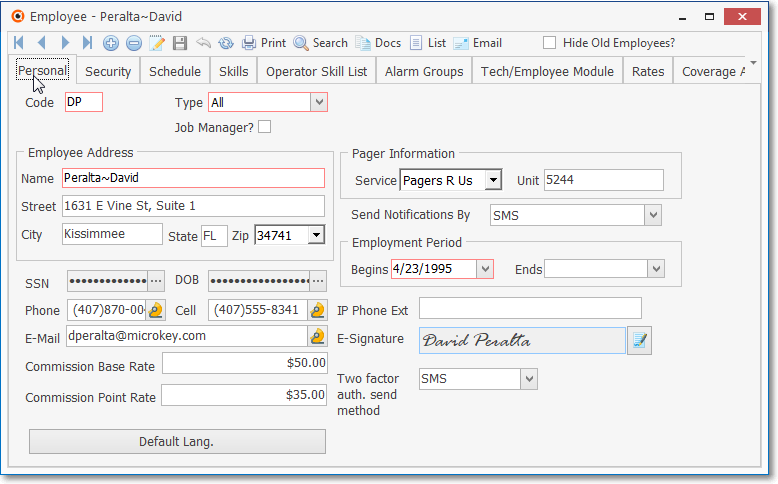
Employee Form - Personal tab
✓This Employee Form may be Re-sized by Dragging the Top and/or Bottom up or down, and/or the Right side in or out.
•Navigation Menu - The Navigation Menu is located at the top of the Employee Form.
![]()
✓This Navigation Menu provides the normal Record Movement, Add, Edit, Delete, Save, Cancel, Refresh, Print, Search, Docs, List and Email Icons.
•Hide Old Employees? - At the top of the Employee Form next to the Navigation Menu is this Check box.
![]()
✓Every Employee ID that has been used as part of a Transaction (e.g., Employee who made a Sale) or Process (e.g., Employee who worked on a Service Request) can never be removed from the database.
✓Why?
▪Because that Employee ID becomes part of the internal "History" of the Transaction or Process.
▪So, once an Employee leaves the Company, rather than deleting that Employee's record, she/he is assigned an Ends Date - indicating that she/he is now an Old Employee (not an Active Employee).
✓Therefore:
▪While viewing the Employee Form, to only view Active Employee records (those Employees who have not been assigned an Ends Date ), Check this Hide Old Employees? box.
▪Or, if you are researching information relating to an Old (departed) Employee, be sure that the Hide Old Employees? box is not Checked.
•To define an Employee, Select the Personal tab:
✓Click the Add Icon on the Navigation Menu to start an Employee entry in the Personal tab.
❖The record can not be saved unless the mandatory information is entered.
❖Although the red boxed fields constitute a valid record, enter - as appropriate - all of the Personal tab information at a minimum.
▪Code - Enter a Code - think of it as their Employee Identification Code - to represent this Employee.
oUp to four alpha characters plus dashes, underlines and spaces are allowed.
oTypically, you should use their initials. Do Not Use Numbers in the Employee Code.
o If a duplicate would result, add another character at the end (ABC, ABCZ, ABCY, ABCX, ETC.).
▪Type - Using the Drop-Down Selection List provided, select a Type classification.
oAdministration - for key staff such as those Employees responsible for accounting operations, are a job manager, and/or perform other management level functions
oAll - for Employees who may be involved in any/all phases of the business
oOperator - for Employees who primarily perform Central Station Monitoring functions
oSales - for Employees who are classified as Salespersons.
➢Note: When assigning a Salesperson to a Subscriber, Prospect, Invoice or Proposal: only those Employees whose Employee Type is identified as either Sales or All will be available (in the Drop-Down Selection List) for populating the Salesman (or Commission To) fields.
oTechnician - for Employees who are Service Technicians.
▪Job Manager? - Check this box if the Employee has been assigned the Type classification of All or Administration, and is an individual who may be assigned the duties of a Job Manager within the Inventory Tracking & Job Costing System,
oThe Lead Technician assigned to Service Requests in the Service Tracking System is identified as such by being the first Technician assigned to that Work Order.
> However, the Lead Technician is not considered a Job Manager
> Therefore, a Technician Employee Type may not be identified as a Job Manager in the Inventory Tracking & Job Costing System,
oA Job Manager must be assigned a Type of either All or Administration.
> Employees should only be identified as a Job Manager if they actually Manage a Job in the Inventory Tracking & Job Costing System,
▪Name - Enter the Name of the Employee
▪Begins - Click the Drop-Down Calendar/Date Entry field provided, select the Date of Hire in the Begins field.
a)Click on the As Of Date field and type in the desired Date using a MM/DD/YYYY format; or
b)Use the Drop-Down Calendar/Date Entry field provided to Choose the desired As Of Date
➢Note: This is the absolute minimum amount of information that may be entered to establish an Employee record.
✓Click the Save Icon on the Navigation Menu to record this Employee.
✓Any number of additional Employee records may be defined, as required.
•The keyboard's Insert (to start a new entry on an Employees Form tab with a Grid format), Delete (to remove an existing entry on an Employees Form tab with a Grid format); plus the Ctrl+S combination (for Save) are implemented, and the Ctrl+Insert combination will start a new record on the Employees Form
❑Tabs - The Tabs that are available are displayed on the Edit View Form.
•The Left and Right Arrow Navigation Keys will move the focus from one Employees Form tab to another, and the Ctrl+Insert combination will start a new record on the Employees Form;
![]()
•Based on the Employee's Type code that was assigned to this Employee record, the Tabs are:
➢Note: Not all Tabs will be displayed for every Employee.
The Tabs that are displayed will be determined by the Type selected for the Employee record currently being viewed.
✓Personal - for information such as name, address, and telephone. This is the primary Data Entry Form and is where an Employee record is originated.
✓Security - to access information (modifiable only by an Administrator) where Security and Access Rights relating primarily to the Accounts Receivable System, access to the Service Tracking System to use the Time Sheets process, Central Station Monitoring Operations and Virtual Operators are set.
❖This is a mandatory Third Edition UL® 1981 Standard 6.3(1-7) requirement.
✓Schedule - to enter the Employee's Schedule (normal hours and days worked) used by the Technician Scheduling system in the Service Tracking System.
✓Skills - allows you to define each Technician's Skills for the Service Tracking System.
✓Operator Skills - allows you to record the alarm processing Skills attained by each Employee who is an Operator.
✓Alarm Groups - to assign the alarm monitoring Alarm Groups this Employee may process.
✓Tech/Employee Module - to define access codes, each Technician's permitted access schedule, and their work location information - for Web Tech Module users only.
✓Rates - to define the pay rates and bill rates for each Employee who has been identified as a Technician or performing All tasks and used when completing Service Requests in the Service Tracking System and by the Inventory Tracking & Job Costing System module.
✓Coverage Areas - to define the Zip Code(s) within which a Technician is available for assignment to a Service Request.
✓SMTP Setup - must be completed when your Company want to use an Email protocol not associated with Microsoft® Outlook® (and/or Outlook Express®).
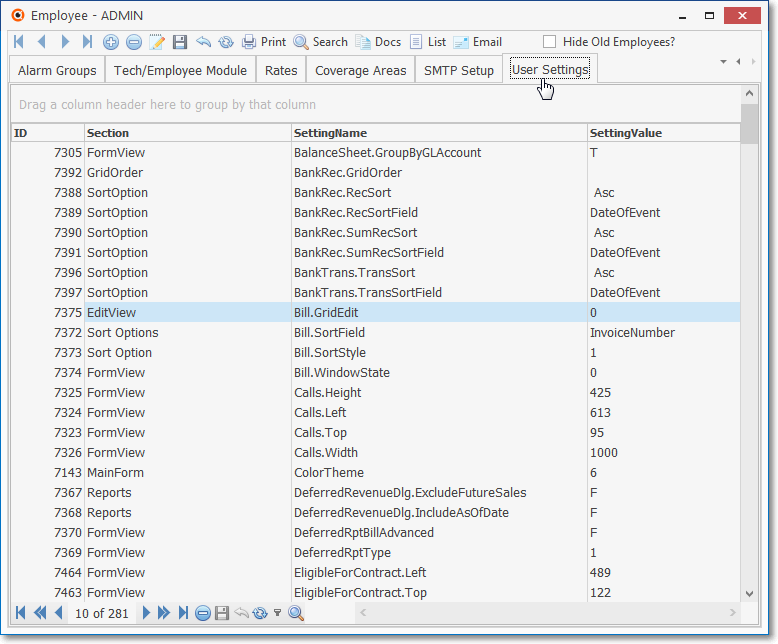
✓User Settings - allows an authorized User to Locate, View and Adjust (if applicable) the most recent Form settings associated with the current color, configuration, dimensions and access rights.
❑Using the Special Functions on the Navigation Menu at the top of the Employee Form:
•Print Option - Click the Print Icon to open the Employee Codes report dialog which provides a list of the Codes, and the associated Name, Type and Phone Number of each Employee.
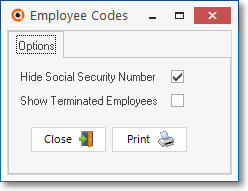
Employee Codes - Option tab
•Search Option - Click the Search Icon to look up a specific Employee record.
✓Use the Search button to locate a specific Employee record when you have too many Employees to be listed on the Table View tab.
✓Click the Search button to open the Search Employee dialog.
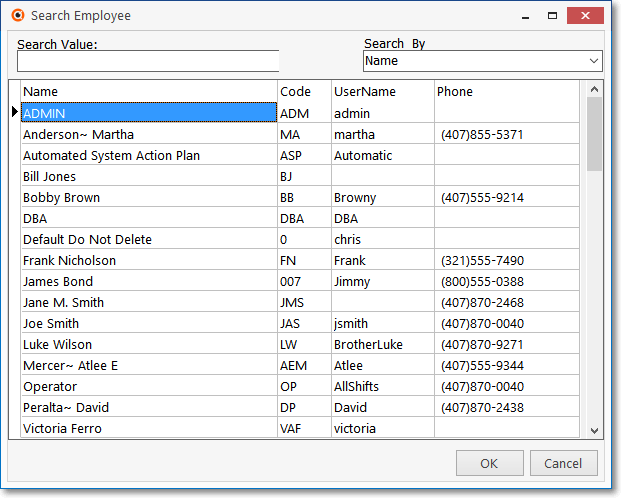
Search Employee dialog
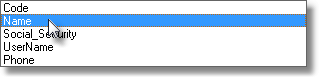
✓Search By - Use the Drop-Down Selection List to Choose the field (the available fields are shown below) that you want to Search By.
✓Search Value - Enter the first few characters of the desired Employee record (based on the Search By method you've chosen)
▪This is an incremental Search starting from the first character in the chosen field.
▪As you type in characters, the system seeks the Employee record that most closely matches the characters you've entered so far.
✓Select - Once you see the desired Employee record, Click on that Employee's Name to Select that record.
✓Close - Then Click OK to Close the Search Employee dialog.
▪The selected Employee record will be displayed in the Employee Form's Edit View.
•Documents Option - Use the Docs Icon on the Navigation Menu on the Employees Form to attach various types of Documents to the selected Employee record.
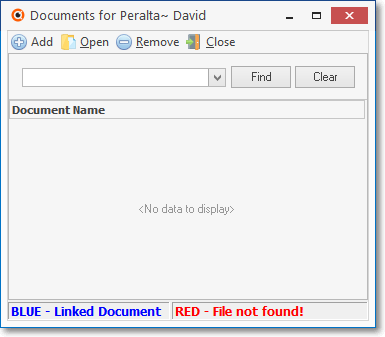
Documents Form
✓Employees often have printed or electronic Documents that relate to their file and must be saved for future reference.
▪To save these electronically (if you do not already have an electronic copy such as a Word® document), Scan the printed Document and save it to your Hard Disk (or your File Server) in either the ".jpg" or ".pdf" file format.
▪Click the Docs Icon.
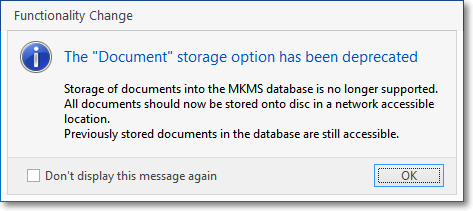
▪Click OK to acknowledge the message.
▪Click the ![]() Icon to identify a Document using the Windows ® Open interface presented.
Icon to identify a Document using the Windows ® Open interface presented.
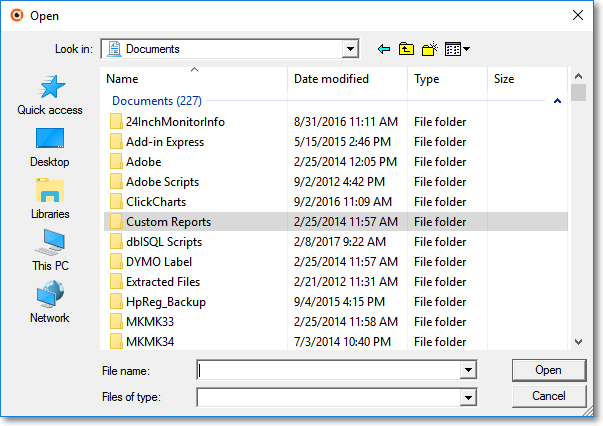
▪Locate the appropriate File and Click Open.
▪The selected File Name will be inserted in the Document Name column.
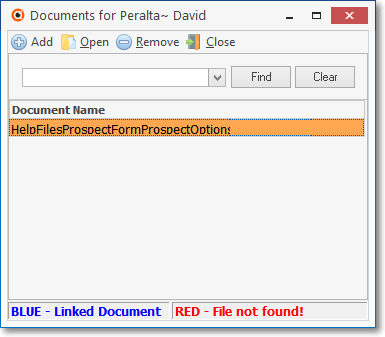
▪See the Documents chapter for detailed instructions
•List Option - Click the List Icon on the Navigation Menu at the top of the Employee Form to display a tabular (spreadsheet style) Record Listing of the currently defined Employees.
✓This List View may be displayed and/or hidden by Clicking and then re-Clicking the List Icon.
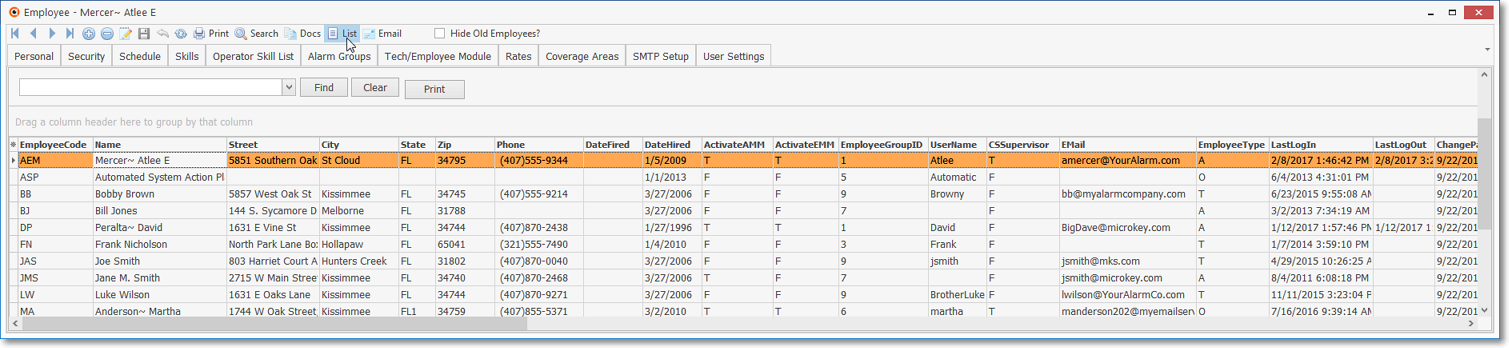
▪There is a Horizontal and/or Vertical Slide Bar - displayed when needed - located at the bottom and/or side of the Employee List to allow the User to view all of the data included in all of the columns.
✓Each column's Header Name describes the data contained in that column.
▪Clicking on a Header Name will set the order in which the Employees will be listed.
▪Clicking on the same Header Name will set the order in the opposite direction (ascending vs. descending).
![]()
▪The Header Name that is determining the Order of the list will have an Arrow indicating the Order displayed next to that Header Name.
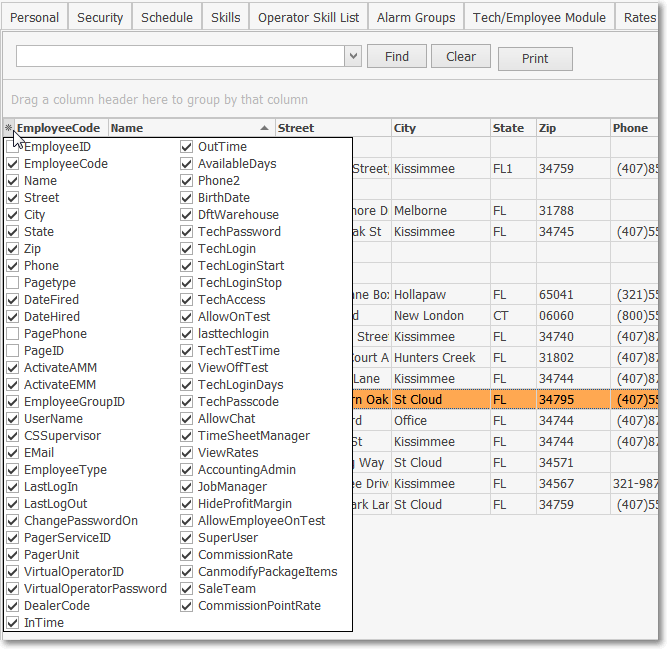
✓Some columns may contain expanded comments or other information (e.g., the details of Action Steps of an Action Plan) which may make the List View's display difficult to use.
Ø In the List View, you may Click the Asterisk at the left of the row of Header Names to display a Drop-Down Check List of each column's Headed Name.
▪Check any Header Name to be included in the List View (by default, All Header Names will be Checked)
▪Remove the Check for any Header Name (see illustration below) that is to be removed from the List View.
•Email - Click the Email Icon to open the Email Dialog (e.g., using Outlook©, or the Email protocol defined in the SMTP Setup tab) to send an Email to this Employee.
Personal Information
•To enter an Employee:
a)From the Backstage Menu System Select Maintenance and Choose Employee to access this Employee Form, or
b)From the Quick Access Menu, Select Maintenance and Choose Employee to access this Employee Form.
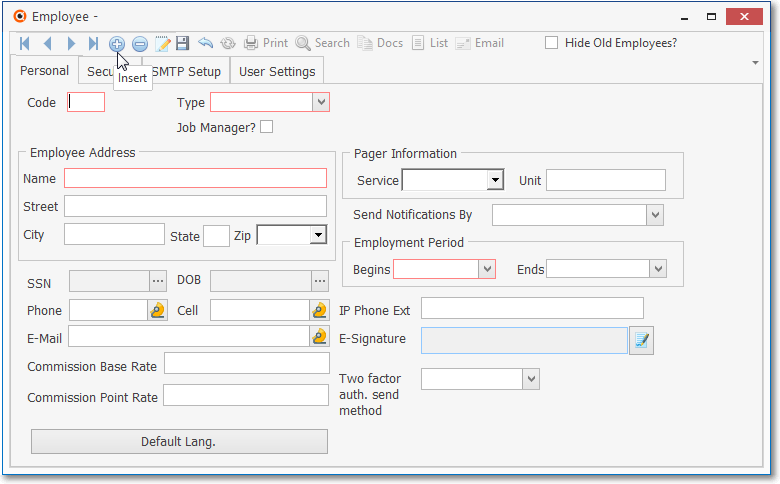
Blank Employee Form showing the Personal tab
•See Personal tab for complete information on how to enter an Employee.
Establishing an Employee's Access Rights
❑The Security Tab is used to establish specific Access Rights for the Employee.
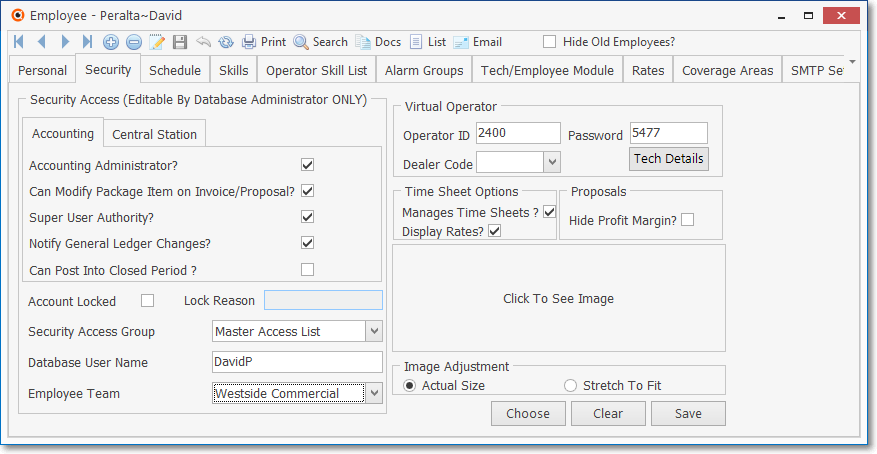
Security tab on the Employee Form
❑The Rules for the Security of your information are established by a System Administrator.
•Your System Administrator is the person with top level access rights to the program's Sybase SQL Anywhere Client Server Database System.
•The System Administrator, using the Main Menu selection Employee Groups Form, is able to design an individual set of Access Rights for each User.
✓Once the Employee Groups are established and the Employee information - including assignment of their Employee Group - is entered on the Employee Form, the System Administrator can add him/her as a User thereby setting their User Name and Password for Login.
•If you are not logged in as a System Administrator, you will not be able to add, delete or modify the Security information nor assign access and functionality permissions.
✓Assigning Access Rights establishes the User's ability to Create, Read, Update, and/or Delete information on any data entry Form that accesses information in the database.
•A Form is any screen within the program that allows for data entry, retrieval or reporting.
❑Access Rights for Form Names, processes and reports may be selectively assigned to a User in the User Access Rights Form, once the Employee has been assigned to an Employee Group.
•These rights may be established on a Form by Form (and sometimes a Field by Field) basis.
❑Next, if this Employee will need to have access into MKMS and/or MKMSCS, go to Add/Delete Users to create a Login Name & Password
Schedule Tab
❑This Schedule tab should be completed when starting the Service Tracking module.

Employee Form - Schedule tab
•The Employee must be assigned the Type of Technician (or All) before you enter their Schedule.
•Enter the normal Schedule for this Technician (Employee).
✓In Time - Enter their normal Starting Time.
✓Out Time - Enter their normal Quitting Time.
✓Days - Check the Days of the Week they normally work.
(Technician's) Skills Tab
❑When starting the Service Tracking module, this Employee Form Skills tab must be completed for each Employee who works as a Technician.
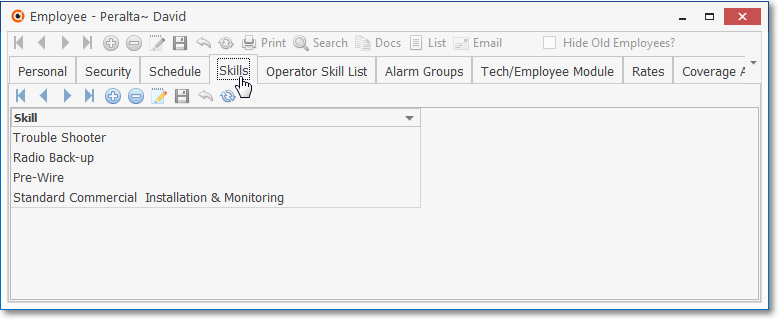
Employee Form - Technician Skills tab
Operator Skills List Tab
❑The Operator Skills tab must be completed for any Employee assigned an Operator or All Type code if you are using the Central Station Monitoring module.
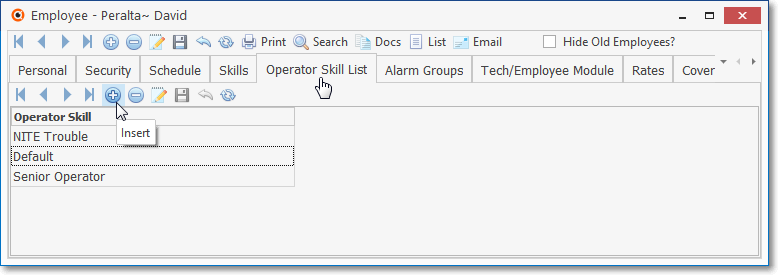
Employee Form - Operator Skill List tab
Alarm (Processing) Groups Tab
❑This Alarm Groups tab must be completed when starting the Central Station Monitoring module.
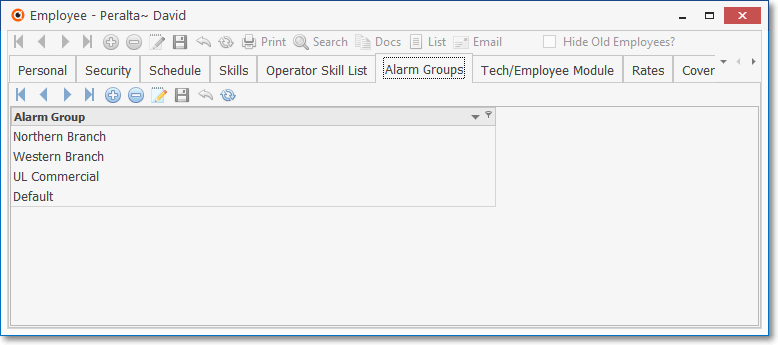
Employee Form - Alarm Groups tab
Tech Module
❑The Employee Form Tech Module tab allows you to define the Persons who will have access and how that access is to be managed.
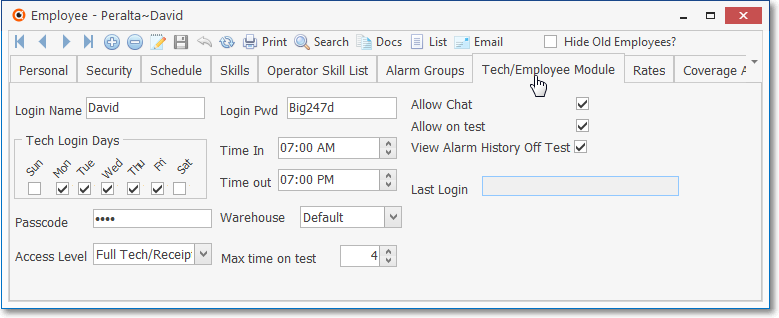
Employee Form - Tech Module tab
Rates Tab
❑The Employee Form's Rates tab must be completed when starting either the Service Tracking System or the Inventory Tracking & Job Costing System module.
•The Employee must be assigned the Type of Technician (or All) before you enter their Rates.
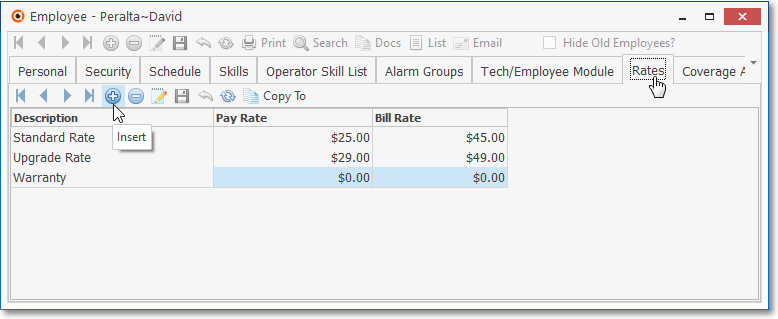
Employee Form - Rates tab
Coverage Areas
❑Assigning an Employee - who is identified as a Technician - a Regional Work Order Coverage Area based on specified Zip Codes will make it is easier for the Service Manager (or Scheduler) to make Service Request assignments.
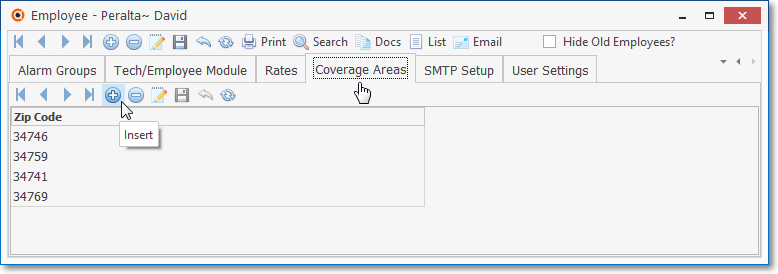
Employee Form - Coverage Areas tab
SMTP Setup
❑Define the appropriate SMTP configuration for this Employee when your Company want to use an Email protocol not associated with Microsoft® Outlook® (and/or Outlook Express®).
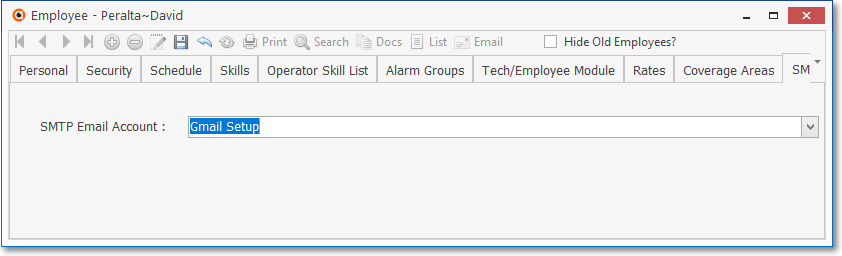
Employee Form - SMTP Setup tab
User Settings
❑Locate, View and Adjust the most recent Form settings associated with Color, configuration, dimensions and access.