❑The Security tab on the Employee Form is used to establish specific function related Access Rights for the Employee.
•Any person needing any of these Security Access Rights must first be entered in the Employee Form.
❑This is also particularly important for Virtual Operators who may not actually be an Employee of your Company.
•If an Employee or Virtual Operator is required to access a particular module, the Security tab will provide the means for the System Administrator to set that Employees's Access Rights for the listed functions.
•If you are not logged in as a System Administrator, you will not be able to add, delete or modify the Security information, nor assign the access and functionality permissions shown within the Security tab.
•To establish or modify an Employee's Security and other Access Rights,
✓Open the Employee Form
✓Retrieve the appropriate Employee's record
✓Enter the required information
✓Select the Security tab on the Employee Form.
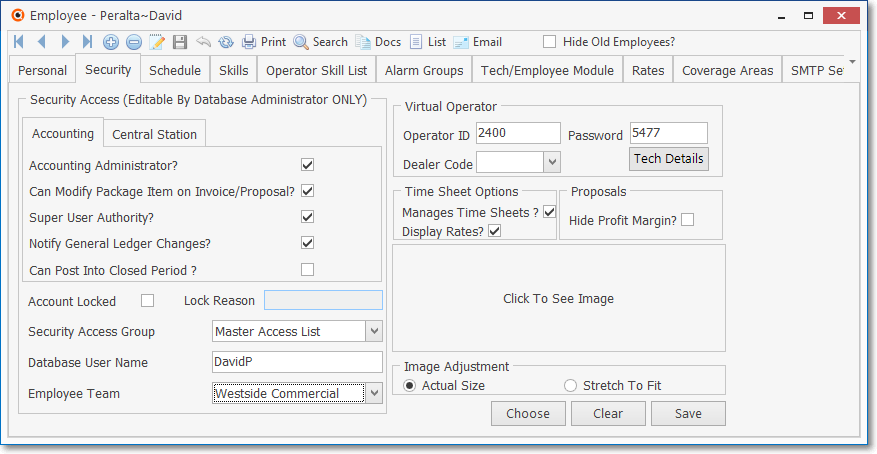
Employee Form - Security tab
•Accounting sub-tab - Set certain Accounting related Security Rights for this Employee.
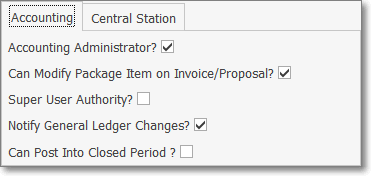
Employee Form - Security tab - Accounting sub-tab
✓Accounting Administrator? - Check this box to provide the Employee the rights of an Accounting Administrator.
▪An Accounting Administrator is permitted to make financial transaction reversals, deletions, and other types of Sale changes after providing a reason for doing so.
▪Without this right, the Employee attempting to make the change will be required to get an Accounting Administrator's permission to do so.
✓Can Modify Package Item on Invoice/Proposal? - Check this box if this Employee may modify a predefined Proposal Package after it is added to a Proposal or Invoice.
✓Super User Authority? - Check this box if this Employee is to be granted Super User Authority (which provides most, but not all ADMIN authority).
▪This field is only visible to an ADMIN and only an ADMIN may grant Super User Authority.
✓Notify General Ledger Changes? - Check this box if this Employee is to be notified in the event of General Ledger changes (e.g., Month Closure, Year Closure, creation of General Ledger Checkpoints).
✓Can Post Into Closed Period? - Check this box if this Employee is to be Permitted to post entries in a Month that has been conditionally closed (see the Closing an Accounting Period chapter for more information).
•Central Station sub-tab - Set certain Central Station related Security Rights for this Employee.
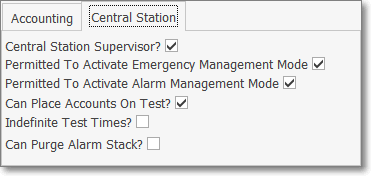
Employee Form - Security tab - Central Station sub-tab
✓Central Station Supervisor? - Check this box to identify this Employee as a Central Station Supervisor.
✓Permitted to Activate Emergency Management System - Check this box to allow the Employee to Activate Emergency Management Mode while working as an Operator or Central Station Supervisor.
✓Permitted to Activate Alarm Management Mode - Check this box to allow the Employee to Activate Alarm Management Mode while working as a Central Station Operator or Supervisor.
✓Can Place Accounts On Test? - Check this box to allow this Employee to Place an Account on Test.
✓Indefinite Test Times? - Check this box to allow this Employee to set indefinite Test Times.
✓Can Purge Alarm Stack? - Check this box to allow this Employee to Purge the Alarm Stack.
•Other Employee Form - Security tab fields
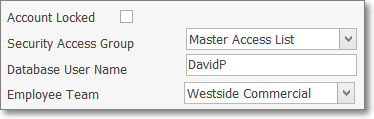
Employee Form - Security tab - Other fields
✓Account Locked - Check this box to disable Log In Access to this Employee.
✓Security Access Group
▪Assign the Security Access Group for this Employee by using the Drop-Down Selection List to Choose the Security Access Rights Group to which this Employee will be assigned.
❖This is a mandatory Third Edition UL® 1981 Standard 6.3(1-7) requirement which requires that each Employee with access to Monitoring related information must be assigned to a Security Access Group whose Access Rights have been established for that purpose based on that Employee's responsibilities and access requirements.
✓Database User Name - Enter the actual User Name which this Employee will be using to access this system through the main Sign On screen.
▪This Database User Name - their login name - must be unique to this Employee.
▪Identifying the Employee's login name here allows the system to know immediately - when they enter - what rights they have been assigned.
▪The User Name - their log in name - is set up in Add/Delete Users and their Password may be reset using the Change Passwords Form.
▪If the CheckULPasswordRestrictions option is set to False ("F"), the UL® Password and Username Requirements Password Restrictions feature (see this discussion below) will be turned off.
✓Employee Team - If using the Commissions Tracking System and this Employee is eligible to receive Commissions:
➢Note: Only those Employees whose Employee Type (see Type above) is Sales, Technician, or All is Commission Eligible and only they are assigned to an Employee Team (i.e., Sales Team).
▪Using the Drop-Down Selection List provided, Choose the appropriate Sales Team (Employee Team) record number when required.
•UL® Password and Username Requirements: As part of properly implementing the Third Edition UL® 1981 Standard, specifically for compliance with section 6.2 Sign-on Security of the Third Edition UL® 1981 Standard:
6.2.1 - The Employee's Password (i.e., Passcode) shall consist of the following:
a)A Username of at least six (6) characters
b)A Password which shall consist of a minimum of six alpha-numeric characters with at least one alpha and one numeric character
6.2.6 - The automation system shall prevent:
a)Repeated passwords, used within the last six changes;
b)Passwords that are a derivative of the user name(s); and
▪[e.g., Password cannot contain 50% of a Username so a User "Stacy" cannot have a Password of "STA3841"]
c)Passwords that are simply letters or numbers in order (e.g.: abcd, 1234, etc.).
▪[e.g., any type of sequence is prohibited such as 'ab', '34', '89', 'xy']
❑Virtual Operator and Web Tech Service module Users:
•For Users of the Monitoring module that have added the Virtual Operator module,
✓Your Company's Technicians, and those of your Alarm Dealers - if you are providing Alarm Monitoring Services for others - may telephonically access their Subscribers to put them on, and take them off Test status, and also get a telephonic report of their Subscriber's most recently sent signals - all without ever having to actually talk to an Operator at your Central Station.
•For Users of the Monitoring module that are also using the Service Tracking System and the Web Tech Service modules
✓Your Company's Technicians and those working for one or more of your Alarm Dealers will also be affected by the Dealer Code entry made below.
•Therefore, for each of your Company's Technicians, and particularly for your Alarm Dealers' Technicians who will access the Virtual Operator System and or the Web Tech Service modules, you must create an Employee record (for Alarm Dealers you only need the basic information) and then complete the Virtual Operator section of the Form.
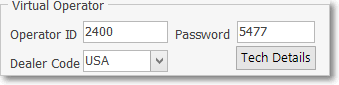
Employee Form - Security tab - Virtual Operator
•Virtual Operator (see the illustration above):
✓Operator ID - Enter the Operator ID for this Virtual Operator.
▪The Operator ID is a unique four digit (numeric) code that the Technician uses to log into Web Tech Service.
✓Password - This Password is the PIN number (up to 8 digits in length and must be unique to this Employee) used by this Employee to log in to the Web Tech Service program.
▪Enter the Password for the Virtual Operator
✓Dealer Code - Use the Drop-Down Selection List to Choose the Dealer Code for whom this Virtual Operator and/or Web Tech Service modules works.
▪If this is a Technician from your company and they need access to all Account, Do Not enter a Dealer Code.
▪Technicians that are not assigned a Dealer Code may access any Account in the database.
▪Therefore, any Technician that works for a specific Alarm Dealer MUST be assigned that specific Dealer's Dealer Code.
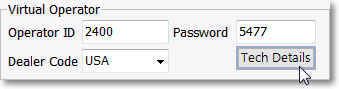
✓Tech Details - This button opens the Dealer Technicians Form used for entering the Names and related information of the Dealer Technicians that are employed by an Alarm Dealer.
•Click the ![]() Icon on the Navigation Menu to save the record.
Icon on the Navigation Menu to save the record.
❑Tech Details - This ![]() button opens the Dealer Technicians Form used for entering the Names and related information of the Dealer Technicians that are employed by an Alarm Dealer.
button opens the Dealer Technicians Form used for entering the Names and related information of the Dealer Technicians that are employed by an Alarm Dealer.
•This offers the same functionality as the Tech Details button on the Dealers Form except the Dealer Technician must be an Employee if she/he is to be entered through this Form.
✓The Dealer Technician does not need to be entered as an Employee within MKMS to have them entered on the Dealers Form through the use of that form's Tech Detail button.
✓Click the ![]() Icon on the Navigation Menu and complete the Form as illustrated below.
Icon on the Navigation Menu and complete the Form as illustrated below.
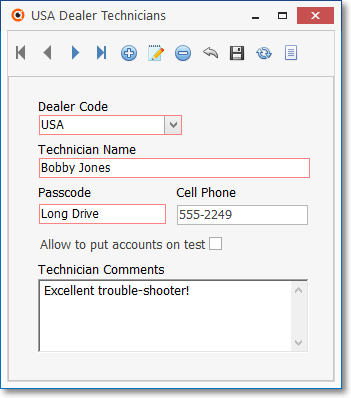
Dealer Technicians Form
➢Special Note: UL® Requirements: As part of properly implementing the Third Edition UL® 1981 Standard, specifically for compliance with section 6.2 Sign-on Security of the Third Edition UL® 1981 Standard:
6.2.1 - The Employee's Password (i.e., Passcode) shall consist of the following:
a)A Username of at least six (6) characters
b)A Password which shall consist of a minimum of six alpha-numeric characters with at least one alpha and one numeric character
6.2.6 - The automation system shall prevent:
a)Repeated passwords, used within the last six changes;
b)Passwords that are a derivative of the user name(s); and
c)Passwords that are simply letters or numbers in order (e.g.: abcd, 1234, etc.).
❑Time Sheet Options - Check the appropriate boxes, if needed.
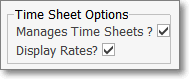
•Manage Time Sheets? - Check this box to allow the Employee to Manage their, or other Technician's, Time Sheets.
✓This Manage Time Sheets option must also be given to Employees who complete Work Orders and enter Job Costing information.
•Display Rates - Check this box to allow the Employee to view and edit their, and other Technician's, Rates of Pay.
✓If this box is Checked this Employee will also be able to view the actual Dollar values when completing Work Orders.
❑Proposals Options - Check if appropriate and if needed:
•Hide Profit Margins - Check this box if you do not want this Employee (who has access to the Proposals Form) to be able to view the Profit Margin displayed on the Estimate tab of the Proposals Form.
❑Employee Image - An Image of this Employee may be imported and displayed within the Security tab.
•The Image File must be either a a ".BMP" or "JPG" file type saved with 256 colors (or Less) and may be no larger than 64K.
✓The file must also be on your Computer (or on the File Server, if you using a Network) where the MKMS database is installed.
1.Click Choose and, using the standard Windows® dialogue box provided, locate the desired file.
2.Once theImage file is selected, choose the Image Adjustment method that best displays the Image by alternately Clicking Show Image At Actual Size and Stretch Image To Fit.
3.Click Save once you are satisfied with the Image Adjustment setting and click OK to exit.
•To re-do this process, Click Clear and repeat the steps above.