❑To open the Employee Form:
a)From the Backstage Menu System Select Maintenance and Choose Employee to access this Employee Form, or
b)From the Quick Access Menu, Select Maintenance and Choose Employee to access this Employee Form.
•The Personal tab will be displayed by default.
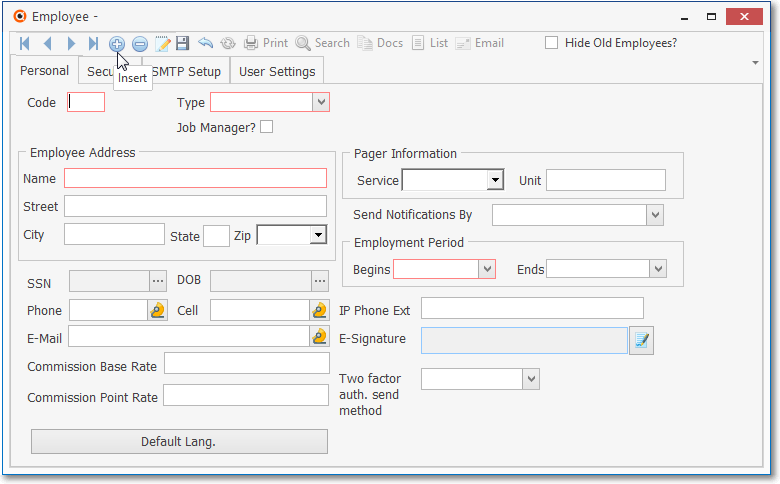
Blank Employee Form - Personal tab
•Click the ![]() Icon on the Navigation Menu to enter a new record in the Employee table.
Icon on the Navigation Menu to enter a new record in the Employee table.
✓Fields boxed in Red are mandatory.
✓The record can not be saved unless the mandatory information is entered.
✓Although the fields boxed in Red constitute a valid record, it is recommended that you complete the Personal tab at a minimum.
•Code - Enter a Code - think of it as their Employee Identification Code - to represent this Employee.
✓Up to four alpha characters plus dashes, underlines and spaces are allowed.
✓Typically, you should use their initials. Do Not Use Numbers in the Employee Code.
✓ If a duplicate would result, add another character at the end (ABC, ABCZ, ABCY, ABCX, ETC.).
•Type - Using the Drop-Down Selection List provided, select a Type classification from the options listed below.
✓Administration - for key staff such as those Employees responsible for accounting operations, are a job manager, and/or perform other important management level functions
✓All - for Employees who may be involved in any/all phases of the business
✓Operator - for Employees who primarily perform Central Station Monitoring functions
✓Sales - for Employees who are classified as Salespersons.
✓Technician - for Employees who are Service Technicians.
•Job Manager? - Check this box if the Employee has been assigned the classification Type of All or Administration, and is an individual who may be assigned the duties of a Job Manager within the Inventory Tracking & Job Costing System,
✓The Lead Technician assigned to Service Requests in the Service Tracking System is identified as such by being the first Technician assigned to that Work Order.
▪However, the Lead Technician is not a Job Manager,
▪Therefore, a Technician Employee Type may not be identified as a Job Manager in the Inventory Tracking & Job Costing System,
✓A Job Manager must be assigned a Type of either All or Administration.
▪Employees should only be identified as a Job Manager if they actually Manage a Job in the Inventory Tracking & Job Costing System,
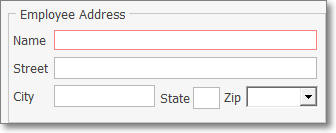
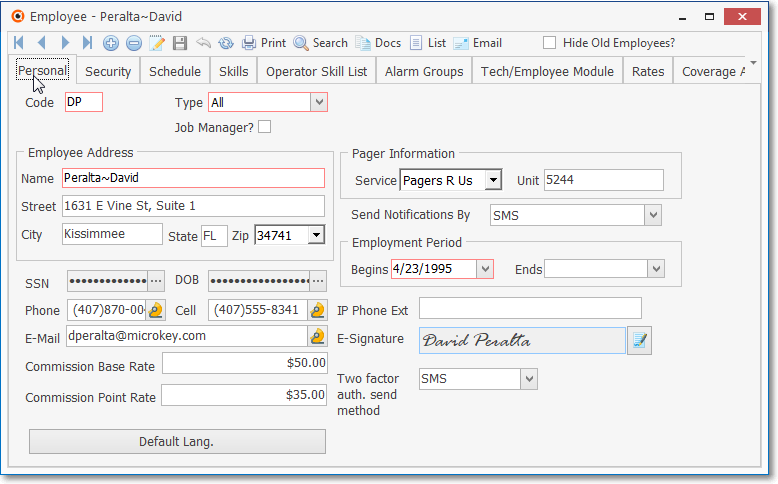
•Employee Address - Enter the Name and Address of this Employee.
Employee Form - Employee Address
✓Name - Enter the Name of the Employee
✓Street - Enter the home address of the Employee
✓City, State, Zip - Enter as appropriate.
•Employment Period fields (explained below):
✓Begins - Using the Drop-Down Calendar/Date Entry field provided, Choose the Date of Hire.
a)Click on the As Of Date field and type in the desired Date using a MM/DD/YYYY format; or
b)Use the Drop-Down Calendar/Date Entry field provided to Choose the desired Begins Date
➢Note: This is the absolute minimum amount of information that may be entered to establish an Employee record.
•Click the ![]() Icon on the Navigation Menu to save the record, or Click the Cancel Icon to cancel the entry.
Icon on the Navigation Menu to save the record, or Click the Cancel Icon to cancel the entry.
❑Complete the remaining fields on the Personal tab - Once you've saved an Employee record with the minimal information outlined above, there are additional fields which may need to be completed.
•Pager Information fields are used with the Paging capabilities provided in the Communications Module

Page Information for Communications Module users
✓Service - Click the Drop-Down Selection List provided, choose the appropriate paging Service Provider.
✓Unit - Enter the Pager Unit number assigned to their Pager.
•Send Notifications By - If a Phone number, Cell number and/or E-Mail address has been identified for this Employee, and your Company has implemented the MKS Connect Service,
a)Notifications are only initiated for Employees who are assigned a Type of All or Technician
b)A Notification (via the communication method identified here) is only generated when an Add, Edit, Add Time, and/or Take Off Test action is executed in the On Test Form (see Place an Account on Test) and this Employee is identified as the Technician on that Form
✓Select the method of notification that will be used when this Employee must be contacted if a designated Signal has been received.
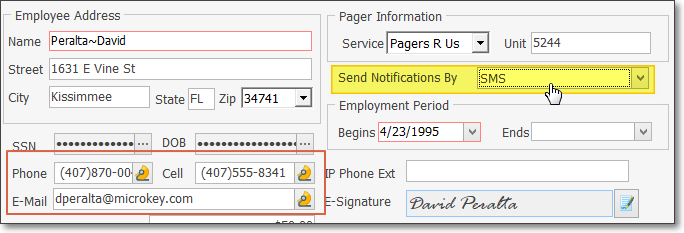
▪Use the Drop-Down Selection List provided to Choose the preferred communication method:
Send Notification by - options
•Employment Period fields (explained below):
✓Begins - Using the Drop-Down Calendar/Date Entry field provided, Choose the Date of Hire.
a)Click on the As Of Date field and type in the desired Date using a MM/DD/YYYY format; or
b)Use the Drop-Down Calendar/Date Entry field provided to Choose the desired Begins Date
➢Note: This is the absolute minimum amount of information that may be entered to establish an Employee record.
✓Ends - Caution - The Ends field is not to be completed until the Employee is terminated or quits.
▪Entering an Ends date automatically removes the Log In access for that terminated Employee.
▪To reinstate an Employee who previously had an Ends date entered, you must reenter the Employee's User Name and Password in Add/Delete Users.
✓Then, complete as much, or as little, of this information as may be necessary, based on the duties and responsibilities of this Employee.
➢Note: Certain fields are Secured Fields and can only be accessed by Users that have Access Rights to Encrypted Data Edit/Entry fields.
✓SSN - Click the Ellipse ![]() button and enter the Social Security Number for this Employee.
button and enter the Social Security Number for this Employee.
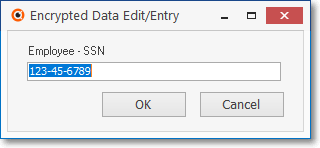
Employee - SSN
✓DOB - Click the Ellipse ![]() button and enter the Date of Birth of this Employee.
button and enter the Date of Birth of this Employee.
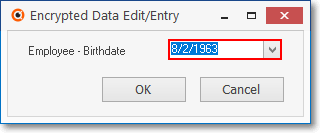
Employee - Birthdate
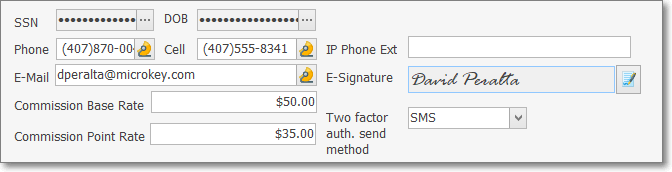
✓Phone - Enter the Home Telephone Number of this Employee.
▪If no Area Code is required, enter the seven (7) digit telephone number (it cannot start with a 1)
▪If 10 digit dialing is in effect - no "1"prefix is needed, but you do need to dial an Area Code as part of the telephone number:
oPress the <Space Bar> first.
oThen enter the three digit Area Code.
oFinally, enter the seven digit Telephone Number.
oCorrect formatting will be applied automatically.
▪Long distance Telephone Numbers (with a "1" prefix) are entered as such, and the appropriate formatting parentheses and dash is applied automatically.
![]() - Click the Contact Icon on the right side of the Phone or Cell fields to open the Contact dialog - to contact this Employee via their Phone or Cell number
- Click the Contact Icon on the right side of the Phone or Cell fields to open the Contact dialog - to contact this Employee via their Phone or Cell number
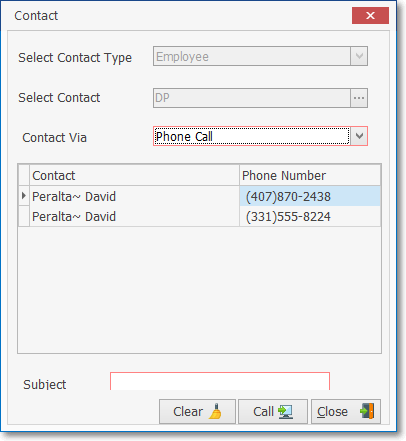
Contact dialog - Contact Via - Phone Call
a)Select Contact Type - This will default to contact the Employee
b)Select Contact - This will default to the Employee Code of the current Employee
c)Contact Via - This will default to Phone Call but may be changed
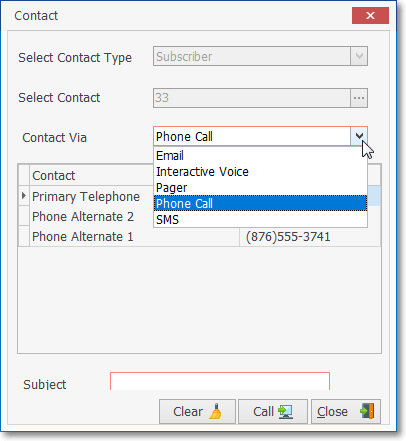
Contact dialog - Contact Via options
i.Email - Send an Email message (see f., i.&ii. below)
ii.Interactive Voice - Make an Interactive Voice Call
iii.Pager - Send a Pager Message (see f., i.&ii. below)
iv.Phone Call (default) - Make a Telephone Call
v.SMS - Send a Text message (see f., i.&ii. below)
d)Available Contacts Grid - This will default to the Telephone Numbers Grid but may be changed
e)Subject - Enter a brief description of the purpose for this Contact
f)When Email, Pager, or SMS is the Contact Via Choice [see c) above]:
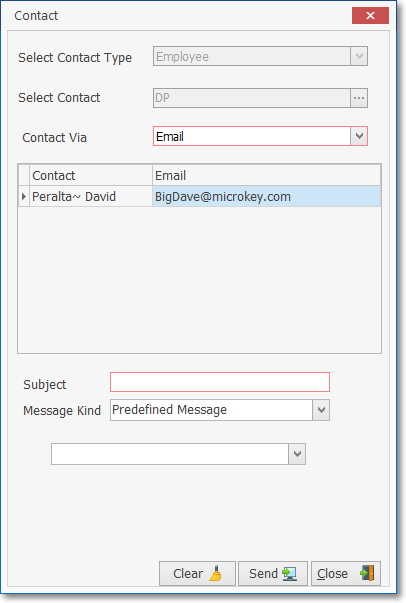
Contact dialog - Contact Via - Email option
i.Subject - Enter a brief description on the purpose for this Contact
ii.When Message Kind selection = Manual Message - enter the text for the contact's message
iii.When Message Kind = Predefined Message - use the Drop-Down Selection List to Choose the appropriate Predefined Message
g)Clear - Remove whatever has been entered in the Contact dialog
h)Call - Execute the Contact
i)Close - Close the Contact dialog
✓Cell - Enter the Cell Phone Number of this Employee
▪If no Area Code is required, enter the seven (7) digit telephone number (it cannot start with a 1)
▪If 10 digit dialing is in effect - no "1"prefix is needed, but you do need to dial an Area Code as part of the telephone number:
oPress the <Space Bar> first.
oThen enter the three digit Area Code.
oFinally, enter the seven digit Telephone Number.
oCorrect formatting will be applied automatically.
oLong distance Telephone Numbers (with a "1" prefix) are entered as such, and the appropriate formatting parentheses and dash is applied automatically.
![]() - Click this Contact Icon to open the Contact dialog - to contact this Employee via their Cell Phone (see the Contact instructions above)
- Click this Contact Icon to open the Contact dialog - to contact this Employee via their Cell Phone (see the Contact instructions above)
✓IP Phone Ext - If a specific IP extension number is required to contact this person at the Phone number entered above, provide that extension number here \
▪This field is only used if this Employee uses an IP Phone to dial First Responders of Customers.
✓E-Mail - Enter the E-Mail Address for this Employee.
![]() - Click this Contact Icon to open the Contact dialog - to contact this Employee via their Email address
- Click this Contact Icon to open the Contact dialog - to contact this Employee via their Email address
•E-Signature - This Signature field provides the ability to enter an Electronic Signature for this Employee; but the Electronic Signature Form is accessible by Clicking the E-Signature ![]() Icon.
Icon.
✓This E-Signature Icon is only active when a User has been given the appropriate Access Rights to the Electronic Signature Form.
▪These Access Rights are provided by including the Electronic Signature Form in the Employee Group to which the Employee is a member (in the Security Access Group field within the Security tab of their Employee Form), or by specifically adding the Electronic Signature Form to the User Access Rights Form for this User.
✓Creating an Electronic Signature:
▪The Electronic Signature Form is displayed when you Click theE-Signature Icon.
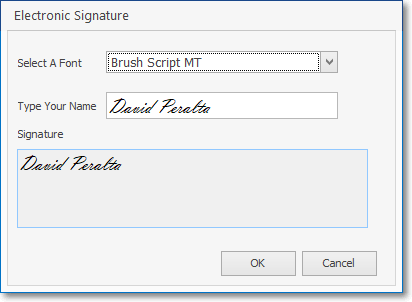
Electronic Signature Form
▪Select A Font - By default, the Brush Script MT font is inserted; but you may use the Drop-Down Selection List provided to Choose from a list of Four (4) available fonts.
oTry as many as you like until you get the font that will best serve as Your Electronic Signature.
▪Type Your Name - Type your name the way you want it to appear as your Electronic Signature.
▪Signature - Your Electronic Signature is inserted by the system (based on the font your selected), as you type it.
▪OK - Click OK to accept this electronic signature entry.
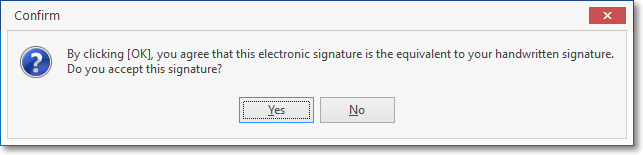
By clicking [OK], you agree that this electronic signature is the equivalent of your handwritten signature.
Do you accept this signature?
▪Yes - You must Confirm that this will be your accepted Electronic Signature.
▪It will be added to your Employee record.
•If your Company is using the Commissions Tracking System and this Employee is eligible to receive Commissions:
➢Note: Only those Employees whose Employee Type (see the Type field information above) is Sales, Technician, or All is Commission Eligible and only they are assigned a "Dollar" Value to one or both of these fields.
▪Commission Base Rate - Enter the minimum "Dollar" Value of the Commission that this Employee will earned for each Commission Eligible Sale.
oSalespersons are assigned a Commission Base Rate (the Amount of Commission automatically earned for each new Sale) and the Value of Commission Points (added or subtracted based on the type of change to a fixed price Proposal Package) to determine the largest part of their Commission earnings for the Sales they make.
▪Commission Point Rate - Enter the "Dollar" Value of each Commission Point they may "Bank".
oTechnicians are only assigned the Value of Commission Points (that are Banked for the Sale of additional, extra cost items sold during the Installation) which will ultimately determines the net Commission earnings of their Add-On Sales for the Installations they have completed.
•Two factor auth. send method - By default this field is blank
✓To establish a Two Factor Authorization methodology for this Employee:
✓Use the Drop-Down Selection List provided to Choose that sending method.
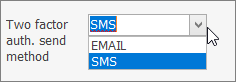
Two factor authorization send method options
❖Understanding Two Factor Authorization implementation:
A.Setup Requirements in Company Settings:

Company Settings grid - sample settings
1.Set the Two_Factor_Auth_Enabled option to True
2.Set the Two_Factor_Auth_Code_Expiration_Minutes option to a value based on your Company's operating Policy (the default is 15)
3.Based on whether your Company is using the Communication Module, and/or MKS Connect Service set these Company Settings as appropriate
a.Set the SMSWorkerEnabled option to True
b.Set the EMailWorkerEnabled option to True
c.Set the SMSTwilioWorkerEnabled option to True
d.Set the SMSTwilioWorkerEnabled option to True
e.Set the MailGunWorkerEnabled option to True
4.Once Two Factor Authorization has been set up, it applies to All Employees!
B.Process
1.When the type of the Two_Factor_Auth_Enabled option is set to False, the Employee Log In process is unchanged
2.When the Two_Factor_Auth_Enabled option is set to True :
a.When any Employee logs in, a Request Authorization Code dialog is displayed
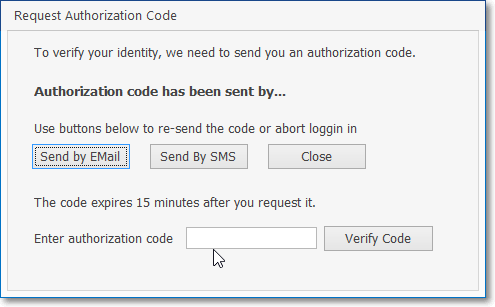
Request Authorization Code dialog
b.The Two Factor Authorization method identified for that Employee will used to send the Authorization Code.
c.The Employee has the number of minutes set in the Two_Factor_Auth_Code_Expiration_Minutes option to respond with the correct Authorization Code
d.The Authorization Code must be entered in the Enter Authorization Code box provided and Click the Verify Code button.

e.If the Authorization Code is not received by that Employee and not entered in the Enter Authorization Code box provided
f.They may request another code be sent in the same of a different way by Clicking on that method, or
g.They may abandon this sign-in by choosing the Close option
•Default Lang.(uage) - Click this bar to Choose the Default Language for this Employee
•Click the ![]() Icon to record this Employee information.
Icon to record this Employee information.
Employee Form - Personal tab - Sample entry
❑Return to this Form at any time and Add to, or Edit the information.
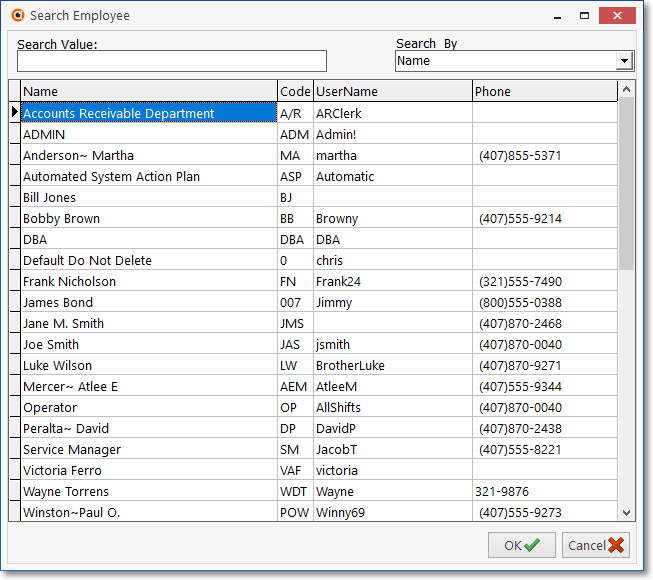
•![]() - Use the Search Icon (or Press F2) to open the Search Employee dialog to retrieve the Employee record that needs to be updated.
- Use the Search Icon (or Press F2) to open the Search Employee dialog to retrieve the Employee record that needs to be updated.
•Then, simply enter the required changes.
•Click the ![]() Icon to record the revisions, or
Icon to record the revisions, or ![]() Click the Cancel Icon to cancel the edit
Click the Cancel Icon to cancel the edit
❑See the Security Tab which is used to establish the basic Access Rights for the Employee.
❖If the Automated Signal Processing (using the MKS Connect Service) is in use:
•You may create a fictitious Employee (as shown below) to be used to Log into the MKSASP application, and for identifying the Operator of record when posting the executed Action Steps in the Subscriber's Alarm History file (an example of which is shown below).
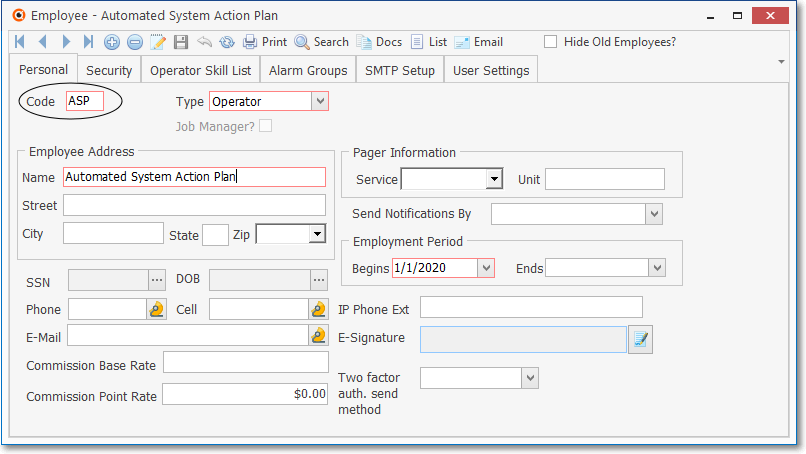
Employee Form - Automated System Action Plan Employee
✓Only the Mandatory (Red boxed) fields need to be completed.
✓The Employee's Code is used to identify the "Operator" who performed the Automated System Action Plan Action Steps as the information is stored in the Subscriber's Alarm History file.
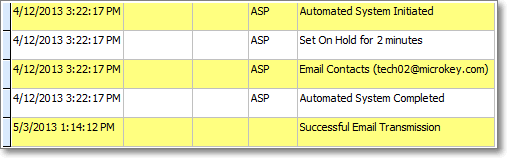
Alarm History detail - showing Automated System assigned Employee Code