❑The Proposals (Grid) dialog is a fully functional data grid which lists all existing Proposals (for Subscribers and Prospects) within a User specified Date Range with those Dates based on a User Selected Type of Date (i.e., Creation or Expiration Date).
•This List of Proposals can have a unique set of User designated data columns, be reformatted, re-sorted, and rearranged;
✓It may then be produced as a Report and/or Exported as a spreadsheet file containing those redesigned data grid contents.
✓The Proposals (Grid) includes (based on the options chosen) the total Number of Converted Proposals and the Percentage of all listed Proposals that were converted to Sales.
•To view or print this Proposals (Grid):
a)From the Backstage Menu System Select Reports and Choose Prospect And Proposal and Select the Proposals (Grid) option, or
b)From the Quick Access Menu, Select Reports and Choose Prospect And Proposal and Select the Proposals (Grid) option
❑ Setting Up the Proposals (Grid) dialog's data grid Options:
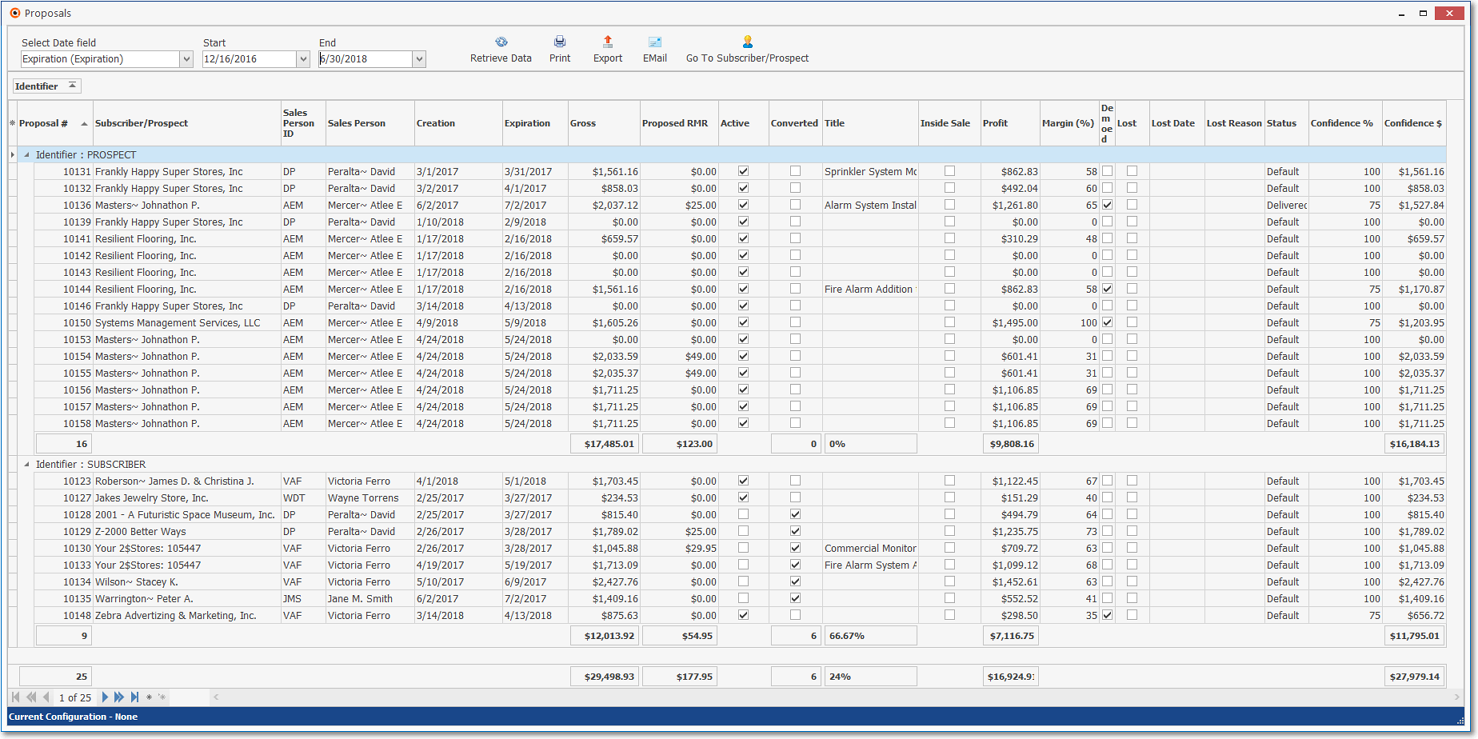
Proposals (Grid) dialog
•Select Date field - By default the Select Date field setting will be Creation Date but may be changed to Expiration Date, if needed.
✓Using the Drop-Down Selection List provided, Choose which type of Date Field will compared to the Date Range specified below.
•Date Range - By default the Date Range offered will be the most recent Week ending in Today, but the User may specify any Range of Dates to be used to determine which Proposal records will be included in the Proposals (Grid)
a)Click on the Date field and type the desired Date using a MM/DD/YYYY format; or
b)Use the Drop-Down Calendar/Date Entry field provided to Choose the desired Date
✓Start - Use the provided Drop-Down Calendar/Date Entry field to change the starting date, when required.
✓End - Use the provided Drop-Down Calendar/Date Entry field to change the ending date, when required.
•Retrieve Data - Once the appropriate Select a Date field entry is selected and the required Date Range specified:
✓Click the Retrieve Data Icon to load that set of Proposal records into the Proposals (Grid).

Retrieve Data
•Go To Options - There are two types of Go To choices available:
1.Select a specific Proposal, then Click the Go To Subscriber/Prospect option on the Ribbon Menu at the top of the Proposals (Grid) dialog to open the associated Subscriber or Prospect Form
2.Right-Click on any line item within the Grid to open the Radial Right-Click Menu to access the Subscriber/Prospect option (which will open the associated Subscriber or Prospect Form), and/or Proposal option (which will open the associated Proposal Form).
-radialmenu.png)
Proposals (Grid) - data-grid - Radial Right-Click menu
•This Proposals (Grid) report may include the "Inside Sale" field to allow the User to filter that Inside Sale field in the report's Grid by "True" (originally a Subscriber's Proposal), or "False" (originally a Prospect's Proposal).
•Print - When the Proposals (Grid) has been formatted as needed, the User may Click the Print Icon to create a Print Preview.

Proposals (Grid) - formatted and grouped - Print Preview
•Export - Once the data has been formatted, filtered, sorted and configured as needed, Click the Export Icon to display the standard Windows® Save As dialog.
✓See the data grid chapter for more information.
•EMail - Once the data has been formatted, filtered, sorted and configured as needed, Click the EMail Icon to send this data as a PDF attachment to an Email address of your choosing.
•Go To Prospect/Subscriber - Click this Icon which will open the associated Subscriber or Prospect Form for the selected Proposal.
•Select columns to be displayed - Choose the columns of data which are to be included in this data grid
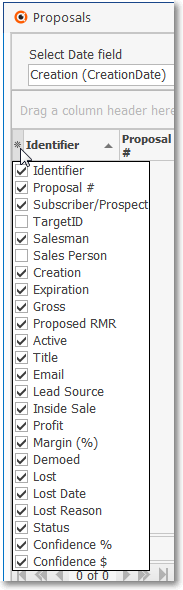
Select Columns to Display
✓Click the asterisk (¬) at the left of the data grid's Header row (see the mouse pointer in the illustration above) to display a list of all of the column names - and associated data - which may be displayed.
✓By default, all Column Names will be Checked.
✓Remove the Check mark (Click on the Check to remove it) to hide that column of data from the data grid.
❖Also see the Understanding and Using the Confidence % and Confidence $ fields discussion in the Proposal chapter.
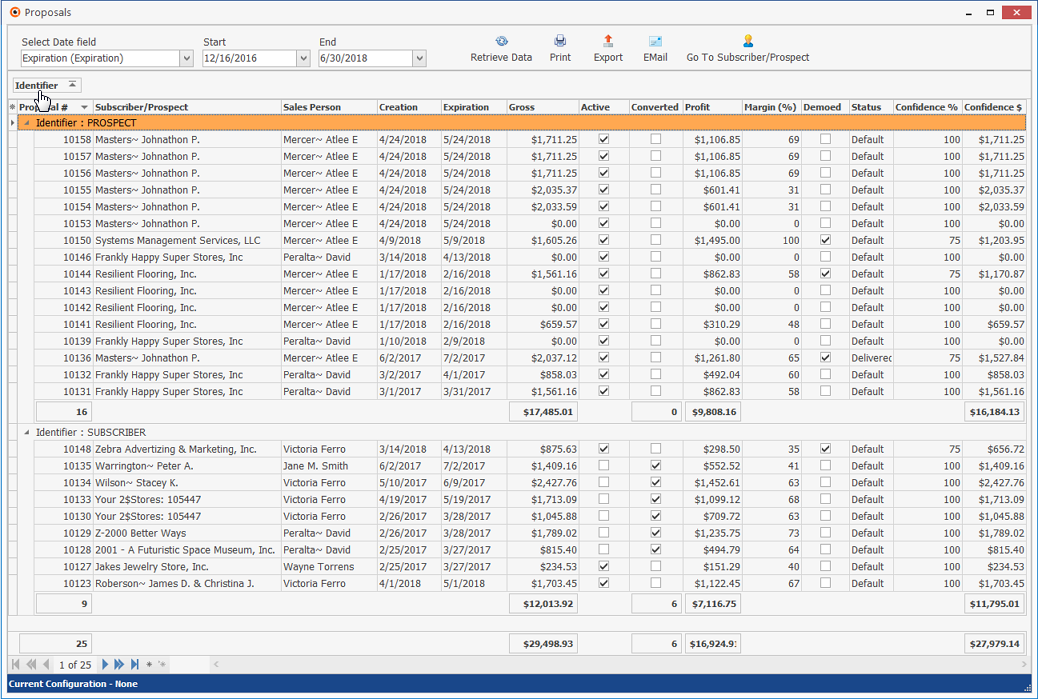
•Setting the Order in which the data in the grid is Listed within the Proposals (Grid) dialog (Report):
✓The default sorted order of the Proposals (Grid) List is based on the Proposal # - which is ordered from lowest to highest (1 - 9).
✓Thereafter, the column that determines the sorted order of the List may be easily changed, whenever needed.
Proposals (Grid) dialog - Sorting by Column
✓To do so:
▪Click another column's Header Name (the mouse points to the sorting arrow within the Subscriber/Prospect Header Name in the illustration above) to change the sorted order to by on that column of data, with the sorted order automatically set from lowest to highest (a-z or 1 - 9).
▪To change this newly selected column's sorted order from highest to lowest, Click that column's Header Name again.
▪An Arrow next to the Header Name indicates the column that is determining the sorted order of the Grid Data.
o~ indicates lowest to highest (a-z or 1 - 9)
o€ indicates highest to lowest (z-a or 9-1).
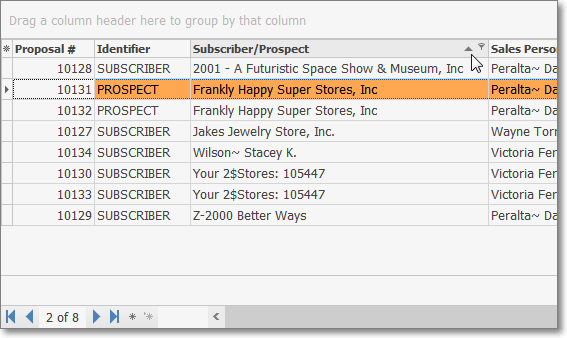
•Grouping the data in the grid - The Proposals (Grid) List may be separated into Groups based on a selected column's Header Name.
✓Click the Header Name (i.e., "Identifier" was selected in the illustration below) and Drag that Header Name to the "Drag a column header here to group by that column" message area at the top of the Grid.
Proposals (Grid) dialog - Grouping by "Identifier" Column
✓See the Grids & Lists - Print Preview - Exporting Data chapter for much more information about Grouping the Proposals (Grid) Form's Data.
•Special Grid Features:
1.Double-Click any Grid line item to Open that associated Proposal Form.
2.When the data in the grid is Grouped (see the "Grouping the data in the grid" discussion immediately above), each Group will have a:
a.Gross column and Proposed RMR column sub-total
b.Grand Total of the Gross column and Proposed RMR column at the bottom of the Grid
3.Go To Subscriber/Prospect - To Open the associated Prospect or Subscriber Form:
a.Select the appropriate Grid line item
b.Click the Go To Subscriber/Prospect menu option.
❑Proposals (Grid) - Output - The data is presented in a Grid format and therefore has all of the normal Grid features and functions such as Sorting, Relocating, and Filtering the data presented before it is Printed as a report, and/or Exported to a file.
1.Choose which columns of data are to be included,
2.Set the order in which they are to be listed, related any columns (if appropriate),
3.Adjust any column's width,
4.Then, when ready:
a.Print - Click the Print Icon at the top of the Form to display the Print Preview dialog.
b.Export - Click the Export Icon to display Save as... Windows® dialog.
•See the Grids & Lists - Print Preview - Exporting Data chapter for much more information about formatting and printing (and exporting) the Proposals (Grid) Form's data grid