❑The Contacts Form provides a means to enter almost any type of contact information (name, job, phone, email, etc.) for almost any purpose.
•A Contact may be entered in the Contacts Form accessed from the Receivables tab.
•A Contact may be linked to a specific Subscriber, Invoice, Prospect, Proposal, Vendor, Bill, Purchase Order, and/or Work Order record
✓The specific record is referred to as an "Entity"
•The same Contact may be linked to more than one Entity
•The may be accessed from the Receivables tab on the MKMS Desktop and/or from any other Entity (i.e., a specific Subscriber, Invoice, Prospect, Proposal, Vendor, Bill, Purchase Order, and/or Work Order record)
❑When the Contacts Form is opened from the Receivables tab on the MKMS Desktop:
•The Contacts Form acts like an Address Book where a User may:
✓View a list of all, or ALL Active Contacts (assuming the Active Contacts Only? Check box is Checked)
✓Search for any Contact record using the first four or more letters on the Last Name of that Contact (or any other Search On option the User selects).
✓Add a new Contact information which may include address, birth date, role, phone numbers, and/or email addresses.
✓Edit an existing Contact
✓Deactivate an existing Contact (or Reactivate an old one) by using the Active Check box
✓Set the number of Contacts displayed in the list at one time.
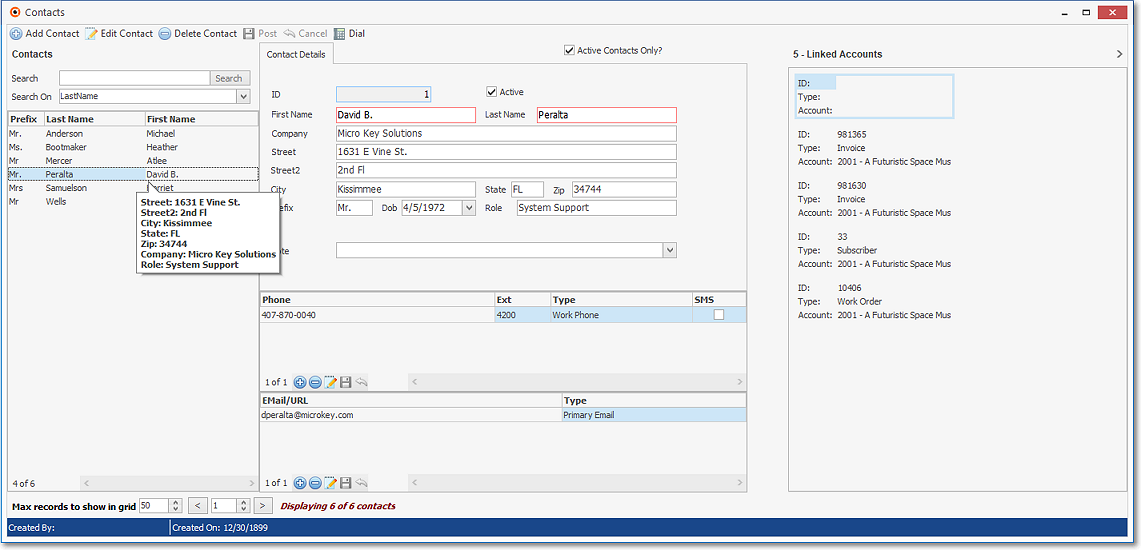
Contacts Form accessed from the Receivables tab on the MKMS Desktop
•Understanding the Contacts Form Ribbon Menu Icons when it's opened from the Receivables tab on the MKMS Desktop::

Ribbon Menu of Contacts Form accessed from the Receivables tab on the MKMS Desktop
✓Add Contact - Click ![]() the Insert Icon to start a new Contact entry.
the Insert Icon to start a new Contact entry.
✓Edit Contact - Click ![]() the Edit Icon to update the Selected Contact entry
the Edit Icon to update the Selected Contact entry
✓Delete Contact - Click![]() to remove the Selected Contact entry
to remove the Selected Contact entry
✓Post - Click ![]() the Post Icon to save a new or modified Contact entry
the Post Icon to save a new or modified Contact entry
✓Cancel - Click ![]() the Cancel Icon to abandon any new or modified information
the Cancel Icon to abandon any new or modified information
✓Dial - Click ![]() to place a telephone call to the selected Phone number of the currently selected Contact
to place a telephone call to the selected Phone number of the currently selected Contact
✓Active Contacts Only? - When Checked, all of the Contacts identified as Active will be listed and/or may be located using the Search option..
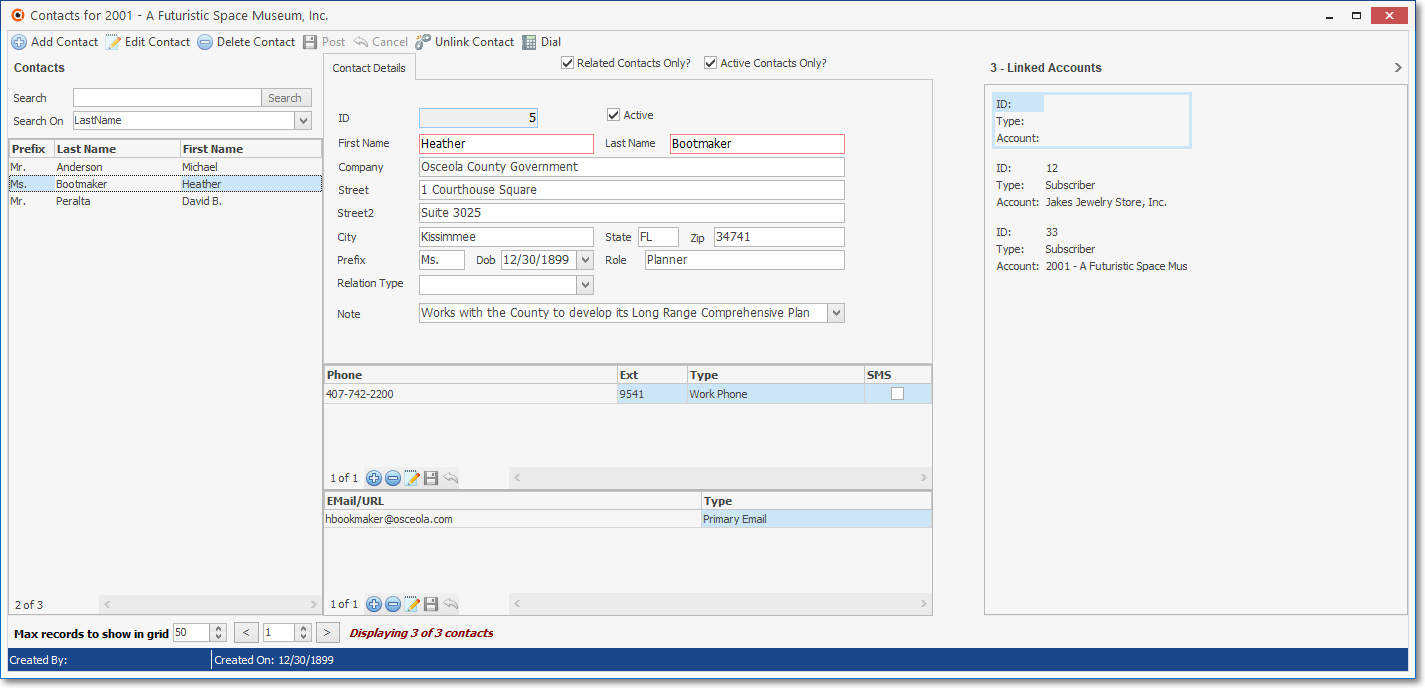
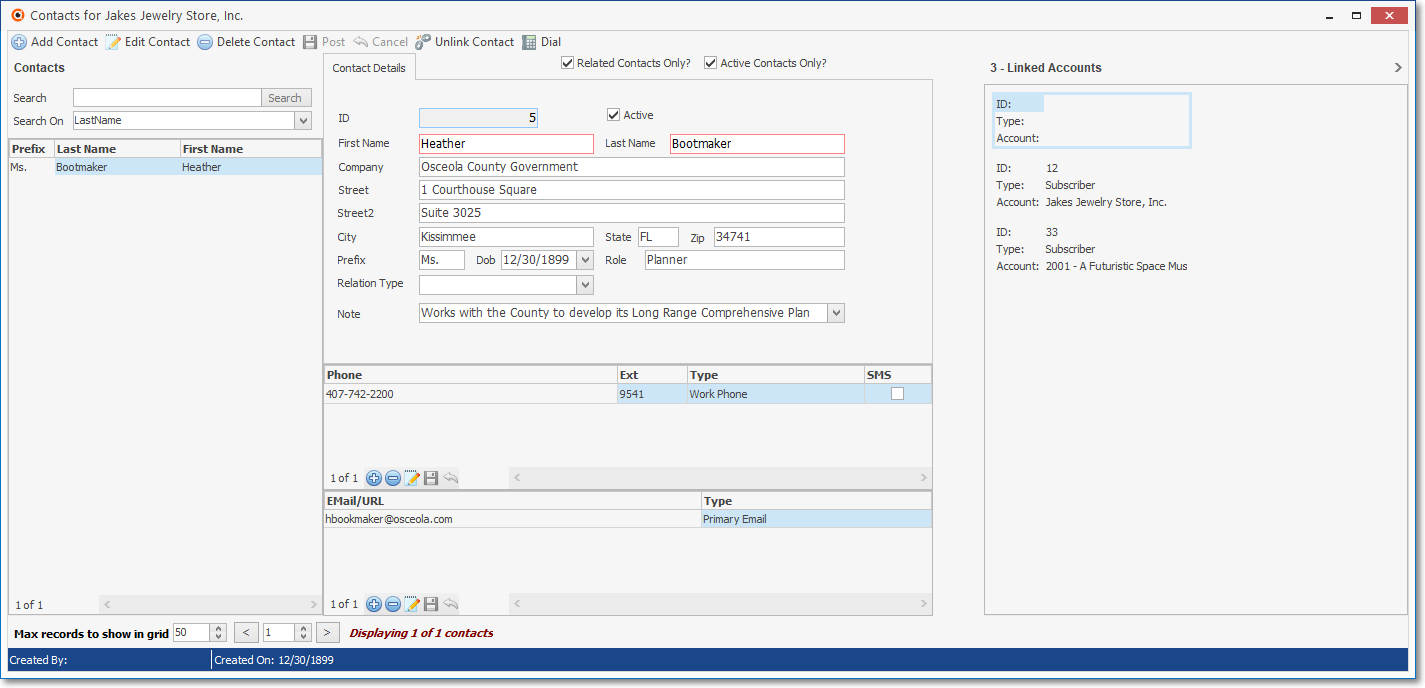
❑When the Contacts Form is opened from the an actual Entity Form (i.e., Subscriber, Invoice, Work Order, Prospect, Proposal, Vendor, Bill, Purchase Order), the Ribbon Menu and associated options are slightly different:
•The Contacts Form acts like an Address Book for that specific Form where a User may:
✓View a list of Related Contacts which are Contacts that have been added when the selected Form was opened or were subsequently Linked to the selected Form.
✓View a list of all Active Contacts (assuming the Active Contacts Only? Check box is Checked)
✓Search for any Contact record using the first four or more letters on the Last Name of that Contact (or any other Search On option the User selects).
✓Add a new Contact information which may include address, role, phone numbers, and email addresses.
✓Edit an existing Contact
✓Delete an existing selected Contact
✓Set the number of Contacts displayed at one time in the Contact List.
Contacts Form accessed from accessed from a Form
•Understanding the Contacts Form Ribbon Menu Icons when it's opened from the an actual Form (Entity)

Ribbon Menu of Contacts Form accessed from a Form
✓Add Contact - Click ![]() the Insert Icon to start a new Contact entry.
the Insert Icon to start a new Contact entry.
✓Edit Contact - Click ![]() the Edit Icon to update the Selected Contact entry
the Edit Icon to update the Selected Contact entry
✓Delete Contact - Click![]() to remove the Selected Contact entry
to remove the Selected Contact entry
✓Post - Click ![]() the Post Icon to save a new or modified Contact entry
the Post Icon to save a new or modified Contact entry
✓Cancel - Click ![]() the Cancel Icon to abandon any new or modified information
the Cancel Icon to abandon any new or modified information
✓Dial - Click ![]() to place a telephone call to the selected Phone number of the currently selected Contact
to place a telephone call to the selected Phone number of the currently selected Contact
✓Unlink Contact - Click ![]() to remove the Related Contact Link (see the "Related Contacts Only?" discussion below) to the Current Subscriber/Prospect from the Selected Contact entry
to remove the Related Contact Link (see the "Related Contacts Only?" discussion below) to the Current Subscriber/Prospect from the Selected Contact entry
✓Active Contacts Only? - When Checked, all of the Contacts identified as Active will be listed and/or may be located using the Search option.
✓Related Contacts Only? - By Checking the Related Contacts Only Box,
a)When the Contacts Form is accessed from the Receivables tab, by default all the records entered in any Contacts Form will be listed and this option will not be available
▪The Contacts which were specifically entered in an Entity Form (i.e., Subscriber, Invoice, Work Order, Prospect, Proposal, Vendor, Bill, Purchase Order) will also be displayed
▪The Contact records displayed may also have been be Linked to another Entity Form
▪The Linked Accounts list will show the Contacts with those relationship (see Linked Contact below)
b)When the Contacts Form is accessed from an Entity Form (i.e., Subscriber, Invoice, Work Order, Prospect, Proposal, Vendor, Bill, Purchase Order), by default only the records entered in the Contacts Form accessed from the current Entity Form will be listed.
▪However, any Contacts entered in any Entity Form (or entered in the Contacts Form accessed from the Receivables tab) may be located and displayed using the Search filter.
▪Once displayed, that Contact may then be Linked to the current Entity Form (see Linked Contact below)
c)The Forms (Entities) which have a Contacts option are:
▪Subscriber - Accessible from the Subscriber Options Menu
▪Invoice - Accessible from the Invoice Form Ribbon Menu
▪Work Order - Accessible from the Service Request Form Ribbon Menu
▪Prospect - Accessible from the Prospect Options Menu
▪Proposal - Accessible from the Prospect Options Menu
▪Vendor - Accessible from the Vendors Form Ribbon Menu
▪Bills - Accessible from the Bills Form Ribbon Menu
▪Purchase Order - Accessible from the Purchase Orders Form Ribbon Menu
•Understanding the functionality of the Related Contacts Only and the Active Contacts Only Check Boxes:
✓Active Contacts Only - When Checked, all of the Contacts identified as Active will be listed and/or may be located using the Search option..
✓Related Contacts Only - By Checking the Related Contacts Only Box,
a)When the Contacts Form is accessed from the Receivables tab, all the records entered in the Contacts Form will be listed.
i.Those Contacts which were specifically entered in an Entity Form (i.e., a Subscriber, an Invoice, a Prospect, a Proposal, a Vendor, a Bill, a Purchase Order, and/or a Work Order) will also be displayed
b)When the Contacts Form is accessed from an Entity Form (i.e., a Subscriber, an Invoice, a Prospect, a Proposal, a Vendor, a Bill, a Purchase Order, and/or a Work Order Form), only the records entered in the Contacts Form accessed from the current Entity Form will be listed.
i.Any Contacts may be located and displayed using the Search filter
ii.Once a Contact record is displayed, it may be Linked (see Linked Contact above) to the current Entity Form.
iii.However, any Contacts entered in any Entity Form (or entered in the Contacts Form accessed from the Receivables tab) may be located and displayed using the Search filter.
•Other Contacts Form Menu Options
✓Search - By default, the User may enter the first 4-5 letters on a Contact's Last Name and it will retrieve that Contact (or display a list of matching Contacts from which the User may choose one)
▪Once the entry is made, Click the Search box.
✓Search On - Using the Drop-Down Selection List, the User may choose an alternate Search method
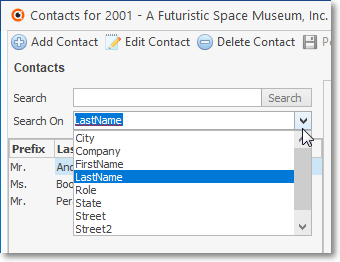
Contacts Form - Search On options
✓Max records to show in grid - This option - which is located at the bottom of the Contact Names Grid is set to 50 by default.
![]()
▪Provided for those Companies who have saved a large number of Contacts
▪This setting allows a User to restrict the number of Contact records - that will be retrieved from the database at one time - to the Maximum number set here.
▪A pair of left and right arrow buttons provides movement from Grid page to Grid page.
▪The number of Contact records being displayed, and the total number of applicable Contacts is also shown.
•Using the Contact Details tab to enter and/or update Contact information:
✓Add Contact - Click ![]() the Insert Icon to start a new Contact entry.
the Insert Icon to start a new Contact entry.
✓ID - This is the record number of the Contact entry and will be inserted when the Contact is initially saved.
✓Active - By default, this box will be Checked.
▪If this Contact will no longer be used, remove the Check mark form this box.
✓First Name - Enter the First Name
✓Last Name - Enter the Last Name
✓Company - Enter the Company Name if appropriate for this Contact.
✓Street - Enter the House/Building Number and Street Name
✓Street2 - Enter any additional address information such as a Floor Number or Suite.
✓City - Enter the Cite name
✓State - Enter the State (Province) abbreviation
✓Zip - Enter the Zip code.
✓Prefix - Enter the appropriate Prefix (e.g., Mr., Ms. Mrs., Dr.)
✓Dob - Enter their Date of Birth in the format DD/MM/YEAR or
▪Use the Drop-Down Date/Calendar box provided.
▪If no Dob is entered, once the Contact record is saved, the Dob field will be shown as 12/30/1899
✓Role - Briefly define the Role/Job/Position of this individual
✓Relation Type - Using the Drop-Down Selection List provided, Choose the appropriate Contact Relation Types.
▪Any number of Contact Relation Types may be defined.
▪The instructions on how to do so are found in the Contact Relation Types chapter.
Contacts Form - Work Order Form
✓Note - Click the Down-Arrow to open a Text Entry box where the User enter additional information about this Contact
✓Save - Click ![]() the Save Icon to save a new or modified Phone entry
the Save Icon to save a new or modified Phone entry
✓Cancel - Click ![]() the Cancel Icon to abandon any new or modified information
the Cancel Icon to abandon any new or modified information
❑Phone - Entering/Updating Telephone Contact information:

Contacts Form - Phone section
•Phone section's Ribbon Menu is at the bottom of the Phone section.
✓Insert - Click ![]() the Insert Icon to start a new Phone entry
the Insert Icon to start a new Phone entry
✓Delete - Click ![]() the Delete Icon to remove the currently selected Phone entry
the Delete Icon to remove the currently selected Phone entry
✓Edit - Click ![]() the Edit Icon to update the Selected Phone entry
the Edit Icon to update the Selected Phone entry
✓Save - Click ![]() the Save Icon to save a new or modified Phone entry
the Save Icon to save a new or modified Phone entry
✓Cancel - Click ![]() the Cancel Icon to abandon any new or modified Phone information
the Cancel Icon to abandon any new or modified Phone information
•Entering a Telephone Number:
✓Number - Enter the Telephone Number as a string of numbers, with no other characters included [e.g., "-", "(", ")"]
✓Ext - If this Telephone Number has an associated Extension, enter that Extension Number here.
✓Type - Using the Drop-Down Selection List provided, Choose the appropriate Contact Phone Type.
▪Any number of Contact Phone Types may be defined.
▪The instructions on how to do so are found in the Contact Phone Types chapter.
✓SMS - Check this box if this Telephone Number is SMS compatible (can receive Text Messages).
✓Save - Click ![]() the Save Icon to save a new or modified Phone entry
the Save Icon to save a new or modified Phone entry
▪Any number of Phone entries may be defined
❑Email/URL and other types of Web based Contact information:
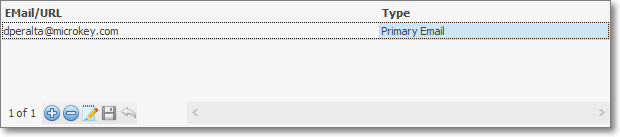
Contacts Form - Email/URL section
•Email/URL section Ribbon Menu is at the bottom of the Email/URL section.
✓Insert - Click ![]() the Insert Icon to start a new Phone entry.
the Insert Icon to start a new Phone entry.
✓Delete - Click ![]() the Delete Icon to remove the currently selected Phone entry
the Delete Icon to remove the currently selected Phone entry
✓Edit - Click ![]() the Edit Icon to update the Selected Phone entry
the Edit Icon to update the Selected Phone entry
✓Save - Click ![]() the Save Icon to save a new or modified Phone entry
the Save Icon to save a new or modified Phone entry
✓Cancel - Click ![]() the Cancel Icon to abandon any new or modified information
the Cancel Icon to abandon any new or modified information
•Entering Email and/or URL information:
✓Email/URL - Enter the Email address, Facebook or another URL, Web Site, etc., as appropriate.
✓Type - Using the Drop-Down Selection List provided, Choose the appropriate Contact Mail Type.
▪Any number of Contact Mail Types may be defined.
▪The instructions on how to do so are found in the Contact Mail Type chapter.
✓Save - Click ![]() the Save Icon to save a new or modified Email/URL entry.
the Save Icon to save a new or modified Email/URL entry.
▪Any number of Email/URL entries may be defined
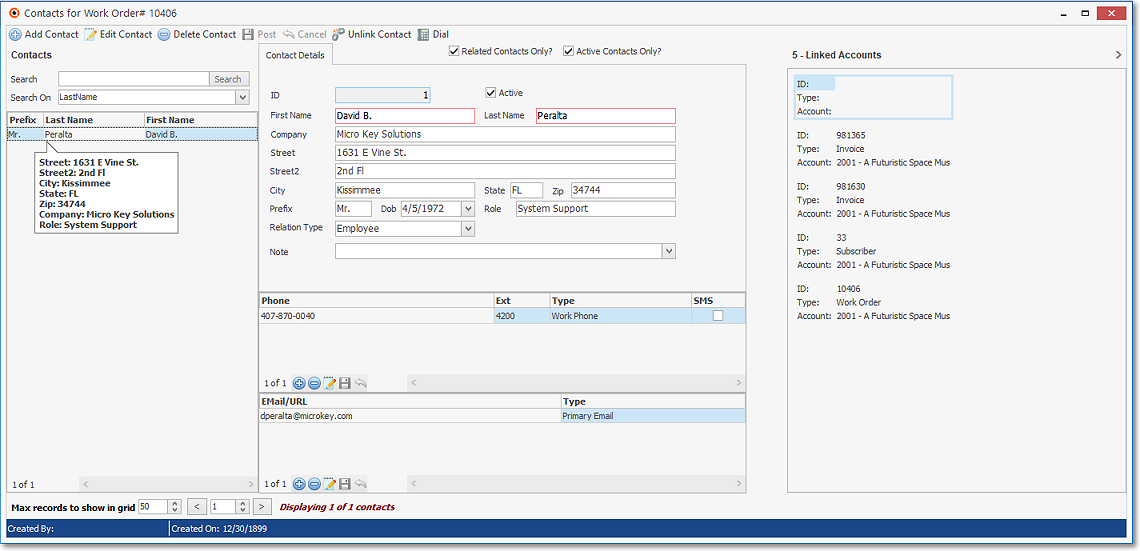
❑When the Contacts Form is opened from an Entity Form instead of from the Receivables tab the Link Contact option is available.
•Link Contact - Used to Link the currently displayed Contact record to the currently displayed Entity Form (i.e., Subscriber, Invoice, Work Order, Prospect, Proposal, Vendor, Bill, Purchase Order)
✓< - Click the left pointing arrow to display the Linked Accounts List

Contacts Form Ribbon Menu - Opened from an Entity Form - < arrow to Open the Linked Accounts list
▪Linked Accounts columns:
a)Account - The Subscriber to whom the current Contact is Linked (see Link Contact above)
b)Type - The Form Type (i.e., Entity) to which this Contact was originally Linked.
▪> - Click the right pointing arrow to close the Linked Accounts List
✓Unlink Contact - Used to Remove the Link from the currently displayed Contact record from the current Entity
❑Locating a Contact - This section is provided so that a User may locate a previously entered Contact record (subject to how the Related Contacts Only? and Active Contacts Only? boxes are currently Checked.
•Search field - This field is used to enter the first four or five letters of a Contact's name who is to be located.
•Search option - Once you've entered the Search characters, Click on the Search option button to display the results in the Search Results Grid immediately below.
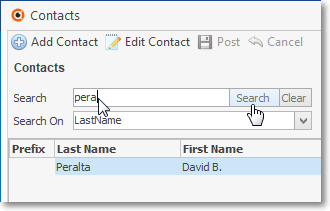
Contacts Form - Search entry field and Search button
•Search On - Alternately, use the Search On field Drop-Down Selection List to Choose a different field on which to perform the Search.
Search On - Drop-Down Selection List
oSearch option - Once you've selected the field to Search On and entered the Search characters, Click on the Search option button to display the results in the Contacts Grid below.
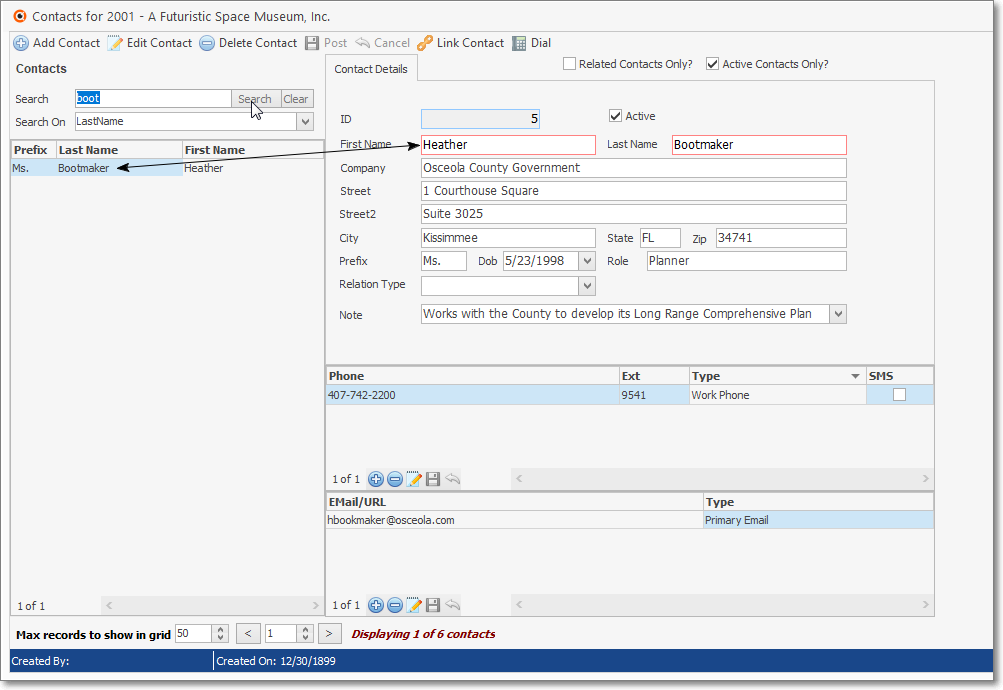
Contacts Form - Search field , Search On field, Search & Clear options - Search Results Grid and updated Contract Details tab
✓Clear - Once you have finished viewing the located Contact, Click the Clear option next to the Search option to restore the full Contacts List