❑If you plan to Charge Late Fees (and you should), and will also be Billing Recurring Revenue in multiple Recurring Billing Cycles (billing certain groups of Subscribers at different times of the month), you should set-up multiple Late Fee Groups.
•By doing so, you will be able to more evenly and fairly Assess Late Fees for late payers.
✓The Late Fee assessment process may be run any number of times throughout the month, but each individual Late Fee Group may only be processed once each month.
✓The Late Fee Group of Subscribers being charged those Late Fees can then be based on when they were billed for their Recurring Revenues (or whatever Late Fee calculation qualification is chosen).
✓This is better than assessing Late Fees based on one fixed date such as the last day of the month where the Invoice Due Dates are all different but the Late Fees calculate for all Past Due Invoices (some of which may be past due just a few days and others many weeks - depending on when they were originally billed).
➢Note 1: Each Subscriber is assigned to a Late Fee Group in the Accounting Receivable Section within the Edit View of the Subscribers Form.
➢Note 2: Be sure to create a generic Sale-Purchase Item named Finance/Late Charges assigning it the code F/C.
❑Opening the Late Fee Groups Form:
a)From the Backstage Menu System Select Maintenance and Choose General and Click the General Maintenance option which displays the Maintenance Menu or,
b)From the Quick Access Menu, Select Maintenance and Choose General Maintenance to display the Maintenance Menu.
•Once the Maintenance Menu is displayed, Select Receivables and Choose Late Fee Groups.
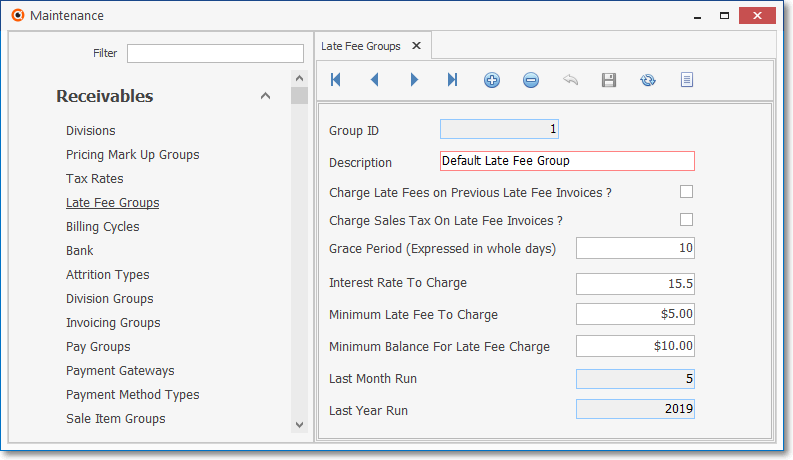
Late Fee Groups Form
✓This Late Fee Groups Form may be Re-sized by Dragging the Top and/or Bottom up or down, and/or the Right side in or out.
•Navigation Menu - The Navigation Menu is located at the top of the Late Fee Groups Form.

✓This Navigation Menu provides the normal Record Movement, plus Add, Delete, Cancel, Save, Refresh, and List options.
•Record Editing View - The details of the currently selected record are displayed below the Navigation Menu at the center (Main Body) of the Late Fee Groups Form.
Late Fee Groups Form - Record Editing View
•To define the Late Fee Groups which will be used to calculate Late Fees (based on When - within the month - or Why the Invoices were created).:
✓Click the ![]() Icon to start the Late Fee Groups entry in the Record Editing View.
Icon to start the Late Fee Groups entry in the Record Editing View.
▪Group ID - This record number will be assigned after the entry is initially saved.
▪Description - Enter a Description of this Late Fee Group
oThe Description may up to 40 characters in length and include upper and/or lower case letters, numbers, spaces and normally used punctuation marks.
▪Charge Late Fees On Previous Late Fee Invoices - Check this box if Late Fees are to be charged on previously assessed, unpaid Late Fees.
▪Charge Sales Tax On Late Fee Invoices - Check this box if the government entity for whom Sales Taxes are collected, requires Sales Tax be assessed on Late Fees.
▪Grace Period (Expressed in Whole Days) - Enter the number of days you will allow for a Grace Period (days after the due date before a Late Fee will be assessed).
▪Interest Rate To Charge - Enter an A.P.R. (Annual Percentage Rate) to be assessed on each Invoice's Past Due Balance (not to exceed your State's Maximum Permitted Interest Rate).
▪Minimum Late Fee Charge - As with most credit providers, a Minimum Late Fee should be established.
oThe system will assess the Minimum Late Fee if there is a Past Due Balance that will create an assessment - based on the APR - that would be less than that Minimum Late Fee.
▪Minimum Balance For Late Fee Charge - To avoid very small balances triggering a Minimum Late Fee, you may set a Minimum Balance For Late Fee Charge, below which, a Past Due Balance will not be assessed any Minimum Late Fee.
▪Last Month Run - A system maintained data indicating the Month Late Fees were last assessed.
oIf for some reason you run the Cycles out of the normal sequence (for example, July, before June), the Month (in the example it would be June) of the most recent cycle that was actually processed will be displayed.
▪Last Year Run - A system maintained data indicating the Year Late Fees were last assessed.
oAs noted above, if a Cycle is run outside of the normal sequence (for example, January 2010, then December 2009), the Year (in the example it would be 2009) of the most recent Cycle that was actually processed will be displayed.
✓Click the Save ![]() Icon to record this Late Fee Group.
Icon to record this Late Fee Group.
•Any number of additional Late Fee Groups may be created.
✓Then, periodically, based on the Late Fee Groups you've defined, execute the Late Fee Invoice Generation process.
✓Use the Late Fee Group Maintenance Form to assign a Late Fee Group, or to move selected sets of Subscribers from one Late Fee Group to another.
![]() List Icon - The Navigation Menu also has a List option which provides a tabular view of these Late Fee Group records.
List Icon - The Navigation Menu also has a List option which provides a tabular view of these Late Fee Group records.
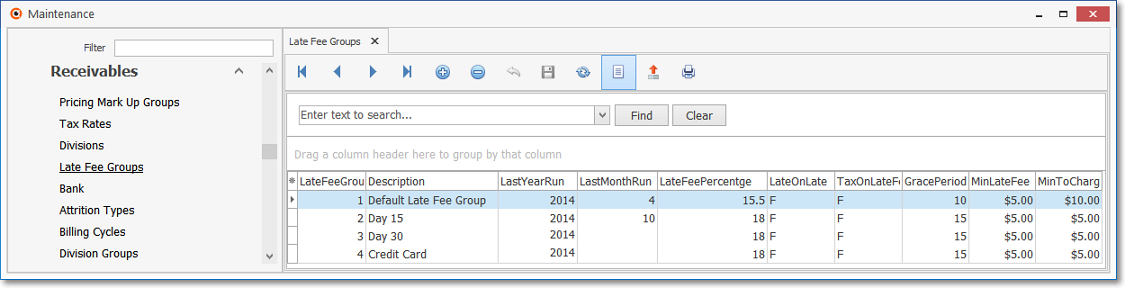
Late Fee Groups Form - List View
✓The columns of listed Grid Data may be rearranged, filtered, sorted, and exported as a PDF file and/or an Excel formatted file.

✓Find - Enter text to search for a specific record, then Click the Find option.
✓Clear - To remove the text to search for entry, Click the Clear option

Navigation Menu shown with the Icons for List, Export and Print
![]() List Icon - Click the List Icon again to Close the List View and return to the Record Editing View.
List Icon - Click the List Icon again to Close the List View and return to the Record Editing View.
![]() Export Icon - Click the Export Icon to create (one of there types of) a spreadsheet compatible file containing the Grid Data as it is currently organized and filtered.
Export Icon - Click the Export Icon to create (one of there types of) a spreadsheet compatible file containing the Grid Data as it is currently organized and filtered.
![]() Print - Click the Print Icon to display the Print Preview Form from which a custom report may be designed and "printed" as an Adobe® PDF File.
Print - Click the Print Icon to display the Print Preview Form from which a custom report may be designed and "printed" as an Adobe® PDF File.
❖See the Grids - Print Preview - Export Data chapter for complete information on using the List View, including its Export & Print options.