❑The Alarm Stack dialog provides a complete (and optionally, a filtered) list of Active Signals which may be individually selected for Processing.
•Incoming Signals get interpreted by SPA and then, when determined to be Active Signals (those requiring some type of Operator action), are sent to the Alarm Stack.
•By default, these Alarm Signals are listed within the Alarm Stack based on their Priority Level « order (determined by the Priority Level assigned to the Alarm Signal's Alarm Condition that is being reported) and within each Priority Level, ordered by Date/Time Received, and optionally by the required Operator Skill needed to process the Condition Code, and the Alarm Group to which the Subscriber has been assigned.
«Typically, Priority Level 1 is reserved for Fire Alarms, 2 for Ambush or Hold Up Alarms, 3 for CO detected and other Medical and Life Safety related issues, 4 for Burglary, 5 for other general alarm events, 6 for System Trouble reports, 7 for Low battery, tamper, and other system status reports, 8 for Opening & Closing related signals, and 9 for Tests and other general system reporting (also see UL Alarm Condition - Priority Ranking).
« UL Systems Prioritized in Alarm Stack - For those using the MKMS UL Version:
▪The Alarm Stack Priority List sequence has been specifically modified.
▪Alarm Signals are sorted and presented to the next available Operator in Priority Order, and within each Priory level, by UL Certificated alarm systems, then non-UL alarm systems.
▪This is required by 11.2.3.(c) "Move certificated system alarms to the top of each respective priority queue" in the Third Edition UL® 1981 Standard.
•There are many times when a specific Alarm Signal needs to be retrieved and processed outside of the normal sequence based on its Priority Level* and/or Time Received.
✓This might be to process a signal which was Placed On Hold, to manage a Pending Signal for a Subscriber who has called in to Abort that signal, and/or for any other reason where having the ability to specifically Choose which Alarm Signal will be processed next, is required.
➢Note: There is a MultipleAlarmStacks option in the Company Settings Grid which, by default, is set to True ("T") thus allowing the Alarm Stack to be opened more than once in MKMSCS, if required
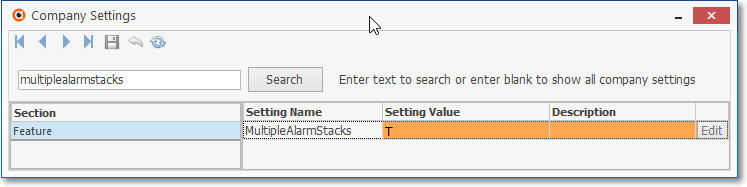
Company Settings - MultipleAlarmStacks option - Set to True by default
▪If the MultipleAlarmStacks option is set to False ("F"), only one Alarm Stack may be opened by each User.
•More than one instance of the Alarm Stack dialog may be displayed at the same time (see Note above).
✓Why? A Shift Supervisor and/or Central Station Supervisor may want to display the Alarm Stack to:
a)View the All Signals in the Alarm Stack, typically in Priority Level Order
b)View only Pending Signals
c)View only Signals on Hold.
d)Reset the Alarm Stack entries to the Default Order (choose Maintenance)
e)View a Filtered list of Alarm Conditions, Operators, Events, etc., as may be needed.
f)View Signal History bu choosing the History Icon on the Alarm Stack's Ribbon Menu
g)Consolidate Signals
h)Show Grid Lines

MKMSCS Desktop -Shortcuts tab - Alarm Stack (F8) option
❑To open the Alarm Stack Press F8 or Click the Alarm Stack Icon on the Shortcuts tab as shown immediately above.

Alarm Stack dialog showing Stack Options and Alarm Signal Grid with All available Columns
•Columns - Which Columns of data listed in the Alarm Stack Form are User Definable (additional information is presented later in this chapter).
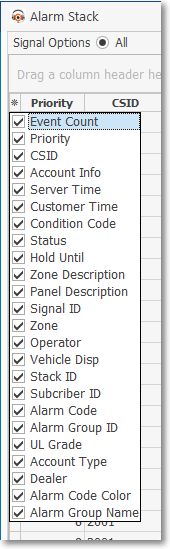
Selecting Columns
✓Click the Asterisk in the very left of the Grid's Header to display the list of available Columns
✓Check those Header Names that are to be included, and remove the Check from those that are to be excluded.
Alarm Stack dialog with Stack Options and Alarm Signal Grid with selected Columns
•Central Station Supervisor - Those Operators who have been identified as a Central Station Supervisor in the Security tab on the Employee Form may:
✓Sort the Alarm Stack based on a selected Header Name
✓Rearrange the Columns that are displayed in the Grid of the Alarm Stack
✓Retrieve a specific Signal from that Alarm Stack for special or regular Processing.
➢Note 1: A separate Alarm Stack Utility application is also available that may be used at any workstation connected to the MKMS/MKMSCS system database.
➢Note 2: There is an AlarmStack.LimitGrid option in Company Settings which by default, is set to False ("F").
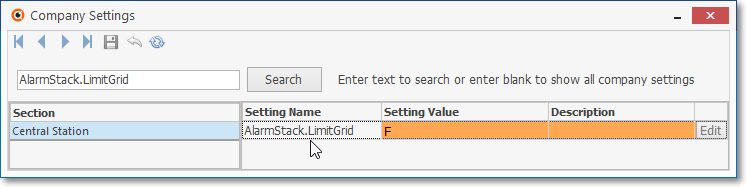
Company Settings - AlarmStack.LimitGrid option - Set to False by default
▪If the AlarmStack.LimitGrid option in Company Settings is set to True ("T"), the normal Filtering and Sorting capabilities are disabled.
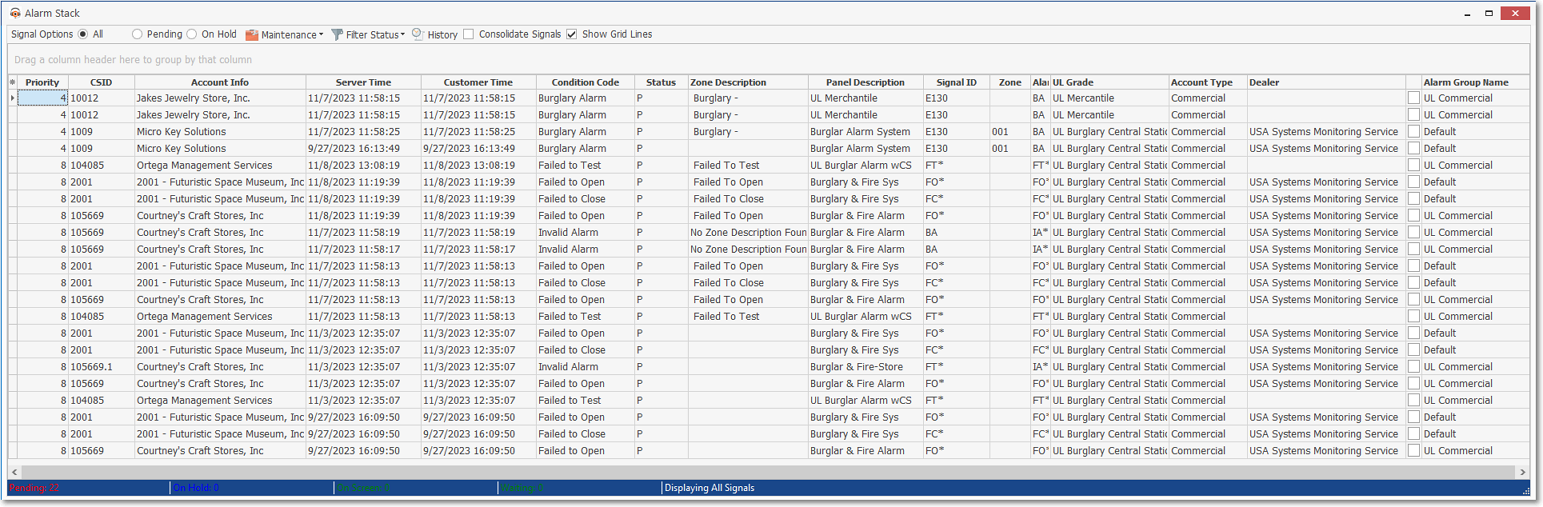
❑Alarm Stack Options - There are five (5) Alarm Stack Options on the Alarm Stack Ribbon Menu:

Alarm Stack options
1.Signal Options - Click the Down-Arrow to Select which Alarms Signals are to be displayed:
a.All Signals - Click the All button to display any signal that is in the Alarm Stack.
b.Pending Signals - Click the Pending button to display only Signals in the Alarm Stack that have not yet been processed.
c.Signals On Hold - Click the On Hold button to display Signals in the Alarm Stack that have been previously placed On Hold.
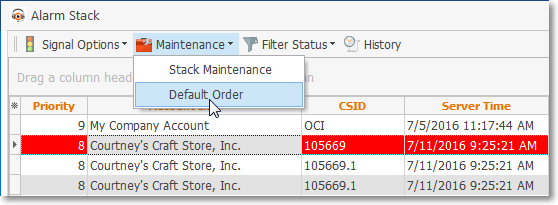
2.Maintenance - There are two Maintenance Options available by Clicking on the Down Arrow ‚:
a.Stack Maintenance which is used to reset each Signals's Status, Purge the Alarm Stack, and/or selectively take action on a specific CSID, or a set of Signals with the same Alarm Condition.
b.Default Order - which is used to reset the order in which the Signals in the Alarm Stack are displayed to Priority order.
3.Filter Status This option indicates whether a Filter has been applied to the Alarm Signals Grid, and will allow for the cancellation of that Filter.
4.History - Selecting this option opens a Signal History right-side-sub-grid for the selected Signal listed in the Alarm Stack.
5.Show Grid Lines - Check this box to have "spreadsheet style" grid lines added to (removed from) the Alarm Signals Grid
❑Alarm Signals Grid - The list of Pending, On Hold, On Screen and/or Waiting Alarm Signals are contained in a Grid (Show Grid Lines is not Checked) shown below.

Alarm Stack - Show Grid Lines Checked
•Each Alarm Signal that is Pending, On Hold, On Screen and/or Waiting (based on the selected Signal Option and/or any Grid Filter) are listed with the following information:
➢Note: Click the Asterisk (¬) on the left side of the Header to Check (or remove the Check from) the Columns which are to be included in (or excluded from) the Alarm Signals Grid.
Alarm Stack
Columns to be Listed
1.Event Count - When the ConsolidatdAlarmStack option is set to T, an Event Count column is added to the Alarm Stack list of Column Names.
a.When multiple instances of the same Alarm Signal are present, the total number of those signals will be shown in this column
2.Priority - The priority level based on the Alarm Condition Code reported with the Alarm Signal.
3.CSID - The Subscriber's CSID that reported the Alarm Signal.
4.Account Info - The name of the Subscriber or description of a system generated Event.
5.Server Time - The exact time this Alarm Signal was received by the Receiver or SPA (based on the Clock in the Server)
6.Customer Time - The Server Time adjusted to the Customer's Time by comparing the Central Station Opt tab's General sub-tab's Time Zone value to the Time Zone value entered in the Central Station Data section within the MonitoringTab of the Edit View of the Subscriber's Form
7.Condition Code - The description of the alarm event based on the Alarm Condition Code reported with the Alarm Signal.
8.Status - The current status (Pending, Alerting, On Hold, On Screen, or Waiting) of the Alarm Signal.
9.Hold Until - If this Alarm Signal was placed On Hold, the time that the Alarm Signal's Hold Status will revert to Pending Status and so will be sent to the next available Operator in its turn.
10.Zone Description - The Description entered for the Panel Zone or the CSID Zone that SPA used to interpret this Alarm Signal.
11.Panel Description - The Description entered in the Panel Info tab for this CSID.
12.Signal ID - The Signal ID for this event that was sent from the Receiver.
13.Zone - The Physical Zone for this event that was sent from the Receiver.
14.Operator - The Operator's Employee Code. No Employee Code will be listed until the Alarm Signal is actually presented to an Operator.
15.Vehicle Disp(atch) - Indicates whether a Vehicle has been Dispatched to the Subscriber's premises
16.Stack ID - This event's system assigned numerical identifier.
17.Subscriber ID - The system's internally assigned Subscriber ID record number.
18.Alarm Code - The Alarm Condition Code assigned to this Signal.
19.Alarm Group ID - This is the record ID of the Subscriber's Alarm (Processing) Group assigned in the Central Station Data section within the MonitoringTab of the Edit View of the Subscriber's Form
20.UL Grade - If a UL Grade system, the UL Classification for the installation
21.Account Type - The Account Type if one is assigned to this Subscriber
22.Dealer - The Dealer Name if one is assigned to this Subscriber
23.Account Code Color - Each column entry has a box within which is the assigned Color for the Alarm Condition Code reported with the Alarm Signal.
24.Alarm Group Name - The Alarm Group assigned to the Subscriber who transmitted the Alarm Signal.
❖To Process a Signal listed in the Alarm Stack's Alarm Signals Grid, Double-Click on that record to open an Alarm Signal Processing Form where you may update, respond and/or complete that Alarm Signal (see the "Selecting a Signal to Process" discussion below).
•Rearranging the Size, Position and Order of the Alarm Stack:
✓The Alarm Stack may be re-sized and the system will remember these dimensional settings on a User by User basis.
✓Instead of the default Priority Level/Time listing Order, the Order of the Signals are listed in the Alarm Stack may be reset based on the Data in a specific column by Clicking the Header Name of that column.
▪Clicking on a Header Name (e.g., Account Info) will set the order in which Alarm Signals will be listed within the Alarm Stack.
▪Clicking on the same Header Name will set the order in the opposite direction (ascending vs. descending).
![]()
▪The Header Name that is determining the Alarm Stack's Order will have an Arrow indicating the List's Order displayed next to that Header Name.
✓To revert to the default Priority Level/Time listing Order, simply Click the Priority Header Name.
▪To Reverse the default Priority Level/Time listing Order from Lowest Number (Highest Priority) first, to Highest Number (Lowest Priority) first, Click the Click the Priority Header Name again.
a.Any Column Header Name (and therefore the data in the column) may be relocated using the standard Windows® Drag & Drop method.
b.The Grid may be re-grouped by Dragging a Column Header Name to the top of the Grid.
c.Filters may also be created for the Grid
❖See the Grid & Lists - Print Preview - Export Data chapter for complete information on using the List View, including its Export & Filter options.
❑Information/Status Bar - Located at the bottom of the Alarm Stack dialog,
•This Status Bar displays the number of Alarms that are: Pending, have been placed On Hold, currently being displayed On Screen, and those signals that are Waiting to be processed.
![]()
Alarm Stack Information/Status Bar
❑Selecting a Signal to Process:
•A designated Operator and/or Central Station Supervisor who is not be performing regular Processing functions, may Select an Alarm Signal from the Alarm Stack for initial or further follow-up Processing, when appropriate.
✓Generally, they will be processing signals which were Placed On Hold, or managing a signal for a Subscriber that has called in to Abort an Alarm Signal, or for many other reasons where having the ability to specifically Choose which Alarm Signal will be processed next, is advantageous.
•Any Alarm Signal listed in the Alarm Stack may be Selected for (additional) Alarm Processing.
✓The Processing function does not have to be active to perform this task.
•If an Action Plan was directing the Operator who previously placed the Alarm Signal On Hold, once that Signal is retrieved after being Placed on Hold, by default the system will revert to the manually managed Operator Guided Response method of Processing the Alarm.
✓Understanding how the Company Setting for the Restart Action Plan from On Hold may change this default behavior:
▪By default, the RestartActionPlanFromOnHold option is set to False ("F").
oTherefore while an Operator is Processing an Alarm, being guided by an Action Plan, and she/he must put that Signal On Hold, when that Signal is retrieved from the Alarm Stack for further processing, it will revert to the Operator Guided Response processing methodology.
▪However, if this RestartActionPlanFromOnHold option is set to True ("T"), it will revert back to the beginning step defined in that Action Plan.
•To Process an Alarm Signal: Double-Click on that Alarm Signal record in the Alarm Stack;
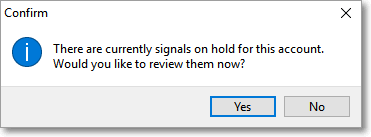
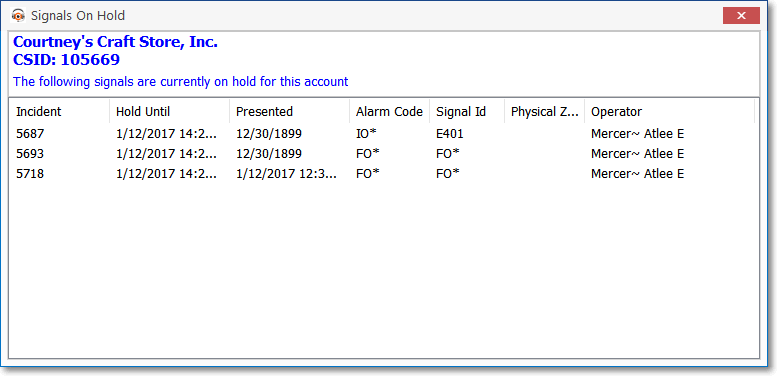
✓If there are other Signals On Hold for this Account, Answer Yes to see a list of those (as shown below).
Signals On Hold Form
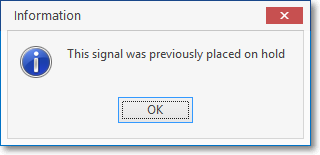
✓If this Signal was previously placed On Hold, an Information message to that effect is displayed.
Information - Signal was On Hold
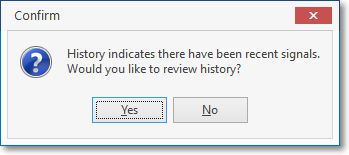
✓View Signal History? - If there has been other recent activity for this Account, you will be notified and asked of you want to review that Signal History.
Recent Alarm History message
✓Click the Yes button to view a Signal History Form with this specific Subscriber Panel Zone's CSID Signal History displayed.

Recent Signal History information for selected account
▪Once you've viewed the relevant information, you must Click the Close ![]() box on this Signal History Form to actually process the signal.
box on this Signal History Form to actually process the signal.
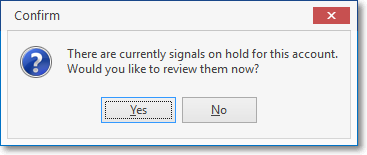
Answer Yes to display the Signal On Hold Form
✓Signals On Hold - If other Signals are on Hold for the associated Subscriber with the selected Alarm Signal, that information will be displayed for the Operator.
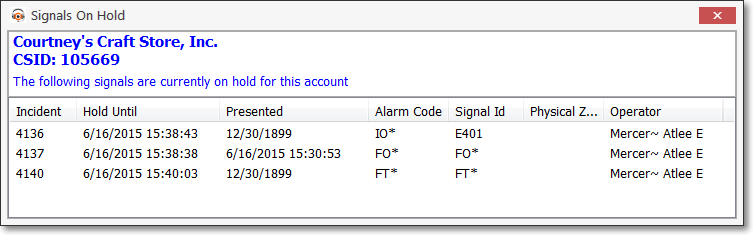
Signals On Hold list
▪Once you've viewed the relevant information, you must Click the Close ![]() box on this Signals On Hold Form to actually process the signal.
box on this Signals On Hold Form to actually process the signal.
Processing the selected Alarm Signal from the Alarm Stack
•Alarm Signal Processing proceeds normally from here.
•Also, see the Poll While Alarm On Screen chapter for more information.
❑Alarm Stack Maintenance operations:
•Stack Maintenance option - Click the Stack Maintenance option to Reset Signal Status settings, or selectively or globally Purge the Alarm Stack.
➢Note: Alarm Stack Maintenance may only be performed by a designated Central Station Supervisor.
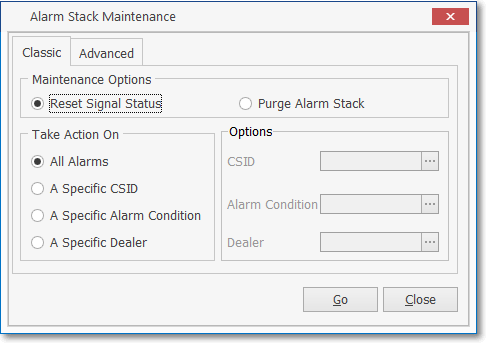
Alarm Stack Maintenance - Classic dialog
❖See the Alarm Stack Maintenance chapter for complete information.
•Default Order option - The Alarm Stack (by default) is listed in Priority Level Order, but that Order may be reset, as needed, by Clicking the Header Name (e.g., Priority, CSID, Time) that represents the Order in which the current User wants to view the Alarm Stack data.
✓The first Click on any Header Name sorts the data in descending order.
✓The second Click on that same Header Name sorts the data in ascending order.
✓Select the Default Order option to return the list to (the default) Priority Level Order.
✓Once the Alarm Stack is Closed, when Re-Opened, the default Priority Level Order is re-established automatically.