❑Understanding the Zone Test Verification Report:
•The Zone Test Verification Report provides an up to the minute listing of the Test Status of the Signal Identifier(s) and/or Physical Zone(s) that had been Placed On Test by an Operator.
✓This report will list the Test Status of those Signal Identifier(s) and/or Physical Zone(s) that were Placed On Test for one of the following:
▪All Subscribers.
▪Those Subscribers being monitored for one specified Dealer.
▪A selected Subscriber with either one, or multiple CSIDs defined in the Subscriber Panel(s) section on the Monitoring tab within the Edit View of the Subscribers Form.
➢Note: If the VerifyZones option is not set to True ("T") in the Company Settings dialog on the Company tab of the User Options Form,
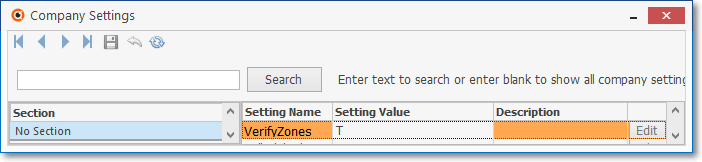
Company Settings - Verify Zones option set to "T"
This Unverified Zones feature and this associated Zone Test Verification Report will not be available.
The Unverified Zones feature only accesses those Signal ID and/or Physical Zone combinations defined within the CSID Zones Form with a Check in the Require Zone Test? box.
•Use the Zone Test Verification Report to view the current Test Status of each of the (selected) Subscribers' Signal Identifier(s) and/or Physical Zone(s) that were Placed On Test.
✓Once the correct list of Signal Identifier(s) and/or Physical Zone(s) and their associated Test Status has been set using the Unverified Zones Form, and subsequently as certain Signal Identifier(s) and/or Physical Zone(s) are successfully Tested, the Zone Test Verification Report will list those that are still Waiting for a Signal, and those that have successfully been Tested.
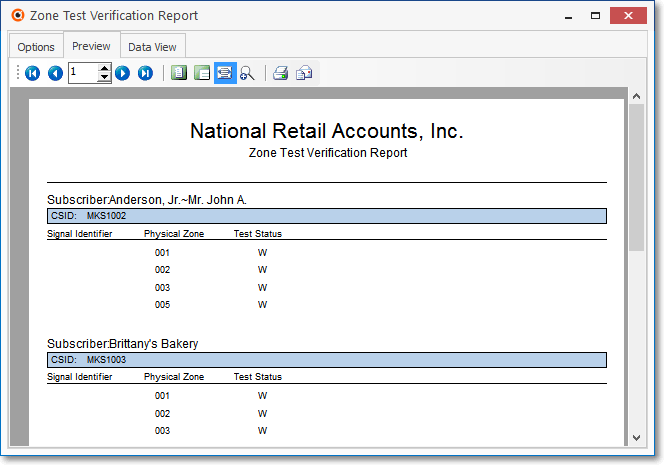
Zone Test Verification Report - Preview tab
•Reset Accounts? - Upon exiting the Zone Test Verification Report, a Reset Accounts? message will be displayed.
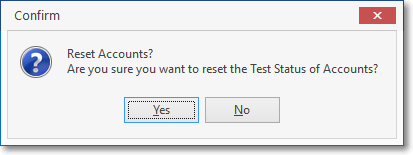
Reset Accounts?
✓If the designated Signal Identifier(s) and/or Physical Zone(s) for all CSID Zones, whether or not successfully Tested, are to have their Test Status reset to Null (i.e., no Test expected), Answer Yes, otherwise answer No.
▪Answering Yes would indicate that no more Test Signals are expected from these Account(s) during this On Test session, so all listed Waiting Accounts should be removed from the report by resetting their Test Status to Null.
▪Answering No, Closes the report with no data changes thereby preserving the Waiting Accounts list for future reference.
❖If there are any Accounts with a Test Status of Waiting ("W") remaining when the On Test process is completed, a SPA generated Signal ID of A139 will be received indicating the number of Unverified Zones that remain in a Waiting ("W") Test Status.
▪This special Signal ID must be predefined as one of SPA's Signal Processing Error messages.
▪Signal ID = A139 Alarm Code = System Messages OCTAR = Alarm Description = Number of Unverified Zones
❑When CSID Zones for an Account are placed On Test, certain steps have, and/or will occur:
•A Technician has requested to Place the Account on Test while servicing or simply testing an Alarm System.
✓This Technician may either be a Company Employee, or an Employee of a Dealer for whom your Company is providing Central Station Monitoring Services, or simply the Subscriber.
•An Operator (or another authorized Employee) actually Places the Account on Test.
✓The system will set the Test Status field to "W" thereby indicating that the system is now Waiting to receive a Signal from one or more Signal Identifier(s) and/or Physical Zone(s).
•The Unverified Zones Form may subsequently be used to remove those Signal Identifier(s) and/or Physical Zone(s) which do not need to be tested.
•When a CSID Zone is tested successfully, the system resets that Test Status field to "T" indicating that this Signal Identifier and/or Physical Zone has been properly Tested.
✓Subsequently, as those CSID Zones are successfully Tested, the Zone Test Verification Report will list both those Signal Identifier(s) and/or Physical Zone(s) that are still Waiting, and those that have already been successfully Tested.
❑The Zone Test Verification Report allows you to view a list of those Accounts which have been placed On Test, and the current Test Status of each.
•To access the Zone Test Verification Report dialog:
1.From the Backstage Menu System Select Reports and Choose Monitoring and Select the Zone Test Verification option
2.From the Quick Access Menu, Select Reports and Choose Monitoring and Select the Zone Test Verification option
•The Zone Test Verification Report dialog will be displayed.
❑ Zone Test Verification Report tabs - There are three tabs on the Zone Test Verification Report dialog.
•Options - Initially only the Options tab is shown (until you make your Options selections and Select Print).
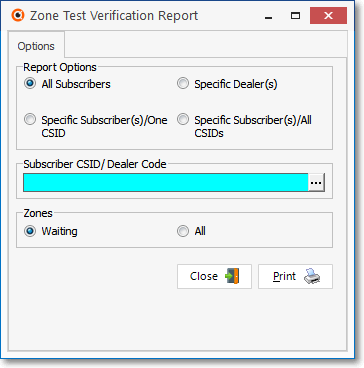
Zone Test Verification Report - Options tab
✓Report Options - Identify which Accounts should be listed:
▪All Subscribers - By default, all Accounts Placed On Test will be listed
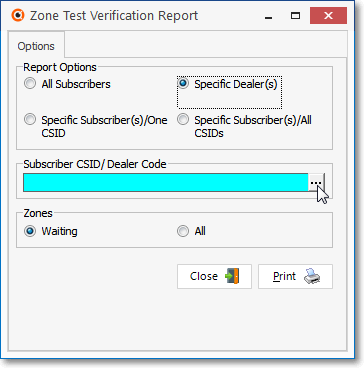
▪Specific Dealer(s) - To list a set of (one or more) Dealers which have Accounts Placed On Test, Click this button.
Zone Test Verification Report - Specific Dealer(s) option
oSubscriber CSID/Dealer Code field will be displayed.
oClick the Ellipse to open the Select Dealers dialog.
oSelect Dealers - To Choose the Dealer(s) required for this report, Check the Selected box for one or more Dealers on this Select Dealers dialog.
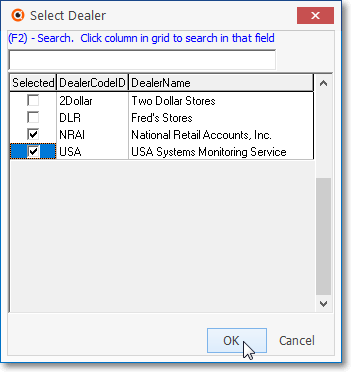
Select Dealers dialog
oClick the OK button to Close the Select Dealers dialog.
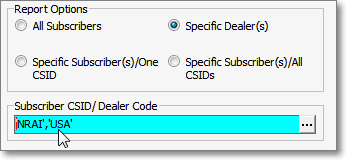
Zone Test Verification Report - with selected Dealer
oThe Selected Dealer Code(s) will be inserted into the Subscriber CSID/Dealer Code field.
▪Specific Subscriber(s)/One CSID - Click this button to list the Test Status of a selected set of Subscribers' CSID(s).

Zone Test Verification Report - Specific Subscriber(s)/One CSID
oClick the Ellipse on the Subscriber CSID/Dealer Code field to will open the Select Subscriber/One CSID dialog.
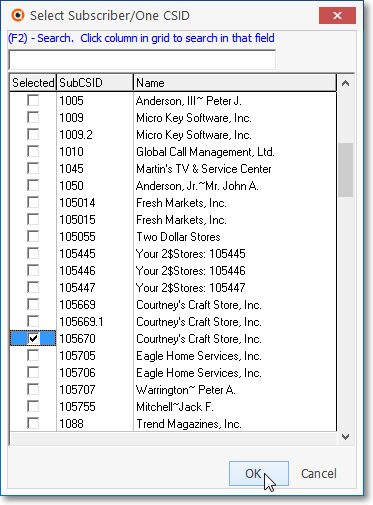
Select Subscriber/One CSID dialog
oCheck the Selected box for one or more Subscribers' CSIDs on this Select Subscriber/One CSID dialog.
oClick the OK button to Close the Select Subscriber/One CSID dialog.
oThe Selected Subscriber CSIDs will be inserted into the Subscriber CSID/Dealer Code field.

Zone Test Verification Report - selected CSID(s)
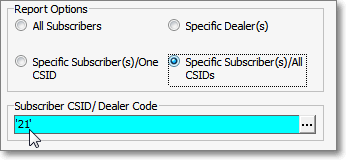
▪Specific Subscriber(s) / All CSIDs - Click this button and then the Ellipse on the Subscriber CSID/Dealer Code field to restrict the Accounts Placed On Test to a specified group of (one or more) Subscriber(s) - all of whose CSID's have been Placed On Test.

Zone Test Verification Report - selected Subscriber(s)
oTo Choose a specified group of (one or more) Subscriber(s) whose Accounts have been Placed On Test - regardless of which CSID was placed On Test - Check the Selected box for one or more Subscribers listed in this Select Subscribers/All CSID dialog.
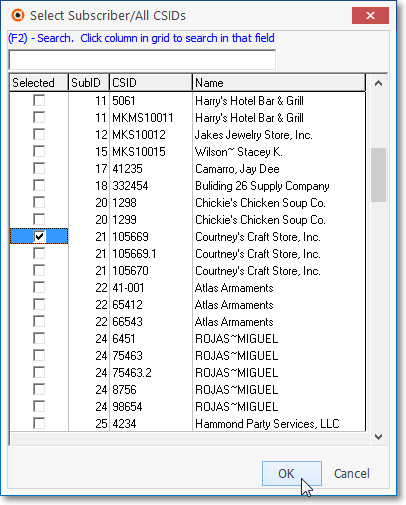
Select Subscribers/All CSIDs dialog
oClick the OK button to Close the Select Subscribers/All CSIDs dialog.
Selected Subscriber record number(s)
oThe record number(s) of those Selected Subscriber(s) will be inserted into the Subscriber CSID/Dealer Code field.
✓Zones - Indicate which type of Test Status will be included:
▪Waiting - Click this button to only include those Accounts whose Test Status is Waiting ("W").
▪All - Click this button to include Zones for all selected Accounts that have been placed On Test.
✓Print - Click the Print button ![]() to Preview and optionally Print (to a File or a Printer) this Zone Test Verification Report.
to Preview and optionally Print (to a File or a Printer) this Zone Test Verification Report.
•Preview - The Preview tab presents the report which resulted from the Options you've selected.
Zone Test Verification Report - Preview tab
✓Home - ![]() - Using either the screen Icon or your Keyboard's Home key, moves the report to the top of the first page.
- Using either the screen Icon or your Keyboard's Home key, moves the report to the top of the first page.
✓End - ![]() - Using either the screen Icon or your Keyboard's End key, moves the report to the bottom of the last page.
- Using either the screen Icon or your Keyboard's End key, moves the report to the bottom of the last page.
✓Arrows - The arrows allow you to move back and forth, from page to page.
✓Number - Indicates the page number you are viewing.
▪You may also type in a specific page number, Press 8 Enter and that page will be displayed immediately.
▪If you enter an invalid page number, it will be ignored.
✓Fit To Page - Click the first button after the arrows to size a full page of the report to fit the screen.
✓Zoom To 100% - Click the second button after the arrows to display the page at 100% (of the printed view).
✓Fit To Page Width - Click the third button after the arrows to size the page of the report to fit the full width of the screen.
✓Zoom To Percentage - Click the fourth button after the arrows to re-size the page of the report by percentage.
![]()
▪When you Click the Zoom To Percentage button, the Percentage selector will be displayed.
▪You may then Click the Up or Down ‚ arrows to set the exact amount of Zoom you want.
✓Print - Click the Print button to Print (to a File or a Printer) ![]() the displayed Zone Test Verification Report.
the displayed Zone Test Verification Report.
✓Email - Click the Email ![]() button to send this report to an Email address of your choosing.
button to send this report to an Email address of your choosing.
✓To Exit the Preview tab and Close this Report dialog Form, Click the Close ![]() box on the right at the top of the Preview tab.
box on the right at the top of the Preview tab.
•Data View - This view provides a tabular (spreadsheet style) presentation of the selected data.
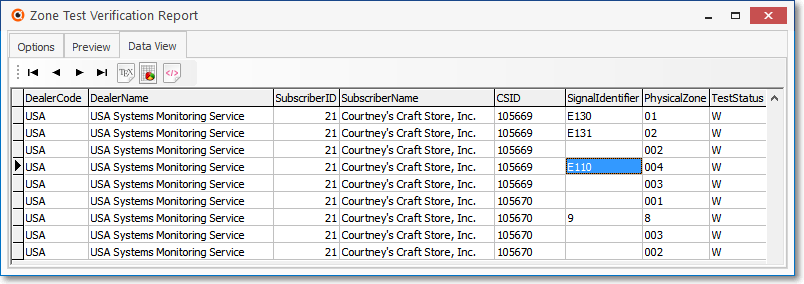
Zone Test Verification Report - Data View tab
✓Arrows - Click the arrows to move through the record.
✓Export - Exporting the data from this Data View tab (note the "fly-over" help available on these buttons):
▪Export to CSV - Click the first button after the arrows to export the data to a Comma Separated Values (CSV) file format.
▪Export To Excel - Click the second button after the arrows to export the data to an Excel (.xls) file format.
▪Export To Html - Click the third button after the arrows to export the data to an HTML formatted file.
✓To Exit the Data View tab and Close this Report dialog Form, Click the Close ![]() box on the right at the top of the Data View tab.
box on the right at the top of the Data View tab.
❑Reset Accounts? -
•Upon exiting the Zone Test Verification Report, a Reset Accounts? message will be displayed.
Reset Accounts?
✓If you want all CSID Zones, whether or not they have been successfully Tested, to have their Test Status reset to Null, Answer Yes, otherwise answer No.
▪Answering Yes would indicate that no more Test Signals are expected from these Account(s) during this On Test session, so all Waiting Accounts should be removed from the report by resetting their Test Status to Null.
▪Answering No, Closes the report with no data changes.
✓If there are any Accounts with a Test Status of Waiting ("W") remaining when the On Test process is completed, a SPA generated Signal ID of A139 will be received indicating the number of Unverified Zones that remain in a Waiting ("W") Status.
▪This special Signal ID must be predefined as one of SPA's Signal Processing Error messages.
▪Signal ID = A139 Alarm Code = System Messages OCTAR = Alarm Description = Number of Unverified Zones