❑Whether you're practicing, training, or actually processing signals from Receivers that are or are not yet connected to SPA (or SPA is off line for service), you will need the capability to initiate an Alarm Signal or any other event manually.
•To Access the Manual Signal Form:
a)From the Backstage Menu System in MKMS, Select Maintenance and Choose the Monitoring Menu, then select the Manual Signal option, or
b)From the Quick Access Menu in MKMS, Select Maintenance and Choose the Monitoring Menu, then select the Manual Signal option, or
c)Within MKMSCS - Press F7 or Click the Man. Signal Icon on the Shortcuts tab.
➢Note: The Manual Alarm Entry function will not populate the Alarm Stack unless (or until) the SPA application is running at this, or another Computer on the Network to which the Current User's Computer is attached.
If not, that Manual Signal information will be stored internally while awaiting the activation of SPA.
When SPA is activated, the Manual Signal is automatically inserted into the Alarm Stack
Thereafter:
a)An Operator (or Central Station Supervisor) may select that specific Manual Signal from the Alarm Stack for processing, or
b)When an Operator who has logged into MKMSCS, and has activated the Signal Processing function, the Manual Signal will be presented in its proper order based on its - and any other pending - signal's Priority..
•In any case, this Manual Signal dialog will be displayed.
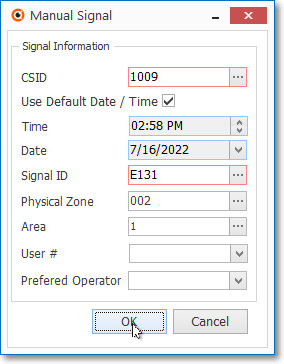
MKMS version of Manual Signal dialog
❑Entering the Signal Information for a Manual Signal:
•CSID - Click the Ellipse to Search for the needed CSID, or enter it manually, if known.
✓The Search dialog will be displayed.
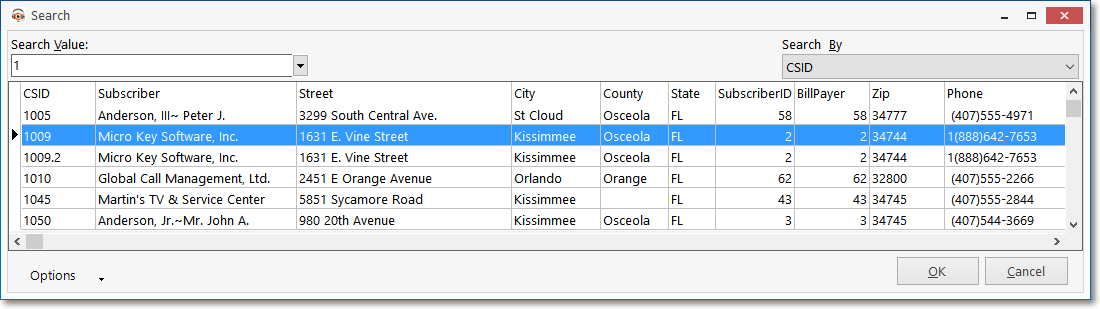
Subscriber Search dialog opened when Ellipse is selected
✓Search By - CSID is the default Search By method.
▪Using the Drop-Down Selection List provided, Choose the Search By method you want to use.
▪On a User by User basis, the selected Search By method will now become the new default Search By method for that User.
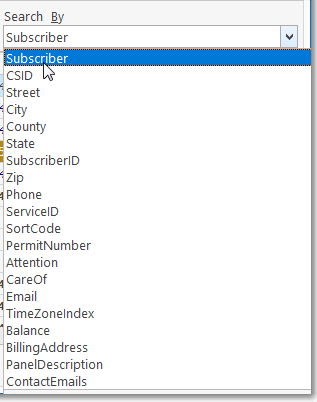
Search By selection list for the Subscriber Search Form
✓Search Value - Based on the Search By method you selected, type your Search Value.
▪As you enter characters, the record closest to what you've typed will be displayed.
▪Click on the desired record.
✓Click OK to execute that selection and Close the Search dialog.
✓CSID - The selected CSID will be inserted into the CSID field on the Manual Signal Form.
✓Time - By default, the current time is entered by the system.
✓Date - By default, the current date is entered by the system.
•Use Default Date / Time - This box is Checked by default (see the mouse pointer in the illustration above), so the File Server's current Date and Time is inserted automatically when this Form is opened.
✓However, to facilitate those Operators who must enter Alarm Signal activity after the fact, the mandatory use of the current Date and Time may be made optional.
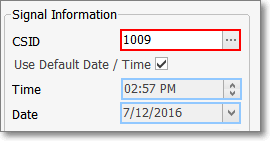
▪Remove the Check in the Use Default Date / Time box to be able to manually set the manually.
▪When the Use Default Date / Time box is not Checked, the manuallytime fields will become mandatory and must be edited as necessary.
▪The File Server's current Date and Time are still offered as the default, but the Operator may change the Time and the Date (using Drop-Down Calendar/Date Entry field provided).
✓Once you Remove the Check Mark from this box, unless this box is Checked again in the future, No Check Mark (i.e. a mandatory Date and Time entry) becomes the default, so the Time and Date fields may be adjusted manually (or the current Time and Date accepted), as the situation requires.
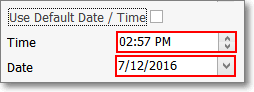
Remove Check to enter Date & Time
✓Time - Edit the Time field as required.
✓Date - Today is the default. Use the Drop-Down Calendar/Date Entry field to manually set a different date.
•Signal ID - Click the Ellipse to Search for the needed Signal ID, or enter it manually, if known.
✓The Search dialog is displayed.
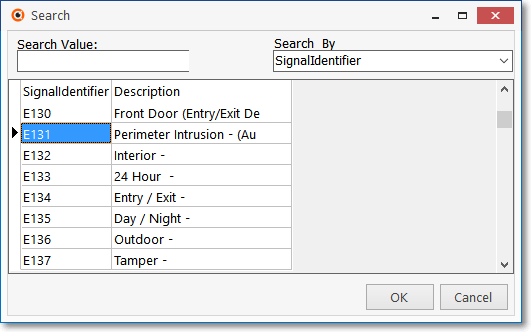
Signal Identifier Search dialog opened when Ellipse is selected
✓Search By - Signal Identifier is the default Search By method. You may also choose to Search By the Description.
✓Search Value - Based on the Search By method you selected, type your Search Value.
▪As you enter characters, the record closest to what you've typed will be displayed.
▪Click on the desired record.
✓Click OK to execute that selection and Close the Search dialog.
✓The selected Signal ID will be inserted into that field on the Manual Signal Form.
•Physical Zone - Optionally, Click the Ellipse to Search for the needed Physical Zone, or enter it manually, if known.
•Area - Optionally, Click the Ellipse to Search for an Area, or enter it manually, if known.
•User # - Optionally, use the Drop-Down Selection List to enter the User ID Number, if applicable.
•Preferred Operator - Optionally, use the Drop-Down Selection List to Choose the Operator to whom this Manual Signal should be specifically directed.
✓Being able to direct a Manual Alarm to a specific Operator allows a Central Station Supervisor/Trainer to provide individualized Operator instruction, or have an Operator record signals within MKMSCS that were previously processed manually.
•Click the OK button to execute this request.
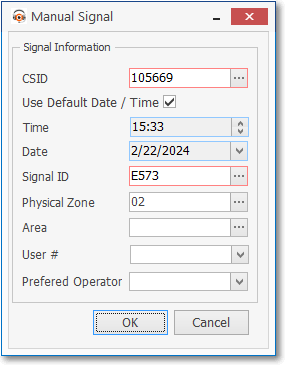
MKMSCS version of Manual Signal - All Options
•See Processing for complete information on how to process the Manual Alarm Signal once it is entered.