❑The Accounts Receivable System - among its many requirements - must accurately track the Receipt of Revenue.
•Part of setting up this Receipts Tracking Process is to identify the Banks into which those Receipts will be deposited.
•To access the Bank Form:
a)From the Backstage Menu System Select Maintenance and Choose General and Click the General Maintenance option which displays the Maintenance Menu or,
b)From the Quick Access Menu, Select Maintenance and Choose General Maintenance to display the Maintenance Menu.
•Once the Maintenance Menu is displayed, Select Receivables and Choose Bank.
✓The Bank Form will be displayed with its two tabs:
1.Bank - This tab contains the Record Editing View and the Bank Reconciliation History Grid.
2.EFT Info - This tab contains the several sub-tabs which may be needed to use Electronic Funds Transfer when using a Manual Payment Gateway
Bank tab
•Select the (default) Bank tab
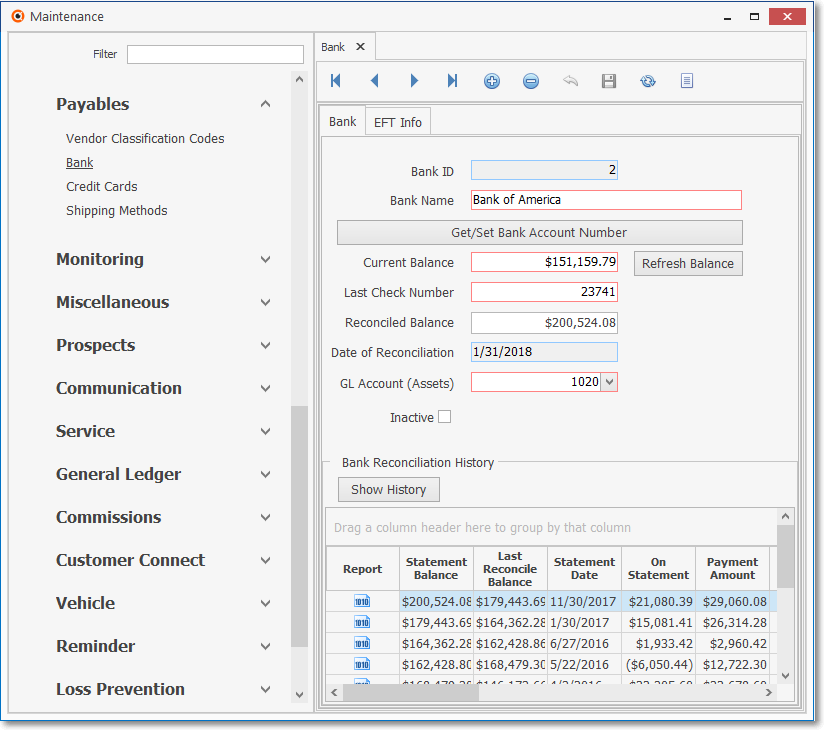
General Maintenance - Receivables (and Payables) sub-menu - Bank Form
✓This Bank Form may be Re-sized by Dragging the Top and/or Bottom up or down, and/or the Right side in or out.
•Navigation Menu - The Navigation Menu is located at the top of the Bank Form.

✓This Navigation Menu provides the normal Record Movement, plus Add, Delete, Cancel, Save, Refresh and List options.
•Record Editing View - The details of the currently selected Bank record are displayed below the Navigation Menu at the center (Main Body) on the Bank Form.
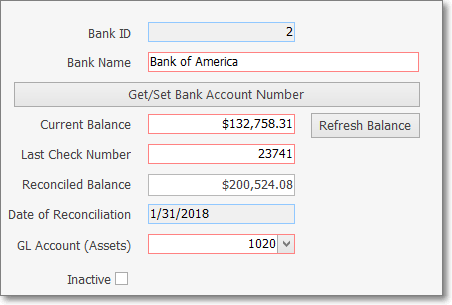
Bank Form - Record Editing View
•To define a Bank Info record:
✓Click the ![]() Icon to start a Bank entry in the Record Editing View.
Icon to start a Bank entry in the Record Editing View.
▪Bank ID - The system will assign a Bank ID number.
▪Bank Name - Enter the name (up to 30 characters) of this Bank or what ever other Financial Institution you are defining.
▪Get/Set Bank Account Number bar - Click this bar and enter the actual Account Number assigned by the Bank.
oFor the Subscriber's protection, once entered and saved, all Account Number information is hidden from view (replaced with Get/Set Bank Account Number bar) and actually encrypted within the database itself.
▪Current Balance - This field will be also be the Balance shown on the Bank Transaction Form
oIf using the General Ledger Module, this will be the Balance as shown in the Account Balance field on the Account Register Form.
▪Last Check Number - Enter the Last Check Number issued from this Bank Account.
oIf you have not yet Issued any Checks, set the Check Number to the number that is immediately before the First Check Number that you will be using first.
▪Reconciled Balance - Enter the most recent Reconciled Balance (if you have not done a Bank Reconciliation or this is a new Bank account, enter 0.00).
▪Date of Reconciliation - The Date of Reconciliation will be provided by the system after you initially Reconcile the Account within MKMS.
▪GL Ac Number - If you are using (or preparing to use) the General Ledger module and have defined your General Ledger Accounts, using the Drop-Down Selection List provided, Select the General Ledger Cash Account number for this Bank.
▪Inactive - If this Account will no longer be used, Check this box.
oAn Inactive Bank Account will not be included in any Drop-Down Selection List on these Forms:
f)Payments
h)Receipts
m)Bank (widget)
n)Company Options - General tab on the User Options Form Default Bank Account Drop-Down Selection List.
oA Bank record cannot be identified as Inactive when:
a)There are Receipts that have not yet been Allocated
b)There are Receipts that have not yet been Deposited
c)There are Payments that have not yet been Allocated
d)It is the Default Bank Account as defined in the Company Options - General tab on the User Options Form.
✓Click the Save ![]() Icon to record this Bank entry.
Icon to record this Bank entry.
✓Any number of additional Banks may be identified, as required.
➢Note 1: If you have used the Void Unused Checks Form to identify certain Check Number(s) that should be skipped, or not ever used again, you must reset this Last Check Number field.
✓To reset the Last Check Number (in the event that one or more have been destroyed, sent as samples for setting up automatic deductions, etc.), Click on the Last Check Number field and replace the currently displayed Check Number, as appropriate, then Click the Save Icon.
➢Note 2: If you be using Electronic Fund Transfers for the direct deposit of Receipts from your Subscribers:
✓The EFT (Electronic Funds Transfer) process is explained in How to Get Paid via Electronic Funds Transfer.
✓Also see the EFT Info sub-tab discussion below.
![]() List Icon - The Navigation Menu also has a List option which provides a tabular view of the Bank records.
List Icon - The Navigation Menu also has a List option which provides a tabular view of the Bank records.
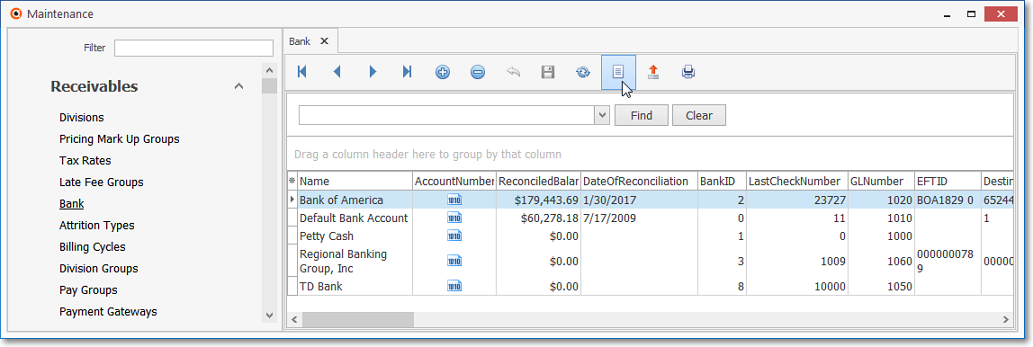
General Maintenance Menu - Receivables sub-menu - Bank Form - List View
✓Click the List Icon to display the associated Grid Data.
•Choosing the Columns to be Viewed:
✓Some columns may contain expanded comments or other information which may make the List View's display difficult to use.
Ø In the List View, you may Click the Asterisk at the left of the row of Header Names to display a Drop-Down Check List of each column's Headed Name.
▪Check any Header Name to be included in the List View (by default, All Header Names will be Checked)
▪Remove the Check for any Header Name (see illustration below) that is to be removed from the List View.
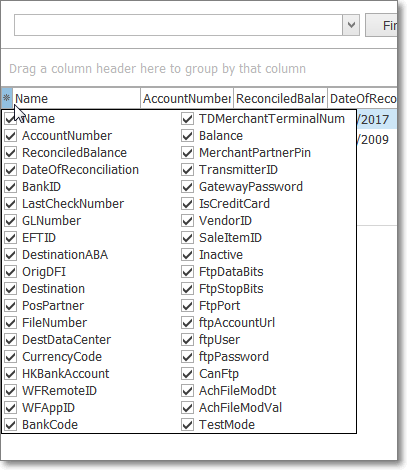
Bank Form - List Available Columns
✓The columns of listed Grid Data may be rearranged, filtered, sorted, and exported as a PDF file and/or an Excel formatted file.

✓Find - Enter text to search for a specific record, then Click the Find option.
✓Clear - To remove the text to search for entry, Click the Clear option

Navigation Menu shown with the Icons for List, Export and Print
![]() List Icon - Click the List Icon again to Close the List View and return to the Record Editing View.
List Icon - Click the List Icon again to Close the List View and return to the Record Editing View.
![]() Export Icon - Click the Export Icon to create (one of there types of) a spreadsheet compatible file containing the Grid Data as it is currently organized and filtered.
Export Icon - Click the Export Icon to create (one of there types of) a spreadsheet compatible file containing the Grid Data as it is currently organized and filtered.
![]() Print - Click the Print Icon to display the Print Preview Form from which a custom report may be designed and "printed" as an Adobe® PDF File.
Print - Click the Print Icon to display the Print Preview Form from which a custom report may be designed and "printed" as an Adobe® PDF File.
❖See the Grids - Print Preview - Export Data chapter for complete information on using the List View, including its Export & Print options.
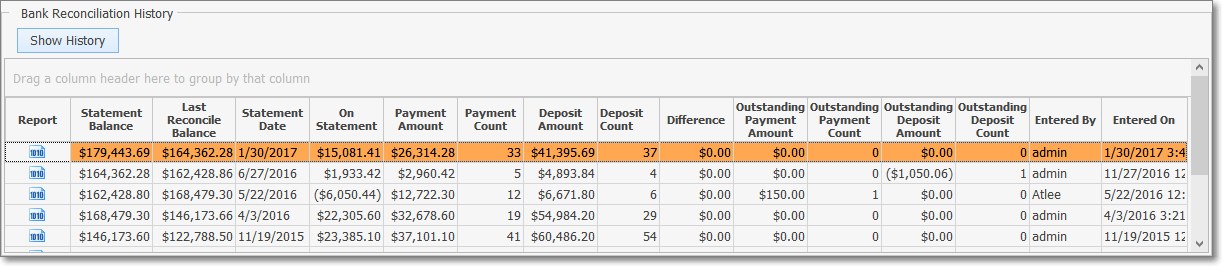
❑Bank Reconciliation History Grid - This section displays a summary of each previously completed Bank Reconciliation procedure for the currently selected Bank.
•Once the required Bank record is located, use the Vertical Slide Bar on the right of the Bank Form and Drag it downward until the Bank Reconciliation History section is displayed.
•To view all of the available information, Drag the right border of the Bank Form to the Right (as shown in the illustration below).
➢Note: This Reconciliation History section is not retroactively populated with Bank Reconciliations that were completed prior to the installation of MKMS NEO Version 5.1.34.2.
•A Bank Reconciliation Summary report created for a completed Bank Reconciliation may be viewed.
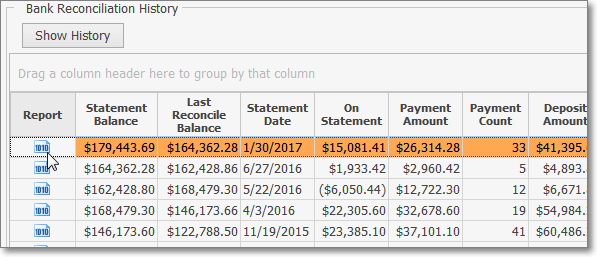
✓In the Report column, Click the record line representing the Bank Reconciliation Summary report that is to be displayed/re-printed and then Click the Ellipse to open a PDF of that Bank Reconciliation Summary report.
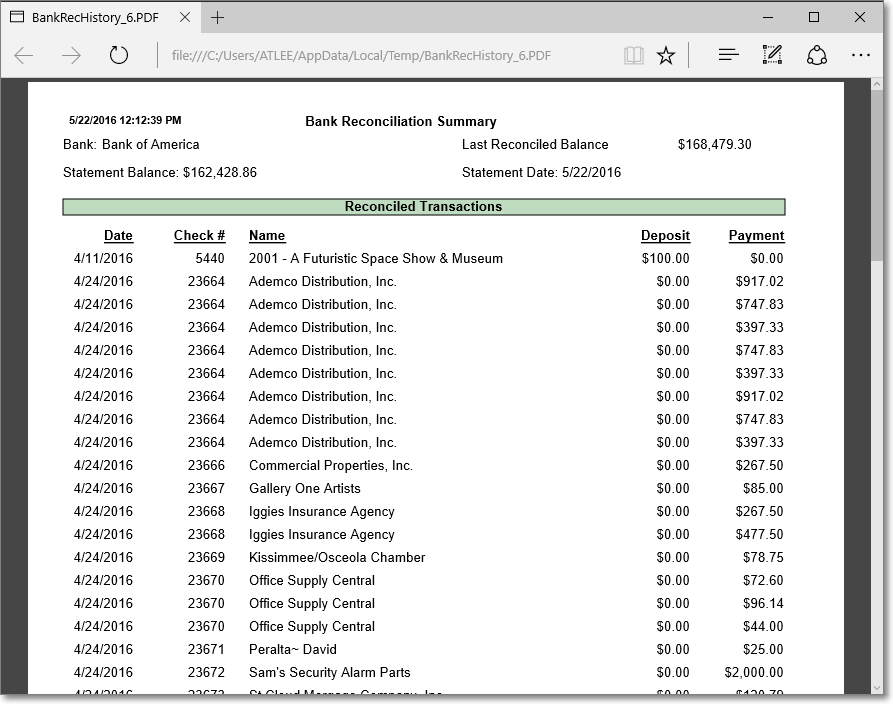
Bank Reconciliation Summary - Reconciled Transactions
❑Microkey Solutions™ offers InnoEPay as its preferred Payment Gateway provider.
•The InnoEPay Setup Process, once completed, offers a virtually automatic Payment Gateway process thereafter.
•No EFT Info information (see below) is required when using InnoEPay.
•See the InnoEPay chapter for that information.
✓When your Company implements the InnoEPay Payment Gateway, this will be the only Payment Gateway that you'll ever need.
▪An exception to that would be when there is more than one Bank into which your Company will be making Deposits via InnoEpay transactions.
✓In that case, each InnoEPay Payment Gateway will make deposits directly into only one Bank.
▪Therefore, when your Company is using additional Banks for depositing InnoEpay transactions, your Company will need to get additional keys and have additional InnoEPay Payment Gateways records defined.
▪Consider a naming method such as InnoEPay-Bank1, InnoEPay-Bank2, etc., with the actual Bank Name used in each case.
✓If your Company does tokenize Credit Cards, all Tokens will be based on the default Payment Gateway, so all the InnoEPay Payment Gateways will automatically recognize those Tokens.
EFT Info tab
❑The Electronic Funds Transfer Process is setup and executed as follows when your Company is not using an Automatic Payment Gateway such as Authorize.net, Forte.net, and the preferred InnoEPay Gateway.
a)Manual Payment Gateway services - If you (will) use Electronic Funds Transfer to Auto Draft your Subscribers (usually for Recurring Revenue related Payments and when using the E-Payments Form), only enter information in the EFT sub-tab (or the appropriate sub-tab representing the Processor Services being defined) on the EFT Info tab on the Bank Form for a Bank/Agency/Company that provides Manual Payment Gateway services and information is required to support that Bank.
b)Automatic Payment Gateway services - When using an Automatic Payment Gateway, (Authorize.net, Forte.net, InnoEPay - which is the Preferred Gateway) everything is controlled internally so the Bank which will receive those payments on your Company's behalf is defined here and associated with that Automatic Payment Gateway record.
•To do so, access the Bank Form as described above.
✓Click the Search Icon on the Navigation Menu (see the "Using the Special Functions on the Navigation Menu at the top of the Bank Form" section below).
✓Click on the Bank Name to be updated with EFT Information.
•Once the required Bank is located, Choose the appropriate Payment Processor sub-tab to enter the required EFT information.
✓Each Bank that is providing Manual Payment Gateway services must have its own Bank record defined and will also need to require EFT Processor information.
➢Note 1: The data in the fields shown in the illustrations below is fictional, the actual data - required and supplied by the currently selected Bank - will be different.
❑EFT Processor sub-tabs: Locate the appropriate Processor Service's sub-tab and complete the information, as needed:
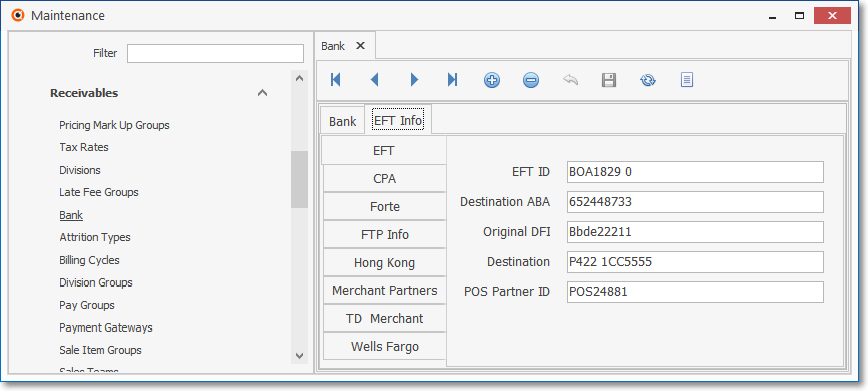
•EFT sub-tab - Complete the fields as required by that EFT Processor - which will be for the currently selected Bank.
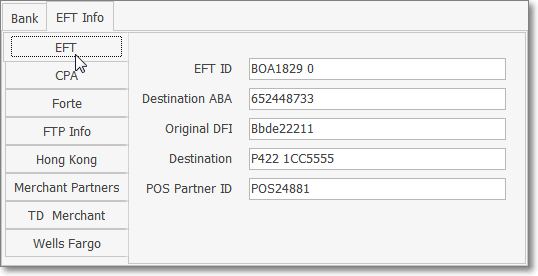
✓EFT ID - Enter the EFT ID specified by the EFT Processor.
✓Destination ABA - Enter the EFT Processor's Bank's Routing Number.
✓Original DFI - This is an optional field that may be required by your EFT Processor. It may be up to 10 characters in length.
✓Destination - Data required in the ACH format specifications.
oIt will be specified by the EFT Processor.
✓POS Partner ID - This is a special purpose ID that will be specified by your Point of Sale system provider.
✓Click the ![]() Icon to record this Bank - EFT Info entry.
Icon to record this Bank - EFT Info entry.
•CPA options sub-tab - Canadian Payments Association Options - Our Canadian Customers may need to enter this Processor Service information:
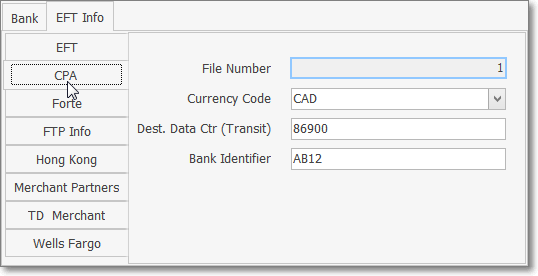
Bank Form - Canadian Payments Association section
✓File Number - This is a read only field.
▪Each time the Post Auto Draft process is executed for this bank, the number will be incremented by +1.
▪This value cannot exceed 9999. and will be reset to 1 automatically, if it does.
▪If a file is submitted to the processing institution, and a number was skipped, the file will be rejected.
▪If Auto Draft must be reset, this number must also be reset to 1.
✓Currency Code - Use the Drop-Down Selection List and choose either CAD or AFT.
✓Dest. Data Ctr. (Transit) - Referred to as the Destination data Center, this unique number is assigned by the processing institution.
✓Bank Identifier - Enter the four character ID assigned by the Bank.
✓Click the ![]() Icon to record these entries.
Icon to record these entries.
✓Also see Subscriber Payment Methods and Post Auto Drafts for important additional information relating to the CPA format requirements.
•Forte sub-tab - If your Company will be using the Forte Payment Processor, see the Forte.net chapter for those instructions.
•FTP Info sub-tab - If you (will) use a File Transfer Protocol ("FTP") to transfer files to this Bank, define those protocols as described below.
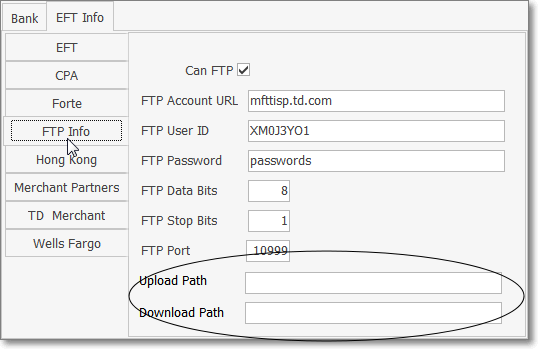
✓FTP Account URL - The FTP site address
✓FTP User ID - Site provided ID
✓FTP Password - Site provided Password
✓FTP Data Bits - As required
✓FTP Stop Bits - As required
✓FTP Port - As required
✓Upload Path - As required
✓Download Path - As appropriate
✓Click the ![]() Icon to record this entry.
Icon to record this entry.
•Hong Kong sub-tab - Enter the Account Number supplied by this Processor Service:
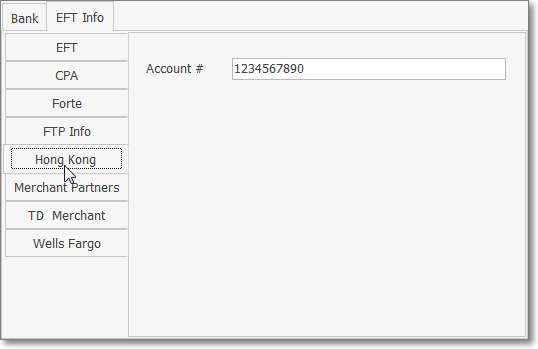
✓Account # - This number Information will be supplied by Micro Key Technical Support for those using this Processor Service.
✓Click the ![]() Icon to record this entry..
Icon to record this entry..
•Merchant Partners sub tab - If using Merchant Partners as your Company's Credit Card and/or ACH Processor Service:
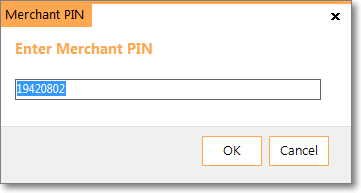
✓Click the Get/Set Merchant Pin bar.
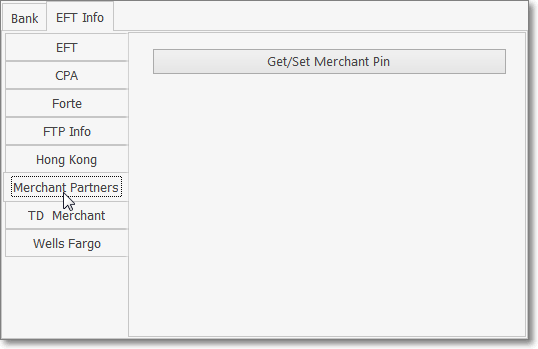
✓Enter the Merchant Pin supplied by this Processor Service.
✓Click the ![]() Icon to record this entry..
Icon to record this entry..
•TD Merchant - Enter the Terminal Number supplied by this Processor Service:
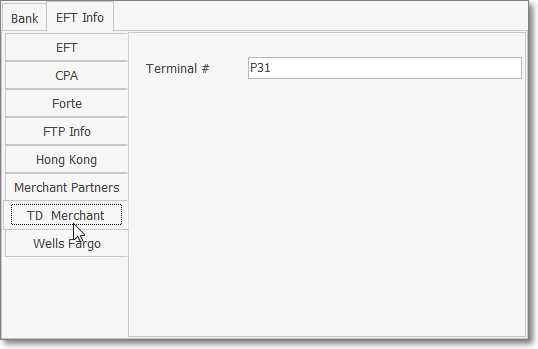
✓Terminal # - This three character entry will be required by this Processor Service.
✓Click the ![]() Icon to record this entry.
Icon to record this entry.
•Wells Fargo - Complete this Special Purpose Information which will be supplied by Wells Fargo Bank:
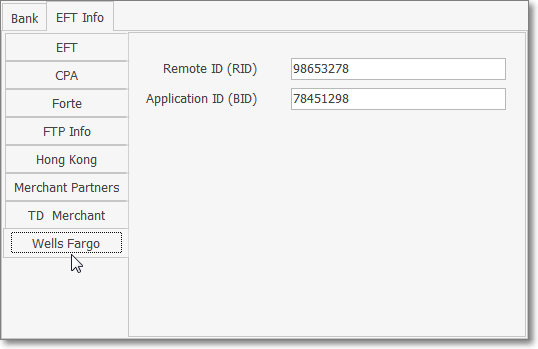
✓Remote ID (RID) - Enter the required (up to) 8 digits. .
✓Application ID (BID) - Enter the required (up to) 8 digits.
✓Click the ![]() Icon to record this entry.
Icon to record this entry.