❑The Cash Receipts Report provides a user definable list of the Receipts
•The Cash Receipts Report shows the Subscriber making the payment, Date received, Check Number, Batch Number on which it was posted, and the payment method that was used (e.g., Check, Credit Card).
✓Whether reviewing the Receipts for the Month, to compare and balance with a Deposit Slip for Making a Bank Deposit, or to check on a specific Subscriber's payment history, you will often have a need to print a Cash Receipts Report.
•To view the Receipts paid by a specific Subscriber:
✓Open a Subscribers Form.
✓Locate the desired Subscriber record.
✓Then, use either of these methods to open the Cash Receipts dialog:
a)From the Backstage Menu System Select Reports and Choose Receivable Reports, or
b)From the Quick Access Menu, Select Reports and Choose Receivable Reports.
▪Then, Select the Cash Receipts option.
•To view the Receipts from All Subscribers (based on specific criteria):
✓Close all open Subscribers Forms (or remember to change the default of Current Subscriber to All Subscribers)
✓There are two ways to access the Cash Receipts dialog:
c)From the Backstage Menu System Select Reports and Choose Receivable Reports, or
d)From the Quick Access Menu, Select Reports and Choose Receivable Reports.
▪Then, Select the Cash Receipts option.
•To print a Cash Receipts Report for a specific Bank Deposit open the Cash Receipts Report dialog as described immediately above, then:
1.Based on which Receipts were Chosen on the Bank Deposits Form to be deposited, Select one of these reporting Period options:
a.For all the Receipts posted Today, or
b.Receipts posted specifically for the One Batch Number assigned to a set of Receipts, or
c.For any Receipt's Batch Numbers that were posted within a designated Date Range
2.Check the Deposited Only box
3.Choose the Bank to which they were deposited
4.Specify the Payment Type(s) that are to be reported (i.e., American Express®, Cash, Check, Discover®, Electronic Transfer, Mastercard®, Other, Visa®)
5.Print this Cash Receipts Report.
❖There are several other specialized reports associated with Receipts:
b)Cash Receipts by Payment Method
c)Cash Receipts by Sales Category
e)Cash Receipts Summary By Month
✓Refer to those chapters for specific information as to the purpose and appropriate usage of these specialized Cash Receipts Reports.
❑Cash Receipts tabs - There are three tabs on the Cash Receipts report dialog.
•Options - Initially only the Options tab is shown (until you make your Options selections and Select Print).
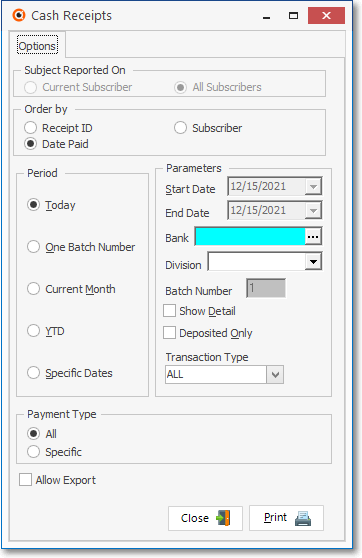
Cash Receipts dialog - Options tab - All Subscribers defaults
✓Subject Reported On - Choose whether to report on the Current Subscriber, or All Subscribers.
▪If you have selected the Cash Receipts report from the Reports Menu with no Subscribers Form open, the default selections will be as shown above, and All Subscribers will be your only Subject Reported On choice (see the illustration above).
▪However, if this report was selected with an open Subscribers Form on screen, the default selections will be as shown below.
Cash Receipts dialog - Options tab - Current Subscriber
oIn this case, Current Subscriber is selected.
oAlternately, you may select All Subscribers, if appropriate.
✓Order By - Select the sequence in which the selected Receipts are to be listed:
▪Receipt ID - The system may list the selected Receipts in the Order in which they were entered (i.e., by the internally assigned Receipt ID).
▪Subscriber - The system will list the selected Receipts in alphabetical order by the Subscribers Account Name.
▪Date Order - The system may list the selected Receipts based on the Date entered on the Receipts Posting or Receipts Form, when each Receipt was recorded.
oRemember that the Date assigned to the entry may be different then the actual day the Receipt entry was entered.
oThe Receipt ID is assigned sequentially and so indicates the order in which the Receipts were actually entered.
✓Period - Choose what Receipts will be listed based on when they were dated when recorded.
▪Today - List Receipts posted in the current day.
oThat date will be inserted in the Start Date and End Date fields and cannot be changed.
▪One Batch Number - Because you may have used multiple Batch Numbers in the same day, or the same Batch Number on multiple Days, you may list Receipts based on a specific Batch Number.
➢Note: See the "Batch Number Assignment" discussion in the Receipts chapter for more information about Batch Numbering.
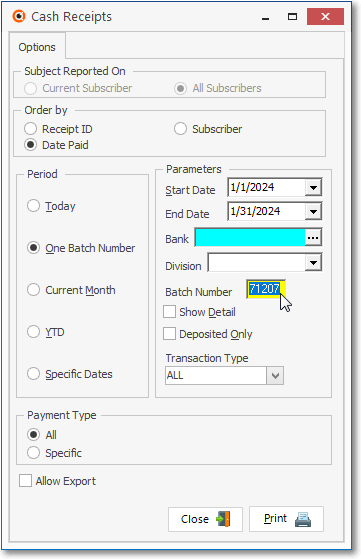
Cash Receipts Report - One Batch Number option
oBatch Number - The default Batch Number will be Today, but may be changed as needed.
➢About Batch Numbers
i.Batch Numbers may be assigned from 1 to 32637 (this limitation is a function of the field type into which you are entering this Batch Number).
ii.You may start a new numbering sequence each month (using the current Date's Day number), so the same Batch Number will be used in multiple Months but the date will be different.
iii.In some cases, you may use the same Batch Number for more than one day to group certain of these types of payments together.
iv.You may use multiple Batch Numbers within the same day to separate Credit Card transactions from Cash Receipts, and to separate those Receipts from EFT funds.
v.You may start from 1 and increment the Batch Number perpetually (if you used 2 batch numbers for two deposits every day, 5 days a week, it would take over 60 years to use all of the numbers) but the down side of this method is that you must keep track of the next number to be used.
vi.Normally, in each month you will start a new sequence (from 1 to whatever) so the same Batch Number will be used in multiple Months
vii.MKMS automatically records Receipts in an individual Month & Year group to keep them differentiated.
oStart Date - By default this will be the First Day of the Current Month but the Start Date may be changed using the Drop-Down Calendar/Date Entry field provided.
i.Click on the Date field and type the desired Date using a MM/DD/YYYY format; or
ii.Use the Drop-Down Calendar/Date Entry field provided to Choose the desired Date
oEnd Date - By default this will be the Last Day of the Current Month but the End Date may be changed using the Drop-Down Calendar/Date Entry field provided.
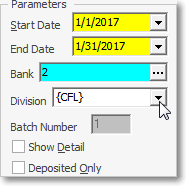
oBank - By default, [All] the Receipts posted to All Banks using the selected Batch Number will be included, but this default may be reset by using the Drop-Down Selection List provided.
oReceipts posted to any Division will be included.
i.You may limit Receipts to those posted from Subscribers assigned to a specific Division.
ii.Using the Drop-Down Selection List provided, Select that specific Division's Receipts, if required.
oShow Detail - To include the detail of each amount that was Allocated to which Invoices, and the total amount of each Receipt that was allocated, Check this box.
▪Current Month - Lists all Receipts for the Current Month (or selected month using the Specific Dates selection explained below).
oMKMS automatically records Receipts in an individual Month & Year group to keep them differentiated from Receipts posted in other Months that will have used the same Batch Number.
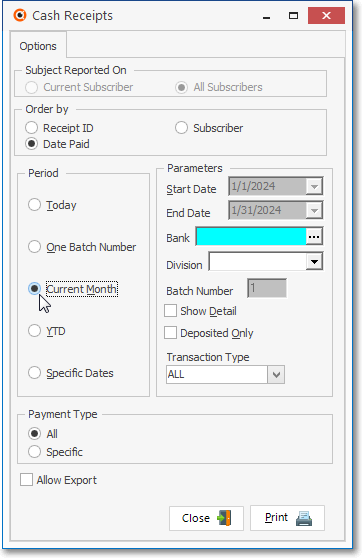
Cash Receipts Report - for Current Month
oIn the illustration above, the Month of April and the Year of 2013 represent the Current Month and so are automatically assigned.
oBy default, [All] the Receipts posted to All Banks, regardless of the Batch Number, will be included.
i.You may limit Receipts to those posted to a specific set of (one or more) Bank(s).
ii.Click the Ellipse in the Bank field to open the Select Bank ID dialog.
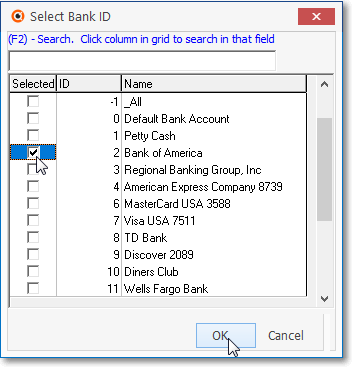
Select Bank ID dialog
iii.Check the Selected box for each Bank that is to be reported.
iv.Click the OK button to Close the Select Bank ID dialog.
v.This will insert the Selected Bank's IDs into the Bank field.
oReceipts posted to any Division will be included.
i.You may limit Receipts to those posted from Subscribers assigned to a specific Division.
ii.Using the Drop-Down Selection List provided, you may Select that specific Division, if required.
oShow Detail - To include the detail of each amount that was Allocated to which Invoices, and the total amount of each Receipt that was allocated, Check this box.
▪YTD - (Year to Date) - Lists all Receipts for the current Year.
oBy default, [All] the Receipts posted to All Banks using the selected Batch Number will be included.
viii.You may limit Receipts to those posted to a specific set of (one or more) Bank(s).
ix.Click the Ellipse in the Bank field to open the Select Bank ID dialog.
Select Bank ID dialog
i.Check the Selected box for each Bank that is to be reported.
ii.Click the OK ü button to Close the Select Bank ID dialog.
iii.This will insert the Selected Bank's IDs into the Bank field.
oReceipts posted to any Division will be included.
i.You may limit Receipts to those posted from Subscribers assigned to a specific Division.
ii.Using the Drop-Down Selection List provided, Select that specific Division, if required.
iii.To create this report for those Receipts posted to Accounts who have no Division assignment, Choose the Unassigned option.
oYou may also report the Receipts posted within a different year by using the Specific Dates option below.
oShow Detail - To include the detail of each amount that was Allocated to which Invoices, and the total amount of each Receipt that was allocated, Check this box.
▪Specific Dates - List Receipts that were posted within a Date Range by using the Specific Dates selection.
oBe default, the Start and End Dates will be Today.
oRe-enter the Start Date and End Date in the Parameters section, as needed using the Drop-Down Calendar/Date Entry field es provided.
oAny Date Range may be used including a period covering multiple Years.
oBy default, [All] the Receipts posted to All Banks using the selected Batch Number will be included.
i.You may limit Receipts to those posted to a specific set of (one or more) Bank(s).
ii.Click the Ellipse in the Bank field to open the Select Bank ID dialog.
Select Bank ID dialog
iii.Check the Selected box for each Bank that is to be reported.
iv.Click the OK button to Close the Select Bank ID dialog.
v.This will insert the Selected Bank IDs into the Bank field.
oReceipts posted to any Division will be included.
i.You may limit Receipts to those posted from Subscribers assigned to a specific Division or Division Group.
ii.Using the Drop-Down Selection List provided, Select that specific Division or Division Group, as required.
oShow Detail - To include the detail of each amount that was Allocated to which Invoices, and the total amount of each Receipt that was allocated, Check this box.
▪Refunds appear on the Cash Receipts Report just below the original Receipt, with the refunded Amount, the Date the Refund, and the Comment describing the reason why the Refund was issued.
✓Parameters - Used to further customize what is to be included in this report.
▪Start Date / End Date - Used to define Specific Dates when that Period option is chosen.
▪Bank - By default, [All] the Receipts posted to All Banks using the selected Batch Number will be included.
i.You may limit Receipts to those posted to a specific set of (one or more) Bank(s).
ii.Click the Ellipse in the Bank field to open the Select Bank ID dialog.
Select Bank ID dialog
iii.Check the Selected box for each Bank that is to be reported.
iv.Click the OK button to Close the Select Bank ID dialog.
v.This will insert the Selected Bank's IDs into the Bank field.
▪Division - Select a Division using the Drop-Down Selection List provided.
oReport Receipts only from those Subscribers assigned to the specified Division
oReporting by Division is particularly useful for Receipts when your Company is billing the Alarm Dealer's Monitoring Accounts and/or its a separate intra-Company profit center.
oThe Division field selection is optional.
▪Batch Number - Enter when the One Batch Number option is selected
oIf a Batch Number is not provided by default, you must enter the Batch Number to be reported.
oBe careful when entering the the Start and End Date Range because the selected Batch Number usually will have been used in other months.
▪Show Detail - Check this box to include the Detail for each Amount that was Allocated including Date when each Invoice was paid, the Invoice Number that was paid, and the Amount of the total Receipt that was Allocated.
▪Deposited Only - Check this box to only include those Receipts which have been identified as Deposited by using the Bank Deposits Form.
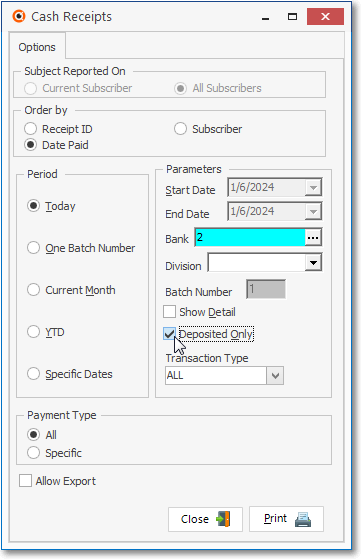
Cash Receipts - Today, Deposited Only
oTo print a Cash Receipts Report for a specific Bank Deposit:
i.As appropriate:
a)Choose the One Batch Number option (and enter the appropriate Batch Number), or
b)Choose Date Range and all Bank Deposits made within that Date Range specified will be reported, or
c)To print the list of Receipts that were (recorded as) Deposited Today, follow the example in the illustration above.
ii.In either case, using the Drop-Down Calendar/Date Entry field provided, Enter the appropriate Dates (i.e., Click the Today option or enter the Date Range) in which the Receipts to be reported were Deposited.
iii.Choose the Bank into which those Receipts have been Deposited if multiple Banks received Deposits in the Date Range specified.
iv.Check the Deposited Only box.
v.Print this Cash Receipts Report to list only those items that have been deposited into the selected Bank within the Date Range (and/or Batch Number) specified.
✓Transaction Type - By default, All Receipts will be included
▪Use the Drop-Down Selection List provided to choose from:
i.All - Include all of the Receipts that match the Parameters set above
ii.Auto Draft - Include all of the Receipts that match the Parameters set above and were posted using the Auto Draft process
iii.Daily - Include all of the Receipts that match the Parameters set above and were posted using the Fully Automated Recurring Revenue Billing process
✓Payment Type - The eight Types of Payments (one of which is specified whenever a Receipt is Posted) are listed below:
1)American Express - charged to this Credit Card
2)Cash - received an actual Cash payment
3)Check - paid with a Business or Personal Check
4)Discover - charged to this Credit Card
5)Electronic Transfer - received Direct payment from Subscriber's Bank
6)MasterCard - charged to this Credit Card
7)Other - paid via "In-Kind" or with something else of value
8)Visa - charged to this Credit Card
▪All - By default, All Types of Payments (Receipts) that were received from Subscribers, within the Period and Parameters specified above, will be included in the report.
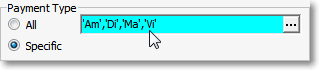
▪Specific - However, the User may want to view only those Payments (Receipts) that were paid using a specified Method of Payment.
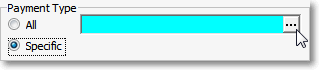
oTo do so, Click the Specific button.
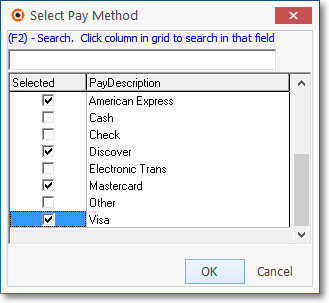
oClick the Ellipse on the right of the Specific field to open the Select Pay Method dialog.
oCheck the appropriate Type(s) of Payment(s) required.
oGenerally, this is done to "balance" certain Credit Card, EFT, or any Other special Type of Payment, associated with a separate "Statement" which is received from those Transaction Providers.
oCheck all that apply.
oClick the OK button to Close the Select Pay Method dialog.
oThis will insert the selected item(s) into the Specific field.
✓Allow Export - Check this box to have the Data View tab included in the Cash Receipts Report results which includes the following Export Options:
▪Export to CSV - Click the first button after the arrows to export the data to a Comma Separated Values (CSV) file format.
▪Export To Excel - Click the second button after the arrows to export the data to an Excel (.xls) file format.
▪Export To Html - Click the third button after the arrows to export the data to an HTML formatted file.
✓Print - Click the Print button ![]() to Preview and optionally Print this Cash Receipts Report.
to Preview and optionally Print this Cash Receipts Report.
✓To Exit this Report dialog, Click the Close button ![]() toward the bottom of the Options tab.
toward the bottom of the Options tab.
•Preview - The Preview tab presents the report which resulted from the Options you've selected.
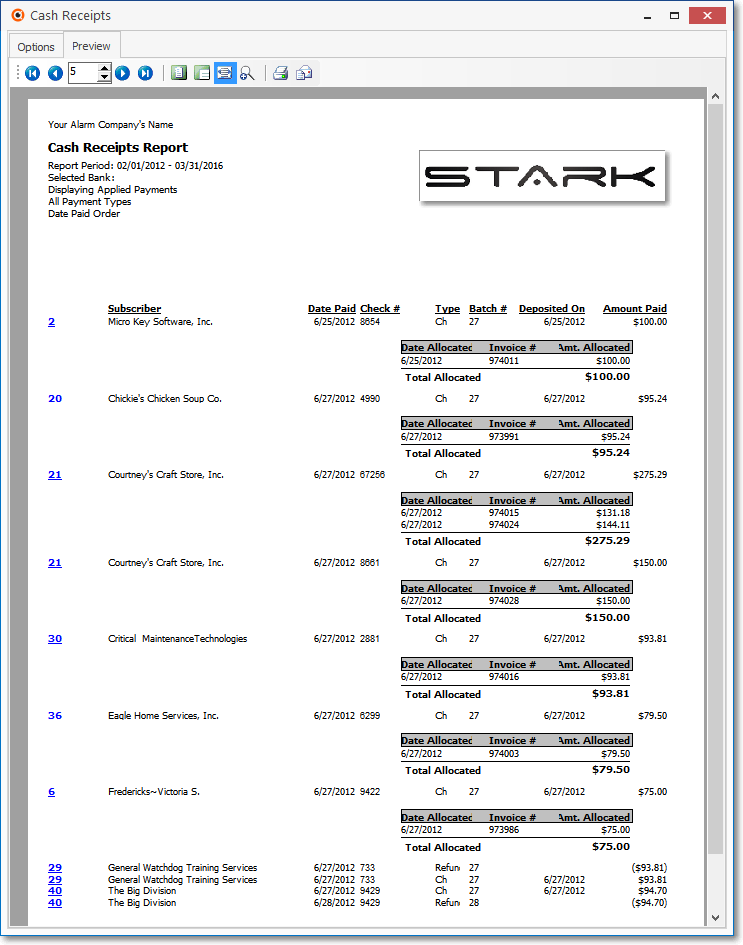
Cash Receipts Report - Preview tab - with detail
✓Subscriber ID - The number shown to the left of the Subscriber Name is that Subscriber's record ID.
▪To view this Subscriber Information Form when previewing the Cash Receipts Report, Click the ID number.
✓Arrows - The arrows allow you to move back and forth, from page to page.
✓Number - Indicates the page number you are viewing.
▪You may also type in a specific page number, Press 8 Enter and that page will be displayed immediately.
▪If you enter an invalid page number, it will be ignored.
✓Fit To Page - Click the first button after the arrows to size a full page of the report to fit the screen.
✓Zoom To 100% - Click the second button after the arrows to display the page at 100% (of the printed view).
✓Fit To Page Width - Click the third button after the arrows to size the page of the report to fit the full width of the screen.
✓Zoom To Percentage - Click the fourth button after the arrows to re-size the page of the report by percentage.
![]()
▪When you Click the Zoom To Percentage button, the Percentage selector will be displayed.
▪You may then Click the Up or Down ‚ arrow to set the exact amount of Zoom you want.
✓Print - Click the Print button to Print (to a File or a Printer) ![]() the displayed Cash Receipts Report.
the displayed Cash Receipts Report.
▪The User may create a Spreadsheet ("XLS Data File") by Choosing Print to File, then selecting the Type of XLS Data File, and indicating Where that file is to be "written."
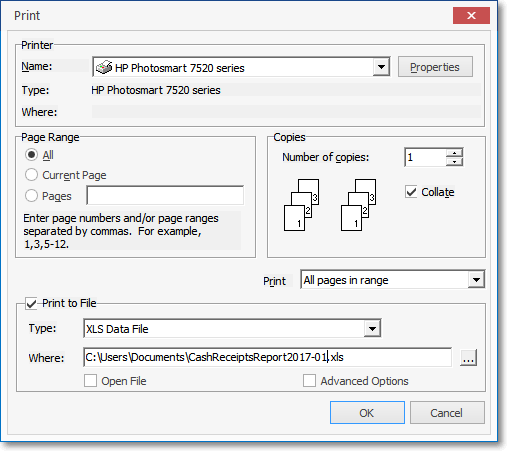
Cash Receipts Report - Print dialog - Print to File information
▪See Printing to a File for additional information ion how to save this report in several different file formats.
✓Email - Click the Email button ![]() to send the Report to an Email Address of your choosing.
to send the Report to an Email Address of your choosing.
✓To Exit the Preview tab and Close this Report dialog Form, Click the Close box ![]() on the right at the top of the Preview tab.
on the right at the top of the Preview tab.
•Data View - This view - only available when the Allow Export option has been Checked, which then provides a tabular (spreadsheet style) presentation of the selected data.
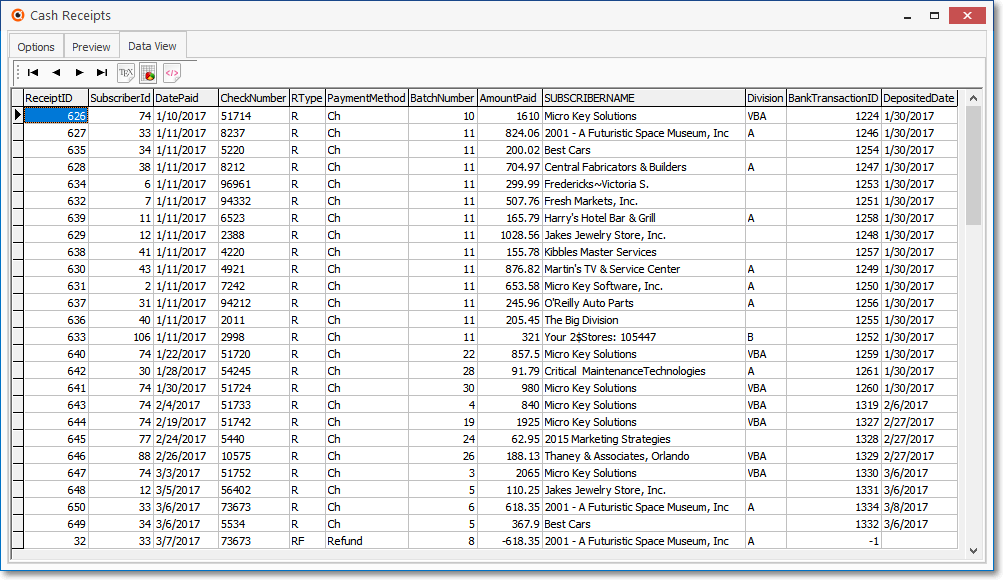
Cash Receipts Report - Data View tab
✓Arrows - Click the arrows to move through the record.
✓Export - Exporting the data from this Data View tab (note the "fly-over" help available on these buttons):
▪Export to CSV - Click the first button after the arrows to export the data to a Comma Separated Values (CSV) file format.
▪Export To Excel - Click the second button after the arrows to export the data to an Excel (.xls) file format.
▪Export To Html - Click the third button after the arrows to export the data to an HTML formatted file.
✓To Exit the Data View tab and Close this Report dialog Form, Click the Close box ![]() on the right at the top of the Data View tab.
on the right at the top of the Data View tab.
❑Reporting Refunds on the Cash Receipts report:
•Refunds appear on the Cash Receipts Report with the original Receipt, and display the refunded Amount, and the Date of the Refund.
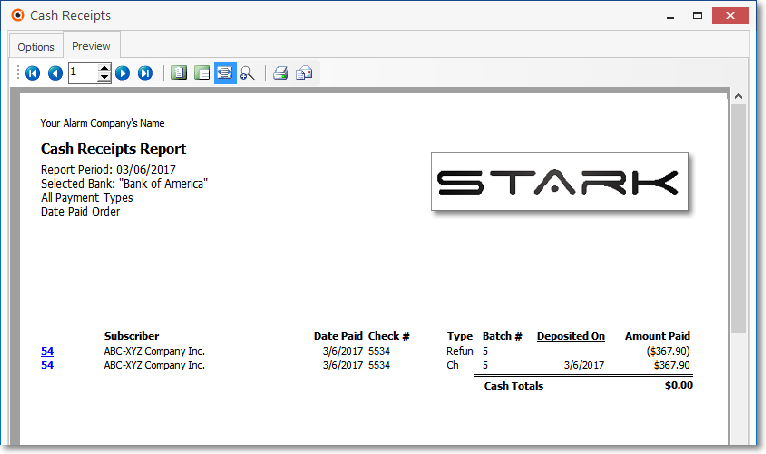
Cash Receipts Report Preview - Specific Dates and showing Detail and Refunds
•If a Refund was issued on a different Date than when the Receipt was originally Posted, the Refund will appear separately unless Specific Dates (see Options above) are specified which include both the original Posting Date and the Refund Date.