❑The task that no one likes (except perhaps for that super detail-oriented person in the Accounting Department), but the one that really has to be done on a regular basis, is Bank Reconciliation.
•The Bank Reconciliation Form provides a comprehensive Bank Reconciliation dialog with:
✓Two sections at the top: 1) Statement Balance and Date plus Last Reconciled Balance, and 2) Totals for selected Payments and Deposits and a Reconcile Now button; and
✓Two Transaction Lists: 1) the all open Payments made from, and 2) the Deposits made to the Bank (populated based on the specified Statement Date).
•To view the Bank Reconciliation Form:
a)From the Backstage Menu System Select File then Choose Payable, or
b)From the Quick Access Menu, Select File then Choose Payable
✓Then, Click the Bank Reconciliation option.
Bank Reconciliation Form
❑Understanding the Bank Reconciliation Form:
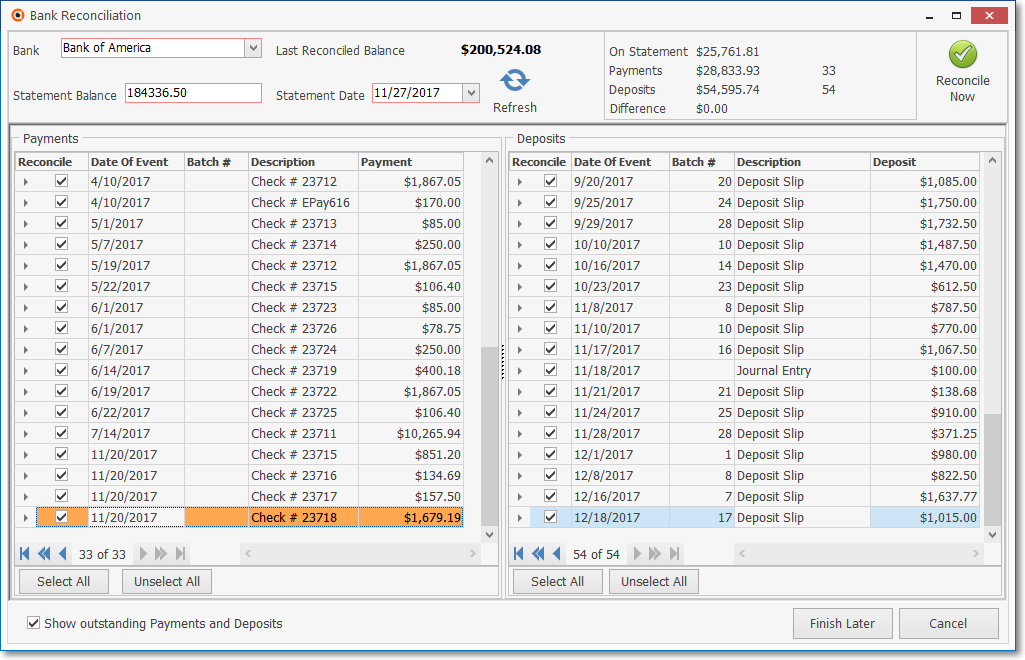
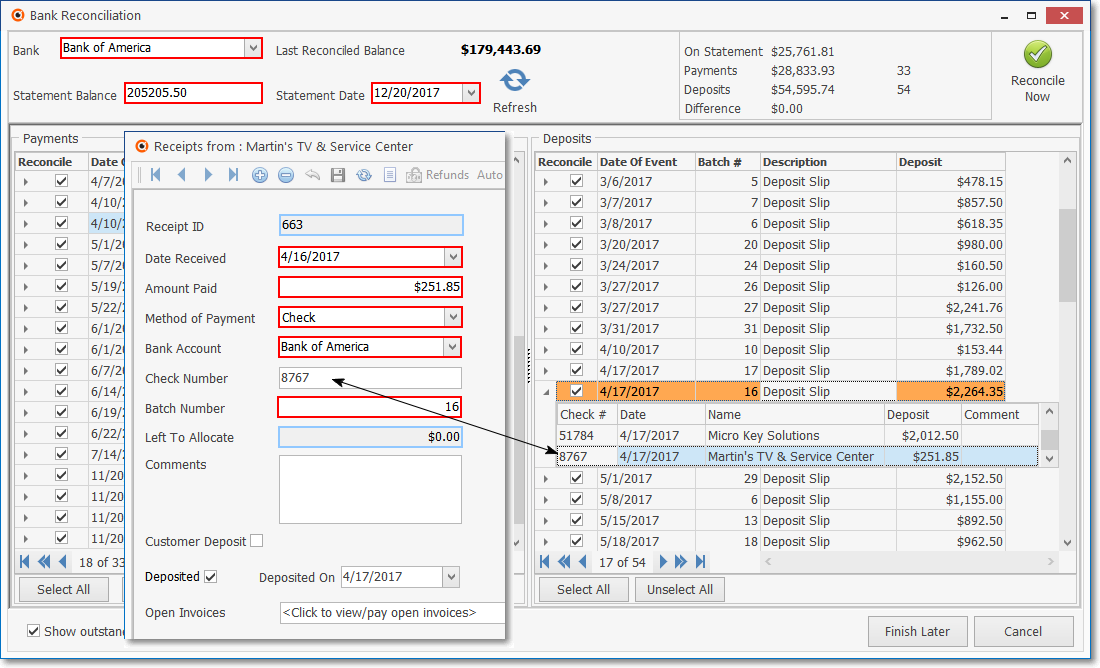
•The Bank Reconciliation dialog (shown above) has two sections at the top; and two Transaction Lists 1) the Payments and 2) the Deposits (populated based on the specified Statement Date) below them.
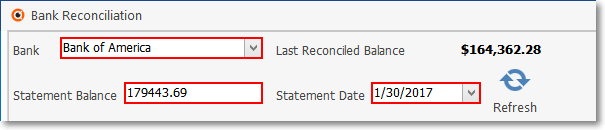
1. Statement Information section - In this section, the Bank Account that is to be Reconciled must be identified, then the Last Reconciled Balance of that Bank that's being Reconciled is shown, and the current Bank Statement's Balance and its Statement Date must entered.
Bank Reconciliation Form - Statement Info
▪Bank - Bank Accounts are Reconciled on a Bank Account by Bank Account basis.
oUse the Drop-Down Selection List to Select the Bank whose account you want to Reconcile.
▪Last Reconciled Balance - This field displays the Amount of the Last Reconciled Balance - which cannot be modified.
oInitially this Amount is set to $0.00.
oOnce a Reconciliation has been completed, the Amount will be updated by the system to reflect this Bank Account's Reconciled Balance.
▪Statement Balance - Enter the current Statement's Balance (the one on the Bank Statement that is about to be Reconciled).
▪Statement Date - Enter the Closing Date of the Bank Statement that is being Reconciled using the Drop-Down Calendar/Date Entry field provided.

▪Refresh - Once the Statement Date is entered, Click the Refresh Icon to update the contents of the Transaction Lists.
▪Show Outstanding Payments and Credits - There is also a Check box at the bottom of the Bank Reconciliation Form

oCheck this box to include all of the Outstanding Payments and Deposits in the Payments and Deposits lists.
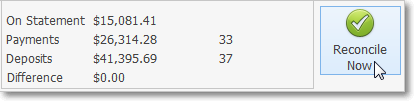
2. Reconcile section - In this section, view the current financial information and access the Reconcile Now button.
Bank Reconciliation Form - Reconcile section
✓Displayed Values:
▪On Statement - This is the Amount of the difference between the Last Reconciled Balance and the Statement Balance (specified in the 1. Statement Info section above) and indicates the net value of all Transactions reported on the Bank Statement.
oThis Amount may be less than, equal to, or greater than the Last Reconciled Balance, based on whether Payments and other fees and charges exceeded Receipts and interest earnings and any other credits, or visa versa.
▪Payments - This Amount is the sum of all of the Payment Transactions that have a Check in the Payments Grid's Reconcile field (based on the Statement Date selected).
▪Deposits - This Amount is the sum of all of the Receipt Transactions that have a Check in the Deposits Grid's Reconcile field (based on the Statement Date selected).
▪Difference - This is the net difference between the On Statement Amount and the net value of the Checked (reconciled) Payments and Deposits Amounts.
oIf these Checked Payments and Deposits Amounts are greater than the On Statement Amount:
i.The Difference Amount shown here will be displayed as a negative value (within parentheses).
ii.This indicates that the On Statement Amount is less than the net value of the Checked Payments and Deposits Amounts
oIf these Checked Payments and Deposits Amounts is less than the On Statement Amount:
i.The Difference Amount shown here will be displayed as a positive value.
ii.This indicates that the On Statement Amount is greater than the net value of the Checked Payments and Deposits Amounts
▪Reconciliation - The goal is to have the net value of the Checked Payments and Deposits Amounts equal to the On Statement Amount - the Difference being $0.00 - thus indicating that you have properly Reconciled this Bank Statement.

✓Reconcile Now - Click this button after you have Reconciled the On Statement Amount with the Selected Amount on this Bank Statement.
▪See "Reconciling a Bank Statement" below for more detailed information.
•Transaction Lists - There are two Transaction Lists immediately below the Statement Info and Reconciliation Sections on the Bank Reconciliation Form:
1. Payments section - Lists all of the unreconciled Payment Transactions which were posted on or before the Statement Date entered above.
➢Note: Voided Payments and Voided Check Numbers do not appear within the Payments section, but do appear in the Check Register report.
When the Voided Payment was originally entered, it was included in the Bank Reconciliation Form's Payments Grid.
However, on the day that the Payment is Voided, neither the original Payment nor the Voided Payment will appear.
Payments List with Check Details
✓There are 5 columns of data provided in the Payments Transaction List.
1.Reconcile - The Check box used to identify a Transaction record within the list that has been Reconciled by the User.
2.Date Of Event - The Transaction Date of each record.
3.Batch # - This column will be empty for Payments
4.Description - A brief Description of the type of this Transaction.
5.Payment - The Amount of this Payment record.
▪Drill Down - The details for any Payment item may be displayed by Clicking the Right-Arrow „ in the Reconcile column (see the mouse pointer in the illustration above)
▪Each of these columns may be used to Sort the Transaction List data by Clicking that column's Header Name.
oThe current order of the Transaction List is indicated by the Icon next to the Header Name of the column that is determining the order.
oThe first Click on a different Header Name sets the Sorting Order to Descending based on the contents if the column of that selected Header Name.
oClick the same Header Name a second time to set the Sorting Order to Ascending.

oWhen this Icon (see mouse pointer immediately above) is next to a Header Name, it means that this is the column that is determining the Sorting Order of the data and the arrow indicates the direction (ascending or descending) of that Sorting Order.
2. Deposits section - Lists all of the unreconciled Deposit Transactions which were posted on or before the Statement Date entered above.
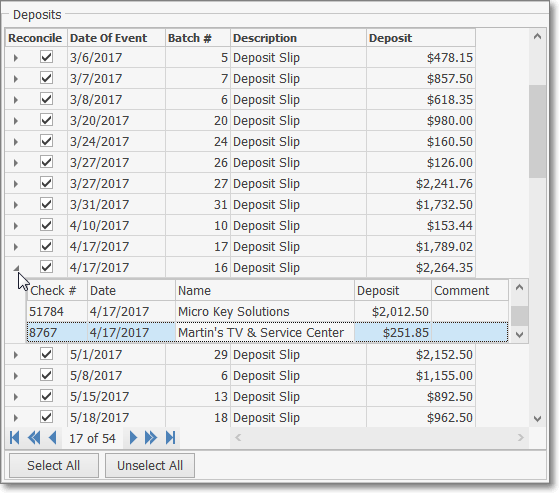
Deposits List with Receipt Detail
✓There are 5 columns of data provided in the Deposits Transaction List.
1.Reconcile - The Check box used to identify a Transaction record within the list that has been Reconciled by the User.
2.Date Of Event - The Transaction Date of each record.
3.Batch # - The Batch Number assigned to a set of Receipts.
➢Note: See the Batch Number Assignment discussion in the Receipts chapter for more information on Batch Numbers.
4.Description - A brief Description of the type of this Transaction.
5.Deposit - The Amount of a Deposit representing a Batch of Receipt records.
▪Drill Down - The details for any Deposit item may be displayed by Clicking the Right-Arrow „ in the Reconcile column (see the mouse pointer in the illustration above)
▪Each of these columns may be used to Sort the Transaction List data by Clicking that column's Header Name.
oThe current order of the Transaction List is indicated by the Icon next to the Header Name of the column that is determining the order.
oThe first Click on a different Header Name sets the Sorting Order to Descending based on the contents if the column of that selected Header Name.
oClick the same Header Name a second time to set the Sorting Order to Ascending.
oWhen this Icon (see pointer above) is next to a Header Name, it means that this is the column that is determining the Sorting Order of the data and the arrow indicates the direction (ascending or descending) of that Sorting Order.
•Transaction Categories:
✓The Category of each Transaction Item is identified in the column with the Header named "Description"
✓Each of these Types of Transactions are described below.
▪Bank Fees - (A Payment Transaction Category) Generally Posted using the Bank Transactions Form to identify those charges and fees assessed by financial institutions for bank account related services and other management related fees (stop payment orders, bounce checks, letters of credit, etc.) that appear on your Bank Statement, and are not separately entered as a Bill.
▪Employee Payments - (A Payment Transaction Category) Generally Posted using the Bank Transactions Form to identify direct loans made to Employees.
▪Employee Receipts - (A Receipt Transaction Category) Generally Posted using the Bank Transactions Form to identify repayments from an Employees of previously funded direct loans.
▪Interest Earned - (A Receipt Transaction Category) Generally Posted using the Bank Transactions Form to identify Monies earned from on-hand Bank Deposits, Money Market Accounts, and other interest bearing Financial Instruments (savings certificates, savings bonds, etc.).
▪Payments - (A Payment Transaction Category) Show previously Posted Payments.
oPayments may be listed as either Positive or Negative Values based on whether they are actual Payments, or Voided Payments respectively.
▪Receipts - (A Receipt Transaction Category) Show previously Posted Receipts.
▪Refunds - (A Receipt Transaction Category but shown as a negative value) Show previously Posted Refunds.
▪Journal Entry - (May be a Payment or a Receipt Transaction Category) Show previously Posted General Journal Entries which affect the selected Bank Account.
▪Paychecks - (A Payment Transaction Category) Imported Payroll data shows the individual Paychecks issued by a Payroll Processor and cashed by your Employees.
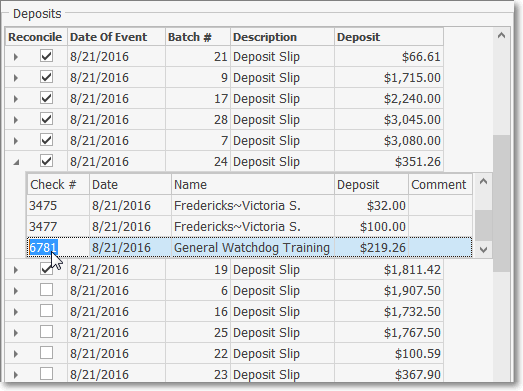
▪Deposit Slip - (A Receipt Transaction Category) Click the Drill Down feature's Plus Box to open the Deposit Slip Detail section.
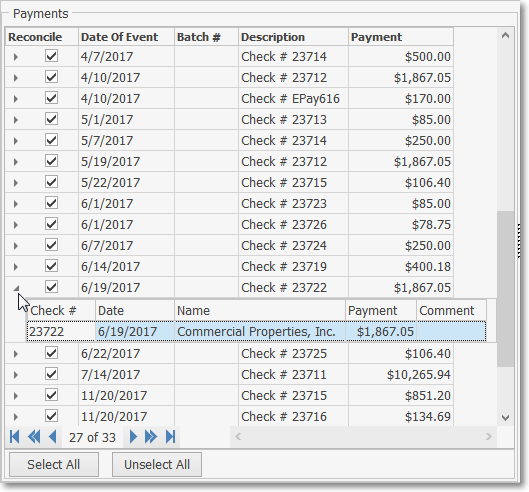
•Payments Transaction Drill-Down Arrow - „ - The Transaction Detail for any Payment may be viewed:
✓Click the Arrow (on the left of the Payments Transaction List) of a selected Line Item.
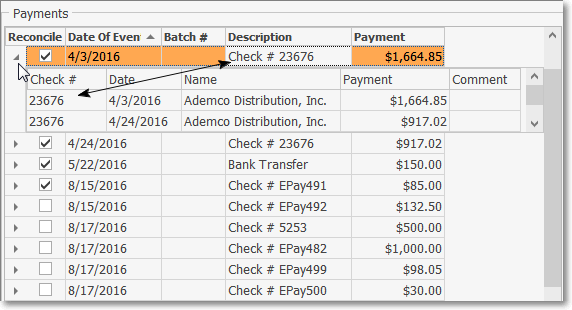
Payments Listing - Drill-Down Detail Pop-Up Box
▪The Arrow tilts downward when it is Clicked.
✓The Details for the selected Payment Transaction will be displayed in a Detail Pop-Up box (see above).
▪Double-Click any Payment Detail Line Item in the Pop-Up Box to open the associated Payments Form for that Transaction.
Associated Form from which Payment Transaction was created
▪Click the Close ![]() box to Close the Payments Form.
box to Close the Payments Form.
▪Click the Tilted Arrow to Close the Transaction Drill-Down box.
•Deposits Transaction Drill-Down Arrow - „ - The Transaction Detail for any Deposit may be viewed:
✓Click the Arrow (on the left of the Deposits Transaction List) of a selected Line Item
Deposits Transaction List - Drill-Down Detail Pop-Up Box
▪The Arrow tilts downward when it is Clicked.
✓The Details for the selected Deposit Transaction will be displayed in a Detail Pop-Up box (see above).
▪Double-Click any Deposit Detail Line Item in the Pop-Up Box to open the associated Receipts Form for that Transaction.
Associated Form in which Receipt Transaction was created
▪Click the Close ![]() box to Close the Receipts Form.
box to Close the Receipts Form.
▪Click the Tilted Arrow to Close the Transaction Drill-Down box.
•Navigation & Shortcut buttons - You may Click a Shortcut button to Check or Remove the Check Mark from All Payments and/or All Receipts in the Transactions Lists

✓Navigation - Use the standard record movement Icons to move from record to record among the listed Payments (and/or Deposits).
![]()
✓Select All - Click this button to insert a Check into the Reconcile field of all the specified Transactions.
✓Unselect All - Click this button to remove all Checks from the Reconcile fields for all the specified Transactions.
❑Reconciling a Bank Statement:
• The Drill Down feature is always available and may be used to properly validate (Reconcile) each Transaction Item Type.
✓Compare the list of Receipts and the total to the Deposit Slip that has this Batch Number assigned to it.
✓As noted above, any Receipt record may be examined by Double-Clicking that line item
▪Confirm that this Deposit Total also matches its corresponding entry on the Bank Statement.
▪Check the Reconcile Box if this Deposit Slip Transaction Item is correct.
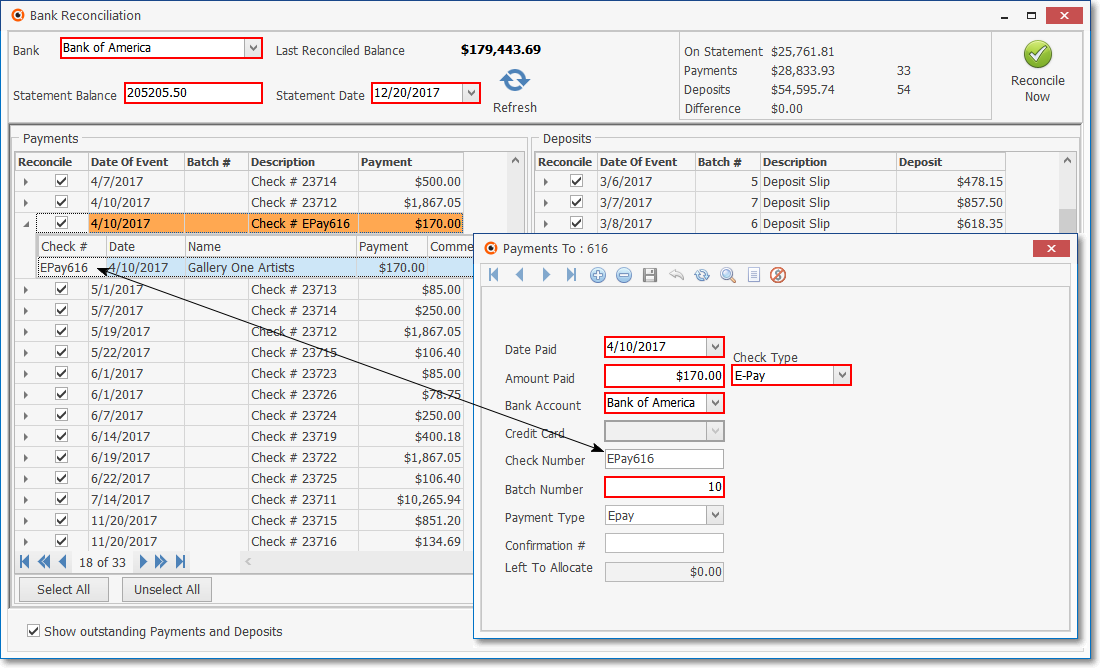
✓Check # - Click the Drill Down Arrow to open the Check Payment Detail section.
Check # Transaction Item with Check Payment Detail section displayed
▪Note the Check Number and the Payment Total.
▪Compare the list of Payments for the Bills that were Paid with the corresponding paper backup to ensure this is correct.
▪Any Payment record may be examined by Double-Clicking the Icon on the left of that line item (see mouse pointer in the illustration above).
▪Confirm that this Payment Total also matches its corresponding entry on the Bank Statement.
▪Click the Tilted Arrow to Close the Transaction Drill-Down box.
▪Check the Reconcile Box if this Check # Transaction Item is correct.
✓Employee Payment - This Type of Transaction Item represents the funding of a direct loan to an Employee that was entered previously using the Bank Transactions Form.

Employee Payment Detail section
▪Click the Drill Down Arrow to open the Employee Payment Detail section.
▪Confirm that also matches its corresponding entry on the Bank Statement.
▪Check the Reconcile Box if this Employee Payment Transaction Item is correct.
✓Employee Receipt - This Type of Transaction Item - listed in the Deposits section - represents a previously entered Bank Transaction identifying a repayment from an Employee of a previously funded direct loan.

Employee Receipt (Deposit) Detail section
▪Click the Drill Down Arrow to open the Employee Receipt Detail section.
▪Confirm that this Deposit Total also matches its corresponding entry on the Bank Statement.
▪Click the Tilted Arrow to Close the Transaction Drill-Down box.
▪Check the Reconcile Box if this Employee Receipt Transaction Item is correct.
✓Bank Fee - This Type of Transaction Item represents charges and fees assessed by the Selected Bank (or other financial institution).
▪These will appear on the Bank Statement and be identified as various bank account related services and/or management fees (stop payment orders, bounce checks, letters of credit, monthly service fee, etc.).
▪These type of charges and fees should be entered using the Bank Transactions Form instead entering them as a Bill.
▪If there are charges and fees on the Bank Statement that have not been entered in the system, use the Bank Transactions Form to do so.

Bank Fees Detail section
▪Click the Drill Down feature's Plus Box to open the Bank Fee Detail section.
▪Confirm that this Payment Total also matches its corresponding entry on the Bank Statement.
▪Click the Tilted Arrow to Close the Transaction Drill-Down box.
▪Check the Reconcile Box if this Bank Fee Transaction Item is correct.
✓When needed, follow this (Drill Down, View, Confirm, Reconcile) pattern for validating any other type(s) of Transaction Item(s) in the Transaction Lists section.
❑Pausing or Abandoning the Reconciliation process
•There may also be cases where one or more special Bank Transactions are not in the Transaction List but are listed on the Bank Statement.
✓This is typically result of new Interest Earnings or Credits, and/or new Finance or Bank Charges which were incurred, but have not yet been entered as Bank Transactions.
✓These missing but necessary Financial Transactions must be recorded in the Bank Transactions Register (see the Bank Transactions chapter for those instructions) to be able to compete the Reconciliation process.
![]()
✓In this case, Click the Finish Later button to save your work and to Close the Bank Reconciliation Form.
•If you Click theClose ![]() box on the Bank Reconciliation Form without completing the Reconciliation process (skipping the Finish Later step described above) a warning message will be displayed.
box on the Bank Reconciliation Form without completing the Reconciliation process (skipping the Finish Later step described above) a warning message will be displayed.
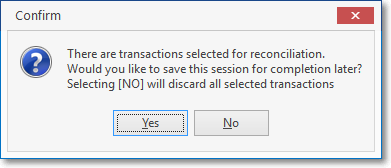
✓Yes - Click the Yes option to Save the Reconciliation process that was already started but not completed.
✓No - Click the No option to abandon the Reconciliation process.
•In either case outlined above, upon retuning to the Bank Reconciliation Form after a previous Reconciliation process was terminated but saved before completion, a confirmation message will be displayed as shown below:
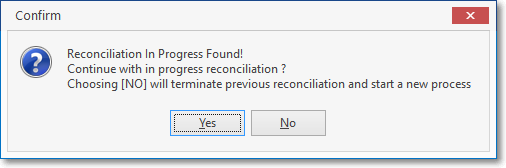
Reconciliation in Progress Found!
✓Yes - Click the Yes option to continue with the previously save3d the Reconciliation process.
✓No - Click the No option to abandon that saved Reconciliation process and start a new one.
❑Completing the Bank Reconciliation Process:
•The goal is to have the Amount of the Selected items - those Checked a Reconciled - to equal the On Statement Amount - which means that the Difference Amount shown will be $0.00.
✓This "$0.00 Difference Amount" indicates that you have properly Reconciled this Bank Statement by identifying and then Checking each Transaction Item on the Transaction List which also appears on this Bank Statement.
•There (usually) will be additional Transaction Items on the Transaction List that remain after establishing a $0.00 Difference Amount situation.
✓This is because certain Transaction Items (usually for various Payments and/or Deposits) that were Posted within MKMS, have not yet been Posted to the Bank Statement that was received from the Selected Bank, when that Bank Statement was printed.
✓These "left-over" Transactions will be automatically carried forward for Reconciliation in the following month.
•Open the Bank Transactions Form and enter each of these missing Transactions - paying special attention to the Date of those Transactions
✓Then, return to the Bank Reconciliation Form to complete the Reconciliation process by Checking these new Transactions and Confirming that a $0.00 Difference Amount situation does now exist.
•Click the Reconcile Now button to proceed with the Reconciliation process.
✓Confirm that you do want to Reconcile Now.
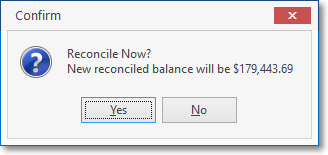
Reconcile Now?
✓Yes - Click the Yes option to Post this Reconciled Balance.
✓No - Click the No option to continue with the Reconciliation process.
•All Transaction Items which have been Reconciled will be removed from the Transaction List.
✓The Bank Reconciliation Summary report will be displayed automatically.
▪This Bank Reconciliation Summary report is stored automatically.
▪It may be viewed at a later time by Selecting the Bank Reconciliation History tab on the Bank Maintenance Form.
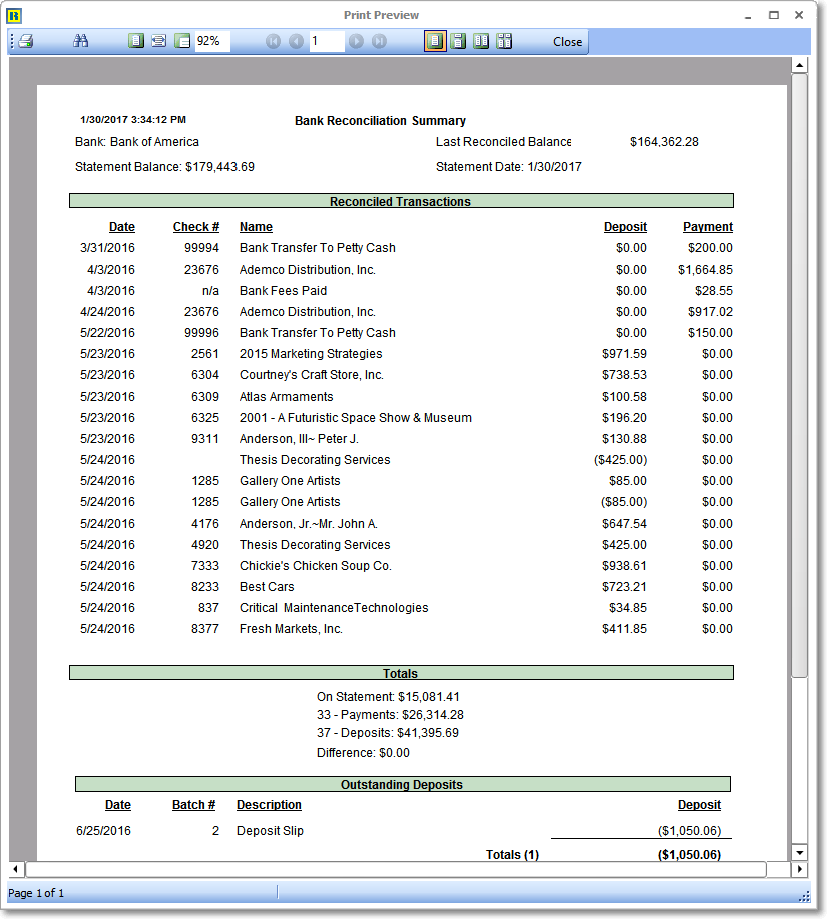
Bank Reconciliation Summary
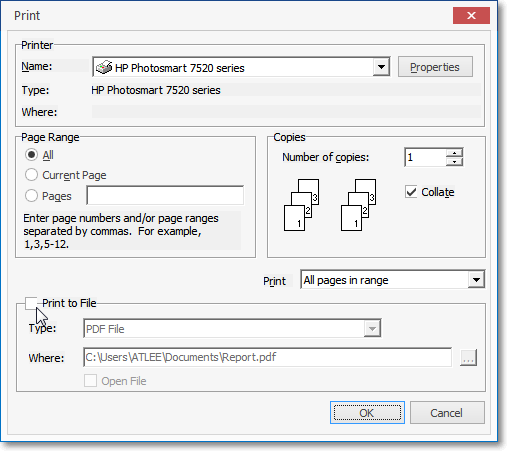
▪Click the Print Icon to open the Windows® Print dialog where a copy of the report may be sent to a selected Printer, or Printed to a File, or created as a PDF document.
✓When the Reconciliation process has been finished, a confirmation message will be displayed.
Reconciliation Completed!
✓The Last Reconciled Balance will be updated as was indicated in the Reconcile Now Confirmation box.
