❑The Payment Gateways Form contains each of the predefined fully automated Payment Gateways,
•This Form may also be used to identify the appropriate Log In Names, Passwords, and any Special Instructions which are required to be defined for each of the Payment Gateways your Company will be using.
•Payment Gateway information must be updated, as appropriate, before accessing the E-Payments Form to charge E-Checks and Credits Cards for a selected Subscriber, and/or running the Fully Automated Recurring Billing and/or Post Auto Drafts process.
•You only need to update the one(s) that your Company will actually be using!
❑About the MKS ePay Service (a Windows® Service) - also see the MKS ePay Service in the MKMS Installation chapter for more detailed information.
•To properly perform its task, a Fully automated Payment Gateway (i.e., InnoEPay, Authorize.net, and Forte.net) requires certain Transactional Information to be formatted in a specific way and have that Transactional Information transmitted to the Payment Gateway via the Internet in an acceptable format, and subsequently have that Transactional Information sent back from the Payment Gateway to your Company - also in an acceptable format.
✓These Payment Gateway tasks are 1) process and approve (or disapprove) Credit Card and Bank Draft requests from your Company, and 2) Transmit the results of the process back to your Company.
•MKMS will perform these tasks in the background - without any User assistance - once the automated Payment Gateway is correctly setup and the MKS ePay Service is properly installed and running.
✓This MKS ePay Service has this capability built in and is included when the MKMS 5.1.35.82XX (or later) upgrade is installed.
✓Certain additional Company Settings - identified in the related InnoEPay, Authorize.net, and Forte.net chapters - must be entered/updated based on the Payment Gateway(s) that will actually be used by your Company.
•The Payment Gateway(s) your Company chooses to use must be contacted directly.
✓Your Company has to "sign-up" with them so your Company's Transaction Information is received in the proper format, and is expected.
✓By "signing up", your Company's Transaction Information will be understood and processed correctly.
✓And most importantly, The Payment Gateway will know where to send the money!.
❑There are two types of Payment Gateways
1.Fully automated Payment Gateways (i.e., InnoEPay, Authorize.net, Forte.net)
2.Manual Payment Gateways (e.g., any number of Banks and/or other Bank Draft and Credit Card Payment Processors)
❖See the Gateway Kinds chapter for important information
❑Each Payment Processor Account (Payment Gateway) must be configured within MKMS prior to use, and then associated with a specific Bank Account:
•Before it can be associated with a Payment Gateway, a Bank Account must to be created and configured within MKMS .
✓MKMS comes with most Payment Processors (Payment Gateways) already defined so the record(s) of the one(s) your Company will be using will just need to be updated.
✓So, before you create a new Payment Gateway record, please check to see if the definition already exists for that Payment Processor
❖Also, you may want to read Payment Gateway Terms & Concepts for related information.
➢Note: Micro Key Solutions™ offers InnoEPay as its preferred Payment Gateway provider.
InnoEPay is one of the oldest Payment Gateway providers in the e-Commerce industry but it is not a merchant account provider.
InnoEPay will match any Rates charged by your Company's current Payment Gateway - so for most Alarm Companies, it translates into generally lower costs.
❖The InnoEPay Payment Gateway integrates seamlessly with MKMS, and is secure, simple to use, and has plenty of extra features in addition to its basic credit card transaction and check processing functions.
❖When your Company implements InnoEPay as your Company's Payment Gateway, this will be the only Payment Gateway that you'll need.
▪However, any combination of the three Automated Payment Gateways (i.e., InnoEPay, Authorize.net, Forte.net) may be used simultaneously.
▪The specific determination as the one to specifically be used during an Auto Draft process, or during the Fully Automated Recurring Billing process, is based on the Processor /Bank for Credit Card payments and the Processor/Bank for Bank Accts payments assignment(s) made in the Billing Cycle record which was subsequently assigned to the Recurring Revenue record being drafted.
•Operational Overview:
1.When Fully Automated Recurring Billing is being used,
a.If using an Automatic Payment Gateway (i.e., InnoEPay, Authorize.net, Forte.net), and if Auto Draft is Checked on the Billing Cycles Form, a Payment Request record (i.e., a Payment Transaction) is generated and the MKS ePay Service will automatically process that Payment Transaction on the Invoice's Due Date.
b.If a Manual Payment Gateway has been assigned to the Billing Cycle, the Payment Request (i.e., a Payment Transaction) is created and the Payment is processed on the Due Date but a special text file must to be created manually using the Generate Payment Batch option on the Post Auto Drafts Form to access the Payment Batch / File Generation Form
c.Generate File option on the Payment Batch / File Generation Form is used to create the specific text file required by the Manual Payment Gateway to be uploaded to that Manual Payment Gateway manually.
d.If "Generate Receipts" is Checked on the Payment Gateway Form, the Receipt record is created and the MKS ePay Service is running that Payment Transaction will be posted on the Invoice's Due Date.
2.When using the manually executed Auto Billing process with an Automatic Payment Gateway
e.If using an Automatic Payment Gateway (i.e., InnoEPay, Authorize.net, Forte.net), and if Auto Draft is Checked on the Billing Cycles Form, a Payment Request record (i.e., a Payment Transaction) is generated and the MKS ePay Service will automatically process that Payment Transaction on the Invoice's Due Date.
f.if "Generate Receipts" is Checked on the Payment Gateway Form and the MKS ePay Service is running, the Receipt record is created
g.Those Payment Transactions will be posted on the Invoice's Due Date.
3.When the MKS ePay Service is Not running and your Company is using the Auto Billing process,
h.if a Manual Payment Gateway is being used and if "Generate Receipts" is Checked on the Payment Gateway Form,
i.the Receipt record is created with the Generate Payment Batch option on the Post Auto Drafts Form.
j.Within the Payment Batch / File Generation Form - accessible from the Post Auto Drafts Form - is not being used, the Generate File option is used to create the special text file required for exporting Payment Transactions.
•Access the Payment Gateways Form:
a)From the Backstage Menu System Select Maintenance and Choose General and Click the General Maintenance option which displays the Maintenance Menu, or
b)From the Quick Access Menu, Select Maintenance and Choose General Maintenance to display the Maintenance Menu.
•Once the Maintenance Menu is displayed, Select Receivables and Choose Payment Gateways.
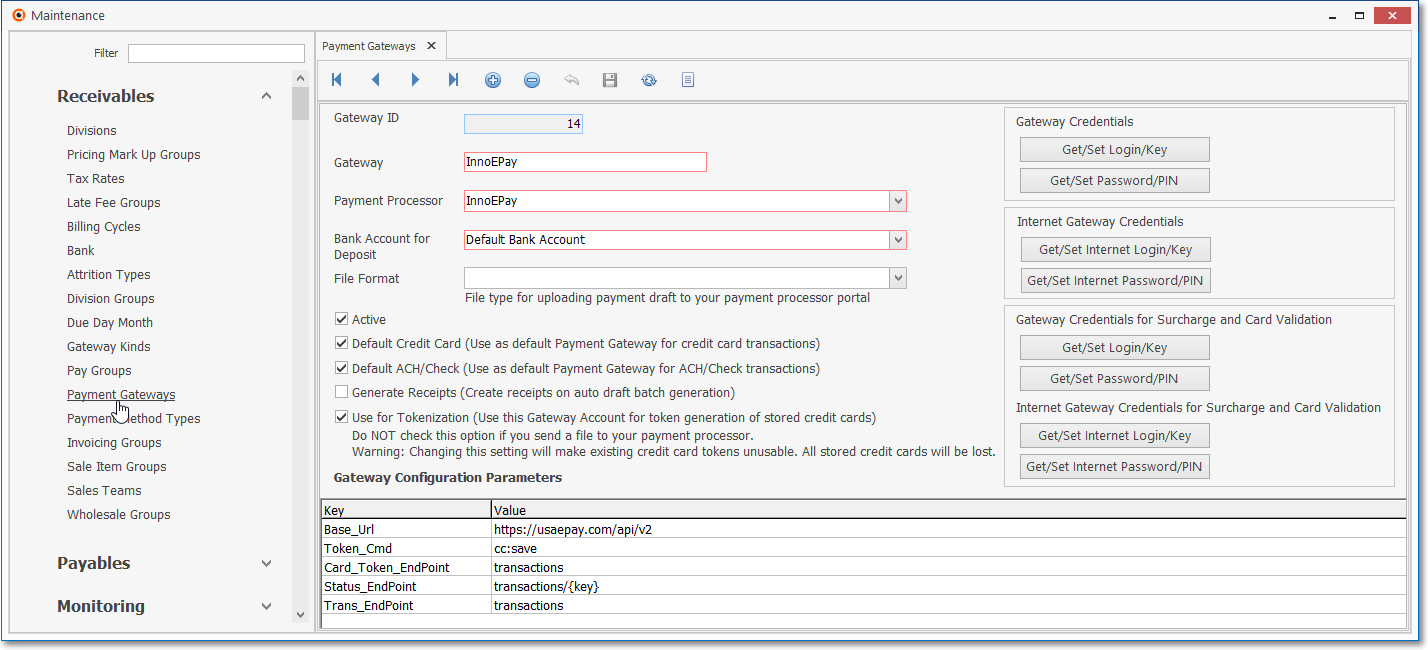
Payment Gateways Form - InnoEPay - an Automatic Payment Gateway
✓This Payment Gateways Form may be Re-sized by Dragging the Top and/or Bottom up or down, and/or the Right side in or out.
•Navigation Menu - The simplified Navigation Menu is located at the top of the Payment Gateways Form.
✓This Navigation Menu provides the normal Record Movement, plus Add, Delete, Cancel, Save, Refresh, and List options.

•Record Editing View - The details of the currently selected record are displayed below the Navigation Menu at the center (Main Body) of the Payment Gateways Form.
✓Select the desired Payment Gateway record or Press Insert to start a new record.
➢Important Note: Before you create your a Payment Gateway you should check to see if one already exists for that Payment Processor.
If it exists, then all you need to do is a minimal configuration for the Authentication Information.
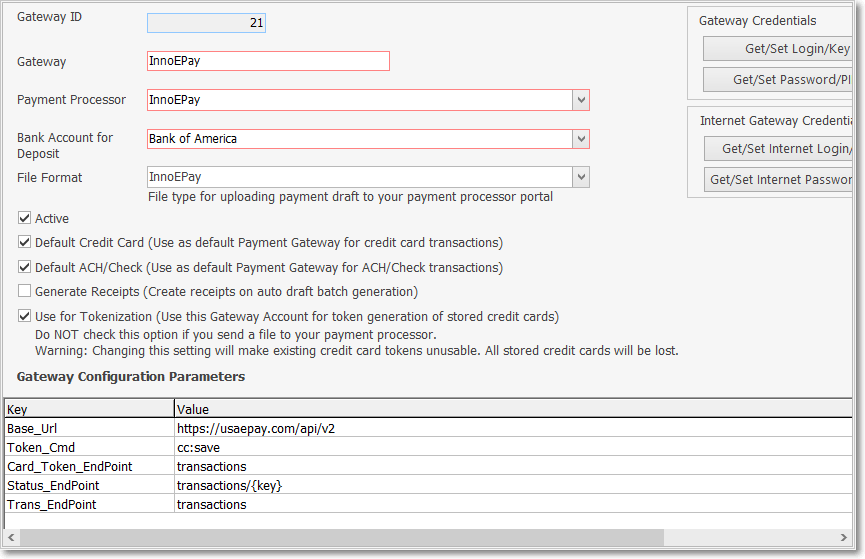
Payment Gateways Form - Record Editing View
✓Gateway ID - This record number will be assigned by the system as the record is initially saved.
✓Gateway - Enter the desired internally created description for the Gateway
▪Description of the Payment Processor Account, we recommend adding additional information like the Bank account's last digits to clearly identify where the funds will be deposited when this Gateway is used
✓Payment Processor - Using the Drop-Down Selection List provided, Choose the appropriate Payment Processor.
▪Select one of the Automatic Payment Processor services supported by the MKMS system, or the a Manual Payment Processor for the non-automatic processor if using one that requires a file transfer.
✓Bank Account for Deposit - Using the Drop-Down Selection List provided, Choose the Bank into which the Receipts (Funds) are to be deposited.
✓File Format - File type for uploading payment draft to your Manual Payment Processor portal:
▪This field is only for Manual Gateways where a text file must be sent with the payment information to be processed.
▪If an Upload File will be required, use the Drop-Down Selection List provided to Choose the appropriate File type.
▪File formats for the most frequently used Banks and other Manual Gateways are provided in this list
✓Active - Check this box if this Payment Gateway is actively being used (this is the default setting).
▪If Active is checked, the Gateway will be shown in the Automatic Billing and the Auto Draft screens, remove the Active Check mark for all Gateways which will not used so they won't be seen in system Drop-Down Selection Lists.
➢Note: A Payment Gateway may be set up to be:
i.the Default Payment Processor for Credit Cards transactions, or
ii.the Default Payment Processor for ACH/Check transactions, or
iii.the Default Payment Processor for both Credit Card and ACH/Check transactions, or
iv.Not the Default Payment Processor for any Credit Card or ACH/Check transactions
✓Default Credit Card (Use as the default Payment Gateway for Credit Card transactions):
▪Check this box to identify this Payment Gateway as the one that should be used as the default for processing credit card transactions for those Billing Cycles which have a Check mark in the “Use Default Payment Processor” box of the Processor/Bank for Credit Card payments Check box field
▪Only one Payment Gateway should be identified as the Default Credit Card Processor.
✓Default ACH/Check (Use as the default Payment Gateway for ACH/Check transactions):
▪Check this box to identify this Payment Gateway as the one that should be used as the default for processing ACH/Check transactions for those Billing Cycles which have a Check mark in the “Use the same Credit Card Processor for Bank Account” box of the Processor/Bank for Bank Accts payments field
▪Only one Payment Gateway can be identified as the Default ACH/Check Processor.
✓Generate Receipts (Create receipts on auto draft generation) - Only Check this box if this Payment Gateway is to generate a Receipt record within MKMS.
▪Manual Gateways - Applies only to Manual Gateways and indicates that Receipt records will be created for all payments at the moment that the Payment Process runs, and the Payment Batch is created,
▪Automatic Gateways - An Automatic Gateway service will always generate Receipts when a payment transaction gets approved.
▪Understanding the process for executing the Email Notification of Receipts:
1)When the "email_receipt_notification" option in Company Setting is set to True ('T') and the Payment Gateway is Manual, and the Generate Receipts option on the Payment Gateway Form is NOT Checked - the Receipt Notification Email is only sent when the User reviews the file returned from the Payment Processor (Bank or Credit Card) and then Clicks on the Approve/Receipt button. -
a)Clicking on the Approve/Receipt button in the Payment Batch File's Payment Transaction Detail (Grid), Approves the Payment and generates a Receipt with an Auth. Code as "MKMS" and Response as "Manually approved. Receipt creation only" inserted in the corresponding Receipt Transaction record in the Payment Batch / File Generation Form's Payment Transaction Detail (Grid).
b)Clicking on the Reject/Bounce button - denies the Payment with Response as "Manually Denied" and does NOT generate any Receipt or send any Receipt Notification Email
2)When the "email_receipt_notification" option in Company Setting is set to True ('T') and the Payment Gateway is Manual, and the Generate Receipt option on the Payment Gateway Form IS Checked - When the Post Auto Draft process is run, the Receipt is generated, but the Receipt Notification Email is NOT sent.
3)When the "email_receipt_notification" option in Company Setting is set to either True ('T') or False ('F') and the Payment Gateway is Electronic (i.e. Automatic: InnoEPay, Authorize.net, or Forte.net), regardless of whether the Generate Receipts option on the Payment Gateway Form Is or is Not Checked, the Receipt is generated and the Receipt Notification Email is sent when the Due Date is reached.
➢Note: This is how the Due Date is set:
i.For all Manual Payment Gateways the Due Date is defaulted to the Date when the Post Auto Draft process was run.
ii.For all Electronic Payment Gateways (i.e., InnoEPay, Authorize.net, or Forte.net) the Due Date is set to the Date as per the Subscriber's (or Company's) Terms.
✓Use for Tokenization (Use this Gateway Account for token generation of stored credit cards) - Check this box if this Payment Gateway will Tokenize Credit Card information..
▪Do NOT Check this option if you manually send a file to your Payment Processor.
➢See section immediately below for a complete review of the Tokenization process.
•Understanding Tokenization - Before creating or activating your Payment Gateway Account, you need to understand the Tokenization Process.
a)For security reason it is not recommended that your MKMS database holds your Subscriber's Credit Cards Numbers
b)To minimize this risk, allow the Payment Processor to hold this information for your Company
c)By doing so, each Credit Card Number will have a Token created by the Payment Processor System
d)This Token will be saved in your MKMS database instead of the actual Card Number
e)Thereafter, you will only see the first and last 4 digits of the Card Number after a Token is received.
f)The process of creating a Token for a Credit Card Number is executed 100% in the background.
g)You do not need to take any actions for it to work.
h)A few seconds after a Credit Card is saved in your system, a background service will replace the Card Number with a Token and everything will continue to work as before.
i)Thereafter, the Payment Gateway process will use a Token instead of the actual Credit Card Number for Payment Processing.
✓Why Tokenization:
▪Tokenization is one of the steps that makes your system compliant with PCI Security Council standards.
▪Reduces the risk of anyone including hackers getting your Subscriber's Credit Card information
▪Replaces the Subscriber's Payment Method Credit Card information with a unique code (Token) and deletes all customer credit card information from your system
▪If you switch from one Payment Processor to another, the existing Token will not work,
▪Therefore Credit Card information will need to be acquired from your Subscribers again
✓Tokenization can be turned ON/OFF but it will not revert already existing Tokens to their original Credit Card Number
▪To turn ON/OFF just remove the Check from the Use for Tokenization field (see below) in the Payment Gateway Form
▪Only the Payment Processor that generated the Token can use that Token to process Credit Card Transactions
▪Only One Payment Gateway can be set up to manage your Subscriber's Credit Card Tokens
▪Your Company can use one, and only one, Automatic Gateway to process your Credit Card transactions
▪If a Token is used, you cannot use any Manual Payment Gateway (File Based Payment Processor) for Credit Card Processing
✓Use for Tokenization (Use this Gateway Account for token generation of stored credit cards) - Check this box if this Payment Gateway will Tokenize Credit Card information..
▪Do NOT Check this option if your Company manually sends a file to your Payment Processor.
▪If the Use for Tokenization is Checked, this Payment Gateway will be used for the generation of Tokens,
▪The Tokens generated by one Payment Gateway cannot be used to process payments with a different Payment Gateway,
▪Use extreme caution before changing this setting.
a)Do not check this option if you send a file to your payment processor.
b)If this is checked, the MKS ePay Service will use this Payment Gateway to the create Credit Card Token.
c)Once the Token is created, the Credit Card Number will be x'd-out (4111XXXXXXXX5362) and there is no way to retrieve the Credit Card Number once it has been Tokenized.
➢Important: If your Company uses Tokenization and a Token already exists for an Account's Credit Card:
Whenever this Credit Card information is updated (e.g., a change of the Credit Card Number, Expiration Date, Billing Address, Name on the Credit Card, and/or the Card Type) and
Tokenization is turned on, the 16 digit Credit Card Number MUST also be fully Re-entered!
Otherwise:
a)the current Token will go into error status,
b)the Token will be set to NULL
c)The Credit Card Number stays in the 8888XXXXXXXX5649 format
d)It will fail when you attempt to use it again.
▪This is because - when making any Credit Card information changes - All the information needs to be 100% updated and accurate so when the InnoEPay service (or whatever Payment Processor Service your Company is using as its automated Payment Gateway such as Authorize.net or Forte.com) does "tokenize" the revised Credit Card again, it will be able to use the complete, new (revised) and matched set of Credit Card information.
✓Click the ![]() Icon to record the updated Payment Gateway information.
Icon to record the updated Payment Gateway information.
▪Understanding the Credit Card's “Token Status” column on the Payment Methods dialog:
oIf the Tokenization service (MKS EPay Service) is On, once a Credit Card is defined as one of a Subscriber's Payments Methods, a few seconds later the Credit Card number will be replaced with representation will have been created for this number (the Token contains the Credit Card's last few digits plus a Tokenization image).
1)Initially, the status is identified as “Token is pending to be created” when the Credit Card has not been Tokenization
2)The status changes to “Token has been created” when the Tokenization process runs and the Credit Card is Tokenized.
3)If an error occurs during the Tokenization process, status is set to “Token could not be created”.
•Authentication Information (when and as required):
✓To accommodate Payment Gateway Payment Transactions originating from both the local system and from the Internet (via Pay Point and/or Tech Pro), there are two sets of Login Name and Password entries.
▪When a Payment Transaction is created from Pay Point or Tech Pro, the Payment Transaction will be flagged as it has originated from the "Internet".
▪This is why the Payment Gateways maintenance screen accepts both a Merchant and an Internet Login and Password set.
✓When the e-Pay Service is processing a Payment Transaction from the Internet, it will attempt to use the Internet Login Name and Password.
▪If there is no Internet Login Name and Password defined, the e-Pay Service will attempt to use Merchant Login Name and Password.
▪When a Payment Transaction originated from the Internet, the e-Pay Review report's Internet column will be Checked.
✓Merchant Login - Click the Get/Set Login/Key bar to enter the Merchant Log In Key for this Payment Gateway.
▪Click this button to enter/edit Gateway Login/Key information provided by the Payment Processor when that Gateway Account was/is created.
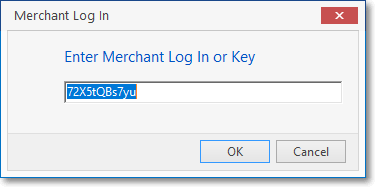
▪Click the OK button to save this information.
✓Merchant Password - Click the Get/Set Password/PIN bar to enter the Merchant Password or PIN for this Payment Gateway.
▪Click this button to enter/edit Gateway Password/PIN information provided by the Payment Processor when that Gateway Account was/is created.
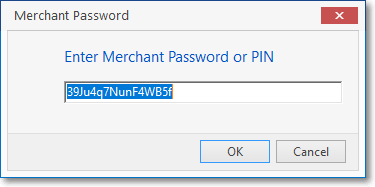
▪Click the OK button to save this information
✓Internet Login - Click the Get/Set Internet Login/Key bar to enter the Internet Log In Password or Key for this Payment Gateway.
▪Click this button to enter/edit Gateway's Internet Login/Key information provided by the Payment Processor when that Gateway Account was/is created.
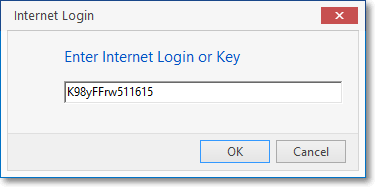
▪Click the OK button to save this information.
✓Internet Password - Click the Get/Set Internet Password/PIN bar to enter the Merchant Password or PIN for this Payment Gateway.
▪Click this button to enter/edit Gateway's Internet Password/PIN information provided by the Payment Processor when that Gateway Account was/is created.
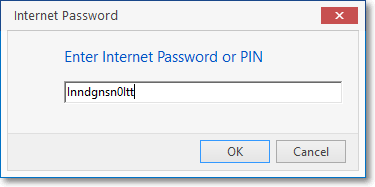
▪Click the OK button to save this information
•Gateway Configuration Parameters (Define the Log In Names, Passwords, PINS, and/or Special Instructions to be used to access the selected Pay Integrator Gateway)
•Configuration Parameters vary for each Payment Processor
•When you apply for a Gateway Account, depending on the Payment Processor that will be used, you may need to update the parameter values for the account
•A chart will be provided with that information.
Key |
Value |
|---|---|
Environment |
Sandbox: Test mode Production: Production mode |
Authorize.net Payment Gateway Account parameters example
➢Note: See the Authorize.net, the Forte.net, and the InnoEpay chapters for specific information.
✓Click the ![]() Icon to record the updated Payment Gateway information.
Icon to record the updated Payment Gateway information.
![]() List Icon - The Navigation Menu also has a List option which provides a tabular view of these Pay Integrator Gateway records.
List Icon - The Navigation Menu also has a List option which provides a tabular view of these Pay Integrator Gateway records.
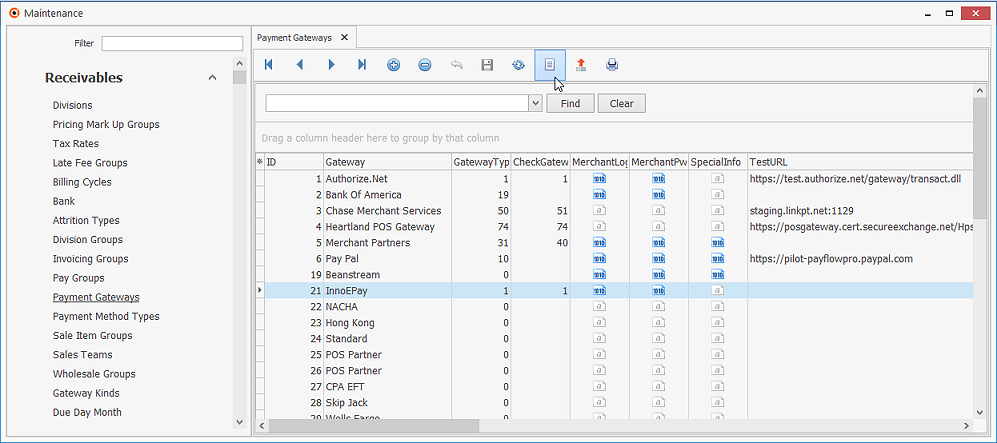
Payment Gateways Form - List View
✓Click the List Icon to display the associated Grid Data.
•Choosing the Columns to be Viewed:
✓Some columns may contain expanded comments or other information which may make the List View's display difficult to use.
Ø In the List View, you may Click the Asterisk at the left of the row of Header Names to display a Drop-Down Check List of each column's Headed Name.
▪Check any Header Name to be included in the List View (by default, All Header Names will be Checked)
▪Remove the Check for any Header Name (see illustration below) that is to be removed from the List View.
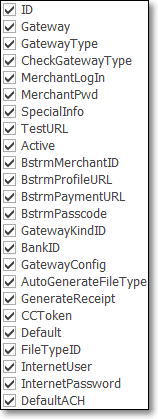
Available Column Names
✓The columns of listed Grid Data may be rearranged, filtered, sorted, and exported as a PDF file and/or an Excel formatted file.

✓Find - Enter text to search for a specific record, then Click the Find option.
✓Clear - To remove the text to search for entry, Click the Clear option

Navigation Menu shown with the Icons for List, Export and Print
![]() List Icon - Click the List Icon again to Close the List View and return to the Record Editing View.
List Icon - Click the List Icon again to Close the List View and return to the Record Editing View.
![]() Export Icon - Click the Export Icon to create (one of there types of) a spreadsheet compatible file containing the Grid Data as it is currently organized and filtered.
Export Icon - Click the Export Icon to create (one of there types of) a spreadsheet compatible file containing the Grid Data as it is currently organized and filtered.
![]() Print - Click the Print Icon to display the Print Preview Form from which a custom report may be designed and "printed" as an Adobe® PDF File.
Print - Click the Print Icon to display the Print Preview Form from which a custom report may be designed and "printed" as an Adobe® PDF File.
❖See the Grids - Print Preview - Export Data chapter for complete information on using the List View, including its Export & Print options.