❑The Payments Form allows you to:
•Specify the Date, identify the Batch Number and enter the Amount that is to be Paid
•Select the Bank Account from which to take that Payment
•Apply that Payment to one or more outstanding Bills of your choosing
•Record these as Hand Written Checks, payments made by Credit Card, and Electronic Payments
•Void a Check, and/or Un-Allocate a Payment
❖Also learn how to:
1.Make Payments using the Disbursements Form in the Disbursements chapter
2.Pay Bills using a Credit Card in the Credit Card Maintenance & Tracking System chapter
❑Making Payments using the Payments Form:
•Accessing the Payments Form:
✓Press F-4 to open the Vendors Form and Press F-2 to Select the Vendor to whom a Payment is to be made.
✓Select the Payments option on the Vendor Options Menu
•The Payments Form for the currently selected Vendor will be displayed.

Payments Form
✓This Payments Form may be Re-sized by Dragging the Top and/or Bottom up or down, and/or the Right side in or out.
•Navigation Menu - The Navigation Menu is located at the top of the Payments Form.
![]()
Payments Form - Navigation Icons & Actions options
✓This Navigation Menu provides the normal Record Movement, Insert, Delete, Save, Cancel, Refresh, Search, and List options; as well as Void, Auto Apply, Apply functions.
•List View - A tabular (spreadsheet style) view of the previously entered Payments is easily accessible.
✓Click the List Icon to display the associated Grid View.
✓The columns of Grid Data may be rearranged and sorted, as needed.
✓Select a record then Click the List Icon again and that record will be displayed in the Record Editing View (explained later in this chapter).
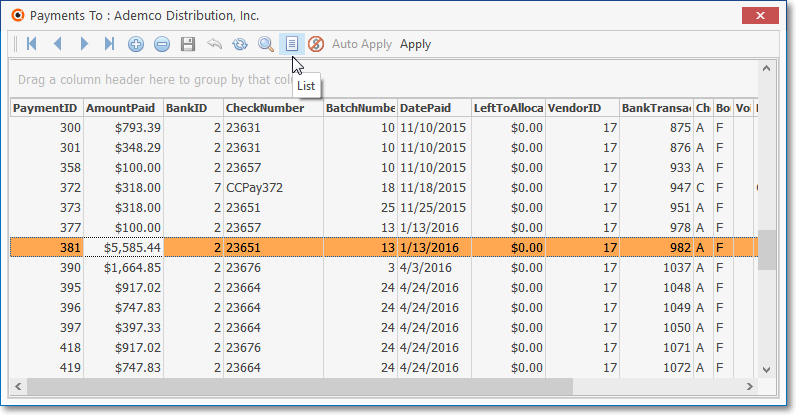
Payments Form - List View
▪There is a Horizontal and/or Vertical Slide Bar - displayed when needed - located at the bottom and/or side of the Payments List to allow the User to view all of the data included in all of the columns.
▪When the List View is displayed, Click the List Icon to Close the List View and return to the Record Editing View.
❖See the Grids & Lists - Print Preview - Export Data chapter for complete information on using the List Icon.
•Using the Search Function on the Navigation Menu at the top of the Payments Form:
✓Search - Click the Search Icon to open the Search Payments dialog.
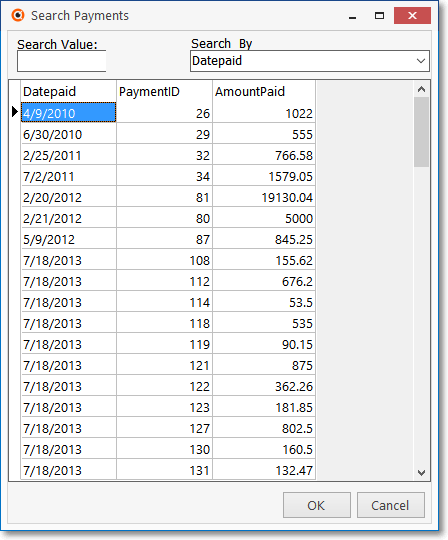
Search Payments dialog
✓See the "Using the Generic Search dialog" section in the Advanced Search Dialog chapter for more information about this Search dialog.
❑Record Editing View - The details of the currently selected record are displayed within the Payments tab below the Navigation Menu at the center (Main Body) of the Payments Form.
Payments Form - Record Editing View - Check Type options
•Payments are initially recorded as an Amount Paid to a Vendor (not to one or more specific Bills) - and so reduces the Accounts Payable Balance - by reducing that Vendor's Balance Due.
✓Basically, the Payment entry will document when (the day received and the batch number it was assigned to), how it was paid (i.e., If using a Bank Account: by Auto Check, E-Pay, Hand Check; If using a Credit Card: select the appropriate Credit Card), how much was paid, and where (i.e., from which Bank account it was withdrawn, or to which Credit Card it was charged).
✓Once recorded, the Payment may be Allocated to specific Bills, to the oldest Bill with an outstanding balance, or however else you choose.
▪Payments that have been fully Allocated will show a Left To Allocate balance of $0.00.
✓Elsewhere, certain predefined Recurring Purchases may be automatically Paid and Allocated by using the Run Automatic Payments feature.
❑Making a Payment:
•To enter a Payment that is to be issued as a printed Check which will be sent to a Vendor:
✓Click the ![]() Icon to start the Payment entry in the Record Editing View.
Icon to start the Payment entry in the Record Editing View.
✓Date Paid - Today is the default date.
▪Use the Drop-Down Calendar/Date Entry field to change the date.
✓Amount Paid - Enter the amount of the payment you wish to make to this Vendor.
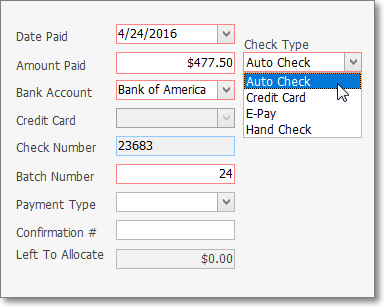
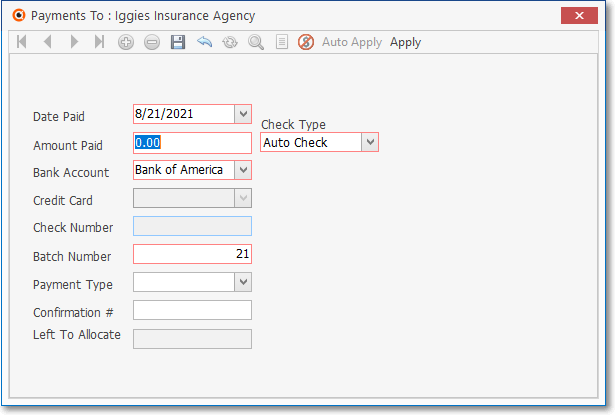
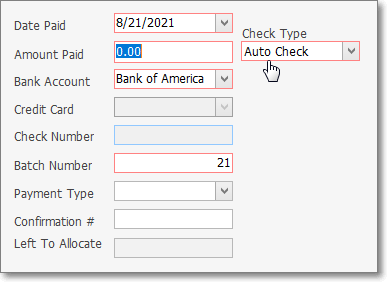
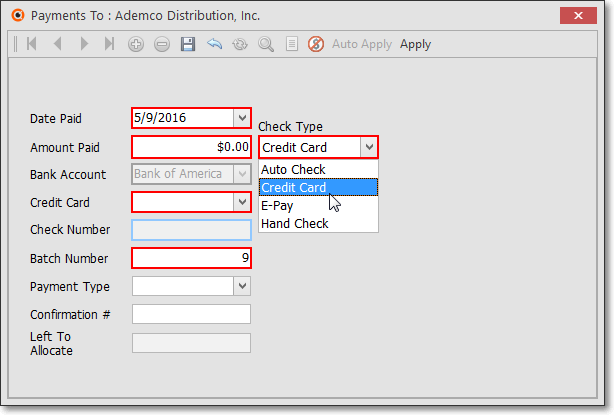
✓Check Type - Use the Drop-Down Selection List provided to identify what type of the Payment method will be used:
▪Auto Check - By default, the Auto Check option will be selected.
oThereafter, the Check Number will be inserted automatically when the Check is actually Printed.
Payments Form - Auto Check entry
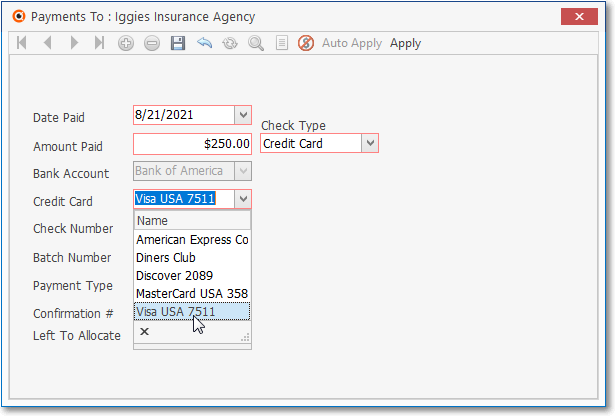
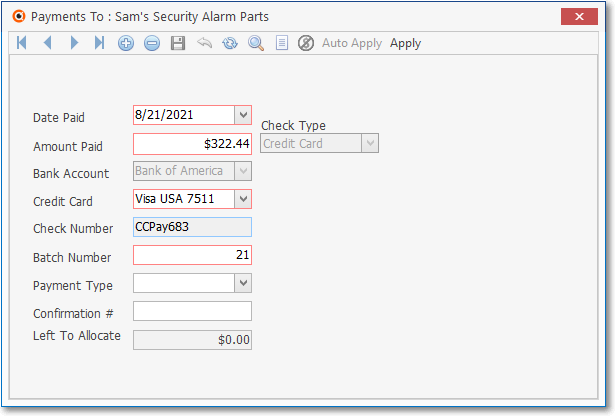
▪Credit Card - A Credit Card Payment may be initiated in two ways:
1.From this Payments Form by using the Credit Card field's Drop-Down Selection List to Choose the specific Credit Card to which the Payment will be charged (instead of using the Bank Account Drop-Down Selection List to Choose a Bank Account from which the Payment will be deducted as shown immediately below, and/or
2.From within the Bills Form using the Credit Card Pay option on its Action Menu (see the "Paying a Bill using the Credit Card Pay option on that Bills Form" discussion later in this chapter)
oDate Paid - Today is the default date but you may use the Drop-Down Calendar/Date Entry field to change the date.
oAmount Paid - Enter the amount of the payment you wish to make to this Vendor.
Payments Form - Credit Card option selected
oCredit Card - Using the Drop-Down Selection List provided, Choose the specific Credit Card to which the Payment will be charged.
Payments Form - Credit Card payment type - Select Credit Card
oCheck Number - The system will insert an internally created Check Number consisting of "CCPay" + the Payment ID assigned in the Register for the associated Credit Card Payment.
oBatch Number - By default it will be the day number of Today's date. Enter the desired Batch Number.
oLeft To Allocate - Initially, this will be the Amount you entered for this Payment.
i.Once you Apply some or all of the Payment (see "Actions options on the Payments Form" below), the system will adjust the Left To Allocate value accordingly
ii.Thus reducing the Left To Allocate Amount as you Apply all (or portions) of the Payment to outstanding Bill(s).
oClick the ![]() Icon to record this entry.
Icon to record this entry.

Payments Form - Credit Card payment completed
▪EPay - Select this option to record a Payment that was made via an Electronic Transfer from the Bank Account Selected below and deposited directly into the Bank Account of the Selected Vendor.

Payments Form - EPay entry
a.Bank Account - Use the Drop-Down Selection List to Choose the Bank from which these funds will be drafted.
b.Check Number - Because an Electronic Funds Transfer to a Vendor using your personal or business banking software has no MKMS assigned Check Number, EPay plus the Record ID is inserted in the Check Number field automatically when the record is saved.
c.Payment Type - Use the Drop-Down Selection List provided in the Payment Type field to Choose EPay.
d.Confirmation # - Because this Payment was made via an Electronic Funds Transfer, enter the Confirmation Number if provided by the Bank, or if not, enter some other notation to clearly identify it, if appropriate.
▪Hand Check - Click this button to record a Payment made with a Check that was Hand Written.
Payments Form - Hand Check entry
oCheck Number - Enter the Check Number you used for the Hand Written Check.
i.This is a mandatory field so the Payment entry can not be saved until a Check Number has been entered.
ii.Be sure the Check Number is not a number that falls within the range of your normal Check Numbering Sequence, or
iii.Alternately, if using the next Check Number in the Check Book (or box, bundle, etc.), reset the Last Check Number field in the Bank Maintenance Form (for the Bank Account that was selected above) with the Check Number used for the Hand Check.
iv.This will "use" that Check Number and so the Print Checks function will assigned the correct Next Check Number appropriately.
v.By using this method, the Check Register Report, the Bank's Transaction Register Form and the Bank Reconciliation Form will all contain the correct information.
✓Bank Account - If this is not a Credit Card Payment, use the Drop-Down Selection List to Choose the Bank from which these funds will be drafted.
▪The default Bank Account identified in the Company Options tab of the User Options Form is inserted, but may be changed using the Drop-Down Selection List provided.
✓Check Number - Because this will be a system generated Auto Check, the Check Number will be assigned when the Check is actually printed (see the Print Checks chapter for those instructions)
▪See the related Auto Check, Credit Card, Hand Check and EPay information in the "Check Type" discussion above).
✓Batch Number - By default it will be the day number of Today's date. Enter the desired Batch Number.
▪Setting The Batch Number - It is best to keep this simple. However:
a.Batch Numbers may be assigned from 1 to 32637 (this limitation is a function of the field type into which you are entering this Batch Number).
b.A new numbering sequence may be started each month (using the current Date's Day number), so the same Batch Number will be used in multiple Months but the date will be different.
c.In some cases, the same Batch Number may be used for more than one day to group certain of these types of payments together.
d.Starting from 1 and increment the Batch Number perpetually (if you used 2 batch numbers for two deposits every day, 5 days a week, it would take over 60 years to use all of the numbers) is another option.
e.The down side of incrementing the Batch Number perpetually is that the next number to be used needs to be maintained manually.
f.The recommended method is that each month starts a new sequence so the same Batch Number can be used in multiple Months because in MKMS the records for Payments are automatically stored internally by Date and Batch Number to keep them clearly differentiated.
✓Payment Type - Select E-Pay to create a record of a Payment that was made via an Electronic Transfer from the Selected Bank Account and deposited directly into the Bank Account of the Selected Vendor.
✓Confirmation # - If available, enter any appropriate Confirmation Number or other information related to this Payment.
✓Left To Allocate - Initially, this will be the Amount you entered for this Payment.
oOnce you Apply some or all of the Payment (see "Actions options on the Payments Form" below), the system will adjust the Left To Allocate value accordingly - reducing it as you Apply all (or portions) of the Payment to outstanding Bill(s).
✓Click the ![]() Icon to record this entry.
Icon to record this entry.
✓The system will assign a Payment ID which is only shown in the List View.
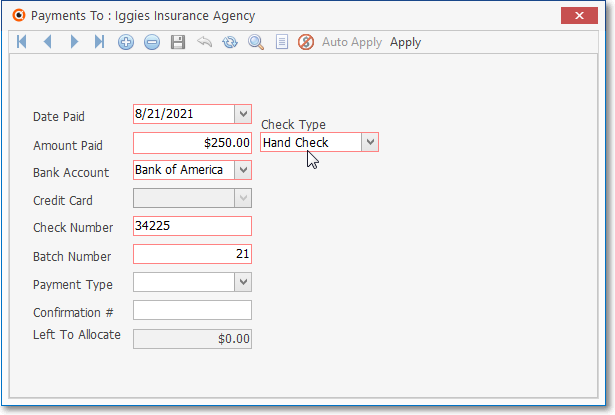
•Modifying a previously Saved and Allocated Payment, assuming a Check for which has not been Printed:
✓Once a Check has been Printed, a Payment record cannot be modified!
✓Check Type - As noted below:
1)From Auto Check to Hand Check: OK but must enter the Check Number that was used.
2)From Auto Check to E-Pay: OK and system will insert the EPay record number, Payment Type of Epay, and accepts a Confirmation # if available.
3)From Auto Check to Credit Card - Not permitted.
4)From E-Pay to Auto Check: OK and system will remove the EPay record number, Payment Type of Epay, but leaves the Confirmation # if entered.
5)From E-Pay to Credit Card - Not permitted.
6)From E-Pay to Hand Check: OK but must enter the Check Number that was used.
7)From Hand Check to anything - Not permitted because a Hand Check is already assumed to have been Printed.
8)From Credit Card to anything - Not permitted because all Credit Card transactions must be managed using the Credit Card Register.
✓Bank - May be modified, as needed.
✓Batch Number - May be modified, as needed.
✓Confirmation # - May be added or modified, as needed.
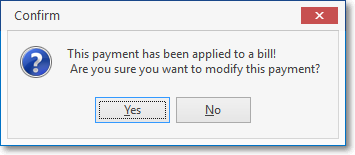
❑Paying a Bill using the Credit Card Pay option on that Bills Form:
•Open the Bills Form and locate the Bill that is to be Paid with a Credit Card.

•Click the Credit Card Pay Icon on the Bills Form
✓Use the Drop-Down Select List to Choose the Credit Card that will be (was) used to Pay this Bill.
Pay Bill by Credit Card
✓Save - Click the Save button.
✓A confirmation message will be displayed.
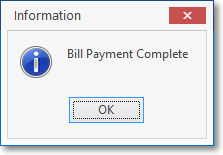
Bill Payment Complete
•The sample entry illustrated below - which documents a Credit Card Payment - is the result of making a Payment to this Vendor with a Credit Card by using the Credit Card Pay option in the Bill Form.
Payments Form - Credit Card entry from Bills Form
✓Date Paid - The Date on which the Credit Card was charged
✓Amount Paid - The Amount that was applied to the Bill
✓Bank Account - This is the Credit Card provider who sent this Payment Amount to the Vendor.
✓Check Number - "CCPay" (for Credit Card Payment) plus the Credit Card Register Record ID is inserted in the Check Number field automatically as the record is saved.
✓Batch Number - As assigned when the Credit Card Payment was made through the Bills Form.
✓Payment Type - Not used in this case.
✓Confirmation # - If identified when the Credit Card Payment was made through the Bills Form.
•Once saved:
✓The Credit Card Payment will automatically be Allocated to this Bill, and the transaction will be entered in the Credit Card Register.

✓This Credit Card Transaction will also appear in the Payments Form for this Vendor.
➢Note: Once saved, you cannot modify a Credit Card Payment entry in the Payments Form.
To make a modification to a Payment made with a Credit Card, Unallocate that Payment (if it was already Allocated), and simply Delete that Credit Card Payment entry.
This action will also remove the Credit Card Payment entry from the associated Credit Card's Register.
Then, re-enter the Credit Card Payment correctly, as needed.
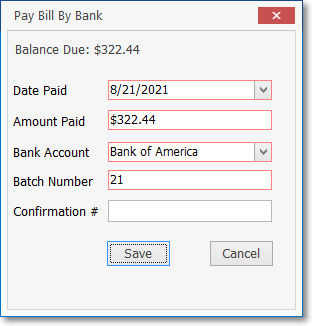
❑Paying a Bill using the Pay Bill by Bank option on that Bills Form:
•Open the Bills Form and locate the Bill that is to be Paid via an Electronic Transfer from a Company Bank Account.

•Click the Pay Bill By Bank Icon on the Bills Form
✓Date Paid - This will be entered automatically as Today
✓Amount Paid - This will be entered automatically as the Amount Due on the Bill
✓Bank Account - Use the Drop-Down Select List to Choose the Bank Account that will be (was) used to Pay this Bill.
Pay Bill with Bank Account
✓Batch Number - This will be the Day Number of Today
✓Confirmation # - Not required
✓Save - Click the Save button.
•The Bill will be paid via Electronic Transfer and the Amount Paid will be Allocated to this Bill
✓A confirmation message will be displayed.
Bill Payment Complete
•The sample entry illustrated below - which documents an Electronic Payment - is the result of making a Payment to this Vendor with a Bank Account by using the Pay Bill By Bank option in the Bill Form.
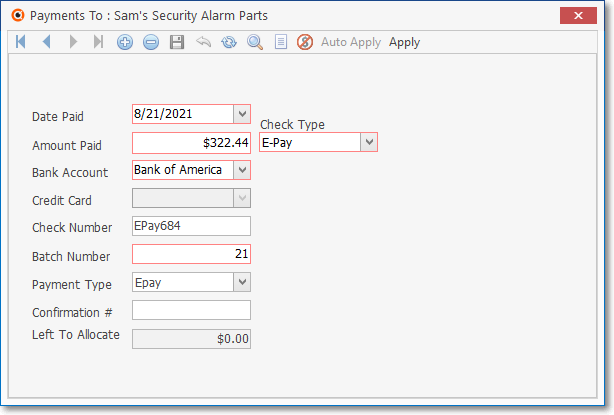
Payments Form - E-Pay entry from Bills Form
✓Date Paid - The Date on which the Bank Account was drafted
✓Amount Paid - The Amount that was applied to the Bill
✓Bank Account - This is the Bank Account from which this Payment Amount was sent to the Vendor.
✓Check Number -EPay plus the Payment's Record ID ( "EPay684" ) is inserted in the Check Number field automatically as the record is saved.
✓Batch Number - As assigned when the Payment was made through the Bills Form.
✓Payment Type - Epay is inserted automatically as the record is saved.
✓Confirmation # - Not required
➢Note: Once saved, you cannot modify a Payment entry in the Payments Form.
To make a modification to a Payment, Unallocate that Payment (if it was already Allocated), and simply Delete that Payment entry.
Then, re-enter the Payment correctly, as needed.
❑Actions options on the Payments Form:
![]()
Payments Form - Ribbon Menu - Actions Options
•Applying this Payment to one or more Bill(s):
✓When you have determined what Bill(s) this Payment should be applied to,
✓ you may use one of two methods:
1.Auto Apply - Click the Auto Apply button to automatically distribute this Payment from the oldest to the newest Bill, based their Due Date - until there is nothing Left To Allocate, or
2.Auto - Click the Apply button opens the Allocations Form which allows you to specifically designate the Bill(s) to which this Payment is to be applied.
✓In either case, when you Print the Checks, information will be printed on the Check Stub explaining to that Vendor exactly what Bills are being paid with these funds.
•Auto Apply - To automatically distribute this Payment to existing Bills, paying off the oldest to the newest Bill until the available Amount in Left To Allocate field is exhausted, Click this Auto Apply option.
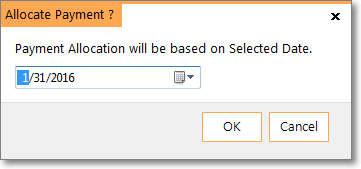
✓If the ChangeAllocationDate option is set to "T" in the Company Settings dialog accessed from the Company tab on the User Options Form, the User must confirm (or re-set) the Posting Date which, by default, will be Today.

Payment Allocation will be based on Selected Date
▪Click the OK to proceed, or use the Drop-Down Calendar/Date Entry field to change the Allocation date.
✓Otherwise, the Allocation will be dated Today.
•Apply - To manually Allocate the Payment to specifically selected Bill(s), Click the Apply option.
✓The Payment Allocations Form will be displayed.
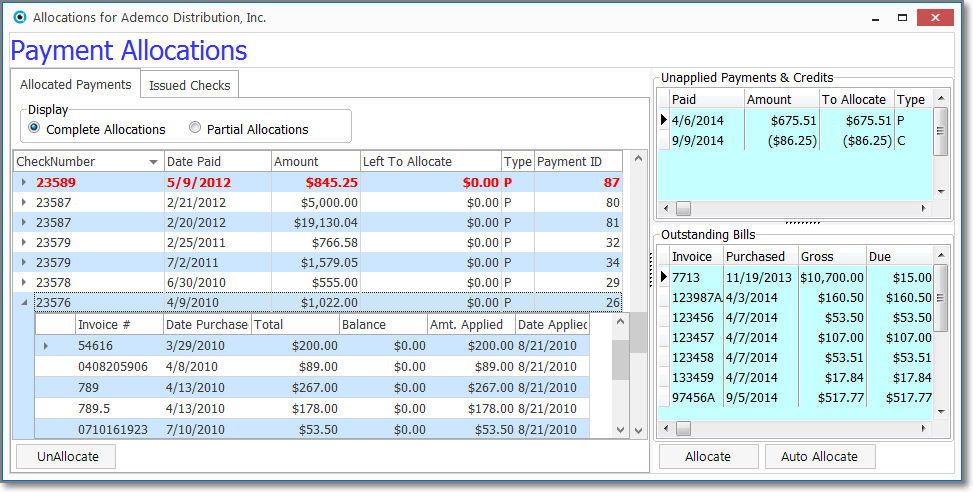
✓Unapplied Payments & Credits - The Payment just entered will be listed in this section.
▪Click on the Payment to be Allocated.
✓Outstanding Bills - Click on the Bill(s) to be Paid with this selected Payment.
▪If more than one Bill will be Paid, Press & Hold Ctr l and Right-Click on each Bill to be Paid with this Payment.
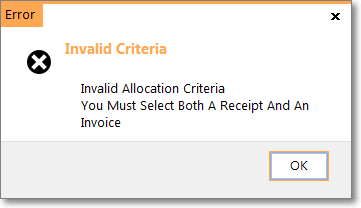
✓Allocate - Click the Allocate button to complete the transaction.
![]()
▪Confirm (or reset using the Drop-Down Calendar/Date Entry field provided) the Date of Allocation
▪The Payment will be allocated (applied) to the selected Bill(s), from the oldest - based on their Due date - to the most recent, until the gross value of the selected Payment has been used.
▪This may result in a Bill being partially paid, and/or one or more of the Bills you've selected not being paid at all, depending on the gross amount of the selected Payment and/or Credit Memos being applied, and the total amounts that are Due on the selected Bill(s).
oIf at least one Payment and one Bill have not been selected, an Invalid Criteria Error Message will be displayed, and the Allocation process will be aborted.
•Void - Checks get lost in the mail, damaged in the printer, paid to the wrong person, etc., and these will need to be voided within the system.
✓The Check Voiding process is explained here.
❖Also see the Applying Payments chapter with instructions on using the Allocations Form for additional information relating to completing the Payments process.
❑An Overview: Creating a Refund Check for a Receipt using the Refunds For dialog and the Accounts Payable System
•The Refund option on the Receipts Form allows the User to Print the Check for a Refund within the Accounts Payable System.
•This process works as follows:
1.To Print a Refund Check, the Cut Check field on the Refunds For dialog is Checked - thus indicating that this Refund is to be processed through the Accounts Payable System.
2.All Refunds that have been identified for payment by inserting a Check in the Cut Check field [and have not yet been marked either as Ready To Print nor Printed by the system - see steps 3., a. and 4., a. below] will be listed in the Disbursement Form
▪The Disbursement Form lists all of the outstanding Bills and any Refunds that are to be paid - the Invoice # of these Refunds will be "REFUND".
▪The User must Check the Pay field for each REFUND item (and Bill) for which a Check should be created.
▪Once all of the Bills and Refunds have been identified, the User must then Click the Pay Bills button on the Disbursement Form.
3.When a Check mark is entered in the Pay field for a REFUND item on the Disbursement Form:
a.On the associated Refunds For dialog each Refund selected for payment by Check will automatically have the Ready To Print field Checked by the system.
b.These Refund Payments become available to Print during the next Print Checks process.
4.Once the Refund Payments are printed using the Print Checks process:
a.On the associated Refunds For dialog the Printed field will be Checked, and Check # field will be populated with the Check Number assigned to the Printed Check.
5.A Payments record is created internally, but is not accessible.
6.On the Bank Reconciliation Form
a.Those Refunds which have not been identified on the Refunds For dialog with a Check in the Cut Check field will be displayed on the Deposits (right) side of the of the Bank Reconciliation Form as a negative Amount with a Description of Refund .
b.Those Refunds which are identified on the Refunds For dialog with a Check in the Cut Check field and a Check in the Printed field will appear under the Payment (left) side of the Bank Reconciliation Form as a positive Amount and the appropriate Check Number displayed.
➢Important Reminder: Refunds should not be issued until you are certain that the Subscriber's Check (or whatever form of payment was used) has cleared!