❑Micro Key Solutions™ offers InnoEPay as its preferred fully automated Payment Gateway provider
•InnoEPay is one of the oldest Payment Gateway providers in the eCommerce industry but it is not a merchant account provider.
✓Merchant account providers give businesses the ability to accept debit and credit cards in payment for goods and services. This can be face-to-face, on the telephone, or over the internet.
✓InnoEPay is a fully automated Payment Gateway provider
✓For most Alarm Companies, it translates into generally lower costs, and much better Payment Gateway features.
•This InnoEPay Payment Gateway integrates seamlessly with MKMS, and is secure, simple to use, and has plenty of extra features in addition to its basic credit card transaction and check processing functions.
✓When your Company implements the InnoEPay Payment Gateway, this will be the only Payment Gateway that you'll ever need.
▪An exception to that would be when there is more than one Bank into which your Company will be making Deposits via InnoEpay transactions.
• When using InnoEPay as your Company's Payment Gateway and your Company is using more than one Bank for making Deposits via InnoEpay transactions:
✓In this case, each InnoEPay Payment Gateway will make deposits directly to only one Bank.
▪Therefore, when your Company is using additional Banks for depositing InnoEpay transactions, your Company will need to get additional keys and have additional Payment Gateways defined - one for each Bank that will get those Receipts..
▪As those additional Payment Gateways are identified, consider a naming method such as InnoEPay-Bank1, InnoEPay-Bank2, etc., with the actual Bank Name used in each case.
▪Also, if your Company will tokenize Credit Cards, all Tokens will be based on the default, so the other InnoEPay Payment Gateway will automatically recognize that Token.
•There are three simple steps to complete to enable InnoEPay as an Automatic Payment Gateway provider:
1.Sign up for a InnoEpay.com Gateway Account.
2.Get your Company's Login/KEY and Password/PIN
3.Update ( one has been created already) the Payment Gateway information, as needed.
1.Your Company must sign up directly to use InnoEPay’s Payment Gateway
✓Go to https://InnoEPay.com - scroll to the bottom of the Home Page - sign up through the Get Started window.
✓As part of your registration, they will provide the required Key Code
2.Confirm the ePay Company Settings are set appropriately:
a.EPay API - EPay API - By default, the EPayAPI option is set to False ("F"). This option is used to activate the MKS ePay Service which processes the Multi-Transaction Payment Batch file created as part of the Fully Automated Recurring Billing process, and/or the manually selected Post Auto Draft process.
▪Setting the EPayAPI option to True ("T") allows your Company to activate the Automatic Payment Gateway processor (i.e., InnoEPay, Authorize.net, Forte.net) capability to process the Multi-Transaction Payment Batch file created as part of the Fully Automated Recurring Billing process, and/or the manually selected Post Auto Draft process.
b.Am CC Batch Number - AmCCBatchNumber - This is the prefix number used to construct the appropriate Batch Number for Receipts associated with American Express charges that originated from the Fully Automated Recurring Billing process, an E-Payment and/or Auto Draft payment(s) from Subscribers which will be/were processed by a Payment Gateway. It is initially set to 6.
c.All CC Batch Number - AllCCBatchNumber - This is the prefix number used to construct the appropriate Batch Number for Receipts associated with other Credit Card charges that originated from the Fully Automated Recurring Billing process, an E-Payment and/or Auto Draft payment(s) from Subscribers which will be/were processed by a Payment Gateway. It is initially set to 7.
d.Check Batch Number - CheckBatchNumber - This is the prefix number used to construct the appropriate Batch Number for Receipts associated with Bank Drafts that originated from the Fully Automated Recurring Billing process, an E-Payment and/or Auto Draft payment(s) from Subscribers which will be/were processed by a Payment Gateway. It is initially set to 8.
e.ePayTranTimerMs - Used by the the MKS ePay Service and is normally set to "3000"
f.ePayBatchTimerMs - Used by the the MKS ePay Service and is normally set to "60000"
g.ePayStatusTimerMs - Used by the the MKS ePay Service and is normally set to "3600000"
h.ePayTokenTimerMs - Used by the the MKS ePay Service and is normally set to "20000"
❖Settings specifically for the InnoEPay Payment Gateway.
i.ePayTranWorkerEnabled - Normally set to Yes ("Y") when InnoEPay is being used as one of your Company's Payment Gateway(s), or No ("N") when not being used.
j.ePayBatchWorkerEnabled - Normally set to Yes ("Y") when InnoEPay is being used as one of your Company's Payment Gateway(s), or No ("N") when not being used.
k.ePayTokenWorkerEnabled - Only set to Yes ("Y") when InnoEPay is being used as your Company's Tokenization Payment Gateway, or No ("N") when not being used for Tokenization or when another Automatic Payment Gateway or Manual Payment Gateway is also being used.
l.ePayStatusWorkerEnabled - Normally set to Yes ("Y").
3.Update the Payment Gateway record for InnoEPay (see the "Update a Payment Gateway record for InnoEPay" discussion below) - this InnoEPay record is created automatically by the system.
❑Understanding the purpose for the InnoEPay batch number default Codes:
•Set your Company's batch number default Codes to identify what your Company wants to use as a batch number prefix (one digit in length) to:
a)Pre-populate the batch number traditionally assigned to each Receipt transaction entered in the E-Payments screen, and
b)Pre-populate the batch number assigned traditionally assigned to each internally created Receipt transaction posted during the Post Auto Draft process (for those accounts setup for Auto Draft to pay for their recurring billing items).
➢Important Note: This prefix Code assignment method should also be used when manually entering the Batch Number for a Receipt in the Receipts and/or the Receipt Posting Form.
See the "Batch Number Assignment" discussion in the Receipts chapter for more information about Batch Numbering.
•These Company Settings Batch Number defaults (i.e., AmCCBatchNumber, AllCCBatchNumber, CheckNumberBatch) are automatically inserted as a prefix, which will then be followed by the number of the Month and Day (e.g., prefix+ '1107' for a transaction posted on November 7th ).
✓These Transactions occur on the Due Date of the Invoice!
❑Processes managed Automatically when using InnoEPay for your Company's Payment Gateway:
•Invoices - The pending payments records for the Invoices created by the Post Auto Draft procedure are stored in the epPayBatchDet table.
✓The epPayBatchDet table will be updated automatically following a modification of an Invoice's Due Date and/or Balance Due.
✓When a User modifies the Due Date of an Invoice created by the Post Auto Draft procedure, the corresponding epPayBatchDet table payment record will be updated with that revised Due Date.
▪Transactions occur on the Due Date of the Invoice!
✓If Balance Due of an Invoice created by the Post Auto Draft procedure is changed, the Amount field of the corresponding epPayBatchDet table payment record will be updated with that revised Balance Due.
•Receipts - When the Balance Due on an Invoice is paid:
✓The system will create a Receipt record and Allocate that Receipt to the appropriate Invoice.
✓The Status field in the epPayBatchDet table will change to MODIFIED.
✓If the Receipt (or a Credit Memo) is Unallocated (see Unallocating Receipts & Invoices), the Status field in the epPayBatchDet table is changed to PENDING.
✓If the Invoice is deleted, Status field in the epPayBatchDet table is changed to MODIFIED.
✓If the Invoice is restored (Review Deleted Entities), the Status field in the epPayBatchDet table is reset to PENDING.
✓If the Bill Payer is changed, then the SubscriberID field will be changed in the epPayBatchDet table.
•When InnoEPay deposits the funds in your Company's Bank Account for Credit Card charges and Bank Drafts (see Note below), they may post those funds to the MKMS in the form of (up to) three (3) separate Bank Deposits on any given day.
✓These Bank Deposits (using the batch number default Codes identified in InnoEPay Setup Process 2.; b.; i, ii, iii discussion above) would then properly characterize each type of Deposit transaction as follows (examples are assuming that those transactions were posted on November 7th):
1.Daily Total of American Express funds (AmCCBatchNumber) assuming you have charges funded by American Express: Batch Number = 61107
2.Daily Total of All other types of Credit Card funds (AllCCBatchNumber) such as Visa, Debit Card, MasterCard, Diners Club, Discover: Batch Number = 71107
3.Daily Total of Bank Drafts (CheckNumberBatch) paid directly from a Subscriber's Bank Account: Batch Number = 81107
➢Note: ACH transactions (i.e., Bank Drafts) typically take up to 4 days too "clear"
The batch number that will be assigned to those Receipt transaction records will be based on the Day the Bank Draft was requested, not the day it eventually cleared.
Should the Bank Draft (Check) Bounce, the associated Receipt record will be canceled automatically.
✓Therefore, your Company could see on each business day:
1.A deposit on your Bank Statement for the sum of all the AMEX charges that were settled that day,
2.A deposit on your Bank Statement for the sum of all other Credit & Debit Card charges that were settled that day
3.A deposit for the sum of all other Bank Drafts funded that day.
•So, by having the batch number Code with prefixes by type pre-populated: the need to identify those items manually is eliminated, consistency is ensured, and when Reconciling your Bank Statement in MKMS, it is easy to characterize those Deposits.
✓We recommend that once these Batch Number options are set, your Company does not change those batch number Codes.
•Validating your Company's batch number default Code entries:
✓When you Choose the "Credit Card" payment type tab on the E-Payments screen, the Batch Number will include the prefix for the Selected Credit Card Type, followed by the Month+Day numbers.
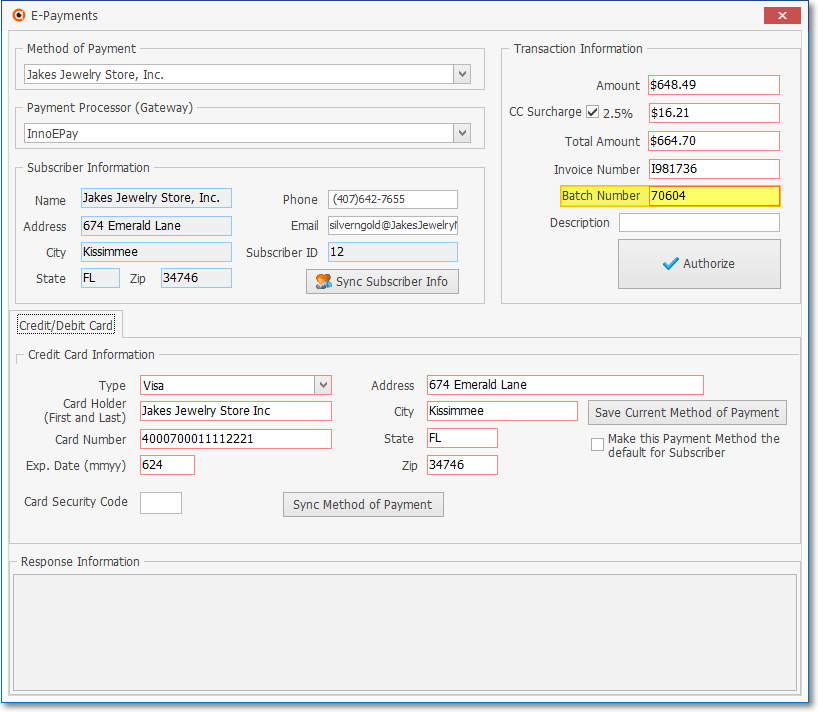
E-Payments dialog - Credit Card tab - Batch Number field
✓When you Choose the “Check” payment type tab, the same thing occurs - the appropriate prefix for a Check is inserted automatically, followed by the Month+Day numbers.
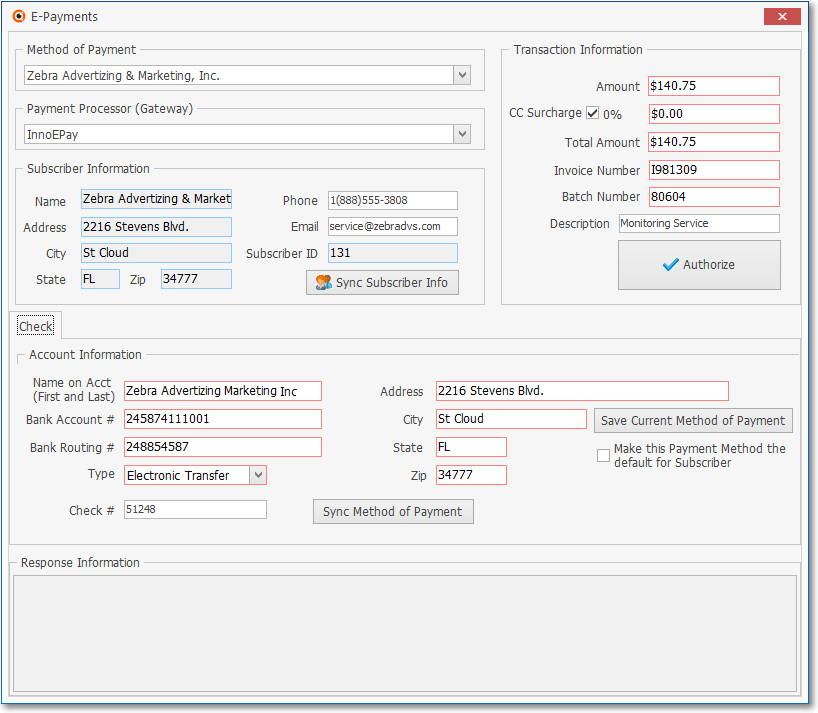
E-Payments dialog - Check tab - Batch Number field
❑Create/Update the InnoEPay Payment Gateway record:
•Access the Payment Gateways Form:
a)From the Backstage Menu System Select Maintenance and Choose General and Click the General Maintenance option which displays the Maintenance Menu, or
b)From the Quick Access Menu, Select Maintenance and Choose General Maintenance to display the Maintenance Menu.
•Once the Maintenance Menu is displayed, Select Receivables and Choose Payment Gateways.
✓List - Use the List option to locate the pre-defined InnoEPay record.
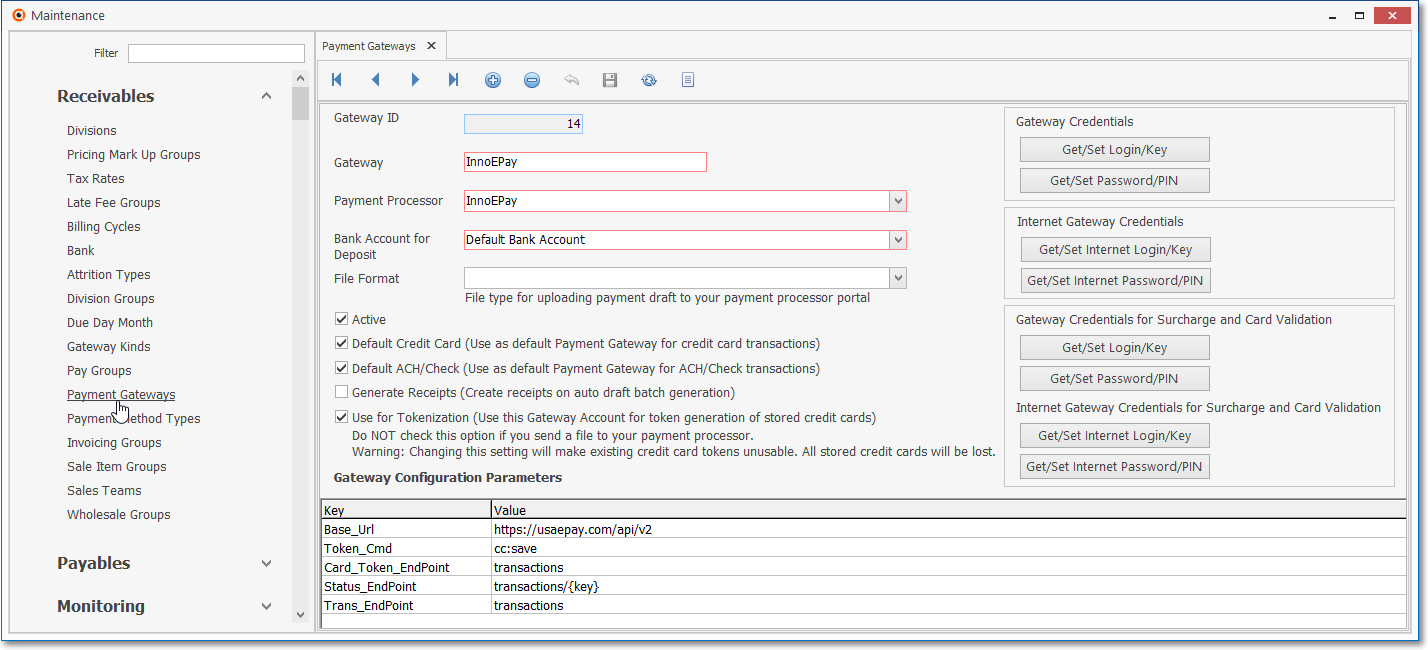
Payment Gateways Form - InnoEPay Record Editing View
Payment Gateways Form - InnoEPay Record Editing View with the Credit Card Surcharge function Activated
✓This Payment Gateways Form may be Re-sized by Dragging the Top and/or Bottom up or down, and/or the Right side in or out.
•Navigation Menu - The simplified Navigation Menu is located at the top of the Payment Gateways Form.
✓This Navigation Menu provides the normal Record Movement, plus Add, Delete, Cancel, Save, Refresh, and List options.

•Record Editing View - The details of the currently selected record are displayed below the Navigation Menu at the center (Main Body) of the Payment Gateways Form.
✓Select the desired Payment Gateway record or Press Insert to start a new record.
➢Important Note: Before you create your a Payment Gateway you should check to see if one already exists for that Payment Processor.
If it exists, then all you need to do is a minimal configuration for the Authentication Information.
•InnoEPay Record Editing View - The details of the InnoEPay Payment Gateway record are displayed below the Navigation Menu at the center (Main Body) Form.
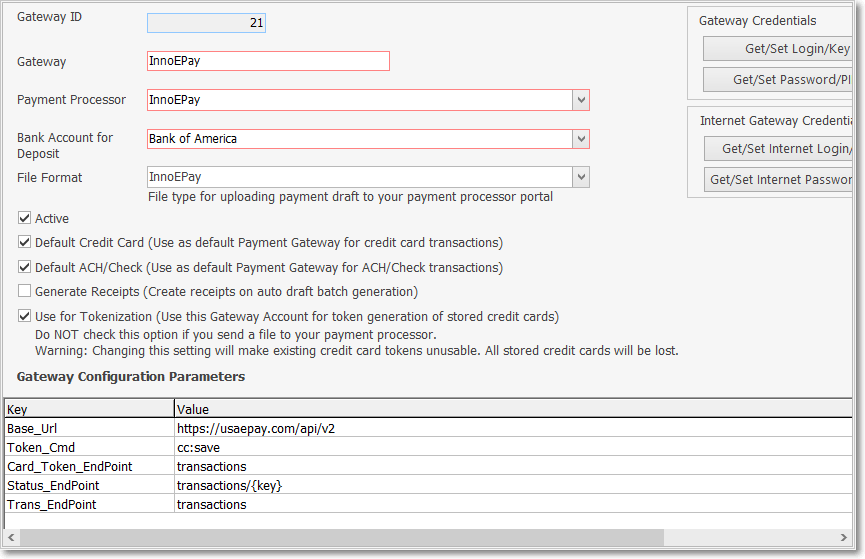
✓Defining the InnoEPay Payment Gateway
▪The InnoEPay Payment Gateway's Name is the only entry required here to "tell" MKMS to enable this InnoEPay processing capability (Login, Password, and Instructions are not required here)
▪However, other information must be entered in the (automatically installed, but user changeable) MKSePayService.exe.config file which will be located in the C:\Program Files (x86)\MKS\MKMS\MKS Services\ePayService folder.
✓Gateway ID - This record number will be assigned by the system as the record is initially saved.
✓Gateway - Enter the desired internally created description for the Gateway
▪Description of the Payment Processor Account, we recommend adding additional information like the Bank account's last digits to clearly identify where the funds will be deposited when this Gateway is used.
✓Payment Processor - Using the Drop-Down Selection List provided, Choose the appropriate Payment Processor.
▪Select one of the Automatic Payment Processor services supported by the MKMS system, which in this case should be InnoEPay.
✓Bank Account for Deposit - Using the Drop-Down Selection List provided, Choose the Bank into which the Receipts (Funds) are to be deposited.
✓File Format - Not required: This is only needed for Manual Payment Gateways where a text file must be sent with the payment information that's to be processed.
✓Active - Check this box if this Payment Gateway is actively being used (this is the default setting).
▪If Active is checked, the Gateway will be shown in the Automatic Billing and the Auto Draft screens, remove the Active Check mark for all Gateways which will not used so they won't be seen in system Drop-Down Selection Lists.
➢Note: A Payment Gateway may be set up to be:
i.the Default Payment Processor for Credit Cards transactions, or
ii.the Default Payment Processor for ACH/Check transactions, or
iii.the Default Payment Processor for both Credit Card and ACH/Check transactions, or
iv.Not the Default Payment Processor for any Credit Card or ACH/Check transactions
✓Default Credit Card (Use as default Payment Gateway for credit card transactions):
▪Check this box to identify this InnoEPay Payment Gateway as the one that should be used as the default for processing credit card transactions for those Billing Cycles which have a Check mark in the “Use Default Payment Processor” box of the Processor/Bank for Credit Card payments Check box field
▪Only one Payment Gateway can be identified as the Default Credit Card Processor.
✓Default ACH/Check (Use as default Payment Gateway for ACH/Check transactions):
▪Check this box to identify this InnoEPay Payment Gateway as the one that should be used as the default for processing ACH/Check transactions for those Billing Cycles which have a Check mark in the “Use the same Credit Card Processor for Bank Account” box of the Processor/Bank for Bank Accts payments field
▪Only one Payment Gateway can be identified as the Default ACH/Check Processor.
✓Generate Receipts (Create receipts on auto draft generation) - Only Check this box if this Payment Gateway is to generate a Receipt record within MKMS.
▪Manual Gateways - Applies only to Manual Gateways and indicates that Receipt records will be created for all payments at the moment that the Payment Process runs, and the Payment Batch is created,
▪Automatic Gateways - The InnoEPay service will always generate Receipts when a payment transaction gets approved.
✓Use for Tokenization (Use this Gateway Account for token generation of stored credit cards) - Check this box if this Payment Gateway will Tokenize Credit Card information..
▪Do NOT Check this option if you manually send a file to your Payment Processor.
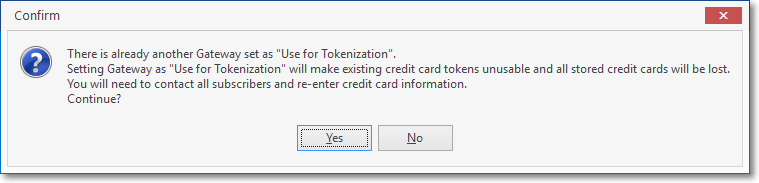
▪Warning: Changing this setting will cause any existing credit card tokens to be unusable. All stored credit cards will be lost.
▪If Checked, this InnoEPay Payment Gateway will be used for the generation of all Credit Card Tokens,
▪The Tokens generated by one Payment Gateway service cannot be used to process payments with a different Gateway, be very careful before changing this setting.
✓Only one Payment Gateway service should ever have Tokenization turned on at the same time!
✓Company Settings of interest:
1)The Company Setting option that turns on each Automatic Payment Gateway is:
a)InnoEPay option is ePayAPI and is turned on when set to True ("T")
b)Authorize.net option is AnetAPI and is turned on when set to True ("T")
c)Forte.net option is ForteAPI and is turned on when set to True ("T")
2)The Company Setting option that turns on each Automatic Payment Gateway's associated Tokenization is:
a)InnoEPay option is ePayTokenWorkerEnabled and is turned on when set to True ("T")
b)Authorize.net option is AnetTokenWorkerEnabled and is turned on when set to True ("T")
c)Forte.net option is ForteTokenWorkerEnabled and is turned on when set to True ("T")
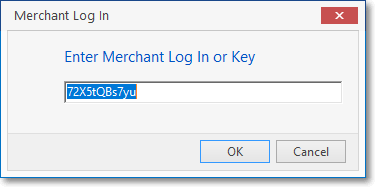
•Authentication Information (when and as required)
✓Merchant Login - Click the Get/Set Login bar to enter the Merchant Log In Key for this Authorize.net Payment Gateway.
▪Click this button to enter/edit Gateway Login/Key information provided by the Payment Processor when that Gateway Account was/is created (the entry below is not what you should enter!).
Sample Merchant Log In
▪Click the OK button to save this information.
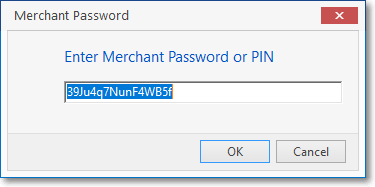
✓Merchant Pwd - Click the Get/Set Password bar to enter the Merchant Password or PIN for this Authorize.net Payment Gateway.
▪Click this button to enter/edit Gateway Password/PIN information provided by the Payment Processor when that Gateway Account was/is created (the entry below is not what you should enter!).
Sample Merchant Password
▪Click the OK button to save this information
✓Internet Login - Click the Get/Set Internet Login/Key bar to enter the Internet Log In Password or Key for this Payment Gateway.
▪Click this button to enter/edit Gateway's Internet Login/Key information provided by the Payment Processor when that Gateway Account was/is created.
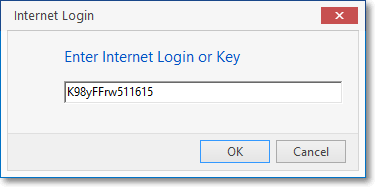
Sample Internet Login
▪Click the OK button to save this information.
✓Internet Password - Click the Get/Set Internet Password/PIN bar to enter the Merchant Password or PIN for this Payment Gateway.
▪Click this button to enter/edit Gateway's Internet Password/PIN information provided by the Payment Processor when that Gateway Account was/is created.
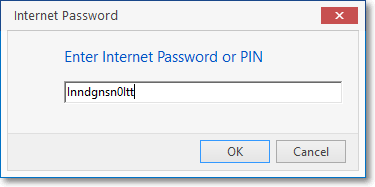
Sample Internet Password
▪Click the OK button to save this information
•Gateway Configuration Parameters
✓There are five configuration parameters, and none of them should require values updates
Parameter |
Value |
Base_Url |
https://usaepay.com/api/v2 |
Token_Cmd |
cc:save |
Card_Token_EndPoint |
transactions |
Status_EndPoint |
transactions/{key} |
Trans_EndPoint |
transactions |
✓Click the ![]() Icon to record the updated Payment Gateway information.
Icon to record the updated Payment Gateway information.
![]() List Icon - The Navigation Menu also has a List option which provides a tabular view of these Pay Integrator Gateway records.
List Icon - The Navigation Menu also has a List option which provides a tabular view of these Pay Integrator Gateway records.
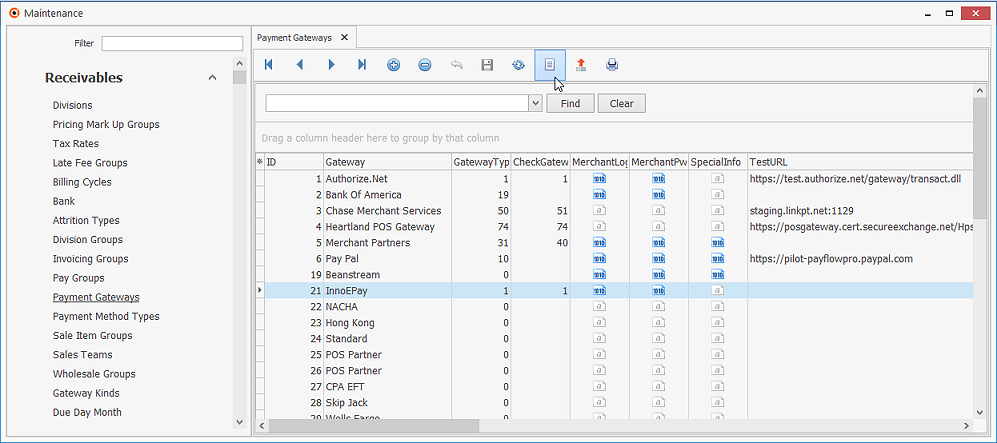
Payment Gateways Form - List View
✓Click the List Icon to display the associated Grid Data.
•Choosing the Columns to be Viewed:
✓Some columns may contain expanded comments or other information which may make the List View's display difficult to use.
Ø In the List View, you may Click the Asterisk at the left of the row of Header Names to display a Drop-Down Check List of each column's Headed Name.
▪Check any Header Name to be included in the List View (by default, All Header Names will be Checked)
▪Remove the Check for any Header Name (see illustration below) that is to be removed from the List View.
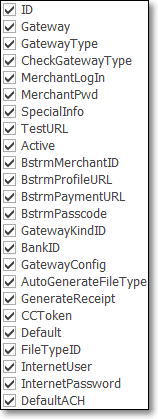
Available Column Names
✓The columns of listed Grid Data may be rearranged, filtered, sorted, and exported as a PDF file and/or an Excel formatted file.

✓Find - Enter text to search for a specific record, then Click the Find option.
✓Clear - To remove the text to search for entry, Click the Clear option

Navigation Menu shown with the Icons for List, Export and Print
![]() List Icon - Click the List Icon again to Close the List View and return to the Record Editing View.
List Icon - Click the List Icon again to Close the List View and return to the Record Editing View.
![]() Export Icon - Click the Export Icon to create (one of there types of) a spreadsheet compatible file containing the Grid Data as it is currently organized and filtered.
Export Icon - Click the Export Icon to create (one of there types of) a spreadsheet compatible file containing the Grid Data as it is currently organized and filtered.
![]() Print - Click the Print Icon to display the Print Preview Form from which a custom report may be designed and "printed" as an Adobe® PDF File.
Print - Click the Print Icon to display the Print Preview Form from which a custom report may be designed and "printed" as an Adobe® PDF File.
❖See the Grids - Print Preview - Export Data chapter for complete information on using the List View, including its Export & Print options.
❑Understanding how to use the InnoEPay Payment Gateway Process:
•Invoices may be paid manually using the E-Payments option on the Subscribers Form and/or the Invoice Form; and/or by using the Post Auto Draft process.
✓When using the E-Payments option on the Subscribers Form or the E-Pay option on the Invoice Form, the InnoEPay option is chosen for the Drop-Down Selection List in the Select Gateway field.
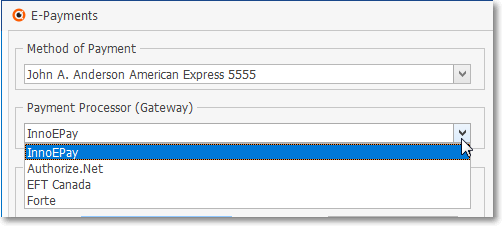
E-Payments Form - Select Gateway Drop-Down Selection List
•Also, when using the Post Auto Draft process:
✓InnoEPay is selected using the Drop-Down Selection List provided in the File Type field.
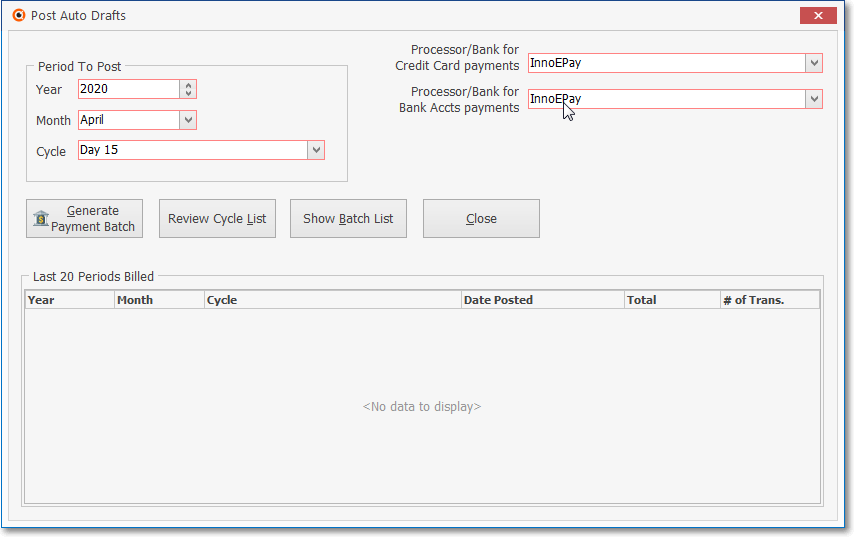
▪Unlike other Payment Gateways, when InnoEPay is selected, there are no Other Options presented or required in the Post Auto Draft Form
▪Once InnoEPay is selected, it should become the default File Type in the Post Auto Draft Form
❑The InnoEPay Process:
•Once an Invoice is "Paid" using the InnoEPay Payment Gateway, this is the basic InnoEPay work-flow/process when a Check (or Credit Card) payment is submitted, through the final result:
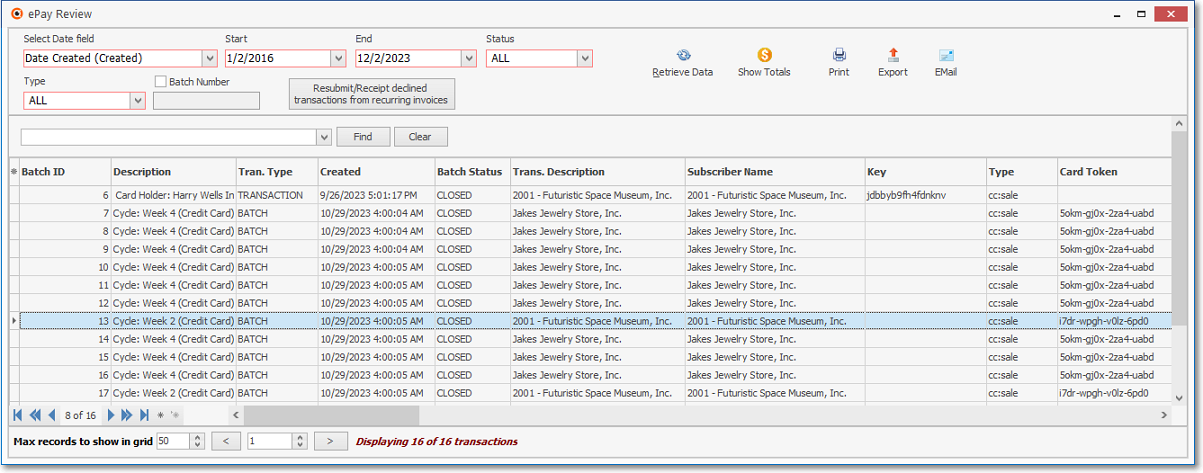
➢Note: The ePay Review report will contain the most up-to-date information for all of your Company's InnoEPay Payment Gateway submissions.
1.Pending – after a Check (or Credit Card) payment is submitted to the InnoEPay Payment Gateway the transaction will reflect a pending status until the final submission to the appropriate Processor
2.Submitted – once the Check (or Credit Card) payment has been submitted to the Processor, the Status within the InnoEPay Payment Gateway will be reflected as Submitted until the transaction is Funded/Settled, or Returned where the processor reports/provides information as to why the transaction will not be funded (e.g., NSF/Account Closed).
|
|---|
Transaction Status Codes, Labels, and Descriptions
3.Final Results:
a.Funded/Settled – the Check (or Credit Card) transaction has been successfully processed and will be paid. You will see:
i.one deposit on your Bank Statement for the sum of the AMEX Credit Card charges that were settled that day,
ii.one deposit for a lump sum of all other Visa, Debit, MasterCard, Diners Club, Discover Credit Card charges that were settled that day, and
iii.one lump sum deposit for all other Bank Drafts settled that day
b.Returned – the Check (or Credit Card) transaction will not be funded so your Company will need to know the reason (e.g., NSF/Account Closed - see the list of Returned Codes below)
➢Note: If your Company has been approved for expedited funding, any returned items for which they have already received funding will be reversed.
•When a Check payment transaction will not be funded, your Company will be provided with the Reason it was Returned [e.g., NSF ("R012"), Account Closed ("R02")]
Response |
Reason |
|---|---|
Returned |
R01: Insufficient Funds |
Returned |
R02: Account Closed |
Returned |
R03: No Account/Unable to Locate Account |
Returned |
R04: Invalid Account Number |
Returned |
R06: Returned per Originating Depository Financial Institution's Request |
Returned |
R07: Authorization Revoked by Customer |
Returned |
R08: Payment Stopped |
Returned |
R10: Customer Advises not Authorized |
Returned |
R16: Account Frozen |
Returned Codes