❑There are three ways available to post Receipts from Subscribers.
1.Open a Subscribers Form.
✓Press F-2 Search on the Navigation section of the Subscribers Form to locate the appropriate Subscriber record,
✓Open the Subscriber Options Menu on the Navigation section of the Subscribers Form, Select the Receivables sub-menu, then Choose the Receipts option.
oThis selection is for posting Receipts one at a time - such as when entering the initial Sale and the associated Receipt from that new Subscriber.
2.Open the Quick Access Menu and Select Maintenance, Choose Receivables sub-menu then Click the Receipt Posting option
3.Click the Post Receipts Icon on the Receivables tab on the MKMS Desktop.
✓These last two selections access the same Receipt Posting Form
✓The Receipt Posting Form is used to post a group of Receipts in the quickest manner possible.
❖Also see the Recording and Depositing Monies Received chapter for an overview on how these Receipts are to be recorded and then Deposited.
❑This Receipts chapter addresses the Receipts option on the Subscribers Form's Subscriber Options Menu which is used for posting Receipts, received from a specific Subscriber, one at a time.
➢Note: Regardless of where and/or how a Payment (Receipt) from a Subscriber is initially recorded (i.e., Receipt Posting, Post Auto Draft, or by using this Receipts Form), ultimately there will always be a Receipt record inserted into the Receipts table, and therefore all posted Receipts may be viewed here in the Receipts Form.
1.Open the Subscribers Form
2.Press F-2 Search on the Navigation section of the Subscribers Form to locate the appropriate Subscriber record,
3.Open the Subscriber Options Menu on the Navigation section of the Subscribers Form, Select the Receivables sub-menu, then Choose the Receipts option to display the Receipts Form shown below.
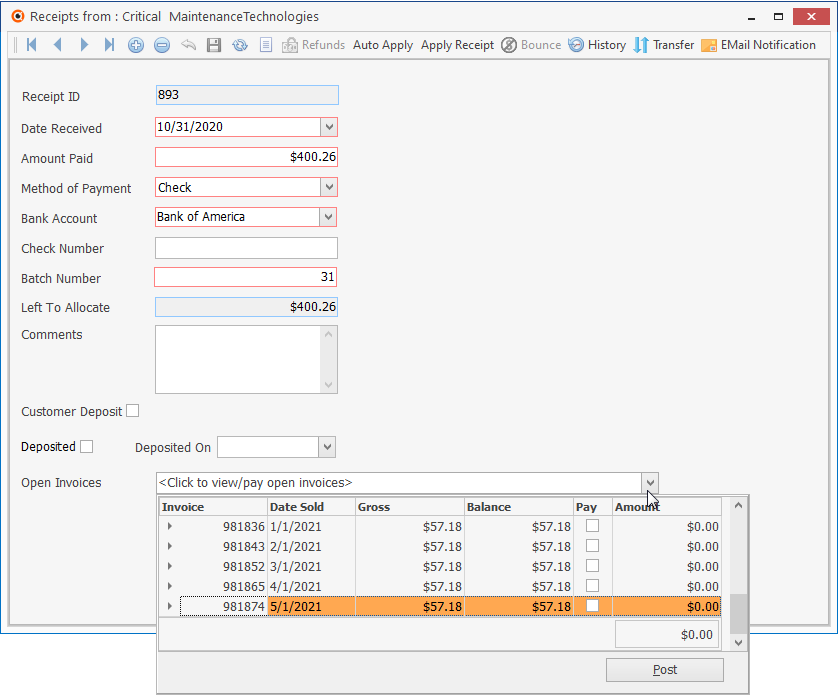
Receipts Form - Open Invoices information shown
✓This Receipts Form may be Re-sized by Dragging the Top and/or Bottom up or down, and/or the Right side in or out.
•Navigation Menu - The Navigation Menu is located at the top of the Receipts Form.
![]()
Receipts Form - Navigation Icons & Actions Icons
✓This Navigation Menu provides the normal Record Movement, Insert, Delete, Cancel, Save, Refresh and List Icons; as well as Refunds, Auto Apply, Apply Receipt, Bounce, History, Transfer, and EMail Notification Icons.
•Receipt Information - To the right of the Receipt information, there is a section that will have nothing in it until a special action is executed on a Receipt record.
✓Then, one or more of these explanations may be included:
a)(BOUNCED) - This Receipt has Bounced
b)(RECONCILED) - Includes the Statement Date when the Receipt was Reconciled
c)(CONVERTED) - This Receipt was Converted from being a Customer Deposit to a regular Receipt.
d)Refund Issued - A Refund was Issued for this Receipt. Refund information detail is available by Clicking the Refunds Icon
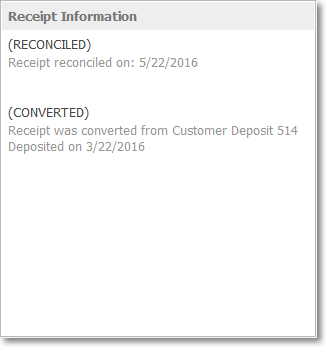
Receipts Information section on a Receipts Form
✓Receipt records may have more than one entry in the Receipt Information section.
•List Data View - A tabular (spreadsheet style) view of the previously entered Receipts is easily accessible.
![]()
✓Click the List Icon to display the associated Grid Data.
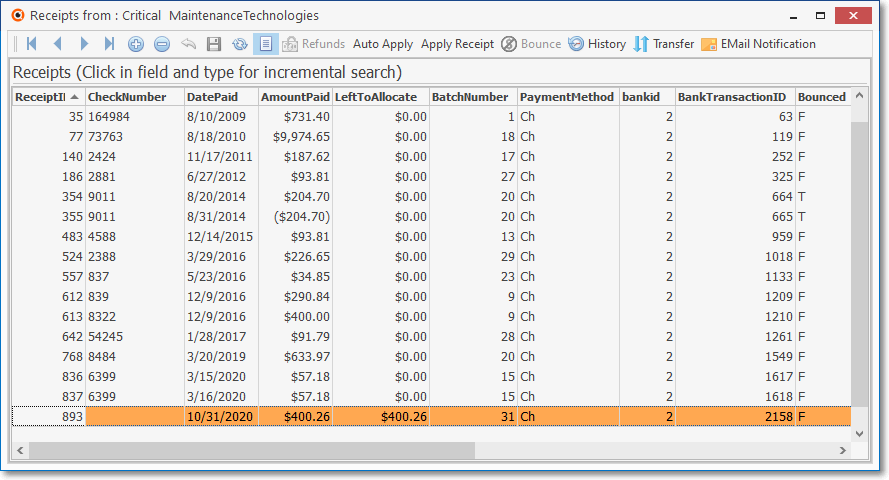
Receipts Form - List View
▪Receipts Search - An incremental Search may be performed within most columns.
oClick within the desired column's field to be searched and type the search entry (Check Number, Date Paid, Transaction ID, etc.)
▪There is a Horizontal and/or Vertical Slide Bar - displayed when needed - located at the bottom and/or side of the Receipts List to allow the User to view all of the available data columns .
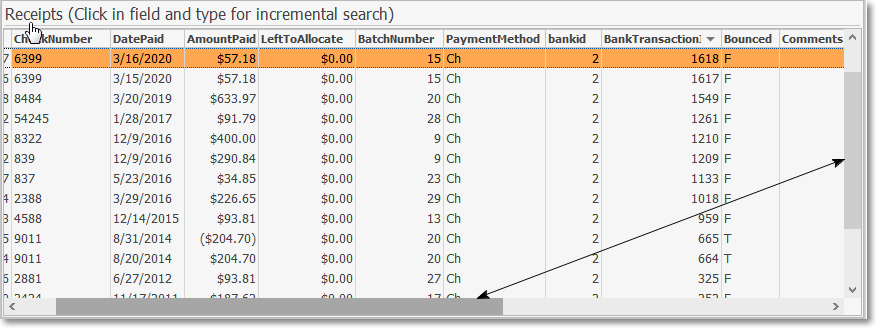
✓The columns of Grid Data may also be rearranged and/or sorted.
![]()
Navigation Menu shown with the List Option
▪Click the List Icon again to Close the List View and return to the Record Editing View.
❖See the Grids - Print Preview - Export Data chapter for complete information on using the Grid Icon.
❑Record Editing View - The details of the currently selected record are displayed within the Receipts tab below the Navigation Menu at the center (Main Body) of the Receipts Form.
Receipts Form - Record Editing View
•Receipts are initially recorded as an Amount Paid to your Company for one of two possible reasons:
a)To reduce the balance owed on a Subscriber's Account to pay off an existing Invoice which will decrease the Balance Amount on the Accounting tab within their Subscribers Form, or
b)As an Amount to be held in escrow (i.e., as a Customer Deposit) which will not decrease the Balance Amount on the Accounting tab within their Subscribers Form.
✓This Receipt entry will document when (the day received and the Batch Number assigned to it), how it was paid (check, EFT, cash, etc.), how much was paid, and where (into which Bank account) it should (will) be deposited.
✓When this Receipt is recorded, it must be identified either as one that will be Allocated to one or more selected Invoice(s), or as a Customer Deposit.
1.If the Receipt is for a Customer Deposit, that box should be Checked before saving the record.
2.If this Receipt is to be Allocated to (1.) the oldest Invoice(s) with an outstanding balance, (2.) specific Invoices chosen on the Receipt Allocation Form, or (3.) Invoices you specifically Select on this Form.
oUse the (1.) Auto Apply, (2.) Apply Receipt, or (3.) Open Invoices option, as appropriate, to designate which Invoice(s) should be Paid with this Receipt.
✓Receipts that have been fully Allocated will show a Left To Allocate balance of $0.00.
✓Receipts that were automatically posted and Allocated using the Auto Draft feature will also have a message identifying that process next to the Date Received field.
▪If Payment was by Credit Card, the last four digits of that Credit Card's Number will be inserted into the Comments section.
•Once recorded, a Receipt must then be Deposited by entering that Deposited information on this Receipts Form, or by using the Bank Deposits Form.
1.Receipts Form
▪Deposited On - If the Receipt being posted was (or will be) Deposited individually:
oUse the Drop-Down Calendar/Date Entry field provided in the Deposited On field to record that Date
a)Click on the Date field and type the desired Date using a MM/DD/YYYY format; or
b)Use the Drop-Down Calendar/Date Entry field provided to Choose the desired Date
oThe Receipt will be recorded as deposited (on this Deposited On Date entered here) into the Bank Account identified on the Receipts Form
▪Deposited - Once recorded as Deposited by entering a Date in the Deposited On field (or by using the Bank Deposits Form), the system will insert a Check Mark in the Deposited box for this Receipt.
2.Bank Deposits Form - However, in most cases multiple Receipts will be deposited at the same time and that type of Deposit Transaction will be recorded using the Bank Deposits Form
▪In this case the Check in the Deposited field and the Date in the Deposited On field will be inserted by the system automatically when recorded in the Bank Deposits Form.
•To record a Receipt:
➢Note: Before proceeding, be sure to read the "Batch Number Assignment" discussion later in this chapter.
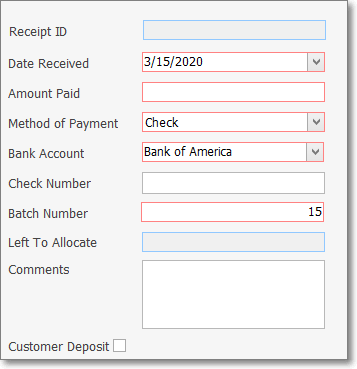
✓Click the ![]() Icon to start the Receipt entry in the Record Editing View.
Icon to start the Receipt entry in the Record Editing View.
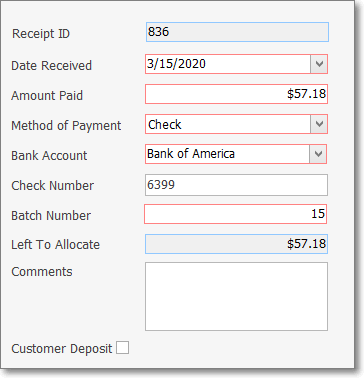
Receipt Form - Record Editing View - with data
▪Receipt ID - This is a system maintained field which contains the record number of this Receipt, it is assign when the record is initially saved.
▪Date Received - Today is the default Date, but - using the Drop-Down Calendar/Date Entry field - another Date may be Chosen.
a)Click on the Date field and type the desired Date using a MM/DD/YYYY format; or
b)Use the Drop-Down Calendar/Date Entry field provided to Choose the desired Date
▪Amount Paid - Enter the Amount of the Receipt.
oA negative Amount [e.g., -1.00, or (1.00)] is not permitted.
▪Method Of Payment - Check is the default, but - using the Drop-Down Selection List - another Payment Method may be Chosen.
oThe eight Methods of Payment are:
a)American Express - charged to this Credit Card
b)Cash - received an actual Cash payment
c)Check - paid with a Business or Personal Check
d)Discover - charged to this Credit Card
e)Electronic Transfer - received Direct payment from Subscriber's Bank
f)MasterCard - charged to this Credit Card
g)Visa - charged to this Credit Card
h)Other - paid via "In-Kind" or with something else of value to your Company
oEach of these Methods of Payment are assigned an internal code number - defined in the Payment Method Types Form - which is used as a prefix, along with the day and month, to create a Batch Number for the Receipt.
▪Bank Account - The default Bank Account defined in the Company Options tab of the User Options Form will be inserted.
oIf needed, use the Drop-Down Selection List to Choose a different Bank Account into which these funds are supposed to be deposited (see the Bank Deposits - Depositing Receipts in the Bank for additional information).
oThe same Batch Number (see Batch Number below) should never be assigned - within the same Month - to Receipts that will be deposited into different a Bank!
▪Check Number - Enter the Check's Number, or any other appropriate characters (such as the last 4 digits of a Credit Card, confirmation code, etc.) which may include numbers, Upper and lower case letters, basic punctuation, and/or spaces for identifying this Receipt.
▪Batch Number - Enter the appropriate number which, by default, will be today's date number but may be changed, as needed, based on your Company's adopted Batch Number Assignment method:
➢Note: Be sure to read the "Batch Number Assignment" discussion later in this chapter.
See Defining your Company's Batch Numbers discussion in the E-Payments chapter
See the "Setting the InnoEPay batch number default values" discussion in the InnoEPay chapter for that information.
▪Left To Allocate is listed as $0.00 until the transaction is saved, then it will equal the Amount Paid until it is Allocated to one or more Invoices.
▪Comments - Enter any appropriate Description or Notation relating to this specific Receipt.
oThis Internal Note (Comment) may be entered or modified "after the fact" (i.e., even later, after the Receipt was initially saved) in this Receipt Form.
oIf Receipt was paid by Credit Card, that information including the last four digits of that Credit Card's Account Number will be inserted into the Comments section.
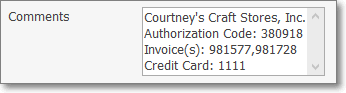
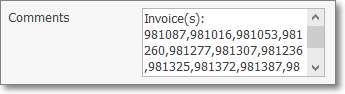
oIf the Receipt paid multiple Invoices and those Invoices were selected for payment using the Open Invoices Drop-Down Selections Check Box List, those Invoice Numbers will be inserted into the Comments section.
▪Customer Deposit - Check this box (before saving the record) when this Receipt is intended to be a Deposit on Account in anticipation of a future Sale (to be Invoiced at a later time), otherwise it is assumes that this Receipt is intended to pay for one or more existing Invoice(s), and so must eventually be Allocated to those Invoice(s) - [see the "Allocating the Receipts to Specific Invoice(s)" discussion later in this chapter].
oWhen a Customer Deposit needs to be converted to a standard Receipt record (assuming that is has already been Deposited in a Bank):
➢Note: Until a Customer Deposit is Deposited in a Bank, it may be re-identified as a regular Receipt by simply removing the Check in the Customer Deposit box.
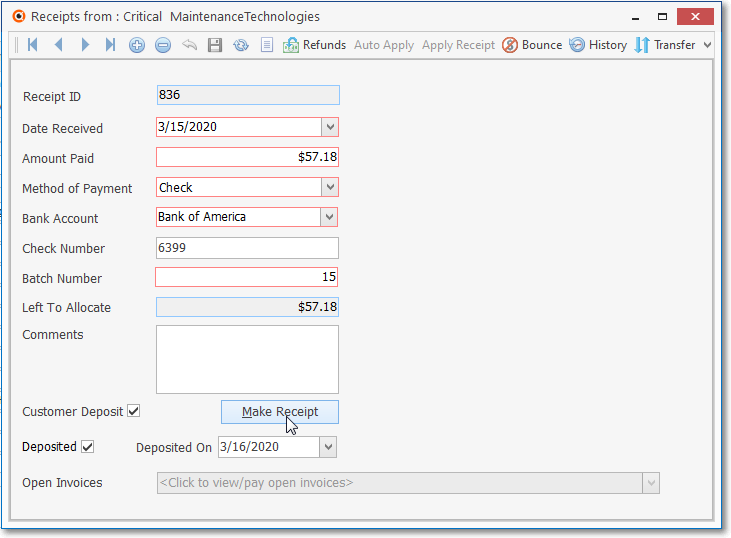
Receipt Form - Customer Deposit with Make Receipt option
i.Click the Make Deposit button on the Receipts Form
ii.Click Yes to confirm this action.
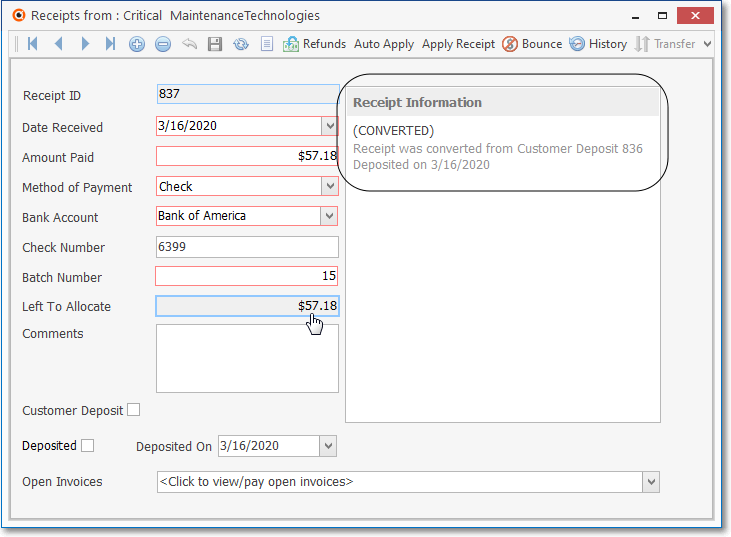
Receipt Form - Customer Deposit Converted
iii.The Receipt will be converted from a Customer Deposit to a standard Receipt and a message to that affect is included on the Receipt Form's information panel.
▪To Allocate the Receipt:
a)Use the Open Invoices Drop-Down Selection List (see the "Allocating Receipts to Specific Invoice(s)" discussion below, and the Allocate chapter), or
b)Use the Auto Apply option, or
c)Use the Apply option.
Receipt Form - Customer Deposit Converted, Deposited, and Allocated
▪The Left To Allocate Amount is automatically adjusted and updated by the system as all (or portions) of the Receipt are applied to designated Invoice(s)..
❖For General Ledger System Users
a)As noted above, when the Amount of the Receipt from a Subscriber is intended for the payment of one (or more) Invoices (i.e., the Customer Deposit box is not Checked):
i.The Receipt Amount is Credited (subtracted from) the Accounts Receivable Asset Account, and
ii.That same Receipt Amount is Debited (added to) the Undeposited Funds Asset Account.
b)However, when the Amount of the Receipt from a Subscriber is an Advance Deposit provided in anticipation of a future Sale to that Subscriber, that Receipt does not affect your Company's Accounts Receivable Account balance.
▪Therefore, when the Customer Deposit box is Checked:
i.That Receipt Amount is Credited (added) to the Customer Deposit (Liab) Liability Account, and
ii.That same Receipt Amount is Debited (added) to the Undeposited Funds Asset Account.
c.When a Customer Deposit is converted to a standard Receipt record (assuming that is has already been Deposited in a Bank):
i.The Receipt Amount is Credited (subtracted from) the Accounts Receivable Asset Account, and
ii.That same Receipt Amount is Debited (subtracted from) the Customer Deposit (Liab) Liability Account
d.When a Receipt is Deposited - regardless of whether it is recorded as a Customer Deposit or a standard Receipt which will be used to pay-off an Invoice:
i.The Receipt Amount is Debited (added to) the Bank Asset Account, and
ii.That same Receipt Amount is Credited (subtracted from) the Undeposited Funds Asset Account.
✓Click the ![]() Icon to record this Receipt entry.
Icon to record this Receipt entry.
•Understanding the Left To Allocate field:
✓As noted above, Left To Allocate is listed as $0.00 until the transaction is saved.
▪Once saved, Left to Allocate is a system maintained field, and will initially be the Amount Paid.
✓The Receipt is initially recorded as either:
a)A Deposit on Account if the Customer Deposit box is Checked, or
b)As an Amount Paid toward the Subscriber's existing Accounts Receivable balance, in which case this Receipt may now (or eventually) be Allocated one or more specified Invoice(s) .
✓To Allocate the Receipt:
a)Use the Open Invoices Drop-Down Selection List (see the "Allocating Receipts to Specific Invoice(s)" discussion below, and the Allocate chapter), or
b)Use the Auto Apply option, or
c)Use the Apply option.
Receipt Form - Customer Deposit Converted, Deposited, and Allocated
✓The Left To Allocate Amount is automatically adjusted and updated by the system as all (or portions) of the Receipt are applied to designated Invoice(s)..
•Modifying a Receipt record:
✓Once a Receipt record is saved (but has not yet been Deposited using the Bank Deposits Form and/or has not yet been Allocated), a User - with the appropriate User Access Rights to do so - may modify any of the data on the Receipts Form.
✓However, once the Receipt has been Deposited, this Receipt record cannot be modified except that the Batch Number may be changed/corrected, even after it is Deposited, when necessary.
▪If someone attempts to do so, a message will be displayed to indicate that modifications to Deposited Receipts are not permitted.
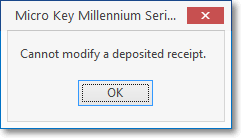
Cannot Modify a Deposited Receipt
✓If the Receipt record has has not yet been Deposited using the Bank Deposits Form but has been Allocated, a different Edit Receipt? dialog will be presented.

Edit Receipt? - Receipt has been allocated
▪If this modification was started in error, Click the No button.
▪If a modification is required, Click the Yes button.
▪An Authorize Transaction dialog will be displayed requesting that the User specify the reason for this modification.
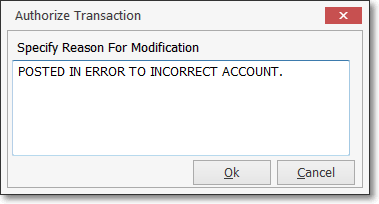
▪Enter the appropriate reason for this modification and Click the OK button to proceed with the required modification.
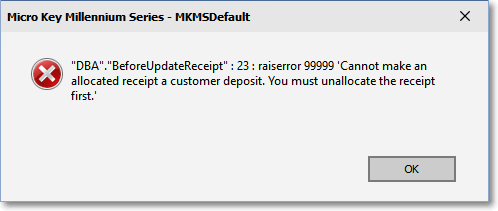
✓If the information in any of the Mandatory field(s) must be changed, the first step is to Unallocate the Receipt.
▪Attempting to convert a regular Receipt - that has been Allocated - to a Customer Deposit will cause an error.
▪Then, make the required changes and Click the ![]() Icon to record those changes.
Icon to record those changes.
•Transfer - Transferring a Receipt to a different Subscriber:
✓Under certain circumstances, a posted Receipt may be Transferred to a different Subscriber (usually because it was initially posted to the wrong Account):
✓If the currently selected Receipt has not been Allocated (see "Allocating Receipts to Specific Invoice(s)" below), and has not been Bounced (see the Bounced Checks chapter for that information), the Transfer Icon on the Navigation Menu will become available.
▪Click the Transfer Icon to transfer this Receipt to another Subscriber.
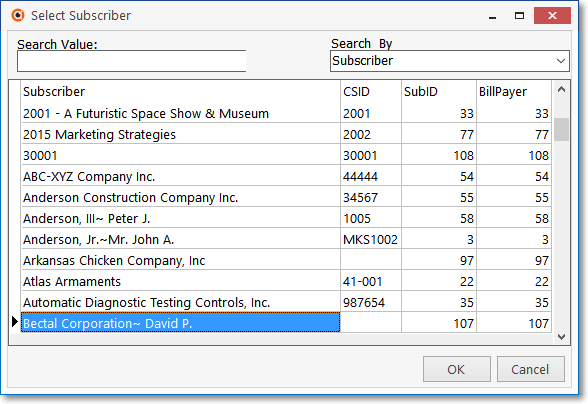
▪Using the Select Subscriber dialog provided, Choose the Subscriber to whom this Receipt is to be Transferred and Click OK
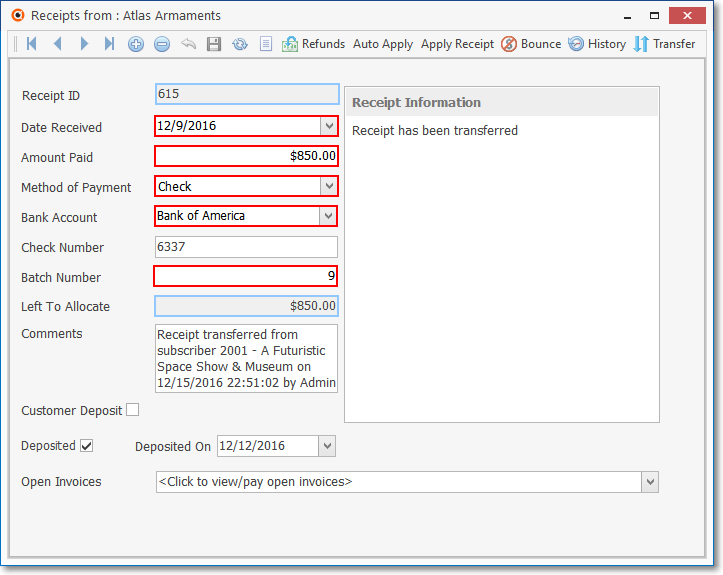
Receipts Form - Transferred Receipt record
▪A transferred Receipt record will be created for the Subscriber to whom this Receipt was Transferred
▪The Comments field will describe the source of the Transfer in detail.
✓The original Receipt record will be removed.
•EMail Notification - The Email Notification Icon is used to inform the Subscriber (via Email) that a Receipt has been posted to their Account (i.e., a record has been created for their Payment).
❑Batch Number Assignment - The How and Why your Company should Consistently assign Batch Numbers to Receipts:
➢Note: In previous versions of MKMS, versions issued prior to 5.1.35.8XXX, the recommended method for assigning Batch Numbers to sets of one or more Receipts was to assign the Number of the Day in which Receipts were recorded, with exceptions for special Receipts generated through the Post Auto Draft and/or E-Payments processes.
•Now, a more sophisticated method is recommended, which will still identify When (what day and month) the Receipt was entered, but also identify what Type of Receipt - the Payment Method Type (e.g, Check or Cash, Electronic Funds Transfer [E-Pay], the specific Credit or Debit Card, Other) that was posted.
•By identifying the Payment Method Type of the Receipt (with a simple one digit Payment Method code number) and the Day and Month in which the Receipt was recorded (by adding a two digit month and two digit day number to the Batch Number), the Bank Deposits and Bank Reconciliation processes become much easier.
✓Why?
1)Receipts are generally selected and Deposited (see Bank Deposits chapter for that information) based on the Batch Number assigned to them.
a)By using this recommended Batch Numbering method, there shouldn't be any confusion about When the funds were received and in what form (Type) that money was paid.
b)This is because the same Batch Number will not be assigned to Receipts from a different day and/or month within your Company's Fiscal Year, nor from different Payment Method Types
2)Bank Deposits are used, along with Checks paid to Vendors/Employees, to complete the Bank Reconciliation process.
a)Having certainty about when and what was deposited makes completing a Bank Reconciliation much easier.
b)If your Company is also using the recommended InnoEPay, Authorize.net or Forte.net as your Payment Gateway, the system will automatically assign this revised Batch Number format when using the Post Auto Draft and/or E-Payments features. You will be able to predefine 3 Batch Number Prefixes (for American Express, Other Credit & Debit Cards, and Bank Drafts) in Company Settings.
i.AmCCBatchNumber - This is a number field representing American Express payment transactions which may be set as 1 to 9, but is initially set to 6.
ii.AllCCBatchNumber - This is a number field representing Other Credit and Debit Card payment transactions which may be set as 1 to 9, but is initially set to 7.
iii.CheckNumberBatch - This is a number field representing Bank Draft payment transactions which may be set as 1 to 9, but is initially set to 8.
iv.These types of electronically acquired funds will be recorded as Receipts and deposited in your Bank with the appropriate Type and Date codes included in the Batch Number
c)When your Company is using a different Payment Gateway, the the Payment Method Type Form is used to identify the Payment Types (e.g, Check or Cash, Electronic Funds Transfer [E-Pay], the specific Credit or Debit Card, Other) and their associated code number prefix identifying the actual Type of Payment
d)Using this Prefix+Month+Day Batch Number Format, you'll always know exactly where those funds came from, when you received them, and who paid it.
3)This recommended method ( see c. below for more detail) will better serve your Company, particularly when using the recommended InnoEPay Payment Gateway
a)By default, the system will insert the Day Number of Today as a fallback.
b)Decide on what Prefix your Company will assigned to the remaining Payment Types - See the "Method Of Payment" discussion above (e.g., only required for Check, Cash, Other; because E-Payments and Posted Auto Draft are automatically assigned the correct Batch Number).
c)Then, as you enter the Batch Number, follow this methodology:
i.enter the (one digit) number for the type of Receipt Transaction being posted
ii.append the two-digit Month Number and two-digit Day Number (e.g., all Debit Card E-Payments entered on October 14 would be assigned Batch Number “71014”)
d)This process makes analyzing and Reconciling your Bank Statements much easier because, at a glance, the Batch Number will tell you what type of Payment (Receipt) was made, and when.
•Understanding the Capability, Purpose and Use of Batch Numbers
✓Adopting this recommended Batch Numbering method as part of your Company's business model:
a.Batch Numbers must still be "real numbers" and may be assigned a value from 1 to 32637 (this limitation is a function of the field type into which you are entering this Batch Number).
i.Previously, You might start a new numbering sequence each month (using the current Date's Day number, a Number representing the Receipt Type, some combination of both, or something else - see c., 1. - iii. below for Micro Key's preferred method)
a)The same Batch Numbers could be used in multiple Months because internally the Date of the Receipt entry will be different and the system stores groups of Receipts by Batch Number + Date.
b)In some cases, you might use the same Batch Number more than one day (within the same Month) to group certain specific types of Receipts together.
c)You could use multiple Batch Numbers within the same day to separate Credit Card transactions from Cash Receipts, and/or to separate those Receipts from EFT funds and/or further divide them by certain Credit Card types.
d)You could start from 1 and increment the Batch Number perpetually (if you used 2 batch numbers for two deposits every day, 5 days a week, it would take over 60 years to use all of the numbers).
oThe down side of all of these methods described above is that you would be required to keep track of the next number that's supposed to be used.
ii.Now, with the new method, all of the above issues are addressed and the inherent problems with the old Batch Numbering method are resolved.
b.The same Batch Number should never be assigned within the same Month to record Receipts that will be / have been deposited into different Banks!
i.Because you can record Bank Deposits based on a Selected set of one or more Batch Numbers, assigning the same Batch Number for Receipts that will be deposited into different Banks could make the Bank Reconciliation process almost impossible.
ii.If Receipts being deposited in different Banks got the same Batch Number, the Cash Receipts Report - which may be printed for One Batch Number - would provide erroneous data. To guard against this happening, you may want choose One Batch Number and also designate that Receipt data for only one Bank be reported.
iii.Unless your Bank Statement Dates are always within one calendar month (i.e., only transactions occurring from the first day through the last day of the month are reported on the Bank Statement), it would cause a real issue if your Company uses the same Batch Number for multiple days that were not all within that month's Bank Statement.
iv.When you use the same Batch Number for Receipts which are going to be “Deposited” on two different days, it will lump them together and could make the Reconciliation process more difficult.
c.It is simpler and more reliable to use Micro Key's recommended Batch Numbering Method:
i.Use the Batch Number Assignment methodology required for InnoEPay when your Company is using them for your Payment Gateway to process and fund Credit & Debit Card and ACH (Bank Draft) Electronic Payments (e.g., when using Post Auto Draft and/or E-Payments):
ii.In Company Settings, set the AmCCBatchNumber (for American Express charges), the AllCCBatchNumber (for all other Credit and Debit Card charges), and the CheckNumberBatch (for ACH Bank Drafts) options as you desire, but with only 1 digit in length).
iii.The Batch Number is created by combining a pre-determined single digit Prefix (see ii. above) with a two-digit Month Number plus a two-digit Day Number
iv.The Prefix identifies what Payment Type is being processed, the remaining numbers identify when the Receipt was posted..
v.It's best if your Company is using InnoEPay as your Payment Gateway:
a)When Post Auto Draft and/or E-Payments entries are made, the Prefix+Month+Day number combination is created and automatically assigned to these transactions based on the payment type of each transaction.
b)When manually posting a Subscriber payments using the Receipts and/or the Receipt Posting Form, the Batch Number will have to be entered manually (the Day Number will be provided so just insert the payment type code and month number in front of that day number).
vi.If your Company is not using InnoEPay as your Payment Gateway, when Post Auto Draft and/or E-Payments entries are made, the Batch Number will have to be entered manually (the Day Number will be provided so just replace it with the payment type code and two-digit month number then the two digit day number [but you will only be able to differentiate between EFT (Bank Draft) and the combination of Credit & Debit Card based payments].
d.This recommended Batch Number Assignment method ( see c., i. through vi. above ) will better serve your Company, whether or not you are using the InnoEPay Payment Gateway
i.By default, the system will insert the Day Number of Today as a fallback.
ii.Decide on what Prefix your Company will assign to each Payment Types (e.g., Check, Cash, certain groups of Credit & Debit Cards, Other) - See the "Method Of Payment" discussion above.
iii.Then, as you enter the Batch Number, follow this methodology:
a)enter the (one digit) number for the Payment Type of the Receipt being posted (1 - 9 based on your Company's adopted Batch Number Assignment method)
b)append the two-digit Month Number and two-digit Day Number (e.g., all Credit Card E-Payments on entered on November 14 would be assigned Batch Number “71114”)
oIf your Company is using the InnoEPay Gateway, this Batch Number configuration would be automatically inserted in the E-Payments Form and while Posting Auto Drafts.
iv.This process makes analyzing and Reconciling your Bank Statements much easier because, at a glance, the Batch Number will identify what type of Receipt was received, and when that Receipt was posted.
❑Allocating Receipts to Specific Invoice(s) - All Receipts should eventually be allocated to (i.e.,applied as a payment for) one or more Invoices.
➢Note: For General Ledger System Users - The Allocation process is an Accounts Receivable System internal control.
The Amount Paid is deducted from the Accounts Receivable Asset Account Balance when the Receipt was initially posted..
The Allocation process does not create, nor require any General Ledger Financial Transaction entries
•This Allocation process may be referred to either as "Allocating a Receipt" or as "Applying a Receipt" to an Invoice.
✓If there are outstanding Invoice(s) for the selected Subscriber for whom a Receipt has been posted, there are four ways available for Allocating a Receipt to an Invoice:
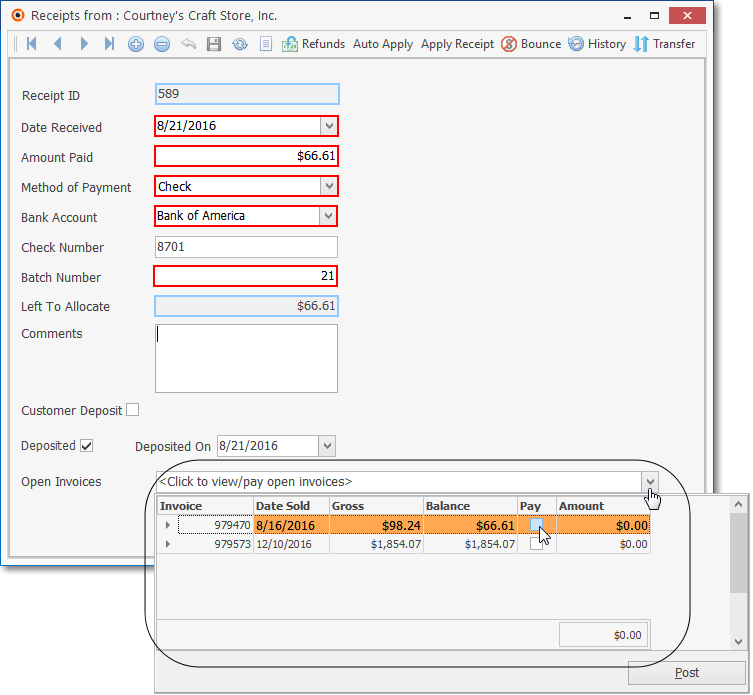
1.In the Open Invoices field of the Receipts Form (as illustrated immediately above), use the Open Invoices Drop-Down Selection List provided to display a list the Open Invoices for this Subscriber:
a.Check the Pay box on each open Invoice record to which this Receipt Amount is to be applied, and Press the Tab F key.
b.The Amount field will be populated with the Balance that was Due on this Invoice.
c.The Left to Allocation field will be updated with the remaining Amount that is available to apply.
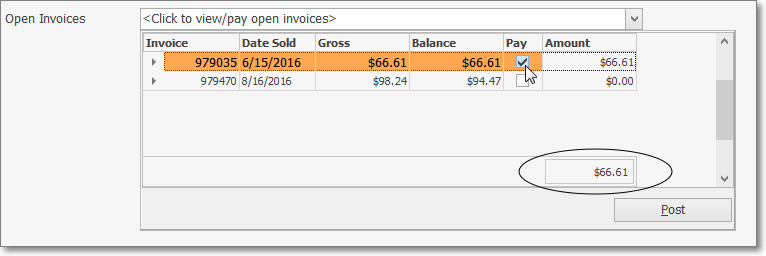
d.The Total Amount designated to be allocated will be summed at the bottom
e.Click the Post button to record this Allocation.
2.If you want the full amount of the Receipt to be applied automatically to the Subscriber's unpaid Invoice(s) - also see the "#2. - Automatically Allocating the Receipt" discussion.
a.Click the Auto Apply option on this Actions Menu of the Receipts Form
b.Application of these funds will progress from the oldest Invoice first, then the next, and next, until the total Amount of the Receipt has been allocated.
3.If you want to specify what part of the Receipt is to be applied to which of the Subscriber's unpaid Invoice(s) - also see the "#3. - Manually Allocating Receipts to Specific Invoices" discussion.
a.Click the Apply button to use the Allocated Receipts to Invoice(s) procedure's Allocations Form
b.Then, designate which specific Invoice(s) and/or specific Detail Line Items on Invoice(s) are to be paid with this Receipt.
4.If you want to specify which Detail Line Items on a specific Invoice are to be paid with this Receipt, see the Itemized Receipt Allocation chapter.
5.Use the automated Post Pending Credits & Deposits procedure.
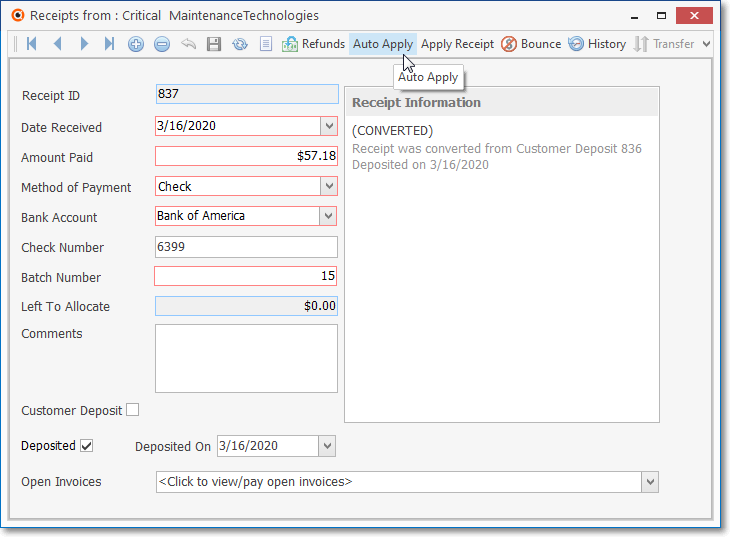
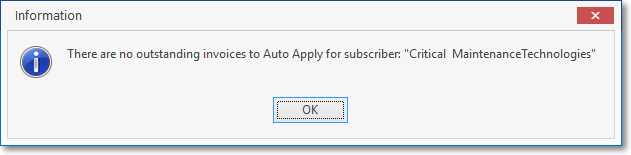
•#2. - Automatically Allocating the Receipt - If you want the full amount of the Receipt to be applied automatically to the Subscriber's unpaid Invoice(s), applying these funds to the oldest Invoice first, then the next, and next, until the total of the Receipt amount is used, Click Auto Apply .
✓The Receipt will be automatically and instantly applied, starting from the oldest Invoice and working forward, until the Receipt's value has been completely allocated.
▪This may leave a partially paid Invoice at the end of the automatic allocation process.
▪This may also leave a Receipt that still has a partial balance remaining to be allocated at later time, when the Subscriber has additional Invoices entered.
▪If no Invoice is available to which this Receipt may be Allocated, an Informational message is displayed.
•#3. - Manually Allocating Receipts to Specific Invoices:
✓Click the Apply Receipt option on the Receipts Form to use the Allocate Receipts to Invoice(s) procedure to designate which Invoice(s) and/or specific Detail Line Items on Invoice(s) are to be paid with this Receipt.
✓Refer to the Allocate Receipts to Invoice(s) and Post Pending Credits & Deposits chapters for additional instructions on Allocating Receipts to Invoices.
•#4. - Itemized Receipt Allocations - To assign a portion of the Receipt to specific Detail Line Items, see the instructions in the Itemized Receipt Allocation chapter
•Email Notification - This Icon is used to inform the Subscriber that a Receipt record has been created for their most recent Payment by crating an Email with that information.
❑Dealing with Bounced Checks:
•Reversing an Allocation of the Receipt because of a Bounced Check or Credit Card was Declined after an initial approval, is quick and easy - though painful in many cases.
•See Bounced Checks for detailed information of how to make these changes.
•See the dedicated Allocate Form's instructions for more detail on reversing Receipts that have already been allocated to Invoices.
❑Dealing with Refunds
•Refunds happen, either because of an error in billing that the Subscriber accidentally paid anyway, or caused by an adjustment offered by your Company.
•See Refunds for detailed information of how to make these entries.
❑Issuing a Credit Memo:
•Sometimes Credit Memos are needed - whether to satisfy a Customer Complaint or to simply correct a Billing Error.
•See Issue a Credit Memo for detailed information of how to make these entries.