❑Company Options - General - The User Option information required for the Accounts Payable System is located in the Company Options - General sub-tab.
•To access the appropriate User Options Form,
a.Open the Backstage Menu and Select Maintenance, Select General then Choose User Options, or
b.Open the Quick Access Menu and Select Maintenance then Choose User Options.
❑Select the Company tab then Click the Company Settings button on the Company tab of the User Options Form to (re-)set availability to any of the features outlined below.
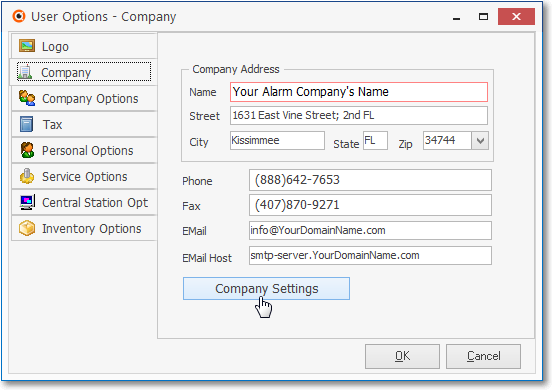
User Options - Company tab - Company Settings bar
a.Restrict Accounting - For Accounts Receivable and Accounts Payable System users, setting this option to True ("T") will require any user, not designated as an Accounting Administrator in the Security tab of the Employee Form, to get authorization for an Invoice change from an Employee that is an Accounting Administrator.
b.ADI Import - For Inventory Tracking, Accounts Payable and Accounts Receivable System users, setting this option to True ("T") will activate the menu options for the ADI Inventory Import procedures.
c.Create Vendor Folders - This CreateVendorFolders option must be set to True ("T") to enable the Vendor's Folders feature whose Folder Name is identified below and to allow "on-the-fly" creation of the Vendor's Scanned Documents folder, if none exists.
i.If set to True ("T") and no folder exists, it will be created as needed and a "New directory successfully created" message will be displayed.
ii.If set to False ("F") and no folder exists, the User will see a "The folder for this Vendor does not exist" message (which must then be created manually).
d.Report Charts - Default set to True ("T"), automatically and should not be changed.
e.Vendor Folder Path - Enter the default VendorFolderPath path for the Vendor's Folder, under which the individual sub-folders used to store each Vendor's Scanned Documents will be created.
f.Canada Tax - By default, the CanadaTax option is set to False ("F") in the Company Settings Form
▪Setting the CanadaTax option to True ("T") enables the specialized Goods & Services Tax tracking system (e.g., PST/GST/HST) for Companies who are required to pay that type of sale tax in Canada
▪For General Ledger System users, it adds two additional fields to the Mandatory Accounts (and in the Re-Declare Accounts) Form
oRead the Canada Sales Tax chapter in the Help Files for that specific information.
g.3 Digits Tax - By default, the 3DigitsTax option is set to False ("F").
▪When Sales Taxing Authorities have implemented Sales Tax Percentage Rates to three (3) Decimal Places (e.g., nn.nnn%), this Company Settings that must be re-set to True ("T") to support Charging and Collecting this type of Sales Tax.
▪Therefore, setting this 3DigitsTax option to True ("T") will also activate this Three Decimal Places Sales Tax feature in the Tax Rates Form.
h.Last PO ID - Internally controlled Last Purchase Order Number that has been assigned.
i.Restrict Vendor PO - By default, the RestrictVendorPO option is set to False ("F") in the Company Settings Form and the previous "normal" behavior is in effect
▪A Sales-Purchase Item (e.g., Purchase Category) may be associated with (e.g., belong to) a Sales-Purchase Item when any of these happens:
1)A Vendor is selected in the Sales-Purchase Item Form's Vendor field
a)When chosen for the Vendor field, it populates the internal APID field in the SaleItem table
2)A Vendor is added to the Sales-Purchase Item Form's Vendor Item ID Grid
a)When inserted into the Vendor Item ID Grid, it also creates a record in table Vendor Codes.
▪If the RestrictVendorPO option is set to True ("T") the above actions are still in effect, plus:
1)When creating a Purchase Order for a Vendor, the User will only be able to pick from a list of the Sales-Purchase Items which have been associated with (e.g., belong to) that Vendor
2)From the Work Order Form, when creating a Purchase Order by Clicking the Order Icon,
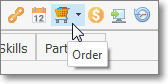
Work Order Ribbon Menu - Order Icon
a)The User is required to select a Vendor, then
b)The Purchase Order Form will be limited to selecting Sales-Purchase Items that "belong" to that selected Vendor.
3)When the Order Inventory option is selected within the Part List tab on a Work Order Form, in the Order Inventory dialog, the User must Choose a Vendor and a Warehouse, after which the User will only be able to Order from a list of the Sales-Purchase Items which have been associated with (e.g., belong to) that Vendor
4)From the Item List sub-tab within the Inventory tab on the Job Costing Form, when the Order Inventory option is chosen an Order Inventory dialog is displayed in which the User must Choose a Vendor and a Warehouse, after which the User will only be able to Order from a list of the Sales-Purchase Items which have been associated with (e.g., belong to) that Vendor
5)From Work Order Invoicing/Review - When viewing the Parts List tab of a specific Work Order Form, if the Order Inventory option is selected within the Part List tab on that Work Order, in the Order Inventory dialog, the User must Choose a Vendor and a Warehouse, after which the User will only be able to Order from a list of the Sales-Purchase Items which have been associated with (e.g., belong to) that Vendor
❑Select the Company Options tab then the General sub-tab and provide the information outlined below.
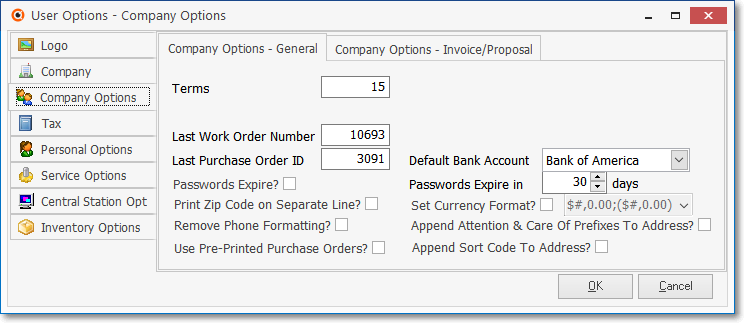
User Options Form - Company Options tab - General sub-tab
•Before proceeding:
✓Review the Tax Rates and the Tax Tab on the User Options Form chapters - which initially defined for the Accounts Receivable module, will also be needed when assigning the appropriate Tax Information to each Vendor.
•Then, enter the following information:
✓Company Options - General sub-tab
a.Last Purchase Order ID - In the Accounts Payable module this will either be:
i.The Last Purchase Order Number would be the number most recently used on an actual Purchase Order;
ii.The number immediately prior to the NEXT Purchase Order Number to be assigned (to the next Purchase Order that will be created)
b.Use Pre-Printed Purchase Orders - If using the Accounts Payable module, Check this box if your Company's Name and Address is Pre-Printed on its Purchase Order Forms.
c.Default Bank Account - Whether using just the Accounts Receivable module, or the Accounts Payable and General Ledger modules also, select the preferred Bank Account from which Payments are made and to which Receipts are posted.
d.Set Currency Format? - If you do not use the "Dollars" format (i.e., the standard US and Canadian format with dollar sign, two decimal places and minus values shown in parentheses),
i.Check the box provided.
ii.Using the Drop-Down Selection List provided, Choose the desired currency format.
iii.The pound sign ("#") indicates that additional numbers will occupy the space(s) as needed.
✓Click the OK button to save these Company Options updates.
❑What's Next?
•After I've finished the entries outlined above:
1.Define your Company's Vendors
2.Create codes and descriptions for the Purchase Categories and Inventory Items your Company will be Purchasing.
3.Establish the Starting Balance for each Vendor
4.Define all of the Recurring Purchases (e.g., Rent, Vehicle Payments, Copier Service Contracts, Loans) your Company makes a regular basis for the same Amount from any Vendor