❑ Menus, Options, Special Functions, Forms, etc., are all component parts of the MKMS system's User Interface.
•Menus - Menus are used to quickly navigate through the system and locate specific Forms to enter data, print reports and select options.
•Function Keys - Certain Special Function Key combinations that allow instant access to specific Forms and Functionality.
•Data Entry Forms - These are screens containing data entry fields (see Special Field types immediately below) which allow you to enter all of the information used by the system.
•Special Field types - Fields - the places within a Form where information is actually entered - come in many types such as numeric, general, specially formatted (e.g., telephone numbers, money, Drop-Down Selection Lists, special editors, etc.) with each Field type documented as needed.
•Settings - Presets which allow you to define many default system behaviors, in advance.
•Keystrokes - These 10 key combinations provide handy navigation and editing shortcuts:
1.Ctrl+PgDn - Move to the next record (if available) on the currently displayed Form.
2.Ctrl+PgUp - Move to previous next record (if available) on the currently displayed Form.
3.Ctrl+Home - Move to the first record on the currently displayed Form.
4.Ctrl+End - Move to the last record on the currently displayed Form.
5.Home - Move to the beginning of the currently selected data entry field.
6.End - Move to the end of the currently selected data entry field.
7.Ctrl+a - Select All of the content of the currently selected data entry field.
8.Ctrl+c - Copy the selected content within a field.
9.Ctrl+v - Move the copied content to another selected field
10.Ctrl+x - Remove the selected content in a field and hold it in memory and be available for the Ctrl+v Move command
•MKMS uses an easy to understand application desktop - the "MKMS Desktop" - with "Module" and function specific tabs (i.e., Menu, Receivables, Payables, Service, Shortcuts) that are displayed horizontally across the top of the Desktop.
✓So, each application desktop tab provides access to that Module's Primary Form (e.g., the Receivables module tab can access the Subscribers Form and the Payables module tab can access the Vendors Form); the Menu tab opens the Backstage Menu System (see below).
❖Help File Chapter Topic references described within this Help Files Electronic Document as "Chapters", "Chapter Topics", "sub-chapters", and/or "Topics" will all represent the same thing, a Chapter (e.g., Topic) within these Help Files which contains the required (referenced) information.
❑Menus - Once you've logged into the Micro Key Millennium Series ("MKMS") STARK, (see Getting Started) you're ready to start.
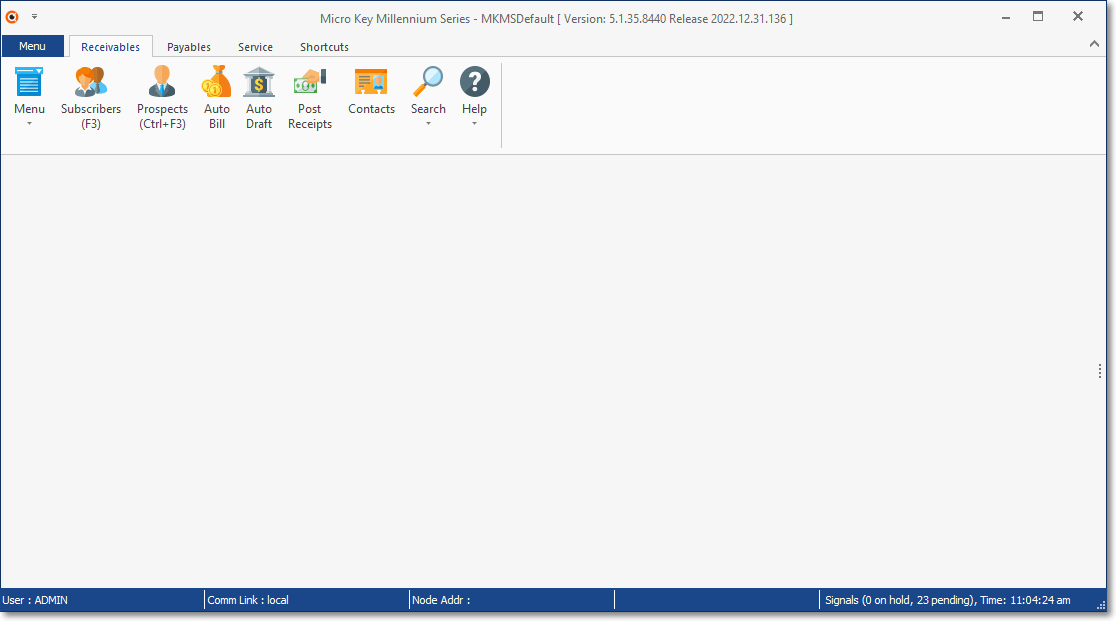
Micro Key Millennium Series - STARK Desktop
❑There are two major Menu Systems provided in MKMS.
1.The Backstage Menu System which provides access to all available Menu Options from the Menu tab on the MKMS Desktop.
2.A Quick Access Menu available at any time with a Right-Click on any open space on the MKMS Desktop, or by Clicking the Menu Icon available on each Module" and function tab on the MKMS Desktop.
❖See the "Quick Access Menu" discussion later in the chapter, and the Ribbon Menus, Backstage, Quick Access & General Maintenance Menus Chapter Topic for more information on the various Menu System that are available within MKMS).
❑Overview of the Backstage Menu System
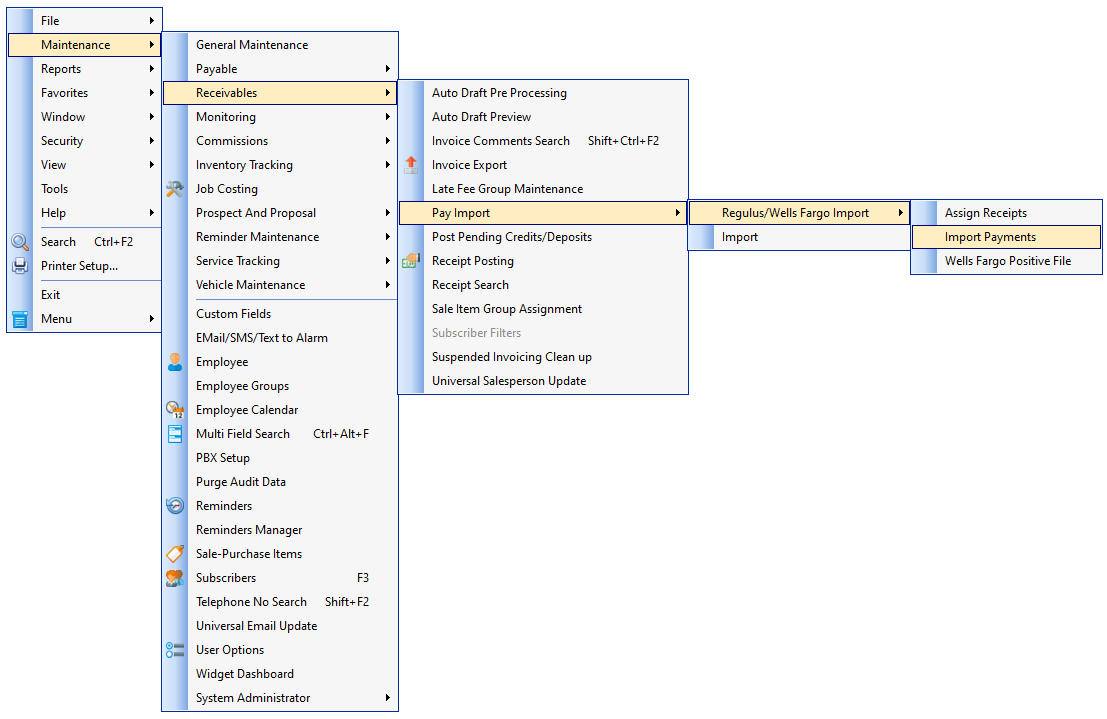
•This "Backstage Menu System" is accessed with a Click on the Menu tab (shown below)
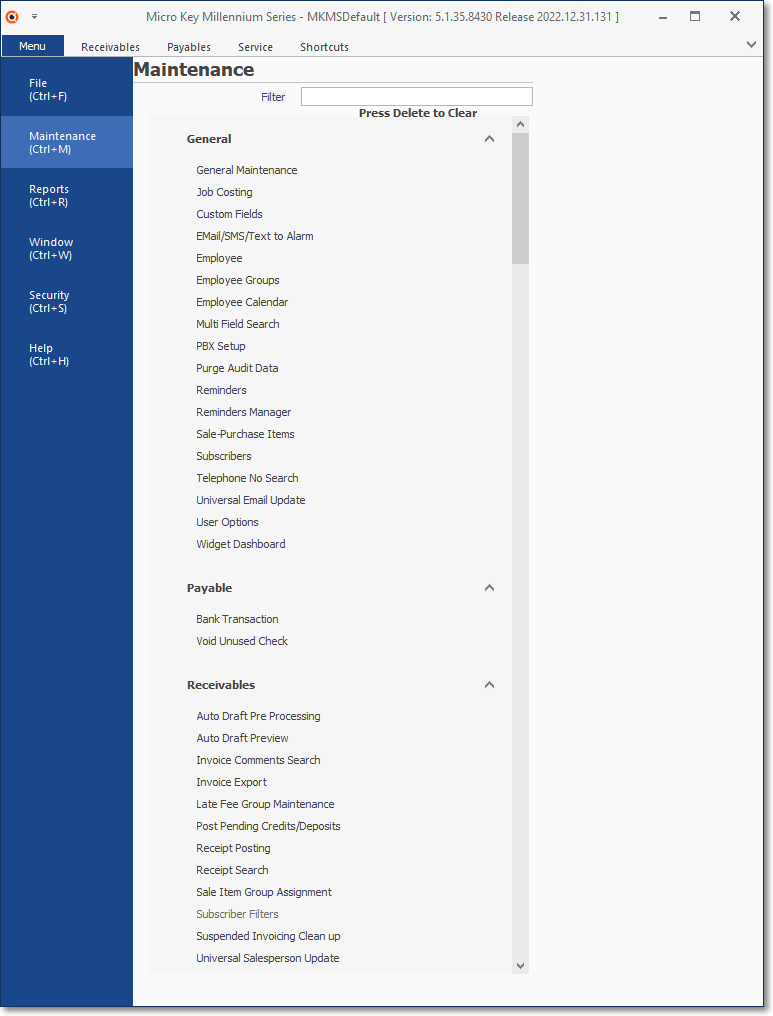
Menu tab used to access the Backstage Menu System - Maintenance Menu displayed
✓The Backstage Menu System, when opened, is displayed on the left side of the MKMS Desktop and includes all necessary set-up, special operation, and administrative Menu Options (with most Menu Options that are specific to the normal, daily functionality also available on those module's tabs) plus several specialized Look-Up options.
Menu tab - Backstage Menu System - Maintenance Menu Options - Filter field
✓An outline of the Backstage Menu System along with examples of the options (functionality) available in each grouping:
1.File - Provides access to one-time and periodic functions (e.g., General Ledger Wizard, Inventory Tracking Start-up, Month Closing), administrative and/or management functions (e.g., Post Earned Revenue, Bank Reconciliation, Custom Pay Increases, Import Payroll), and specialized processes (e.g., Run Automatic Payments, Work Order Completion/Review, Late Fee Generation, various specialized look up utilities).
a.Communications - Email now modified Subscribers, Manual Email and Manual Page.
b.General Ledger - Month and Year Closing, Account Register, General Journal Entries, etc.
c.Payable - Month Closing, Disbursements, Bank & Credit Card Reconciliations, Run Automatic Payments, etc.
d.Receivable - Bank Deposits, Custom Pay Increase, Month Closing, Post Auto Drafts, Late Fee Generation, Run Auto Billing process, etc.
e.Service - Run Automatic Service, Subscriber by Work Order, Work Order Completion/Review
f.General - Review Deleted Entries, Review Audit
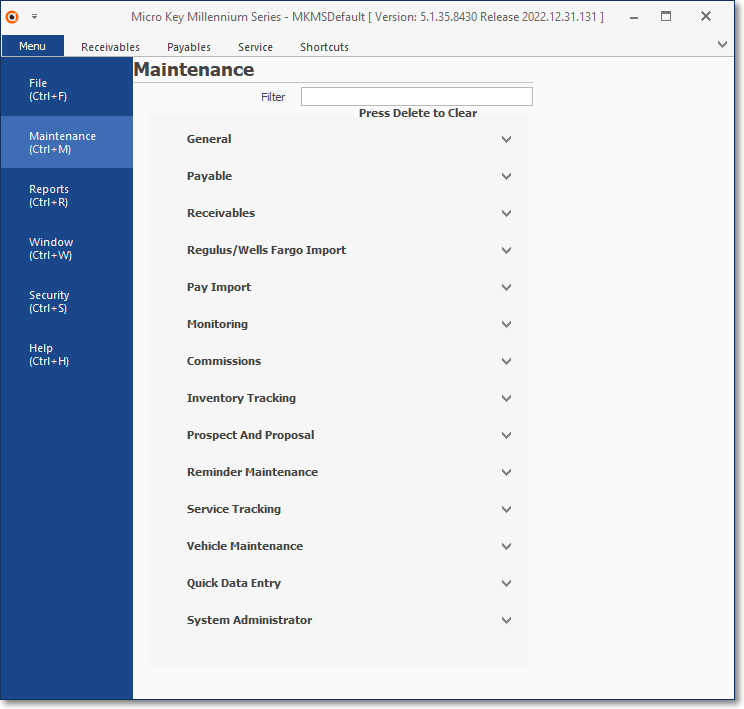
2.Maintenance - Provides access to all of the System Maintenance Forms used to initialize each module (see list below), and initiate specialized processes.
a.General - Provides access to over a dozen module specific Forms to define default codes and descriptions, Custom Fields, Purge Audit Data, Sale-Purchase Items, Employees, User Options, etc.
b.Payable - Bank Transactions, Void Unused Check
c.Receivables - Auto Draft, Invoice Export, Receipt Posting, Sale-Item Group Management, etc.
d.Regulus/Wells Fargo Import - Assign Receipts, Import Payments, Wells Fargo Positive File
e.Pay Import - Import Payment Data from outside sources
f.Monitoring - Alarm Group Maintenance, Create Mass Accounts, Manual Signals, Purge Alarm History, etc.
g.Commissions - Commission Adjustments, Commission Approvals
h.Inventory Tracking - ADI Parts Import, Calculate Inventory Item Average Cost, Transfer Inventory
i.Proposal and Prospect - Prospects, Prospect Filters
j.Reminder Maintenance - Purge Reminders
k.Service Tracking - Quick Work Order, Technician Schedule, Time Sheets, Service Group Maintenance, etc.
l.Vehicle Maintenance - Vehicle Maintenance Options
m.Quick Data Entry - Manage Templates, Data Entry
n.System Administrator - Backup Database, Validate database, Update Forms Table, Validate Documents, etc.
3.Reports - Provides access to all MKMS reporting capabilities.
a.Payable Reports - Accounts Payable, Cash requirements, Check register, Print Checks, Purchase Orders, etc.
b.Receivable Reports - Accounts Receivable, Auto Draft Accounts, Cash Receipts, Sales Analysis, Recurring Revenue Preview, etc.
c.Audit Reports - Audit, Accounts Audit, System Audit
d.General - Calls, Financial Spreadsheet, Inventory Tracking, Labels, Subscriber Listing, etc.
e.Monitoring - Active/Passive Signals, Alarm Activity, All Events, Call List Verification, Excessive Signals, Still Opened or Closed, etc.
f.Commissions - Earned Commissions
g.General Ledger - Balance Sheet, General Journal, Income Statement, Profit and Loss Comparison, Trial Balance.
h.Inventory Reports - Inventory Adjustments, Inventory Kits, Inventory Listing, Inventory Reorder, Inventory Usage, etc.
i.Job Costing 2.0 - Job Listing, Job Profit Summary, Job Work Sheet, Reserved Inventory, Work In Progress
j.Prospect And Proposal - Leads (Analysis, By Salesperson, By Source), Proposals, Prospect Information, etc.
k.Service Tracking - Determine Excessive Services, Eligible for Service Contract, No Service since, Open Service Requests, etc.
l.Vehicle Maintenance - Mileage List, Service Required
4.Window - Provides standard Windows® application choices for how the various active Forms will be presented on the MKMS Desktop.
5.Security - Add/Delete Users, Change Password, Register, User Access Rights, Log In, Log Out
6.Help - Contents, Function key help, Search for Help on Web, Tip of the Day, About, Troubleshooting
✓Once it is displayed, the Backstage Menu System may be collapsed by Clicking the Menu tab again, tapping the Escape (esc) key, or Clicking on another tab.
▪If a Form was open when the was selected (e.g., Subscribers Form, Vendors tab), when you exit the Backstage Menu System, you will be returned to that previously displayed Form or tab.
▪Not all Menu Options defined in these Help Files will be available to every User.
▪Certain Modules must be registered before their specific Menu Options are displayed.
▪The General Ledger System, Inventory Tracking & Job Costing System, Communications Module and Tech Module are some examples of modules.
❑Quick Access Menu - Like the Backstage Menu System (explained above). the Quick Access Menu system provides complete access to virtually all the Forms, Reports and Set-up/Start-up Procedures within MKMS.
•Each of the Module and Function MKMS Desktop tabs (i.e., Receivables, Payables, Service, Shortcuts) also contains a Menu Icon with a small Drop-Down Arrow that will also display the Quick Access Menu.
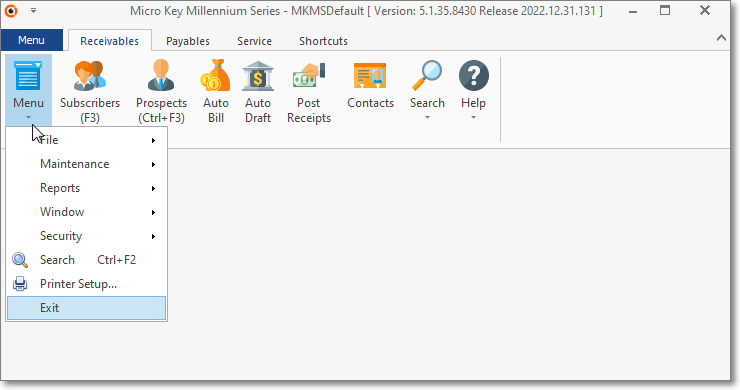
MKMS Desktop - Menu Icon with options shown on the Receivables tab
•Alternately, Right-Click on the MKMS Desktop at any location not within an open Form or any of the MKMS Desktop's Tabs or Ribbon Menus, or Click the Menu Icon to display the Quick Access Menu (see below)
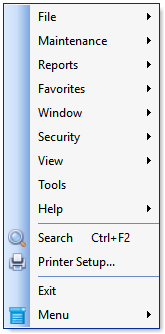
Quick Access Menu options
•All of the Backstage Menu options (and a few more) are available within the Quick Access Menu System
Specialized Function Keys & Menus
❑Function Keys - See the Special Function Keys Chapter Topic for a complete list of all of the available function key actions.
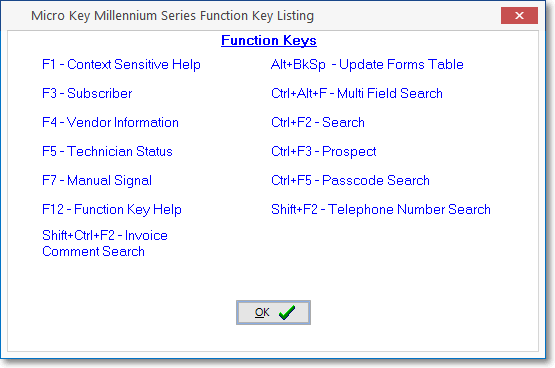
MKMS (internal) Function Key Listing - Other Functions Keys are available
❑Many Forms have their own Ribbon Menus located at the top of the Form which have Icons that are used to access features and sub-menus specifically associated with the currently active Form.
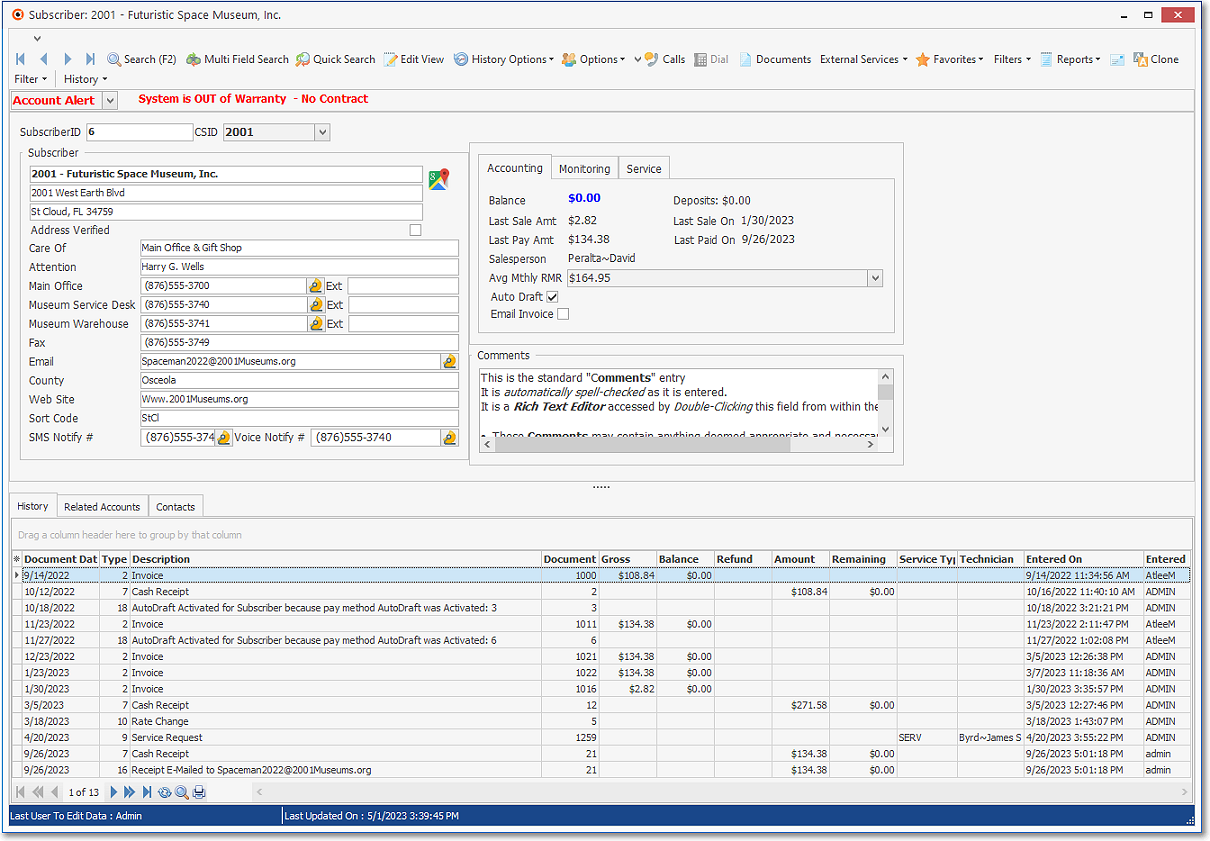
Subscribers Form - Ribbon Menu sections - Navigation and Action Icons
•The MKMS Desktop has various tabs across the top, including the Menu tab on the left to access the Backstage Menu System.
•Forms - Special menus, processes, and functions are available by Clicking the appropriate Icon within the Navigation and Actions sections of each Form's Ribbon Menu
![]()
❖Complete information about the Subscribers Form's Menu sections shown above is contained in the Subscriber Information Chapter Topic and its sub-chapters.
❑Drop-Down Selection Lists and Drop-Down Calendar/Date Entry fields
•Drop-Down Selection Lists - There are often cases where the allowable entry in a field must be selected from a predefined list.
✓These predefined lists may be included with the system, or they may have been user defined (such items might include a list of Employees, Sales Categories, Vendors, etc.).
✓Data entry fields - when attached to a Drop-Down Selection List - have all the available choices which typically were previously User defined as part of a module's Maintenance Entries process.
•Drop-Down Selection Lists may also be attached to a Mandatory Entry Field and if so, it that field will be displayed within a Red box, otherwise when its a regular (optional data entry) field, it will be displayed with a normal White background.
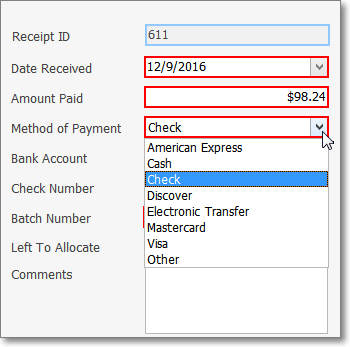
Mandatory Drop-Down Selection List field
•In either case, by Clicking the Down Arrow ˆ button on the right of the field, a Drop-Down Selection List containing a list of all acceptable (usually user-defined) entries/options will be displayed.
✓Type the first letter or two of your desired selection and, as you type, your typed entry will be used to locate the item closest to it.
✓If you do not know what you are looking for and all of the choices are not shown, there is a Horizontal and/or Vertical Slide Bar - displayed when needed - located at the bottom and/or side of the List to allow the User to view all of the data included in all of the columns.
✓Click and Drag the Slide Bar to the right of Drop-Down Selection List to view the entire list of options.
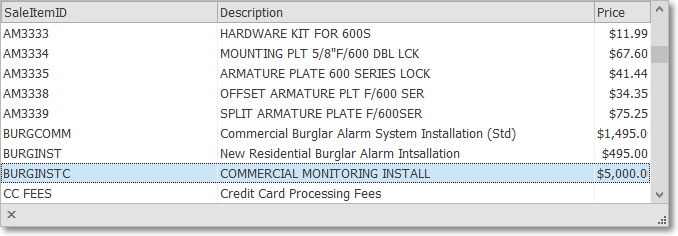
Drop-Down Selection List
✓To make the required selection, Click on it.
•A Drop-Down Calendar/Date Entry field is used to identify and select a specific Date.
a)Click on the Date field and manually enter the desired Date using a MM/DD/YYYY format; or
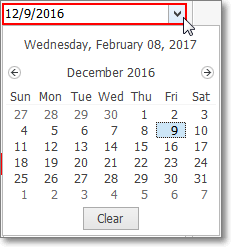
Drop-Down Calendar/Date Entry field
b)Use the Drop-Down Calendar/Date Entry field provided to Choose the desired As Of Date
▪Click the Date at the top of the Drop-Down Calendar/Date Entry field (immediately below the Drop-Down Calendar/Date Selection field - see Sunday, May 01, 2016 in the illustration above) to choose the current Date (i.e., Today).
▪Click the left arrow ![]() to move back one month, or the right arrow
to move back one month, or the right arrow![]() to move forward one month.
to move forward one month.
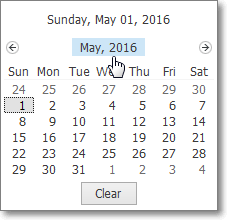
✓Click the Month, Year field ( May,2016 in the illustration above) to display a List with all months.
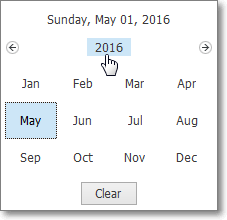
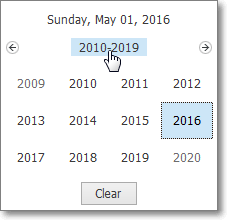
✓Click the Year (in the illustration above, the number 2016 itself) to display a List of Years from which to choose.
❑Edit Rich Text
•Comment fields usually support the Rich Text Editor interface that allows bold, italics and underlines of text, and the selection of Font type, it's size, color, and highlight.
•Double-Click the field to see if the Edit Rich Text dialog appears.
•See the Rich Text Editor Chapter Topic for detailed information about this feature.
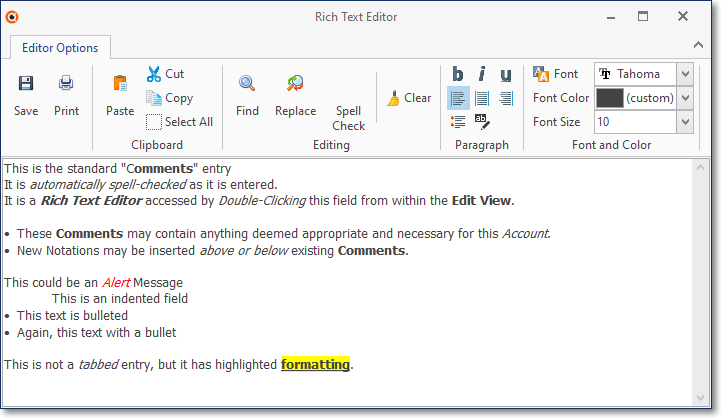
Rich Text Editor dialog
❑Reports and Processes
•Finally, all of this data entry must have a purpose. And it does.
•Whether it's billing recurring revenue in hours rather than days; getting your bills paid quickly, easily and on time; properly managing your service department and tracking your inventory, costs, profits and revenue easily and consistently, it's knowing that you finally have control of your business operations that makes this effort worthwhile.
•So in the end, Reports and special Processes help you run your business in the best, most efficient and professional manner possible.
❑Individual User's Settings
•The User Settings functionality "remembers" each User's specific usage selections.
✓Individual User Settings remember certain Form locations (any change in size settings), most recently selected Report Options, any Drop-Down (field to search by) Selection List, and most recently entered search character entries.
✓All these options are stored based on the User's Log In Name, therefore the User Settings are unique for each User.
✓If operating on a Network, and have Users who move from station to station on occasion, User Settings follow those Users around the network, regardless of what workstation the User has actually logged on to.
❑More Features - The following Chapter Topics contain important additional information on how other useful MKMS features are used:
1.Information Processing Forms - Forms consist of the program's background area, current Form's title, data entry fields, and any other information presented by the MKMS for the function or process you requested.
2.Tabbed Forms - Some Forms may have tabs which provide space for additional information about the master subject. These tabs are used to provide additional space for information about the master Form's subject.
3.Custom Report Formats - When printing Invoices, Service Request Forms, Subscriber Statements and Proposals from their corresponding Reports menu, the format used to print those Invoices, Service Request Forms, Subscriber Statements and Proposals may all be modified using this Custom Reports dialog.
4.Printing to a File - Some Reports must be saved as they looked Today. Generally this is because the report is a "snap shot" report of Today's current status and would be different "tomorrow".
✓These "snap shot" reports should be "printed" to a file - preferably a "pdf" file - so that it can be viewed at any time in the future but with the information as it existed on the exact day the report was originally run.
5.Advanced Search Dialog - The Advanced Search Dialog provides the User a method to locate and Select a specific record that is contained within a table in the MKMSDefault (and any currently selected Multi-Company) database.
6.Rich Text Editor - Allows you to enter bold, italicized and underlined text, and the individual selection of Font type, it's size, color, and to highlight areas of text.
7.Set the List Order of a Drop-Down Selection List - Setting the order that the field name' appear in a Drop-Down Selection List, established on a User by User basis.
8.Re-Order Table View Header - You may Re-Order Header Names, and therefore the data in those columns, in the Table View on most Maintenance related Forms.
❑Special Company Settings allow you to customize the behavior of certain features within MKMS.
•These Special Company Settings establish rules on a Company wide basis.
✓See the User Options, Company and Company Settings Chapter Topics for details on the Special Company Settings.
❑What's Next?
•Before you can continue, you must Establish your System Preferences.
•By doing so, you will define important information for MKMS that will be used by everyone accessing the module(s) you are responsible for setting up.