❑The Payment Method Types Form is used to identify:
a)The various types of Payment Methods which may be received and processed from Subscribers
b)The associated default Batch Number preface (see Batch Number Assignment) discussion in the Receipts chapter for more information) that should be used to construct the Batch Number assigned to a Receipt record, particularly when executing the Post Auto Draft and E-Payments processes.
c)The Credit Card Surcharge (once implemented) which may be assessed on charges made via each Payment Method
•The supported Payment Method Types have been predefined.
❑Creating a Payment Method Type:
a)From the Backstage Menu System Select Maintenance and Choose General and Click the General Maintenance option which displays the Maintenance Menu or,
b)From the Quick Access Menu, Select Maintenance and Choose General Maintenance to display the Maintenance Menu.
•Once the Maintenance Menu is displayed, Select Receivables and Choose Payment Method Types.
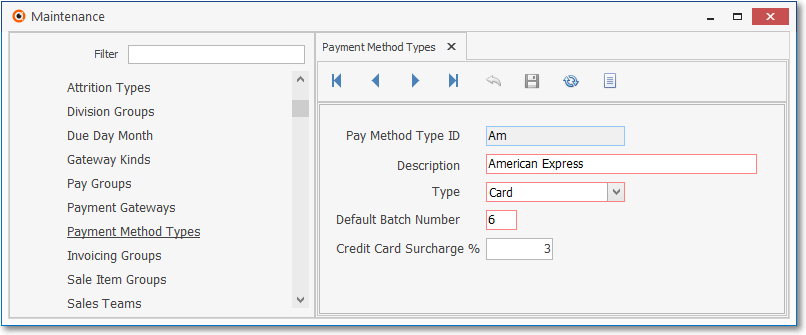
Payment Method Types Form
✓This Payment Method Types Form may be Re-sized by Dragging the Top and/or Bottom up or down, and/or the Right side in or out.
•Navigation Menu - The Navigation Menu is located at the top of the Payment Method Types Form.
![]()
✓This Navigation Menu provides the normal Record Movement, plus the Cancel, Save, Refresh, and List options.
•Record Editing View - The details of the currently selected record are displayed below the Navigation Menu at the center (Main Body) of the Payment Method Types Form.
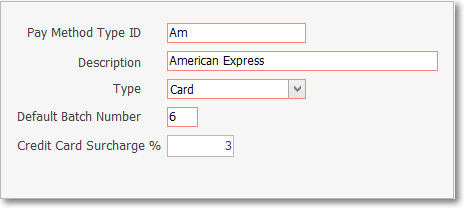
Payment Method Types Form - Record Editing View
•You may update/modify certain information on a Payment Method Type entry iwithn the Record Editing View.
✓Payment Method Type ID - The data in this field may not be changed
✓Description - The Description of this of the Payment Type may be modified as long as this Payment Method is not effectively changed
▪The Description may up to 30 characters in length and include upper and/or lower case letters, numbers, spaces and normally used punctuation marks.
✓Type - The data in this field should not be changed
✓Default Batch Number - You should use the default prefix number for the selected Payment Type (1 - 9) which will be inserted (along with the MMDD suffix) when entering E-Payments and using Fully Automated Recurring Revenue Billing is posting the Subscriber's Payments.
✓Credit Card Surcharge % - When the Credit Card Surcharge functionality has been properly setup, this field will be available and is used to enter the actual Surcharge % Rate, when appropriate
✓Click the ![]() Icon to record and changes made to this Payment Method Type.
Icon to record and changes made to this Payment Method Type.
![]() List Icon - The Navigation Menu also has a List option which provides a tabular view of these Payment Method Type records.
List Icon - The Navigation Menu also has a List option which provides a tabular view of these Payment Method Type records.
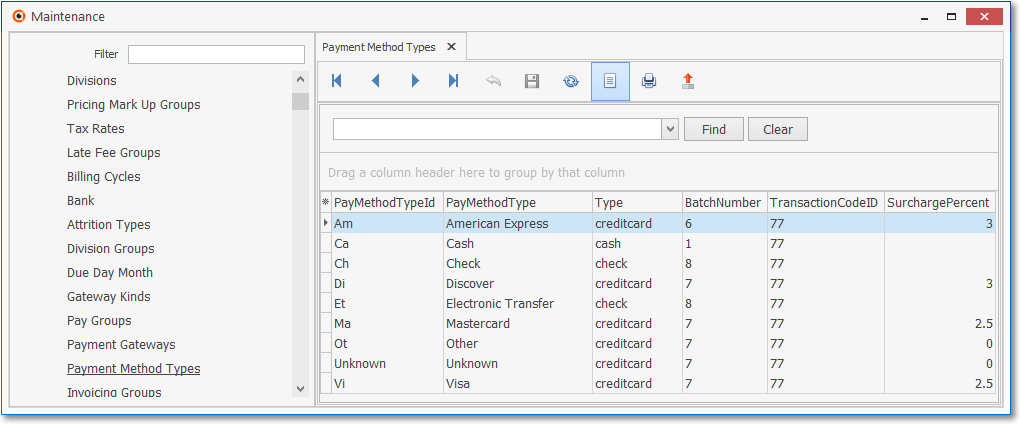
Payment Method Types Form - List View
•Columns - You may also Select which columns of data are to be displayed:
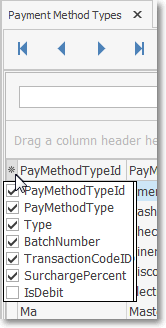
Available Columns
✓Click the asterisk (¬) at the left of the data grid's Header row (see the mouse pointer in the illustration above) to display a list of all of the column names - and associated data - which may be displayed.
✓By default, all Column Names will be Checked.
✓Remove the Check mark (Click on the Check to remove it) to hide that column of data from the data grid.
❖See the Grid & Lists - Print Preview - Export Data chapter for complete information on using the List View, including its Export & Print options.
✓The columns of listed Grid Data may be rearranged, filtered, sorted, and exported as a PDF file and/or an Excel formatted file.

✓Find - Enter text to search for a specific record, then Click the Find option.
✓Clear - To remove the text to search for entry, Click the Clear option

Navigation Menu shown with the Icons for List, Export and Print
![]() List Icon - Click the List Icon again to Close the List View and return to the Record Editing View.
List Icon - Click the List Icon again to Close the List View and return to the Record Editing View.
![]() Export Icon - Click the Export Icon to create (one of there types of) a spreadsheet compatible file containing the Grid Data as it is currently organized and filtered.
Export Icon - Click the Export Icon to create (one of there types of) a spreadsheet compatible file containing the Grid Data as it is currently organized and filtered.
![]() Print - Click the Print Icon to display the Print Preview Form from which a custom report may be designed and "printed" as an Adobe® PDF File.
Print - Click the Print Icon to display the Print Preview Form from which a custom report may be designed and "printed" as an Adobe® PDF File.