❑The Time Sheet Form is used to record - and therefore account for - the Technician's Time worked for each Work Order on which they worked (or the Time that was required to complete some other project).
•The Time Sheet Form is accessible within MKMS as follows:
a)From the Service Tab on the MKMS Desktop Click the Time Sheet Icon, or
b)From the Backstage Menu System Select Maintenance and Choose Service Tracking then Select the Time Sheet option, or
c)From the Quick Access Menu, Select Maintenance and Choose Service Tracking then Select the Time Sheet option
Time Sheet Form for maintaining Technician's Time Sheets
❑Understand the importance of Time - Entering and Reporting Time Sheet information:
•Time may be entered using this Time Sheet Form
•Time, in the form of Job Costing charges for Labor, is entered using the Inventory Tracking & Job Costing module's Job Costing Form's Labor tab.
•Time may also be entered using the Labor Drop-Down Info Box on the Work Order Form.
✓That Labor Drop-Down Info Box allows you to assign both the Labor Hours that were Used, and the hourly Pay Rates to be Charged, to any number of Technicians.
✓See the Completing a Work Order and Labor Drop-Down Info Box chapters for detailed information.
•Time, once recorded, may then be reported using the Time Sheets Report.
➢Note #1: There are some Security and Access Management issues that may arise, depending on the User Rights and/or Time Sheet Options you've been assigned on the Security tab in the Employees Form - that were either granted to you individually, or as part of being assigned to a specific Security Group - that may have to be addressed while selecting the Technician whose Time Sheet you want to update.
✓The User must have Read, Write, Update and Delete Access Rights established for the Time Sheet Form Name.
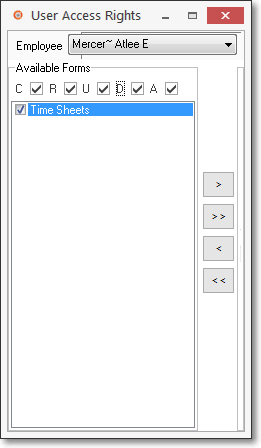
Granting access to Time Sheets
➢Note #2: The User's Employee record must permit access to the Time Sheet dialog (has the Display Rates? and Manage Time Sheets? boxes Checked in the Time Sheet Options section of the Security tab).
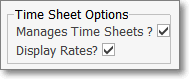
Time Sheet Options
❑To manually enter Time Sheet information:
a)From the Service Tab on the MKMS Desktop Click the Time Sheet Icon, or
b)From the Backstage Menu System Select Maintenance and Choose Service Tracking then Select the Time Sheet option, or
c)From the Quick Access Menu, Select Maintenance and Choose Service Tracking then Select the Time Sheet option
•Click the Insert ![]() Icon to enter Time Sheet data for an Employee:
Icon to enter Time Sheet data for an Employee:
✓Technician - Use the Drop-Down Selection List provided to Choose the Technician whose Hours are being recorded.
▪If the selected Technician does not have Pay Rates defined in the Rates tab on the Employees Form, no rate can be entered
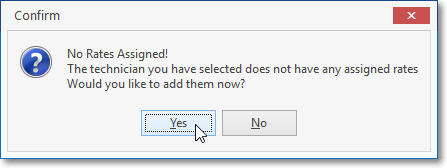
No Rates Assigned? - Would you like to add them now?
▪To assign selected Technician does to the selected Technician answer Yes.
▪Complete the Add Technician Rate dialog appropriately and ClickOK to save this information
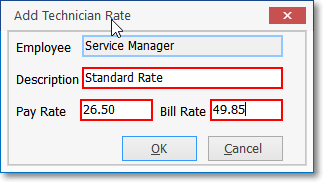
Add Technician Rate dialog
✓Date - Enter the Date when the work was performed.
✓Rate - Use the Drop-Down Selection List provided to Choose the appropriate Pay Rate for these Hours worked.
✓Work Order - Optionally, use the Drop-Down Selection List provided to Choose a Work Order number, if appropriate.
▪There are circumstances where an Employee's Time needs to be charged or accounted for - but not necessarily charged to a Work Order.
▪Therefore, this is not a mandatory field.
▪If you are selecting a Work Order, use the Drop-Down Selection List which includes the Work Order Number, Subscriber Name, CSID, and Service Type.
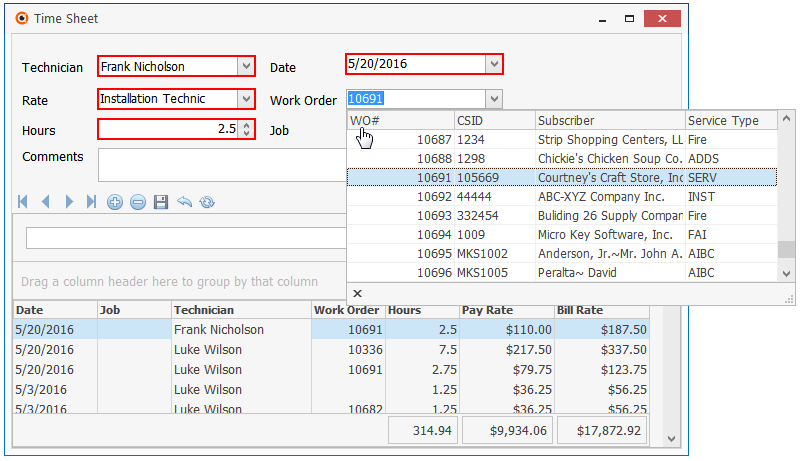
Work Orders List is listed by WO#
▪The Work Order Drop-Down Selection List may be ordered by the Work Order Number, Service Type, the Subscriber's CSID, or by the Subscriber's Name.
▪Click the Header Name of the Column (see the hand shaped pointer in the illustration above) that should determine the sorted order of the Work Order List.
▪Click the desired Work Order Number (see the mouse pointer in the illustration above) to select it.
✓Hours - Use the Up & Down arrows to enter Hours and Quarters of Hours, or simply enter the number of Hours and Tenths of Hours, if that level of refinement is needed.
![]()
✓Job - Optionally, use the Drop-Down Selection List to Choose a Job number, if the time and charges should be charged to a specific Job identified in the Inventory Tracking & Job Costing System.
▪When selecting a Job, the Drop-Down Selection List includes the Job Number, Description and Subscriber Name.
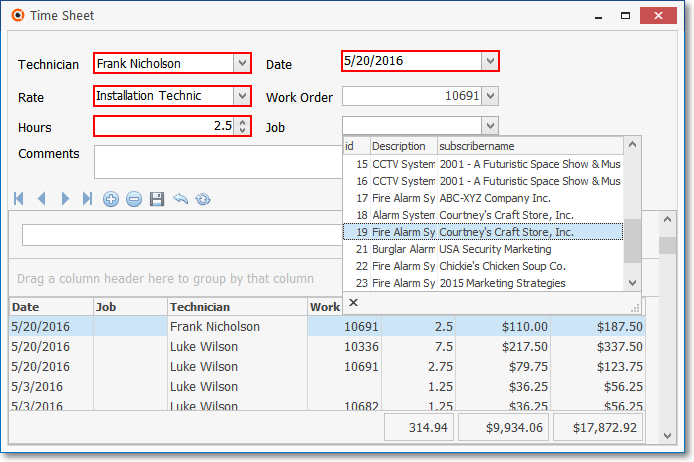
Job Number list with all optional sorting order fields
▪The Job Drop-Down Selection List may be ordered by the Job Number, the Description of the Job Type, or by the Subscriber's Name.
oAs in the Work Order field explained above, you may Click the Header Name of the Column that should determine the sorted order of the Job List.
✓Comments - Enter any additional information to clarify this Labor Time charge.
✓Click the Save ![]() Icon to record this entry
Icon to record this entry
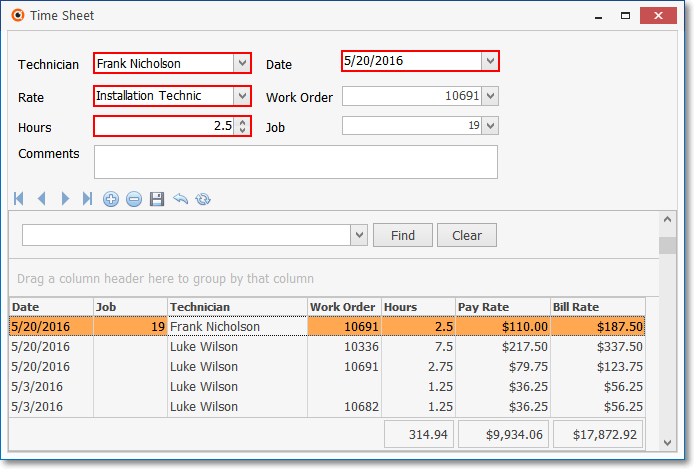
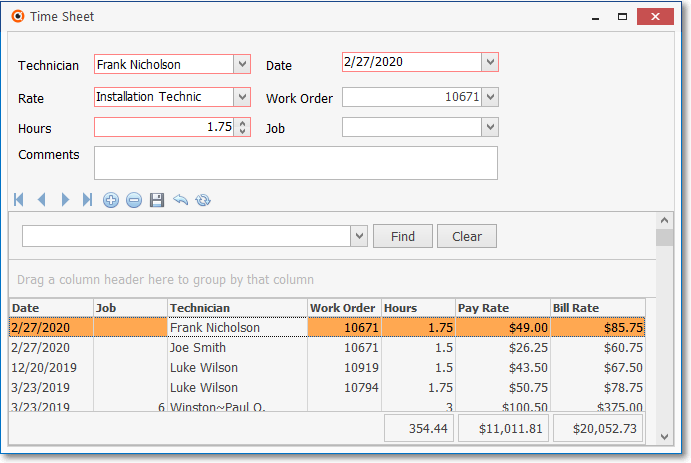
Time Sheet Form showing Time Entry information
✓Data List - Highlights - with an Orange background - the currently selected Time Entry
▪The Time Sheet data is sorted by Date (newest to oldest) and within date, by Name (as entered in the Employees Form).
▪The Date, Job, Technician, Work Order, Hours, Pay Rate and Bill Rate will be listed.
▪If Manage Time Sheets? box is Checked on the Security tab, but the Display Rates? box is not, the Pay Rate and Bill Rate fields will not be included in the list.