Providing Security for the Company's Information - An Overview
❑About the System Administrator:
•Your Company's System Administrator is the person given the top most level of access rights to the system's (i.e., MKMS, MKMSCS and associated Utilities) Sybase SQL Anywhere Client Server Database.
✓If you are not logged in as the System Administrator (Admin), you will not be able to add, delete or modify the Security settings, nor assign/change form access, access rights, and functionality permissions (e.g. reports and processes).
✓These Security settings (specifically User Access Rights and Employee Group Access Rights) must be established by a System Administrator.
❑The System Administrator, using the Employee Groups Form, must define a set of Employee Groups - each of which establishes the Access Rights authorized for a specific set of one or more Employees - who will then be assigned to one of those Employee Groups.
•Once Employee Groups are identified (added in MKMS):
1.The Company's Employees should be identified (added in MKMS):
2.Employees should then be assigned to the appropriate Employee Group and given - if required - a Database User Name.
a.That Employee information - including assignment to an Employee Group and a Database User Name are entered in the Security tab of the Employee Form
b.Those Employee Group Access Rights may be established on a Group by Group basis and within that Group, on a Form by Form basis.
c.Normally, this Employee Group assignment is the way an Employee gets their Access Rights
3.For each Employee who will be permitted to Log In to the system, the System Administrator must create a User record - using the Add/Delete Users Form - for each Employee who will be allowed to Log In
a.This User record entry will include both their User Name (as identified in the Security tab of the Employee Form)
b.A database Password (see "UL® Password Requirements" below) may also be assigned which he/she will use during that Log In
4.The User Access Rights Form will allow the System Administrator to assign specific (e.g., different, additional, less) Access Rights which re-sets the User's ability to Create, Read, Update, and/or Delete any data on a specific Form that accesses information within the Sybase SQL Anywhere Client Server Database; and which must also be Audited for those actions (if your Company must comply with the Third Edition UL® 1981 Standard).
a.A Form is any screen within the system that allows for entry, retrieval, and/or reporting of Data)
b.Therefore, Access Rights may be selectively assigned to an individual User for a specific Form using the User Access Rights Form
c.These User Access Rights assignments override what was given to the Employee based on their previously assigned Employee Group.
❑UL® Password Requirements:
•As part of properly implementing the Third Edition UL® 1981 Standard, specifically for compliance with section 6.2 Sign-on Security and 6.3 (1-7) Five Security Levels of the Third Edition UL® 1981 Standard:
6.2.1 - The Employee's Password (i.e., Passcode) shall consist of the following:
a)A Username of at least six (6) characters
b)A Password which shall consist of a minimum of six alpha-numeric characters with at least one alpha and one numeric character
6.2.3 - Any modification made to the database shall be logged with a unique personal identification (Employee ID) belonging to the person performing the modification).
i.To comply with 6.2.3 of theThird Edition UL® 1981 Standard, the Audit box must always be Checked for All Form Names when User Access Rights are assigned to any Employee or Employee Group
ii.Users cannot turn auditing off when the UL® Version is Registered (i.e., Active).
iii.In the Employee Groups and/or the User Access Rights Forms - when the UL® Version is Active -, the Audit option box will always be Checked on all Form Names.
iv.No User will be able to remove that Check Mark.
6.2.6 - The automation system shall prevent:
a)Repeated passwords, used within the last six changes;
b)Passwords that are a derivative of the user name(s); and
▪[e.g., Password cannot contain 50% of a Username so a User "Stacy" cannot have a Password of "STA3841"]
c)Passwords that are simply letters or numbers in order (e.g.: abcd, 1234, etc.).
▪[e.g., any type of sequence is prohibited such as 'ab', '34', '89', 'xy']
6.3 (1-7) - A minimum of Five Security Levels must be defined and the appropriate one assigned to each specific Employee based on that Employee's Need for Access.
•Audit - Setting the Audit Access Rights for Form Names: Access Rights - that are established using the Employee Groups and/or the User Access Rights Forms, and/or the Security tab on the Employee Forms - for assigning Access Rights to Forms, must Check (turn on) the Audit Access Right for the All Form Names which have access granted to any Employee using those User Access Rights, and/or the Employee Groups, and/or the Security tab on the Employee Forms.
✓This will occur automatically when the UL® Version is active.
✓Specific Audit Reports are used to comply with 6.2.3 - (relating to Tracking User Changes) of theThird Edition UL® 1981 Standard (i.e., Any modification made to the database shall be logged with a unique personal identification (Employee ID) belonging to the person performing the modification).
❑Creating Employee Groups
•Employee Groups are created so a default set of Access Rights based on the needs of a specific type of Employee may be identified for each Employee.
✓Once defined, assigning the appropriate Employee Group Name to each Employee record (entered in the Security Access Group field in the Security tab of the Employee Form) will allow that Employee to inherit all of the Access Rights granted to that (assigned) Employee Group.
•The Employee Group Form allows you to define which Access Rights will be available to the Employee (on a Form by Form basis) by assigning the appropriate Employee Group Code to that Employee.
✓There are several default Employee Groups already defined for you.
❖This is a mandatory Third Edition UL® 1981 Standard requirement.
•So, once Employee Groups are established, assigning an Employee Group to an Employee (in the Security Access Group field on the Security Tab of the Employee Form) allows that Employee to inherit all of the assigned Employee Group's Security and Access Rights.
✓Add as many Employee Groups as may be required.
✓The system will assign the Employee Group ID number automatically.
•Defining the required Employee Groups information:
✓To open the Employee Groups Form:
a)From the Backstage Menu System Select Maintenance and Choose Employee Groups to access this Employee Groups Form, or
b)From the Quick Access Menu, Select Maintenance and Choose Employee Groups to access this Employee Groups Form.

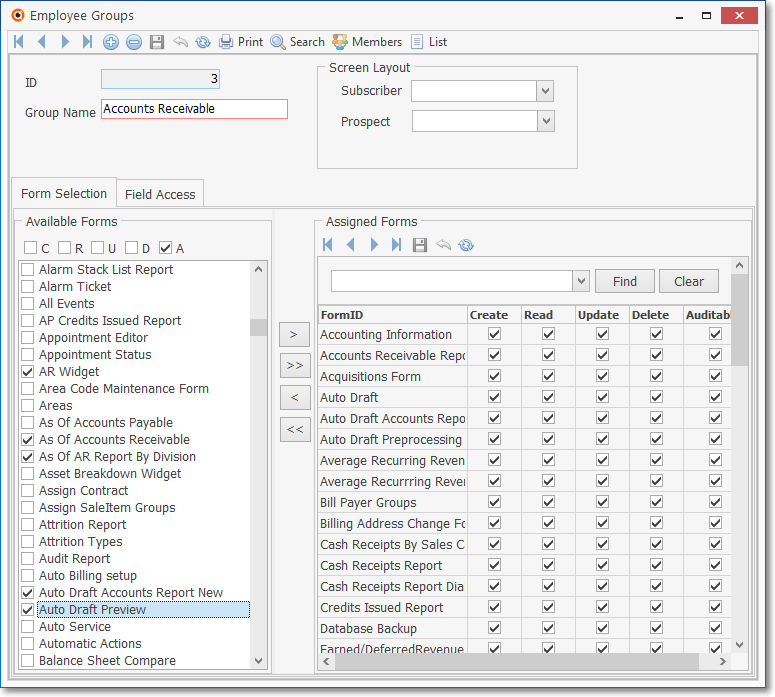
Employee Groups Form with Members data displayed
✓To see a list of the Employee Group's Members, Click the Members button located at the top of the Employee Groups Form (see insert in the screen illustration above - on the right).
❑Form Selection tab - Identify those Forms to which the Members of each Employee Group are to be granted Security and Access Rights.
•Understanding Form Names:
✓Almost every Screen Page within the Micro Key Millennium Series (MKMS) - whether used for data entry, look-up, or printing a report - has an internal Form Name assigned to it.
✓These internal Form Names may, or may not, be displayed as the Form's Title, when the Form is viewed within the MKMS program.
✓So why is this important?
▪Form Names, along with the permitted Forms Based Access Rights identified here, are used to assign Security & Access Management Rights to each of your Employees.
•Defining the Employee Group's Access Rights:
✓The body of the Employee Group Form presents a listing of all Available Forms in MKMS (see the Form Names chapter for detailed information about these Form Names) on the left.
✓At the top of that Available Forms list are Check boxes that allow you to define what Security Access Rights you want to provide for the currently selected Employee Group.
•Understanding Access Rights - You may allow or disallow specific Security Access Rights for each selected Form Name
✓Those Security Access Rights are:
▪C - Create - Allow the assigned Members of this Employee Group to Start a new record
▪R - Read - Allow the assigned Members of this Employee Group to Read an existing record
▪U - Update - Allow the assigned Members of this Employee Group to Modify an existing record
▪D - Delete - Allow the assigned Members of this Employee Group to Delete an existing record
▪A - Auditable - Enable the Audit function on this Form for this Employee Group.
✓As noted earlier in this chapter, to comply with Section 6.2.3 - Track User Changes of the Third Edition UL® 1981 Standard [i.e., Any modification made to the database shall be logged with a unique personal identification (Employee ID) belonging to the person performing the modification]:
a)Users are not be allowed to turn auditing off when the UL® 1981 Version is Registered (i.e., Active).
b)In the Employee Groups Form. when the UL version is Active, the Audit option box will be Checked on all Form IDs.
c)No User will be able to remove the Audit Check Mark.
❑To define an Employee Group:
•From the Main Menu Select the Maintenance Menu and Choose the Employee Groups option view the Employee Groups Form shown above.
✓This Employee Groups Form may be Re-sized by Dragging the Top and/or Bottom up or down, and/or the Right side in or out.
•Navigation Menu - The Navigation Menu is located at the top of the Employee Groups Form.
![]()
✓This Navigation Menu provides the normal Record Movement, New, Edit, Delete, Cancel, and Save options; as well as special Print, Search, Members and List options.
✓For more information about the special functions, see the Employee Groups Report chapter, the "Using the Employee Groups Search Function" and the "Viewing the list of Members of the selected Employee Group" sections below.
•List View option - Click the List Icon on the Navigation Menu at the top of the Employee Groups Form to display a tabular (spreadsheet style) Record Listing of the currently defined Employee Groups.
✓Each column's Header Name describes the data contained in that column.
▪Clicking on a Header Name will set the order in which the Employee Groups will be listed.
▪Clicking on the same Header Name will set the order in the opposite direction (ascending vs. descending).

▪The Arrow next to the Header Name indicates the column that is determining the sorted order of the Grid Data.
o~ indicates lowest to highest (a-z or 1 - 9)
o€ indicates highest to lowest (z-a or 9-1).
•Adding an Employee Group
✓Click the Add Icon to create a new Employee Group,
✓A complete list of the Form Names will immediately be displayed in the Available Forms column.
✓ID - This record number is assigned by the system when the entry is initially saved.
✓Group Name - Enter a Name for the new Employee Group
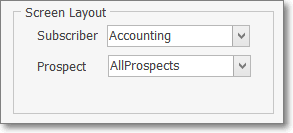
▪Subscriber - Use the Drop-Down Selection List provided to Choose the Screen Layout definition that should be implemented when a Member assigned to this Employee Group accesses the Subscribers Form.
oTo revert to the system Layout, Delete the Screen Layout Name
▪Prospect - Use the Drop-Down Selection List provided to Choose the Screen Layout definition that should be implemented when a Member assigned to this Employee Group accesses the Prospects Form.
oTo revert to the system Layout, Delete the Screen Layout Name
✓Click the Save Icon to record this Employee Group.
✓You may request to have Form Names - which have already been assigned to a previously defined Employee Group - moved to the Assigned Forms column by Clicking Yes when asked.
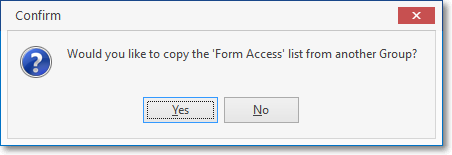
✓If you did Click Yes, Select the appropriate Employee Group Name from the pop-up list provided.
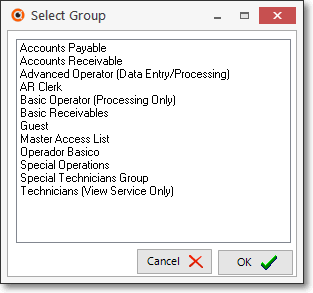
✓Click the OK ü button and those Form Names - and the associated Access Rights assigned to the Selected Employee Group - will be inserted into the Assigned Forms column.
•Choosing the Assigned Forms - Next, Check which of the (other) listed Available Forms should be assigned to this new Employee Group

Check Form Names for the new Employee Group
✓Check what type(s) of Access Rights will be assigned to each of the Selected Form Names for this Employee Group
![]()
Check the allowable Access Rights
•Moving the Selected Form Names to the Assigned Forms column:

✓Click the Right Arrow box (">") to move the selected Form(s) to the Assigned Forms column
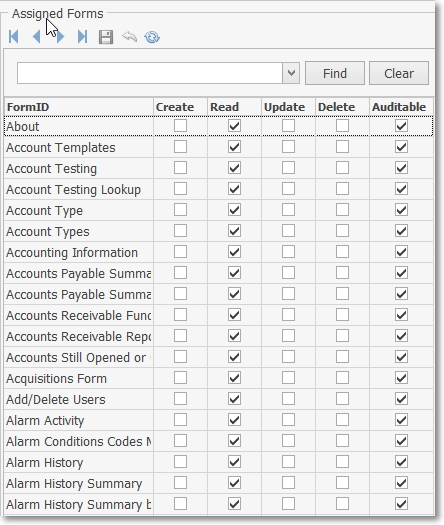
Employee Groups Form
Assigned Forms section on the Form Selection tab
✓They will be saved as part of this Employee Group's set of Form Name Security Access Rights.
✓If this Employee Group requires that some Form Names in the Available Forms list are to be given a different set of rights than others:
▪Check the appropriate Security Access Rights box(es).
▪Check the appropriate Form Names that will be assigned that different set of Security Access Rights.
▪Move them to the Assigned Forms section.
▪Repeat this process for each set of Form Names requiring a different combination of Security Access Rights.
▪Also, see "Copying and Modifying" below.
❑Field Access tab - Certain Forms have an internally maintained list of Fields which may be made accessible or inaccessible on a Field by Field basis.
•When one of these Forms (having this Field by Field access control capability) has been assigned to an Employee Group, that Employee Group - in addition to granting it Access Rights to a specific set of Forms - may also restrict or allow, on a Field by Field basis, access to specifically identified Fields.
•The Field Access tab - shown below - displays a (sample) Form List containing those Form Names which are among the Assigned Forms (see the illustration above) for the selected Employee Group and also provide a Field List containing the available Field by Field access permission options.
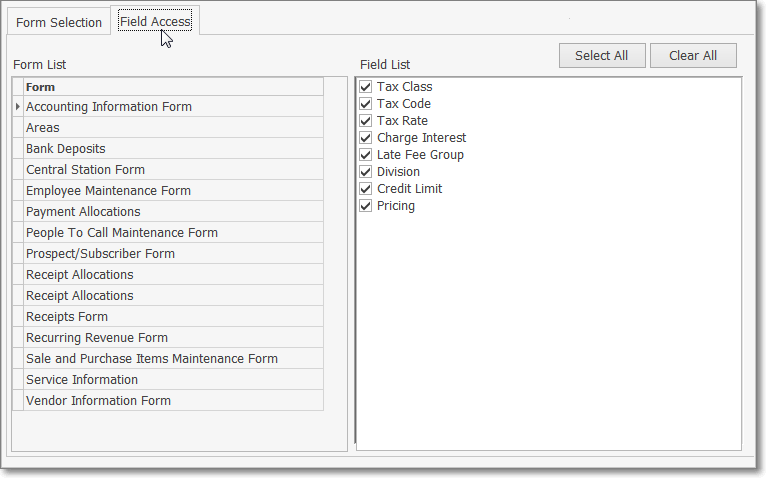
Employee Groups Form - Field Access tab
•This Field Access tab has two columns of information:
1.Form List - This is the list of Form Names to which the currently Selected Employee Group has Access Rights granted, and also have the Field by Field permission capability implemented.
2.Field List - This is the list of data entry Fields which exist in the Form currently selected in the Form List column (in the Field Access tab) - with the Field by Field access permission option implemented
•By default, all of the data entry Fields for a selected Form will be Checked. indicating that Access Rights to these Fields are not denied.
✓Sometimes an Employee Group must have access to a Form but does not require total access to all of the Fields within that Form.
✓In this case, Un-Check any of the items in the Field List for which Access is to be denied to this Employee Group.
✓The Forms which have this Field by Field access permission option are listed based on the Group Name which has been selected.
•There are two buttons located on the Field Access tab:
1.Select All - Click this button to Check each Field list item's Check Box.
2.Clear All - Click this button to remove the Check from every each Field list item.
•Field Access usage example:
➢If your Company wants to restrict access to Passwords on the Central Station Data section of the Monitoring tab, but allow access to the other Fields on this Form, simply remove the Check from the Password item.

Employee Groups Form - Field Access tab - Password access denied
➢The result would be that no Employee assigned to this Employee Group would have access to that field.
➢Note: It is important to remember that when an Employee has specific rights assigned by using the User Access Rights Form
Those rights granted or restricted by using the User Access Rights Form will override those granted or restricted on the Employee Groups Form!
Make sure when restricting or granting any rights, or access to a Form or a Field, that those restricted or granted rights are not negated in the User Access Rights Form
❑Viewing the list of Members of the selected Employee Group:
•Every Employee who needs access to the database must be assigned to a Security Access Group in the Security tab of the Employee Form.
✓Those Security Access Groups are actually the Employee Groups created using this Employee Groups Form.
✓Each time an Employee is assigned to a Security Access Group, by default they become a Member of one of these Employee Groups.
![]()
•To view the Members of the currently Selected Employee Group, Click the Members Button at the top of the Employee Groups Form.
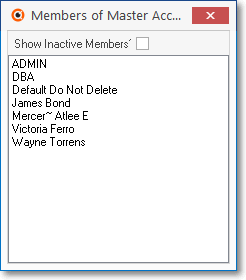
•The Members List dialog will be displayed.
❑Employee Group Report - Click the Print Button on the Employee Groups Form to open the Employee Group Report dialog.

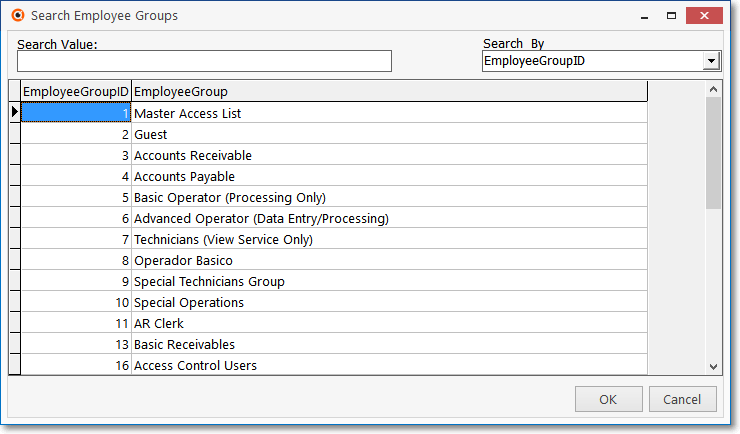
❑Search - To locate a specific Employee Group, Click the Search Button to open the Search Employee Group dialog.
❑Copying and Modifying the default groups or previously defined groups of Security Access Rights:
•Rather than modifying any of the default security access sets, add a new Group Name and then copy the set that best matches the security settings you want to define.
•The ability to Copy an Employee Group's Security Access Rights to another Group is useful when defining multiple groups that have similar (but not equal) access needs.
•To do so, start by Adding a new Group Name.
•You will be asked if you want to copy from the Select Group listing provided.
•Answer Yes if you want to start with a predefined set of Forms, No if you want to make an entirely new set.
•If you answered Yes, use the Select Group Form to select the Group that represents the best match for the new group you are defining.
•Click OK to save the selection.
•A complete listing of some or all of the Employee Group information is available in the Employee Groups List.
❑Next, if you have not already done so, enter your Employees.
04/28/2021