❑The Check Register lists all Check Numbers and/or Receipt IDs that have been recorded within a designated Date Range, including Payments, Receipts and Bank Transactions, as well as Hand Written Checks, those Check Numbers that were Voided, and any Bank Transactions that would affect the Bank Account Balance (i.e., Bank Transfers) - for a selected Bank or for all of the Bank Accounts that have been defined.
•There are two ways to access the Cash Requirements dialog:
a)From the Backstage Menu System Select Reports and Choose Payable Reports, or
b)From the Quick Access Menu, Select Reports and Choose Payable Reports.
✓Then, Select Check Register.
❑Understanding the Check Register Report versus the Account Register Form
•This Check Register report is presented in same same way as a typical Bank Statement is formatted with reductions from your Bank Account's Balance shown as Debits and additions to that Account's Balance shown as Credits.
✓General Ledger System Users who compare these Transactions to those corresponding Financial Transactions reported on the Account Register Form will see them in reverse (i.e., additions in an Account's Balance are shown as Debits and reductions to that Account's Balance are shown as Credits).
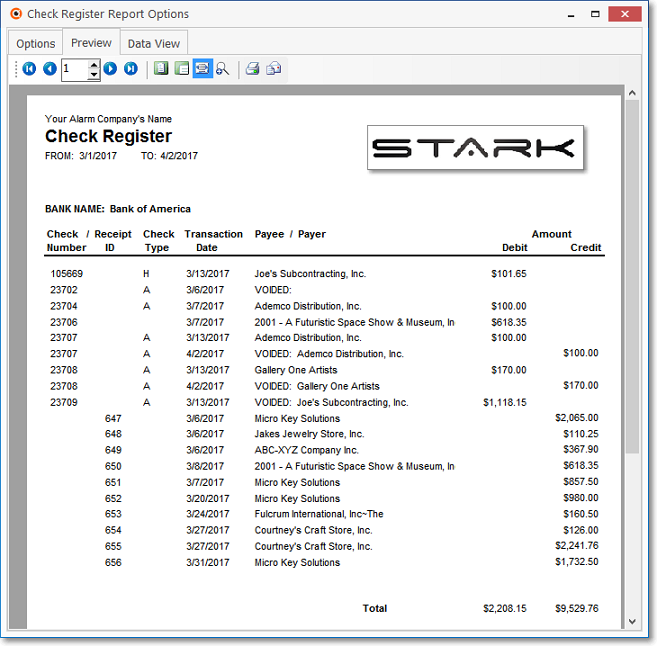
✓Voided Checks - The Check Register Report will show the Voided Check with the original date of the Check and its Amount in the Credit column; and that Voided Check Amount will also be listed as an additional entry in the Debit column.
•OK, so now we will explain something that only some Users - particularly General Ledger System Users - will want to know:
✓Why is there a difference?
▪Because the Check Register is reporting from the Bank's point of view for these Financial Transactions, not your Company's view.
▪If you put money in a Bank Account, that Bank owes your Company that money and must eventually pay it back: therefore it's a Credit (Liability) posting on their end as long as they are holding your Company's money.
▪Conversely, if you write a Check and the Bank cashes it, this would be a Debit posting (of their Liability Account) for them because they did pay you back and no longer owe you that money.
❑Check Register Report Options: There are three tabs on the Check Register Report dialog.
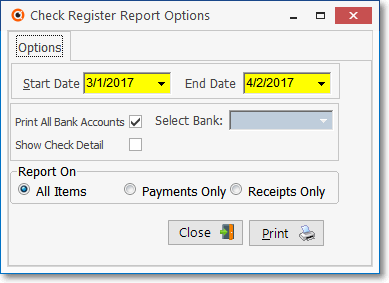
•Options - Initially only the Options tab is shown (until you make your Options selections and Select Print).

Check register Report - Options tab
✓Specify a Date Range for this report:
▪Start Date - By default, it will be the First Day of the most recently completed Month.
oUse the Drop-Down Calendar/Date Entry field to Choose a different Start Date.
▪End Date - By default, it will be Today.
oUse the Drop-Down Calendar/Date Entry field to Choose a different End Date.
✓Print All Bank Accounts - The default, Print All Bank Accounts is Checked.
✓Select Bank: - To specify one Bank to be reported:
▪Un-Check the Print All Bank Accounts box
▪Use the Drop-Down Selection List to Choose the desired Bank.
✓Report On: Click the appropriate button:
▪All Items - By default, all Payments and Receipts (for all Banks, or a selected Bank) which were posted within the specified Date Range will be included.
▪Payments Only - Click this button to list only those Payments (for all Banks, or a selected Bank) which were posted within the specified Date Range.
▪Receipts Only - Click this button to list only those Receipts (for all Banks, or a selected Bank) which were posted within the specified Date Range.
➢Note: Bank Transfers entered in the Bank Transactions Form are listed in the Check Register Report as follows: the Bank Transactions representing the Amount of the Bank Transfer are reported as a Credit entry for the Bank from which the Amount was taken, and as a Debit entry for the Bank which received the Amount of that Bank Transfer) .
✓Print - Click the Print button ![]() to Preview and optionally Print (to a File or a Printer) this Check Register Report.
to Preview and optionally Print (to a File or a Printer) this Check Register Report.
✓To Exit this Report dialog, Click the Close button ![]() toward the bottom of the Options tab.
toward the bottom of the Options tab.
•Preview - The Preview tab presents the report which resulted from the Options selected above.
✓Up Arrow/Down Arrow - h Moves the report up one line, i Moves the report down one line.
✓Page Up/Page Down - Moves the report to the previous or next page, respectively.

Check Register Report - Preview tab
✓Home - ![]() - Using either the screen Icon or your Keyboard's Home key, moves the report to the top of the first page.
- Using either the screen Icon or your Keyboard's Home key, moves the report to the top of the first page.
✓End - ![]() - Using either the screen Icon or your Keyboard's End key, moves the report to the bottom of the last page.
- Using either the screen Icon or your Keyboard's End key, moves the report to the bottom of the last page.
✓Arrows - The arrows allow you to move back and forth, from page to page.
✓Number - Indicates the page number you are viewing.
▪You may also type in a specific page number, Press 8 Enter and that page will be displayed immediately.
▪If you enter an invalid page number, it will be ignored.
✓Fit To Page - Click the first button after the arrows to size a full page of the report to fit the screen.
✓Zoom To 100% - Click the second button after the arrows to display the page at 100% (of the printed view).
✓Fit To Page Width - Click the third button after the arrows to size the page of the report to fit the full width of the screen.
✓Zoom To Percentage - Click the fourth button after the arrows to re-size the page of the report by percentage.
![]()
▪When you Click the Zoom To Percentage button, the Percentage selector will be displayed.
▪You may then Click the Up or Down ‚ arrows to set the exact amount of Zoom you want.
✓Print - Click the Print button to Print (to a File or a Printer) ![]() the displayed Check Register Report.
the displayed Check Register Report.
✓Email - Click the Email button ![]() to send the Report to an Email Address of your choosing.
to send the Report to an Email Address of your choosing.
✓To Exit the Preview tab and Close this Report dialog Form, Click the Close box ![]() on the right at the top of the Preview tab.
on the right at the top of the Preview tab.
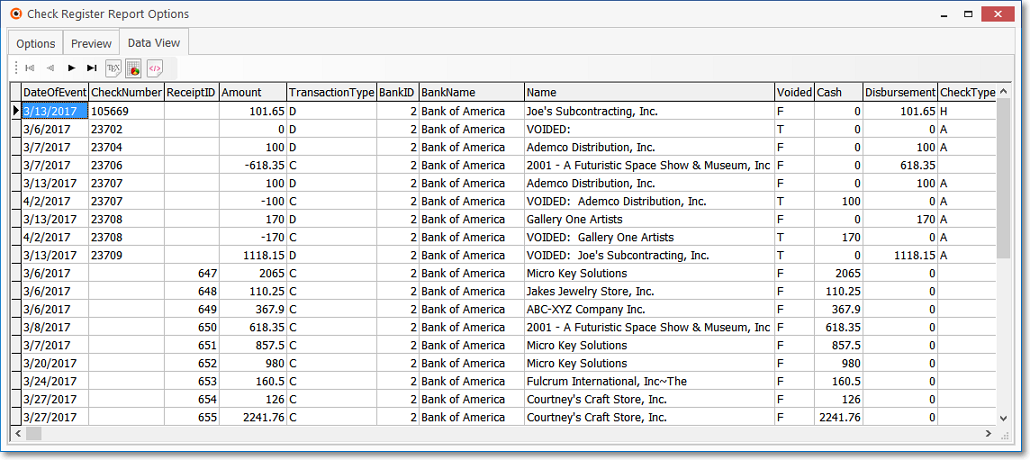
•Data View - This view provides a tabular (spreadsheet style) presentation of the selected data.

Check Register Report - Data View tab
✓Arrows - Click the arrows to move through the record.
✓Export - Exporting the data from this Data View tab (note the "fly-over" help available on these buttons):
▪Export to CSV - Click the first button after the arrows to export the data to a Comma Separated Values (CSV) file format.
▪Export To Excel - Click the second button after the arrows to export the data to an Excel (.xls) file format.
▪Export To Html - Click the third button after the arrows to export the data to an HTML formatted file.
✓To Exit the Data View tab and Close this Report dialog Form, Click the Close box ![]() on the right at the top of the Data View tab.
on the right at the top of the Data View tab.