❑Before configuring the Service Options as described below, identify the Last Work Order Number on the Company Options - General sub-tab within the Company Options tab on the User Options Form.
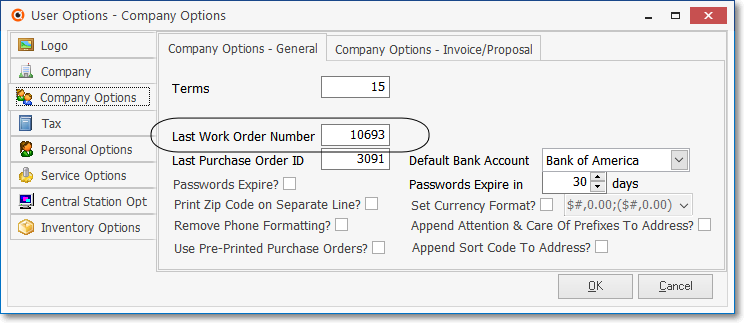
User Options Form - Company Options tab - Company Options - General tab
➢Note: For this discussion - and throughout these Help Files - the term Work Order represents the information entered on a Service Request Form or a Quick Work Order Form for a Subscriber who is requesting service.
❑Service Options must be defined as the first step in setting pup the Service Tracking System.
•To access the User Options Form from the MKMS Desktop,
a.Select the Backstage Menu tab and Choose the Maintenance option, then the General option, then Select User Options; or
b.Access the Quick Access Menu and Choose the Maintenance option, then Select User Options
❑On the User Options Form,
•Select the Company tab and Click the Company Settings bar.
✓Review the default settings of these Company Settings options and make changes where appropriate for your Company's business model:
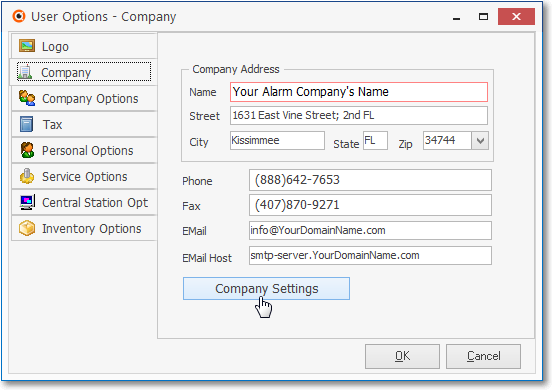
User Options - Company tab - Company Settings bar
a.Restrict Service Creation - This RestrictServiceCreation option may be set to True or False. This setting applies to both the MKMS and MKMSCS applications.
i.If the RestrictServiceCreation option is set to True ("T") when adding a new Service Request or entering a Quick Work Order, the User will need to confirm authorization to make this entry.
ii.If the RestrictServiceCreation option is set to False ("F"), the User will be able to add a new Service Request or Quick Work Order with no additional authorization required, as long as they have the appropriate Access Rights to that Service Request or Quick Work Order Form.
b. Include Auto Service WO - By default, the IncludeAutoServiceWO option is set to False ("F").
i.When opening a Service Request Form, Warning Messages are displayed based on certain circumstances (e.g., Outstanding Balance Due, open (i.e., unfinished) Service Requests exist, their Service Contract has Expired) - except if the only open (unfinished) Service Requests were created automatically using the Auto Service feature.
ii.This functionality may now be kept by setting the new Company Settings option "IncludeAutoServiceWO" to False ("F") to eliminate those Warning Messages when the only open (unfinished) Service Requests were those that were created automatically using the Auto Service feature.
iii.Setting this "IncludeAutoServiceWO" option to True ("T") will turn on Warning Messages (if appropriate) regardless of the origin or type of any existing Service Requests.
c.Default Warranty Terms - By default, the Value of the DefaultWarrantyTerms option will be set to 12.
i.This Value represents the number of Months after the Sale Date entered in the Service Info section of the Edit View of the Subscribers Form when the installation's Warranty Ends.
ii.The Value entered here will automatically populate that Warranty Ends field (i.e., Sales Date + Value in months = Warranty Date).
iii.This Value may be changed, based on your individual Company's Warranty Policy.
d.Default Warranty WO Settings - By default, the DefaultWarrantyWOSettings option is set to False ("F") in the Company Settings Form
i.Setting the DefaultWarrantyWOSettings option to True ("T") will set the Non Billable and Exclude Invoice Labor Check boxes on a new Work Order Form to match the settings in the Service Contract record associated with (assigned to) the current Subscriber - if that Subscriber is still under Warranty (i.e., Warranty Ends Date > Today).
e.Check Date Requested After Sub Sale Date - By default, the CheckDateRequestedAfterSubSaleDate option is set to True ("T")
i.When set to True ("T"), the program will confirm that the Requested On Date entered on a Work Order is on or after the Sale Date entered in the Service section of the Subscriber Edit View.
ii.When set to False ("F"), the program will not make that comparison.
f.Suppress WO Warnings - By default, the SuppressWOWarnings option is set to False ("F").so the normal Warning Message when the Subscriber has a pending Work Order, a Balance that is Past Due, and/or is out of Warranty (or has a Service Contract which has expired) will be displayed when a new Work Order is started.
i. Setting this SuppressWOWarnings option to True ("T") will suppress this Pop-Up Warning Dialog.
g.Display Warranty Info - By default, the new DisplayWarrantyInfo option is set to False ("F") which means when a Subscriber record is displayed, their Warranty Status is not included on the Information Bar on that Subscriber Form
i.When the ShowWarrantyInfo option is set to True ["T"] the Subscriber's Warranty Status is displayed in the Information Bar on that Subscriber Form.
h.Insert Comments From WOMD To Invoices - Inventory/Materials:Comments will not be added to the Invoice's detail line item when the Company Setting "Insert_Comments_From_WOMD_To_Invoices" is set to False ("F").
i.If the "Insert_Comments_From_WOMD_To_Invoices" option is set to True ("T"), those Inventory/Materials Comments will be included in the Invoice's detail line item
i.Insert Multiple Equipment Items - The Insert_Multiple_Equipment_Items option'is a True/False entry will determine whether a How Many? Check box will appear in several Forms which affect when and how the Subscriber's Installed Equipment table is updated when a Work Order is Completed, a Proposal is Converted to an Invoice, and/or while using the Work Order Invoicing/Review Form.
•Select the Company Options tab
✓Click the Company Options - General sub-tab within the Company Options tab and assign the Last Work Order Number.
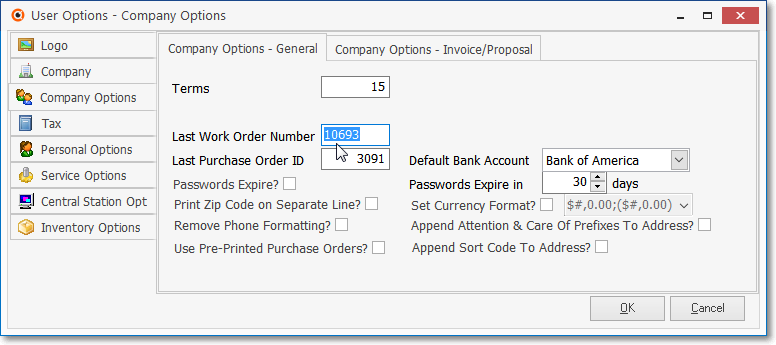
User Options Form - Company Options - General tab - Last Work Order Number field
✓Understanding and assigning the Last Work Order Number field:
▪In the Service Tracking System module, the LAST Work Order Number would be the number most recently assigned to an actual Work Order; OR the number immediately prior to the NEXT Work Order Number that is to be assigned (to the next Work Order that will be created).
▪Enter the appropriate Work Order Number.
•Next, Click the Service Options tab to specify certain options for the Service Tracking System:
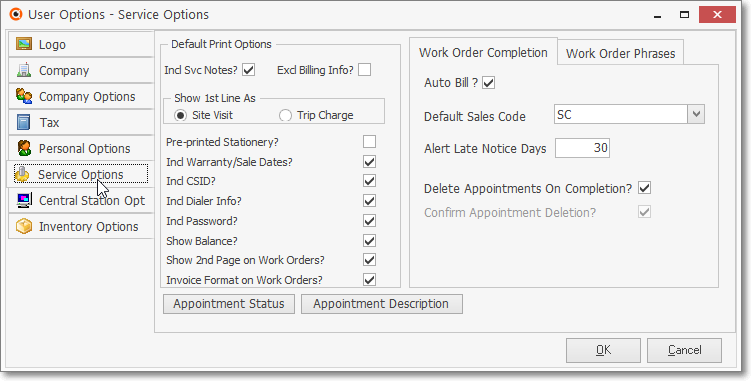
User Options - Service Options tab
•Understanding the Default Print Options - This section is used to configure the printed format of your Work Orders.
✓There are 4 basic Work Order formats available (see some Work Order Samples at the end of this chapter) when a Service Request is created, based on the Work Order Type that is identified.
▪These 4 basic Work Order Types are:
1) Standard Work Order
2) Fire Alarm Test
3) Fire Extinguisher Inspection
4) Installation List
✓You may want to print a sample of each Work Order (see some examples at the end of this chapter) for these configurations to determine the one(s) that best suits the operational needs of your Company's Service Department by simply Checking and/or Un-Checking these various Default Print Options, and then printing a Work Order for each Work Order Type.
▪The same Work Order may be re-printed as many times as may be needed.
❑Default Print Options - These are the Options which will alter the appearance of a Work Order when it is actually printed:
•Choosing your Default Print Options:
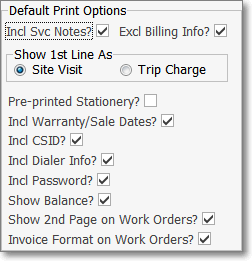
Default Print Options
✓Inc Svc Notes? (Include Service Notes - by default, is Checked)
▪Check this box if you want to include the Subscriber's System Notes - that were defined on the Service Information section within the Edit View of the Subscribers Form - on the Work Order.
✓Excl Billing Info? - Exclude Billing Information, by default, is Checked.
▪If you have Checked the Invoice Format on Work Orders? option (see below), Remove the Check Mark from this box to produce that Invoice format.
▪If you have not Checked the Invoice Format on Work Orders? option (see below),and want to exclude all Pricing and/or Payment fields from being printed on the Work Order, Check this box to get that Work Order format.
▪However, if you do want the Technician to be able to Price and Collect the Parts and/or Labor that was required to Complete the Service Call, but do not want to use the Invoice format for the Work Order, Remove the Check Mark from this box to use the Work Order and Billing format.
✓Show 1st Line As - On either the Invoice format or the Work Order and Billing format (as described above), there is a field provided to assess either a Trip Charge or Site Visit.
▪Depending on how your Company refers to this type of charge, Click the appropriate button.
•Choose the Work Order Formatting (Default Print Options) features that will automatically be included/excluded when you Print Service Requests:
✓Pre-Printed Stationery? - Check this box if your Company is using pre-printed stationery when you Print Service Requests so MKMS will know not to print your Company's Return Address and/or your Company's Logo on those Work Orders.
✓Incl Warranty/Sale Dates? - Check this box if you want the Subscriber's Sale Date and their Warranty Expiration Date included on the Work Order.
✓Incl CSID? -Check this box if you want the Subscriber's Primary CSID included on the Work Order.
✓Incl Dialer Info? - Check this box if you want the Subscriber's Dialer Information (i.e., Communicator Format) included on the Work Order.
✓Incl Password? - Check this box if you want the Subscriber's Password included on the Work Order
✓Show Balance? - Check this box if you want the Subscriber's Current Balance included on the Work Order
✓Show 2nd Page on Work Orders? - Check this box if you want a second information page printed for each Work Order
▪The actual content of the 2nd Page will vary - based on the Service Type of the Work Order that is being printed - and may include:
oInventory Used which lists the Parts that were used to complete this Service Request (typically for an installation or add-on situation).
oMaterials assigned to the Work Order.
oService History for the Subscriber (which is usually included) - the number of past Work Orders that will be listed is based on the available page space that's remaining after listing the Inventory and Material items.
✓Invoice Format on Work Orders? - Check this box if you want the Invoice Format style of Work Order (see "Choosing your Default Print Options" above).
❑Company Settings Form accessible from the Company tab on the User Options Form
a.Default Warranty Terms - By default, the Value of the DefaultWarrantyTerms option will be set to 12.
•This Value represents the number of Months after the Sale Date entered in the Service Info section of the Edit View of the Subscribers Form when the installation's Warranty Ends.
•The Value entered here will automatically populate that Warranty Ends field (i.e., Sales Date + Value in months = Warranty Date).
•This Value may be changed, based on your individual Company's Warranty Policy.
a.Default Warranty WO Settings - By default, the DefaultWarrantyWOSettings option is set to False ("F") in the Company Settings Form
•Setting the DefaultWarrantyWOSettings option to True ("T") will set the Non Billable and Exclude Invoice Labor Check boxes on a new Work Order Form to match the settings in the Service Contract record associated with (assigned to) the current Subscriber - if that Subscriber is still under Warranty (i.e., Warranty Ends Date > Today).
c.Display Warranty Info - By default, the DisplayWarrantyInfo option is set to False ("F") which means when a Subscriber record is displayed, the Warranty Status is not included on the Information Bar on that Subscriber Form
•When the ShowWarrantyInfo option is set to True ["T"] the Subscriber's Warranty Status is displayed in the Information Bar on that Subscriber Form.
•Details:
✓Default Warranty Terms - By default, the Value of the DefaultWarrantyTerms option in Company Settings will be set to 12.
✓Warranty Terms - This DefaultWarrantyTerms option's Value represents the number of Months after the Sale Date entered in the Service Info section of the Edit View of the Subscribers Form when the installation's Warranty Ends.
▪The Value will be used to automatically populate that Warranty Ends field (i.e., Sales Date + Value in months = Warranty Date) and may be changed, based on your Company's Warranty Policy. The warranty expiration date may be entered or modified as needed, but will be initially set based on the DefaultWarrantyTerms option's setting.
❑Work Order Completion sub-tab - Set certain procedures for the Service Tracking System to follow:

Work Order Completion sub-tab on Service Options tab
•Auto Bill? - Enable the Request to Bill dialog for Completed Service Requests.
✓This option may only be set or modified by the System Administrator.
•Default Sales Code - Use the Drop-Down Selection List to Choose the default Sales Category Code for the invoicing of a Service Request.
✓The Drop-Down Selection List will not include Inactive Sales Category Code, any Sales Category Code beginning with "R-", and Sales Category Codes identified as Inventory Items.
•Alert Late Notice Days - Set the number of days that an outstanding Invoice must be Past Due to display the Past Due Warning when creating a Service Request.
•Delete Appointments Upon Completion? - To automatically delete an Appointment on the Technician Scheduling Form when that Service Request (Work Order) has been Completed, Check this box.
•Confirm Appointment Deletion? - If you have elected to automatically Delete Appointments Upon Completion, Check this box to require the system asks permission prior to each Appointment deletion.
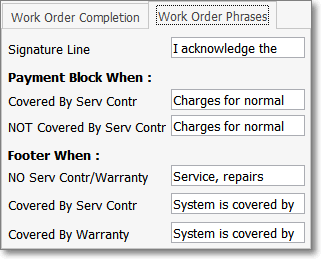
❑Work Order Phrases tab - Lets you define what "legal" and Warranty related "coverage" language appears on your Work Orders.
Work Order Phrases tab on Service Options
•Double-Click any phrase and then edit it, as needed, using the text editor that appears.
Work Order Phrases Editor
✓Signature Line - This is the text that is printed directly below the signature line.
▪By default: "I acknowledge the satisfactory completion of the work as described above and receipt of an exact and completely filled in copy of this work order repair form."
▪You may edit this as desired.
✓Payment Block When:
▪Covered By Serv Contr - This is the text that is printed directly below the payment line when a Service Agreement is in place..
oBy default: "Charges for normal repairs are covered by a comprehensive service agreement."
oYou may edit this as desired.
▪NOT Covered By Serv Contr - This is the text that is printed directly below the payment line when there is no Service Agreement in place.
oBy default: "Charges for normal repairs NOT covered by a comprehensive service agreement."
oYou may edit this as desired.
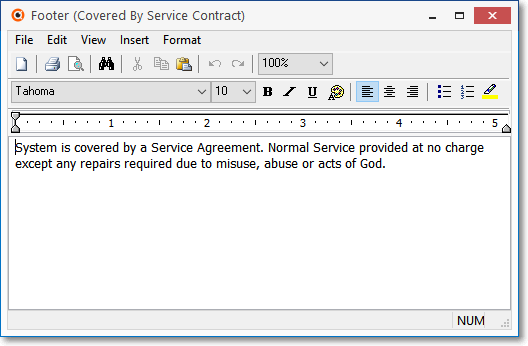
✓Footer When:
▪NO Serv Contr/Warranty - This is the text that is printed on the bottom of the printed Work Order when the Warranty has expired and no Service Agreement is in force.
oBy default: "Service, repairs and/or additions require payment upon completion. Thank you! Payment upon completion helps to keep our (and your) service costs down."
oYou may edit this as desired.
▪Covered By Serv Contr - This is the text that is printed on the bottom of the printed Work Order when a Service Agreement is in place.
oBy default: "System is covered by a Service Agreement. Normal Service provided at no charge except any repairs required due to misuse, abuse or acts of God."
oYou may edit this as desired.
▪Covered By Warranty - This is the text that is printed on the bottom of the printed Work Order when it is still under Warranty.
oBy default: "System is covered by a warranty agreement. Normal Service provided at no charge except any repairs required due to misuse, abuse or acts of God."
oYou may edit this as desired.
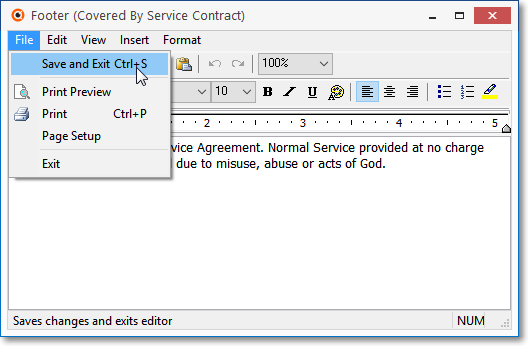
✓Select File > Save and Exit, or Press Ctrl+S to record the edited Work Order Phrase.
•OK - Click OK to record all of this information in the User Options Form, or Cancel, to exit without posting the changes.
❑There are two Service Option buttons:
1.Appointment Status - Allows you to define various Status Categories of Service Appointments and to Color Code the description of each Appointment Status.
Appointment Status categories
2.Appointment Descriptions - Click this button to open the Appointment Description dialog which is used to pre-define the Appointment Description used in the Appointment Editor Form that is accessible through the Technician Scheduling Form.
Appointment Description dialog
❑What's Next?
•Look at the Work Order samples below for a better understanding of how the Default Print Options effect Work Orders.
•Define the Appointment Status by selecting this option on the Service Options tab of the User Options Form
•Define the Appointment Descriptions by selecting this option on the Service Options tab of the User Options Form
•Go to Service Tracking Maintenance Entries and complete the recommended and required information outlined there.
❑Work Order Samples: The examples shown below are all printed using the Standard Work Order type, but each was printed with a different set of Default Print Options chosen on this Service Options Form.
1.Invoice format - Produces a Work Order that looks like an Invoice with pre-formatted areas for Parts, Labor, Trip Charge (e.g., Site Visit), etc. allowing itemizing of Parts, Labor, Prices and including a Payment posting area.
a."Invoice Format on Work Orders" field Is Checked in Service Options
Standard Work Order produced using the Invoice format
2.Work Order and Billing format - Produces a more typical Work Order Form that allows the Part items and Labor time to be entered in a less structured manner, but with a place to calculate the Price and record Payment
b."Invoice Format on Work Orders" field is NOT Checked in Service Options and
c."Exclude Billing Info" is NOT Checked in Service Options.

Work Order with basic Billing format
(i.e., "Invoice Format on Work Orders" field is NOT Checked and "Exclude Billing Info" is NOT Checked in Service Options)
3.Work Order format - Produces a Work Order that allows the Part items and Labor time to be entered, but provides no area to include the Price or accept any payment.
d."Invoice Format on Work Orders" field is NOT Checked in Service Options and
e."Exclude Billing Info" IS Checked in Service Options.
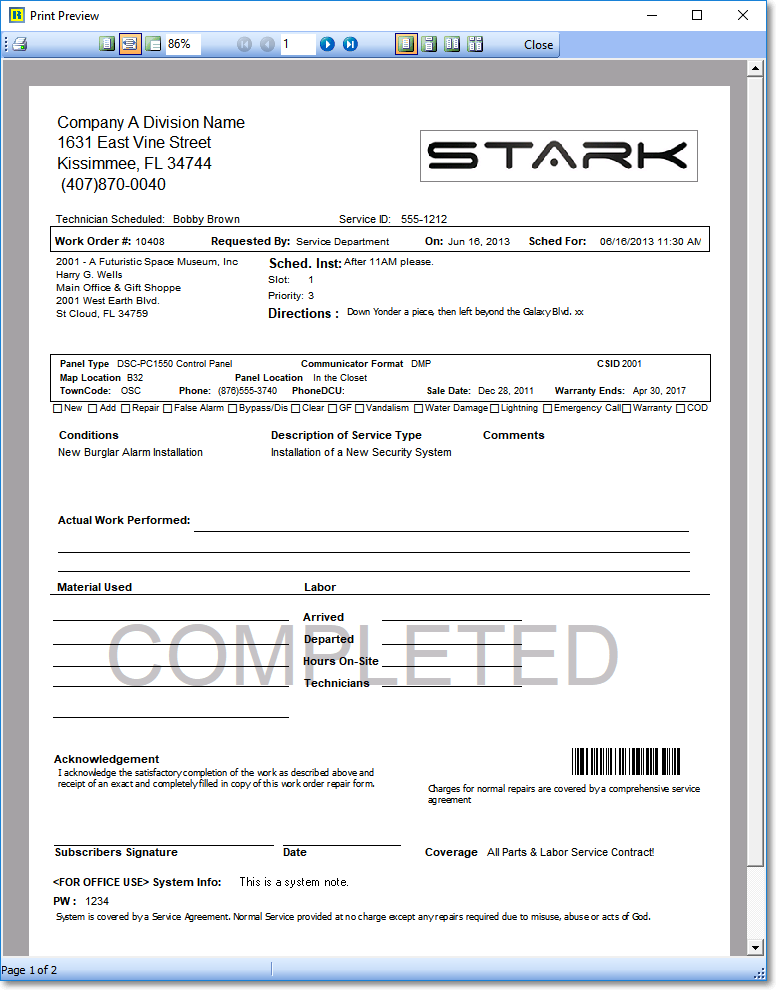
Work Order with no Billing, Pricing or Payment information
(i.e., "Invoice Format on Work Orders" field is NOT Checked and "Exclude Billing Info" is Checked in Service Options)