❑Starting a Work Order - The standard, full length Work Order Format is accessible on the Subscriber Options Menu of the Subscribers Form by Selecting the Service sub-menu, than Choosing the Work Orders option.
❖There are three types of Warning Messages listed below (an explanation of the appropriate action step(s) that should be taken for each of these issues are also provided):
I.Unpaid, Past Due Balance Warning
II.Subscriber Contract has Expired
III.Existing Service Request(s) Warning
•Warning - If the Subscriber has a pending Work Order, a Balance that is Past Due, and/or is out of Warranty (or has a Service Contract which has expired), a Warning Message will be displayed with the necessary information as the Work Order Form is opened.
✓When opening a Work Order Form, these Warning Messages are displayed with one exception:
▪If the only open (unfinished) Work Order was created automatically using the Auto Service feature, no Warning Message will be presented.
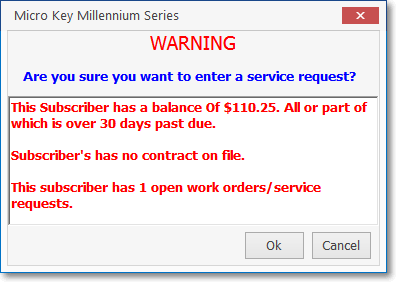
Are you sure you want to enter Service Request?
▪This functionality is established in the Company Settings option "IncludeAutoServiceWO" - by default set to False ("F") - to eliminate those Warning Messages when the only open (unfinished) Service Requests were those that were created automatically using the Auto Service feature.
▪Setting the "IncludeAutoServiceWO" option in Company Settings to True ("T") will turn on Warning Messages (if appropriate) regardless of the origin or type of any existing Service Requests.
▪Setting this SuppressWOWarnings option in Company Settings to True ("T") will suppress the Pop-Up Warning Dialog which displays a Warning Message when the Subscriber has a pending Work Order, a Balance that is Past Due, and/or is out of Warranty (or has a Service Contract which has expired) when a new Work Order is started.
I.Existing Service Request(s) Warning
•Answer Cancel.
•On the Work Order Form, Click the List Icon and locate any Work Orders that have no Date entered in the Date Serviced column.
✓To speed this search, Click the Date Serviced Header name to sort the data by that field.
✓Work Orders with no Date Serviced entry will be listed first.
✓Click on each one - one at a time - then Click the List Icon again to return to the Work Order Request tab.
✓Determine if this request is similar, or in any way could be linked, to any of the other open Work Order(s).
✓Repeat if there are more than one.
•If this request is similar, Link the new Work Order to the existing Work Order entry (see the "Create a New Work Order Linked to This One" discussion below).
✓Otherwise, ignore this message and continue to Enter the Work Order.
II.Subscriber Contract has Expired
•This message is referencing any Contract between your Company and this Subscriber - generally for providing various types of Monitoring Services - that has been assigned a specific Expiration Date which has now passed without a Renewal being identified/accepted/recorded.
✓These Contract Types are not the same as those that are specifically defined as Service Contracts.
•When this warning is presented, follow your Company's Policy which may include:
✓Denial of service until a new contract is executed,
✓Sending the Technician out but with a renewal contract in hand,
✓Simply reminding the Account that their renewal date has passed, or
✓Any other action step(s) deemed appropriate by the Service and/or the Central Station Manager.
•Once this Subscriber has been cleared for service, Enter the Work Order.
III.Unpaid, Past Due Balance Warning
•If the Subscriber has a Past Due Balance a message will be displayed:
✓Answer Cancel.
✓Select the Accounting Receivable Section on the Edit Tab of the Subscribers Form.
✓Verify that they are eligible for service because:
▪The Past Due balance is OK because of special circumstances.
▪They have made a promise to pay that was noted on the Comments tab.
▪They are still an active Account.
▪Or, if unsure, consider transferring the call from this Subscriber to the Accounts Receivable Department.
✓Company Policy may dictate that you refer them immediately to your Accounts Receivable Department.
✓This whole process should take less than half a minute.
✓Once they have been cleared for service, Enter the Work Order.
•Service Notes - This field is located at the bottom of this standard, full length Work Order Form
✓If a Service Note (meant for Internal use only) has been entered in the Service Notes (Internal Only) field in the Service Info Section on the Edit Tab of the Subscribers Form), these notes are automatically displayed in a Pop-Up Text Box when a User attempts to create a new Work Order.
▪These Service Notes are supposed to be Comments that would be useful to Users interacting with this Subscriber.
▪These - internal use only - comments are only displayed when a Work Order Form is displayed on screen
▪These - internal use only - comments are not printed on a Work Order.
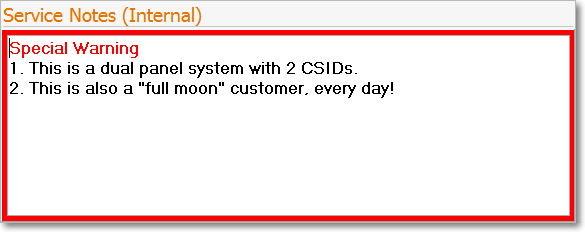
Service Note (Internal) - when activated - is framed in Red
✓Click the Work Order Form's Work Order Request tab to Close the Service Notes (Internal) Pop-Up Text Box.
▪This Service Notes (Internal) Text Box may be reopened by Clicking the Service Notes Pop-Up Text Box's Down-Arrow.
❑Once the Work Order Form Warning Messages outlined above (and/or a Service Note) have been displayed, unless you want to Chain an existing Work Order to a new one (see the "Create a New Work Order Linked to This One" discussion below):
•Click Add ![]() Icon on the Work Order Form to start the new Work Order entry.
Icon on the Work Order Form to start the new Work Order entry.
✓An Authorize Transaction dialog may be displayed.
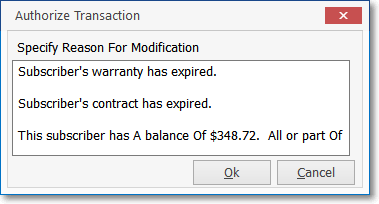
Authorize Transaction
➢Note: See the Authorizing a Work Order chapter if an Authorize Transaction dialog is displayed.
✓Otherwise, the current User may proceed with the Work Order entry.
❑Create a New Work Order Linked to This One
1.If you have decided to connect the new Work Order with the previously entered Work Order:
2.Locate the previously created Work Order which is to be connected with (chained to) the new Work Order
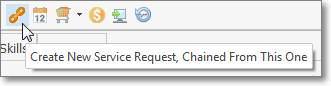
3.Click the Link WO Icon at the top of that Work Order Form.
✓Answer Yes and a new Work Order Form will be created with the existing Work Order information already included.
✓Modify this new Work Order information to include the additional service(s) requested by the Subscriber.
✓Follow the normal , Enter the Work Order. process thereafter.
➢Note: A Work Order created for a Job Task cannot be Chained.
❑What's Next?
•Enter the Work Order - See the Entering a Work Order chapter for detailed information.
•Verify Skills - Assure that the Lead Technician has the necessary Tech Skills by using the Technician Skills tab
•Using the Schedule Button - See Using the Schedule Button for information on how to assign a Technician and Schedule the Work Order:
•Track the Technician's Time - See Technician Activity Tab for important information about tracking your Technician's Time.