❑Using with the Work Order Form to create, update and/or complete a Work Order:
•Creating a Work Order is actually a multi-stage process where:
✓Certain information is entered initially to identify who, when, what type of Work Order it will be, and why this service request will be entered (e.g., repair, inspection, upgrade, new installation).
✓Additional scheduling information is added along with what the Technician actually did, and how much labor and/or materials were required, etc.
✓Finally, once this service request is completed, the Work Order is finalized and Invoiced.
•The Service Tracking System offers two ways to start a Work Order entry:
1.Using the Quick Work Order Format which is accessible from:
a.The Service Tab on the MKMS Desktop
b.The Quick Access Menu's Service Tracking option on its Maintenance Menu
c.The Backstage Menu's Service Tracking option on its Maintenance Menu
2.Using the standard, full length Work Order Format
a.This "standard" Work Order Form is accessible by selecting the Work Orders option in the Subscriber Options Menu of the Subscribers Form
b.Alternately, when your job's responsibilities include frequently opening the Work Order Form, consider adding a Customized Quick Access Menu Work Order option to the Subscribers Form
❑Processing a service request using the standard, full length Work Order Form
•These are the steps which are generally required to a) create, b) schedule, c) update, d) track, and e) complete a Work Order:
3.Enter the initial Work Order (e.g., identify who needs service, what is required?).
4.If appropriate, enter the specific Technician Skills that will be required for this Work Order, before assigning a Technician.
5.If this Work Order is for an Installation, create a Parts List for the Inventory Items that will be required.
▪A Proposal may be converted directly into an Installation Order
6.Assign the service request to a Technician (who will do it, when is the Technician expected?).
7.Schedule the Work Order, and when appropriate (e.g., you are not using Tech Pro or Web Tech), Print it.
8.Track the Technician Activity (updated automatically by the Technician using either Tech Pro and/or Web Tech, or manually using the Technician's Status Form).
9.Record what was done, the Labor required, and the Inventory and Materials that were used to complete the Work Order.
10.Complete and Invoice the Work Order.
❑Entering the Work Order:
•When accessing the Work Orders option on the Subscriber Options Menu of the Subscribers Form (if you have not already done so, read the Starting a New Work Order chapter before proceeding.)
✓Click the ![]() Icon to enter a new service request.
Icon to enter a new service request.
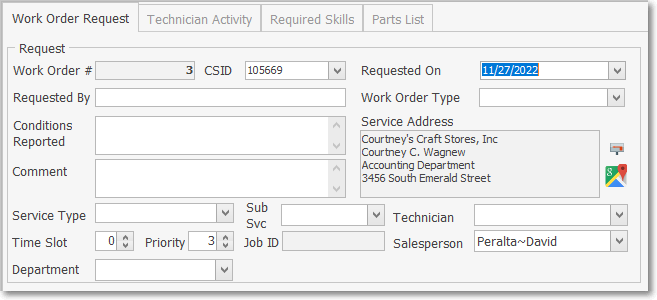
Entering a new Work Order
•Request - The section on the Work Order Request sub-tab at the top of the Service Request Form
✓Work Order # - Automatically assigned by the system.
✓CSID - By default, if defined, the Primary CSID for the selected Subscriber will be inserted.
▪If the Subscriber has multiple CSIDs defined, and the Primary CSID is not the Subscriber Panel that requires service, use the Drop-Down Selection List provided to Choose the appropriate CSID for this Service Request.
✓Requested On - By default, Today is inserted.
▪Use the Drop-Down Calendar/Date Entry field to change the Date, if appropriate.
✓Requested By - Enter the name of the person requesting the service.
▪If there is a special contact number for her/him (i.e., Cell or a direct internal Phone line) you may also include that information in this field.
✓Work Order Type - There is no default.
▪Using the Drop-Down Selection List provided, Choose the Type of Work Order this will be (these formats are included with the initial installation of MKMS).
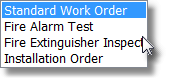
Work Order Types
1)Standard Work Order - Most Service Requests will be of this type, so it will default to this one unless another one is chosen.
2)Fire Alarm Test - For periodic Fire Alarm Testing.
3)Fire Extinguisher Inspection - For required Fire Extinguisher Inspections.
4)Installation Order - For documenting the Inventory requirements of a New Installation.
✓Conditions Reported - Enter a description of the service problem.
▪You may enter up 150 characters (this is not an Edit Rich Text field).
▪Upper & Lower case letters, all numbers and most punctuation marks are permitted.
✓Comment - Enter any comments that may help the Technician better understand this service issue.
▪An entry of up to 500 characters is permitted (this is not an Edit Rich Text field).
▪Upper & Lower case letters, all numbers, spaces and most punctuation marks may be used.
▪If a special contact number is known (i.e., Cell or a direct internal Phone line) and it was not entered above, include that information in this field.
✓Service Type - This will categorize the type of Installation or Service Call that is required for this Work Order.
▪Use the Drop-Down Selection List provided to Choose the appropriate Service Type.
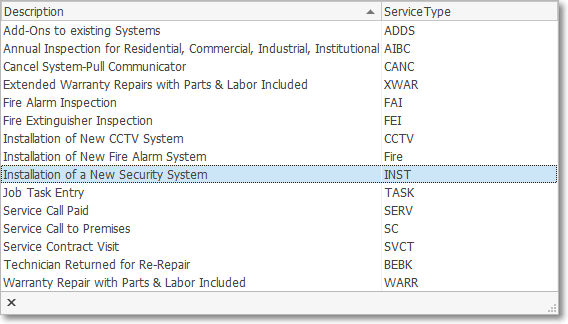
Sample Service Types in Drop-Down Selection List
▪By assigning a Service Type to this Service Request before assigning a Technician (see Tech below), the Technician Skill(s) generally associated to that Service Type will be inserted into the Technicians Skills tab of this Work Order, automatically.
▪When a Service Type is assigned to this Service Request, the default Priority Number (3) is reset to the Priority Number established for that Service Type.
✓Sub Svc - Optionally, a sub-category of the Selected Type of Service may also be chosen.
▪Use the Drop-Down Selection List provided in the field to the right of the Service Type field to Choose the appropriate Service Category.
▪Only a Service Category associated with the assigned Service Type Code may then be selected
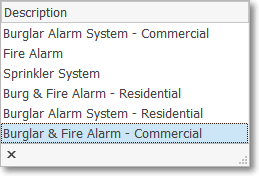
Sample Sub Srv Drop-Down Selection List
✓Tech - Before assigning a Technician to this Work Order, review the "Verify Required Skills" discussion below as well as the Technician Skills tab chapter!
▪If you are ready to assign this Work Order to a Technician, use the Drop-Down Selection List - which lists each Technician's Name - to Choose the desired Technician.
✓Time Slot - The general time position the Subscriber has requested, if applicable.
▪Time Slots are numbers from 1 (the earliest) to whatever number of time slots you offer in a day (the latest).
▪The default is "0" (no time slot preference specified).
▪Enter the time slot preferred by the Subscriber.
✓Priority - A Priority Number by default it is set to 3.
▪When a Service Type is assigned to this Service Request, the Priority Number is reset to the Priority Number established for that Service Type.
oThat Service Type Priority Number may be changed as needed to indicate more and less critical situations.
▪The Priority Number is included in the Pending Work Orders Listing on the Technician Scheduling Form.
▪If not scheduled initially Using the Schedule Button, the Service Manager (or other User) that is scheduling this Work Order using the Technician Scheduling Form, may choose to use this Priority Number value to help in that process.
✓Salesman - The Salesman assigned to the Subscriber, for whom this Service Request is being created, will be inserted.
▪However, a different Salesperson may also be identified, if appropriate.
▪To do so, use the Drop-Down Selection List provided.
oWhen assigning a Salesperson to a Work Order, only those Employees whose Employee Type is identified as either Sales or All will be available in the Drop-Down Selection List when re-populating the Salesman field.
✓Department - Use the Drop-Down Selection List provided to Choose the Department that should be charged for the Inventory/Materials expenses used to complete this Work Order.
▪Once a Department has been assigned, it will become the default Department inserted when the Inventory/Materials expenses are actually recorded.
▪When a Work Order is Invoiced, the Department assigned on the Work Order will be Department assigned to each Detail Line Item on that Invoice.
➢Note: Although this field is usually used by those Companies who have implemented the MKMS General Ledger System, your Company's Departments may be defined and assigned here without using the General Ledger, as appropriate.
✓Click the Save ![]() Icon to record this Work Order before moving on to the Required Skills or Technician Activity tab(s).
Icon to record this Work Order before moving on to the Required Skills or Technician Activity tab(s).
✓Created By - Once a Service Request is saved, as the Form is closed, the User Name (as defined in the Database User Name field on the Security tab of the Employee Form) of the person who entered the original Service Request is recorded automatically and will be displayed at the top of the Service Request Form thereafter.
![]()
▪The current User Name becomes the Created By: name, and cannot be changed.
▪Whenever this Work Order Form is viewed in the future, the Created By information will appear at the top of that Form.
•System supplied Information
✓Non Billable Check box - Automatically maintained under certain circumstances, but may be changed later (see ØNote immediately below).
✓Exclude Invoice Labor Check box - Automatically maintained under certain circumstances, but may be changed later (see ØNote immediately below).
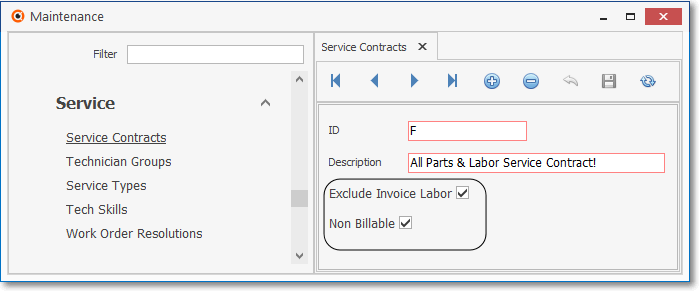
Service Contracts Form - Exclude Invoice Labor & No Billable fields
➢Note: Setting the DefaultWarrantyWOSettings option to True ("T") in the Company Settings Form will automatically set the Non Billable and Exclude Invoice Labor Check boxes on any new Work Order Form to match the Non Billable and Exclude Invoice Labor Check box settings in the Service Contract record associated with (i.e., assigned to) that Subscriber when that Subscriber record indicates that Account is still under Warranty (i.e., Warranty Ends Date > Today).
▪Therefore, when the DefaultWarrantyWOSettings option to True ("T"), and a Service Contract is entered for a Subscriber in the Service Info section of the Subscriber's Edit View,
a)you must know the Term (i.e. length) of that Contract, and
b)you must reset the Warranty Ends Date to match that Term
c)then the Non Billable and/or Exclude Invoice Labor Check boxes will be properly populated on their Work Orders.
▪If the DefaultWarrantyWOSettings option to False ("F"), the Non Billable and Exclude Invoice Labor Check boxes on any new Work Order must be set manually, as appropriate.
✓Job ID - If this Work Order was created as a Job Task within the Job Costing system, the appropriate Job ID will be inserted automatically at that time, otherwise it will be blank.
✓Service Address - The Service Address of the Subscriber - as identified in the Address Configuration section of the Edit View - is displayed.
▪However, if you may want to mail this Work Order to the Subscriber once it has been completed and the preferred Mailing Address is different from the displayed Service Address:
➢Important Note: Be sure the Technician has completed the required service before you make the change described below.
Once the address in this Service Address field is changed to the Billing Address, it cannot be changed back!
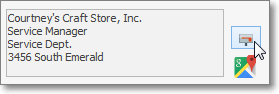
oClick the Select Billing Address button (illustrated above) to the right of the Service Address field. to open the Search Billing Addresses dialog shown below.
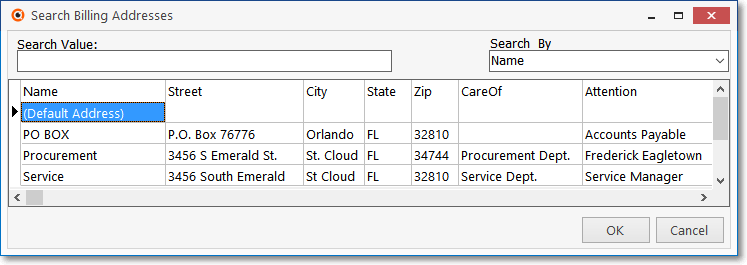
oSelect the Billing Address and Click the OK button.
•Google Maps® - Click the ![]() Icon to open a Digital Map Display showing the exact location of this Subscriber.
Icon to open a Digital Map Display showing the exact location of this Subscriber.
✓Technicians having a Coverage Area Zip Code that matches that of the Subscriber, will also be identified on the map.
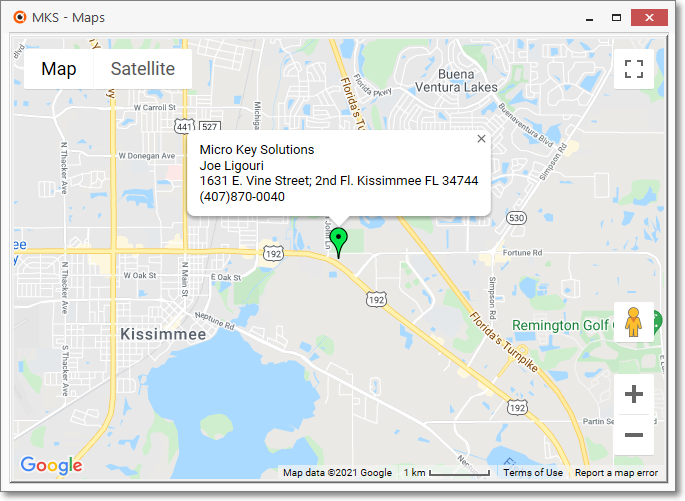
MKS - Maps showing location of the Work Order (in Blue)
❑Verify Required Skills - Often specialized type of skill(s) will be required for a Work Order:
•If this Work Order might require one or more specialized Technician Skills, be sure that a Service Type code has been assigned which has those (required) Technician Skills defined.
✓By doing so, those Technician Skills will automatically be inserted into the Technician Skills tab of this Service Request.
✓Thereafter, when a Technician is Selected, that Technician's Skill Sets will be compared (automatically) with the required Skill Set, and if they do not match, a Warning Message will be displayed.
•To assure that the Lead Technician has the necessary Technical Skills that will be required for this Work Order:
✓The first Technician assigned to a Work Order should be (and by default is) the Lead Technician.
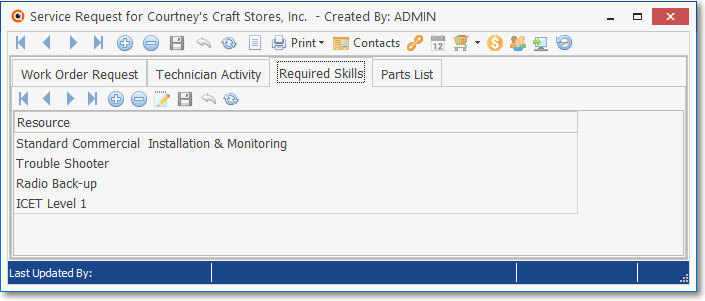
Work Order Form - Required Skills tab
✓Identify those Skills using the Technician Skills tab before assigning any Technician to this Work Order, and/or Schedule the Work Order.
✓By doing so, when the Lead Technician is assigned to the Work Order, or Schedule the Work Order, the system will verify that she/he has the required Technician Skills assigned on them on the Skills tab of their Employee Form.
•Tech - If you are ready to assign this Work Order to a Technician, use the Drop-Down Selection List provided to Choose that Technician.
✓The first Technician assigned to a Work Order should be (and by default is) the Lead Technician.
❑Understanding the difference between the Schedule button and the Scheduling Drop-Down Information Box
1.The Schedule Icon within the Work Order Options section

✓The Schedule button opens the Technician Scheduling Form displaying Today's schedule for the currently assigned Technician
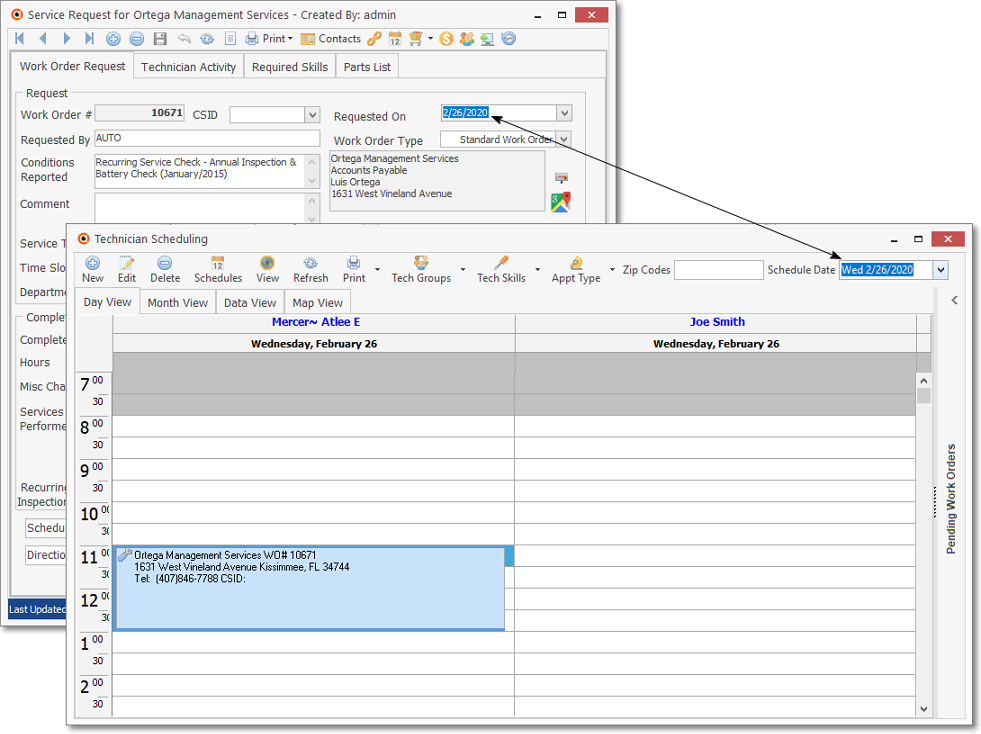
✓Double-Click the desired (open) Time Slot to open the Appointment Editor for this Work Order
▪The Appointment Editor Form will be automatically populated with the required information.
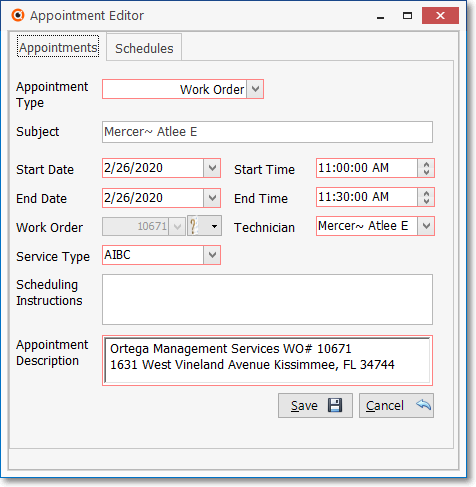
✓Edit this Appointment as needed, then Click the Save ![]() button to insert that Appointment record into the Technician Scheduling Form in the appropriate Time Slot.
button to insert that Appointment record into the Technician Scheduling Form in the appropriate Time Slot.
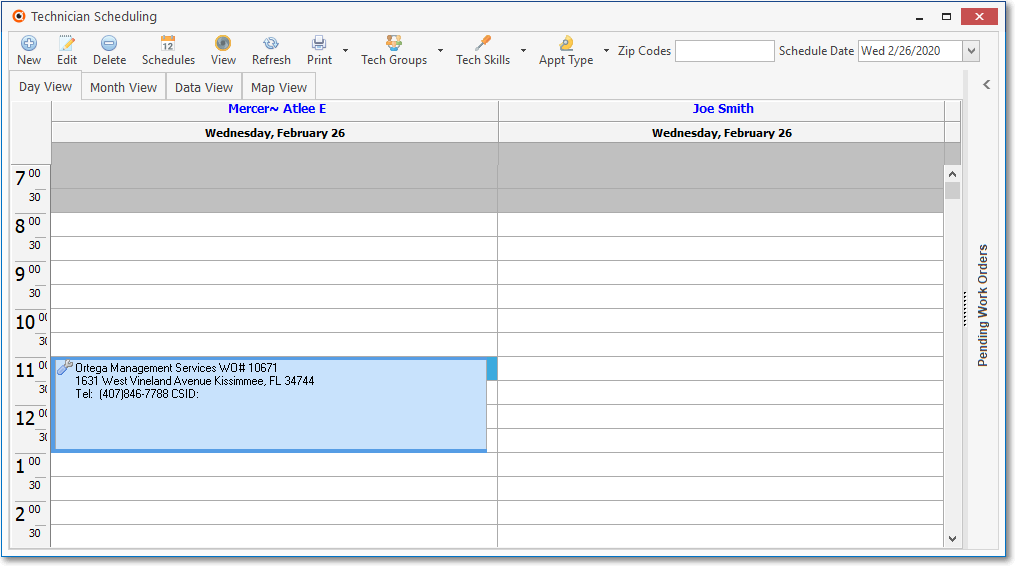
2.The Scheduling Drop-Down Information Box at the bottom of the Form:
✓Click the Scheduling option to view the Drop-Down Information Box for this Work Order's currently established Scheduling information.
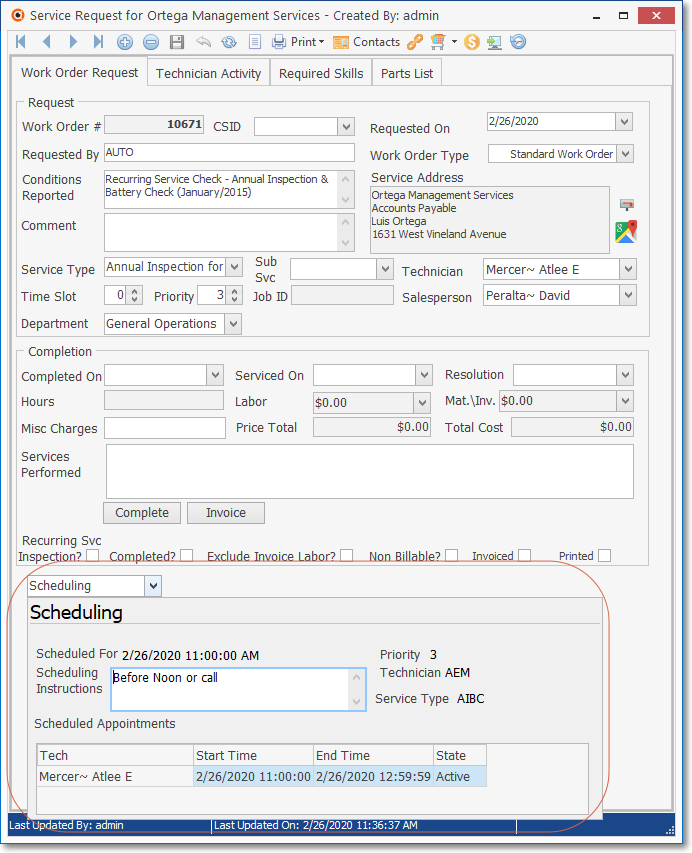
Work Order Form - Scheduling data
•If no Scheduling Information is shown, one of two cases exist:
11.It has not yet been scheduled (be sure to do so!).
12.The Technician Scheduling feature is not being used (why not?).
✓See Using the Schedule Button for more information on how to assign a Technician and Schedule the Work Order.
✓For information about the adjacent Labor and Inventory\Materials Drop-Down Information Boxes, see Completing a Service Request.
❑Tracking the Technician's Time - See the Technician Activity tab chapter for important information about tracking each Technician's Time.
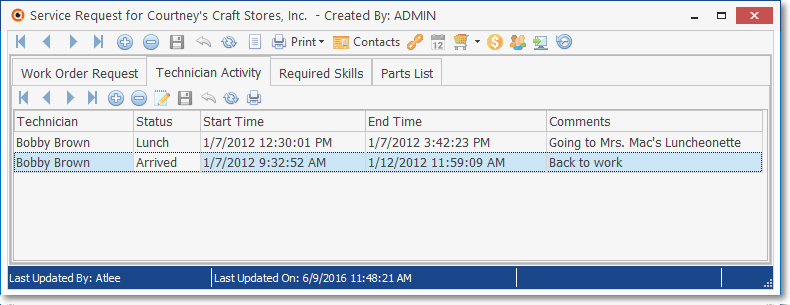
Technician Activity sub-tab on the Work Order Form
❑Creating an Installation List - See Parts List tab for important information about Creating and Using an Installation List.
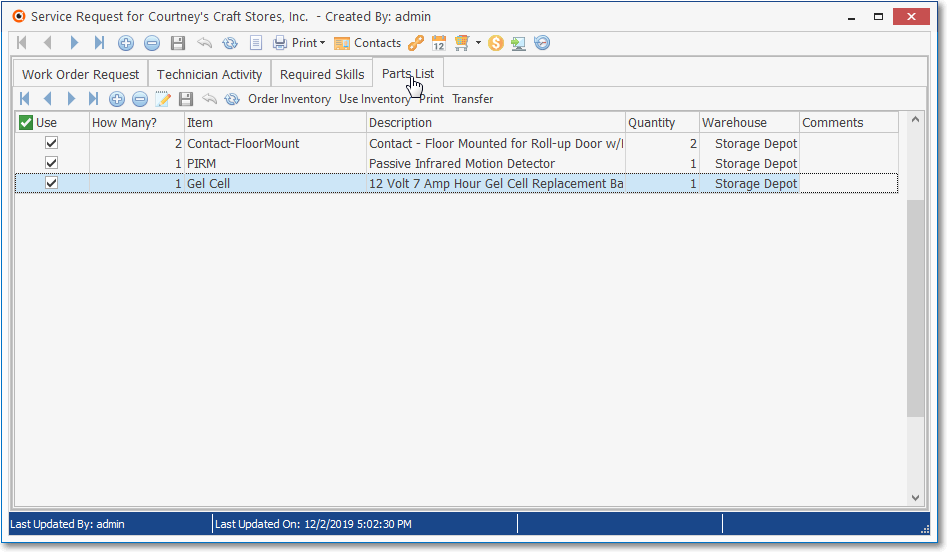
Parts List sub-tab on the Work Order Form